| Oracle® Retail Point-of-Service User Guide Release 14.1 E54472-02 |
|


 Previous |
 Next |
This chapter describes how to search for a customer, add a new customer, modify or delete customer information, and link a customer or sales associate to a transaction.
The following benefits and functionality result from linking a customer or sales associate to a transaction:
Customer information is available for future transactions.
Customer transactions can be viewed.
Customer purchase history is updated.
Sales productivity of sales associates can be determined.
Sales associate transactions can be viewed.
The following functions are described in this chapter:
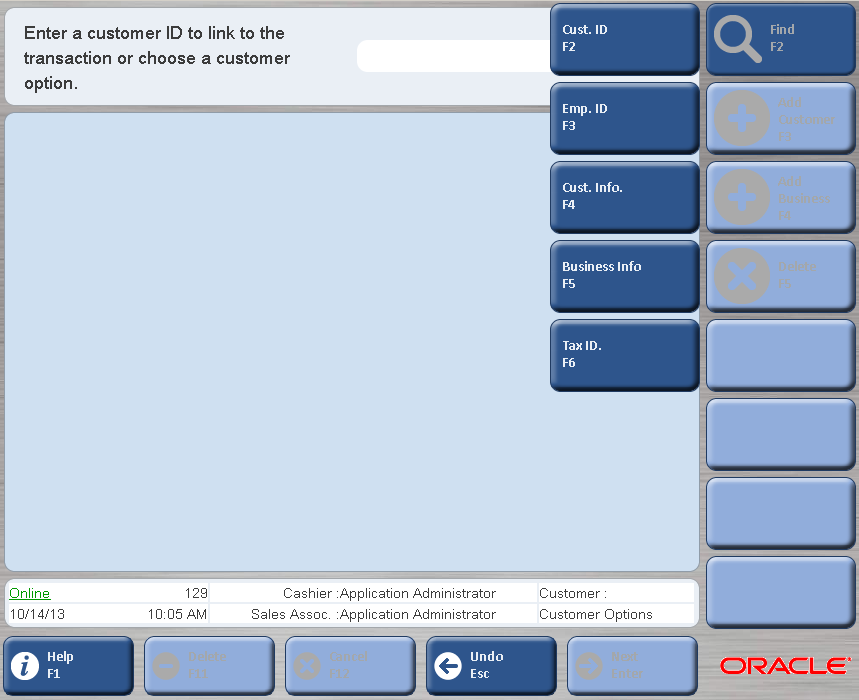
The Customer Options screen is used to find, add, edit, or delete customer information. To access the Customer Options screen, press POS/F3 on the Main Options screen and then Customer/F7. The navigation buttons for the customer options appear.
From this screen, you can perform the following actions:
Enter the customer ID to link the customer to the transaction. You are returned to the Sell Item screen.
Select Find/F2 to search for a customer. See "Searching for a Customer".
Select Add/F3 Customer to add an individual customer. Select Add Business/F4 to add a business customer. See "Adding an Individual/Business Customer".
Select Delete/F5 to delete a customer. See "Deleting a Customer".
There are different ways to search for a customer. To initiate the search for a customer, press Find/F2 on the Customer Options screen. Table 4-1 describes the customer search options that are available.
Table 4-1 Customer Search Options
| Function Key | Options | Screen | Description |
|---|---|---|---|
|
Cust. ID/F2 |
Customer ID |
Search by Customer ID |
If the Customer ID is known, enter the customer ID. |
|
Emp. ID/F3 |
Employee ID |
Search by Emp. ID |
Customers associated with an employee ID can be found by searching by employee ID. |
|
Cust. Info/F4. |
Customer Information |
Search by Customer Info. |
If customer information other than the Customer ID is known, the information can be entered for the search. The minimum information needed to perform a search is the first letter of the customer's first name, the first letter of the customer's last name, and the postal code. Additional information can be entered to limit possible matches. A list of matching customers appears. The correct customer may be selected from this list. |
|
Business Info/F5 |
Business Information |
Search by Customer Info. |
If the customer is a Business Customer, the search can be based on business information, including Business Name and Postal code. A list of matching customers appears. The correct customer may be selected from this list. |
|
Tax ID/F6 |
Tax ID |
Search by Tax ID |
Customers associated with a tax ID can be found by searching by tax ID. |
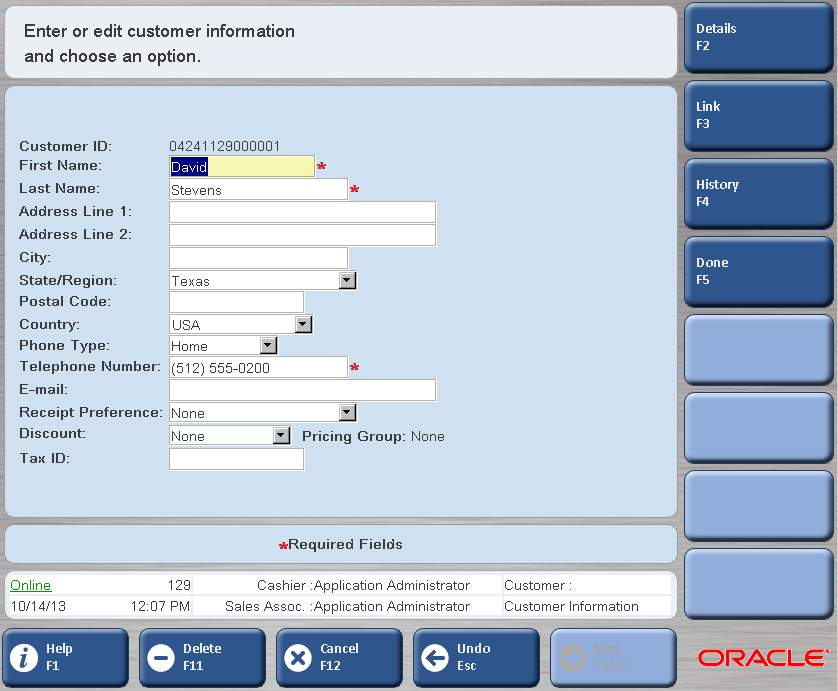
The Customer Information screen appears after a search for a customer is completed successfully.
From this screen, you can edit customer details, directly link the customer to a transaction, and view customer history.
To edit customer information, enter the new information in the Customer Information screen. To edit customer details, press Details/F2. The Customer Details screen appears. When you are finished making changes in this screen, press Next/Enter to return to the Customer Information screen.
When you have completed your changes, press Done/F5. You are prompted to confirm the changes. To confirm the changes, press Yes. The customer information is updated. You are returned to the Customer Options screen. To return to the Customer Information screen, press No.
To link a customer to a transaction, press Link/F3. The Sell Item screen appears with the customer name in the status region.
To view a customer's history, press History/F4. The History List screen appears. This screen displays the transaction number, date, location, type, and the total amount for each transaction in the customer's history. To view the details of a particular transaction, select the transaction number, and press Next/Enter. The History Detail screen appears. When finished viewing the transaction details, press Done/F2 to return to the Customer Information screen.
To edit information for an existing customer, enter the new information in the Customer Information screen and press Done/F5. The customer information is updated. You are returned to the Customer Options screen.
To add an individual or business customer:
Select one of the following options on the Customer Options screen:
To add an individual customer, press Add/F3 Customer.
To add a business customer, press Add Business/F4.
The Add Customer screen appears.
Enter the required information and press Done/F5. The customer is added to the database.
During the Customer Add process, if you choose to cancel before pressing Done or Link, none of the customer information is saved.
|
Note: If a customer discount type is selected while adding a customer, the discount type is saved as part of the customer information. When an item that is eligible for discount is scanned and the customer is linked, the discount is applied, based on the discount type, to the transaction. |
To delete a customer on the database:
Press Delete/F5 on the Customer Options screen. The Cust. Search Options screen appears.
Select a search option. For more information on searching for customers see "Searching for a Customer". Once a customer has been searched, the Delete Customer screen appears.
Enter the information and press Delete/F2. The Confirm Delete dialog appears.
To delete the customer, press Yes. The customer is deleted. You are returned to the Customer Options screen.
To not delete the customer, press No. You are returned to the Customer Options screen.
Some transactions must be linked to a customer. Whereas, others can be optionally linked. The must-link transactions are those transactions that have to be linked to a customer. For more information, see "Must-Link Transactions".
When a customer is linked to a transaction, the following benefits are also available for the customer:
Receipts print in the customer's preferred language if the device supports the user's preferred language.
Screens on the signature pad appear in the customer's preferred language if the device supports the user's preferred language.
If a customer is entitled to any discounts or price promotions, that special pricing is applied to the transaction.
A discount type and pricing group can be selected when a new customer is added or the details for an existing customer are changed. When a customer is assigned a pricing group, the customer is entitled to receive the price promotions and discounts currently in effect for that pricing group. For more information on discounts and pricing groups, see the Oracle Retail Back Office User Guide.
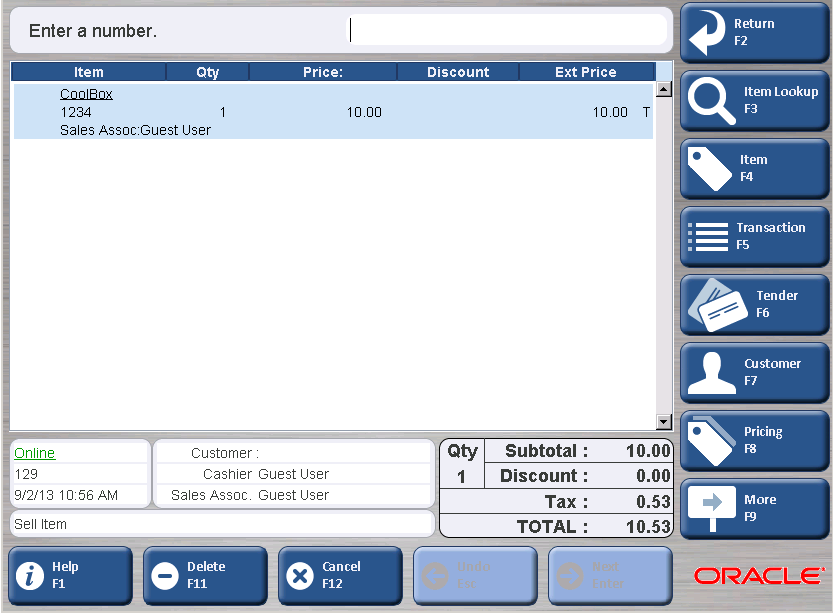
To link a customer to a transaction, begin by searching for a customer. For more information see "Using Customer Options". On the Customer Information screen, press Link/F3. The Sell Item screen appears with the customer's name in the status region, indicating the customer has been linked to the transaction. Enter or scan items to be purchased and tender the transaction normally.
Certain types of transactions, may require a customer to be linked. At various points in the Oracle Retail Point-of-Service application, you are prompted to input customer information that is then attached to the transaction. The Sell Item screen appears with the customer's name in the status region, indicating that the customer has been linked to the transaction. Following are examples of transactions that require a customer to be linked:
Send
Order
Return
Price Adjustment
Tender Redeem
Transaction with Mail Back Check as the tender type
Layaway
Tax Exempt
Alterations
To link a sales associate to a transaction:
Press Transaction/F5 on the Sell Item screen. The navigation buttons for the transactions options appear.
Press Sales Assoc./F3. The Trans. Sales Assc. screen appears.
Enter sales associate ID and press Next/Enter. The transaction is linked to the sales associate. You are returned to the Sell Item screen. The sales associate's name appears in the status region and underneath each item, indicating the sales associate is linked to the transaction.
|
Note: Items can also be linked to sales associates. See "Linking an Item to a Sales Associate" in Chapter 3 for more information.Only one sales associate can be linked to an item, and only one sales associate can be linked to a transaction. |
A sales associate can be linked to an item in a transaction where other sales associates are already linked to items. To link another sales associate to an item:
Press Transaction/F5 and then Sales Assoc./F3 on the Sell Item screen. The Mult Sales Assoc dialog appears.
To link this sales associate to all items in the transaction, press Yes. To link only to items currently without a sales associate, press No. The Trans. Sales Assc. screen appears.