20 Working with the Announcements Service
Announcements offer a quick, convenient way to create and widely-distribute messages instantly or at a time you specify.
This chapter describes how to use the features provided through the Announcements service. It contains the following sections:
This chapter is intended for users interested in viewing, creating, and managing announcements. The WebCenter Spaces application administrator has the authority to expose or hide task flows from a particular service. Tasks discussed in this chapter are not available to you if the relevant service is hidden.
20.1 What You Should Know About the Announcements Service
The Announcements service provides the ability to post announcements about important activities and events to all authenticated users.
The Announcements service is integrated with many WebCenter Web 2.0 services, such as the RSS, Search (to search announcement text), IMP, and Recent Activities services. You can use the Links service to link announcements to other services, such as Events or Discussions.
In group spaces, announcements are scoped to the group space where you create them. In personal space pages and custom application pages, announcements are scoped application-wide, to all logged-in (authenticated) users.
The Announcements service offers two task flows:
20.1.1 Announcement Manager Task Flow
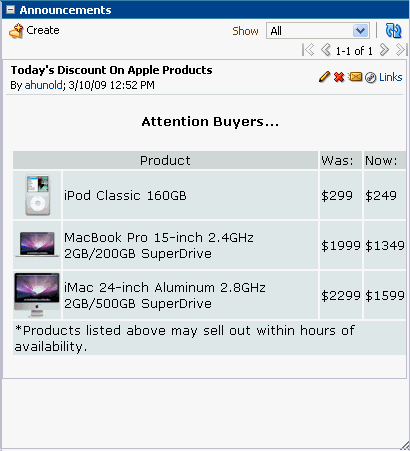
Use the Announcement Manager task flow to manage announcements. The Announcement Manager task flow (Figure 20-1) can be accessed only by users with grant privilege (custom application) or manage privilege (WebCenter Spaces) on the page. By default, these privileges are available to an application administrator (custom application) and group space moderator (WebCenter Spaces) respectively.
Figure 20-1 Announcement Manager Task Flow
Description of "Figure 20-1 Announcement Manager Task Flow"
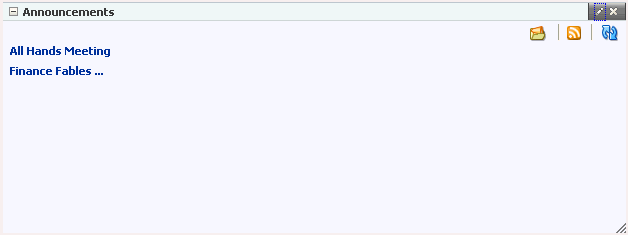
The Announcement Manager can be accessed by clicking the Open Announcement Manager icon in the Announcements task flow (Figure 20-2).
Figure 20-2 Open Announcement Manager Icon in Announcement Task Flow

Description of "Figure 20-2 Open Announcement Manager Icon in Announcement Task Flow"
Adding the Announcement Manager Task Flow to a Page
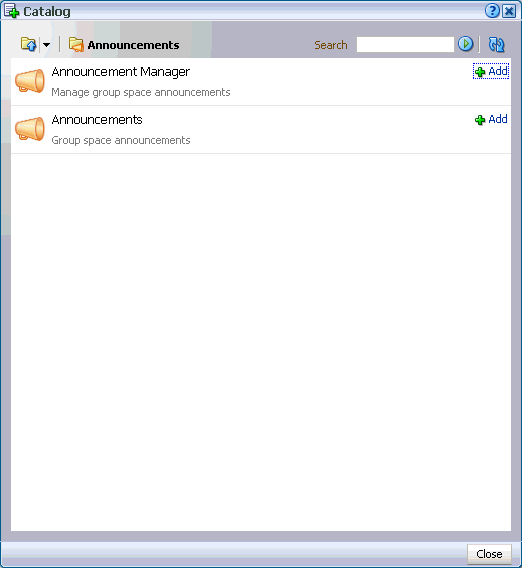
The Announcement Manager is available as a task flow that qualified users can add to their custom application or group space pages. If you have the required privilege, the Announcement Manager task flow is displayed in the Catalog dialog box in Oracle Composer (Figure 20-3).
Notes:
-
You cannot add an Announcement Manager task flow in your personal space page. The Announcement Manager task flow is displayed in the component catalog only if you have
manageprivilege and if you are adding content in a group space page.However, if you have manage privilege, you can access the Announcement Manager from the Announcements task flow from your personal space pages. This is explained in Section 20.1.2, "Announcements Task Flow."
-
All instances of the Announcement Manager task flow in an application run against the same server and therefore, it serves no purpose to add multiple Announcement Manager task flow instances.
Figure 20-3 Announcement Manager Task Flow in the Component Catalog
Description of "Figure 20-3 Announcement Manager Task Flow in the Component Catalog"
You can add this task flow to your page by clicking the Add link next to the task flow. For information about accessing the Catalog dialog box and adding task flows to your page, see Section 7.1.3, "Adding Task Flows to a Page."
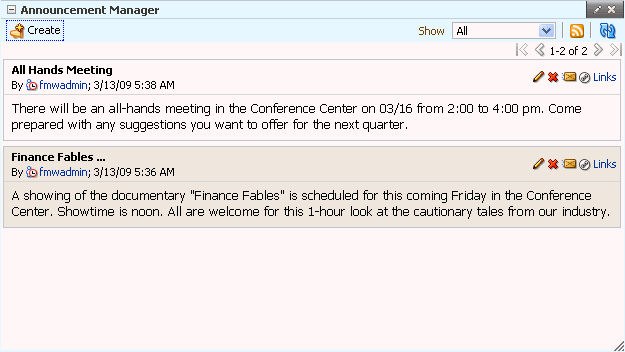
The Announcement Manager task flow is then displayed on your page as shown in Figure 20-4.
Figure 20-4 Announcement Manager Task Flow on a Page
Description of "Figure 20-4 Announcement Manager Task Flow on a Page"
The Announcement Manager provides options to create, edit, and delete announcements, send an e-mail regarding a selected announcement, and link another WebCenter object to a selected announcement (Figure 20-4). However, depending on the privileges you have on the page and whether the required WebCenter services are configured in your application, you may see only a subset of these options in the Announcement Manager. For example, the Mail icon is displayed only if the Mail service is configured in your application, and the Delete option is displayed only to users with grant privilege (custom application) or manage privilege (WebCenter Spaces).
The Announcement Manager task flow also provides the Show list, which you can use to personalize your view of announcements.
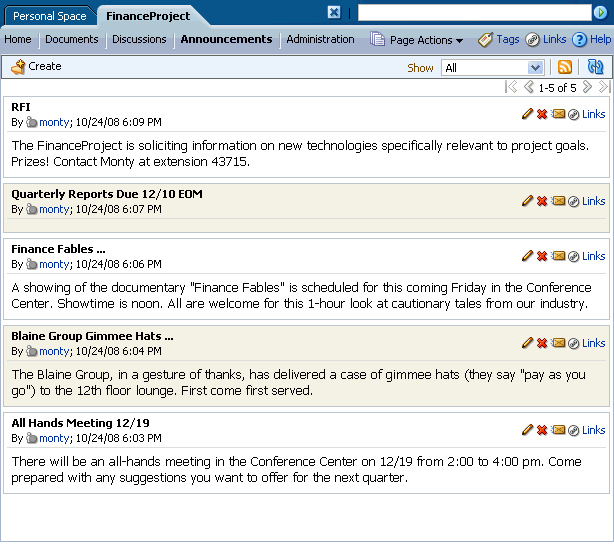
In group spaces, by default the Announcements page contains the Announcement Manager task flow (Figure 20-5). The Announcements page is available in every group space, provided the group space is configured to display announcements. For information about enabling services in a group space, see Section 11.3.1, "Enabling and Disabling Services Available to a Group Space."
Note:
In group spaces, you can also create a custom page and add the Announcement Manager task flow to that page.Figure 20-5 The Announcements Page in a Group Space
Description of "Figure 20-5 The Announcements Page in a Group Space"
Users with page-edit privileges can access the task flow's region parameter through the Component Properties dialog box in Oracle Composer to specify the ID of the Discussion forum under which announcements must be created. For information about accessing the Component Properties dialog box and editing properties, see Section 7.4.2, "Setting Component Properties."
For more information about setting task flow properties, see Section 20.3, "Setting Announcements Service Task Flow Properties."
20.1.2 Announcements Task Flow
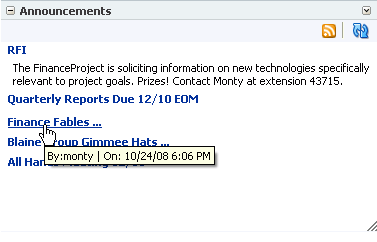
The Announcements task flow is a read-only view of the Announcements service that provides convenient access to current announcements (Figure 20-6). The amount of information displayed in an Announcements task flow depends on the property values provided for the task flow instance.
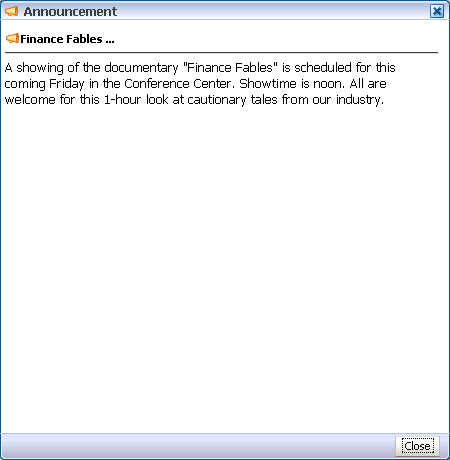
But when you add an Announcements task flow to the page, by default the task flow displays only the titles of announcements as links. Clicking a link opens the complete announcement in a separate dialog box (Figure 20-7). Unlike announcement content displayed in the Announcement Manager (as plain text), this dialog box displays content with all the formatting that was applied to it.
Figure 20-7 An Announcement Accessed from an Announcement Link
Description of "Figure 20-7 An Announcement Accessed from an Announcement Link"
You can set the Announcements task flow's region parameters to show a limited number of characters below the announcement title. This is described later in this section.
Adding the Announcement Task Flow to the Page
You can add an Announcements task flow to your page from the Catalog dialog box in Oracle Composer (Figure 20-8). Click the Add link next to the task flow name to add it to the page. For more information about accessing the Catalog dialog box and adding task flows, see Section 7.1.3, "Adding Task Flows to a Page."
Note:
All instances of the Announcements task flow in an application run against the same server and it serves no purpose to add multiple Announcements task flow instances. This is true for all service task flows that require connections to back-end servers, for example, task flows from Discussions, Mail, and IMP services.Figure 20-8 Announcements Task Flow in the Catalog Dialog Box
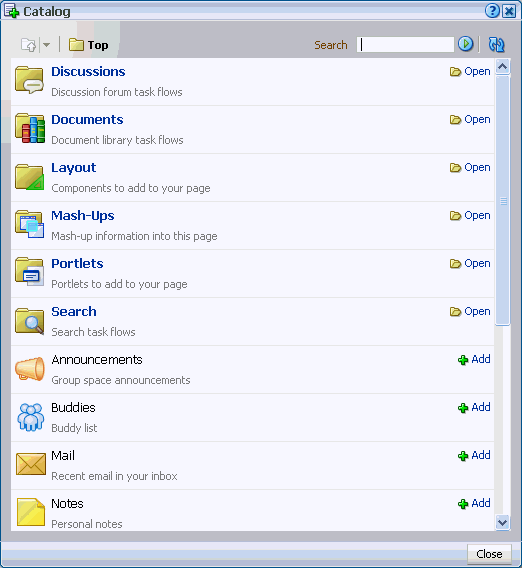
Description of "Figure 20-8 Announcements Task Flow in the Catalog Dialog Box"
Like the Announcement Manager task flow, the Announcements task flow provides the Show list to personalize your view of announcements.
Users with page-edit privileges can access the task flow's region parameters through the Component Properties dialog box in Oracle Composer to specify how to display information and how much information to display in the task flow. For information about accessing the Component Properties dialog box and editing properties, see Section 7.4.2, "Setting Component Properties."
For more information about task flow properties, see Section 20.3, "Setting Announcements Service Task Flow Properties."
20.2 Working with Announcements Service Task Flows
Both Announcement Manager and Announcements task flows display current announcements. The Announcement Manager additionally offers tools for managing announcements. This section provides information about using the Announcements service task flows.
Depending on the privileges you have on the page, you can perform all or some of the tasks described in this section:
-
View the Announcement Manager task flow—Application administrators in custom applications, Discussions Server administrators in personal spaces, and group space moderators in group spaces
-
Create an announcement—Users with the required privileges in custom applications and all participants in WebCenter Spaces
-
Edit an announcement—Creator of the announcement, application administrators in custom applications, Discussions Server administrators in personal spaces, and group space moderators in group spaces
-
Delete an announcement—Application administrators in custom applications, Discussions Server system administrators in personal spaces, and group space moderators in group spaces
This section contains the following subsections:
20.2.1 Working with the Announcement Manager Task Flow
The Announcement Manager task flow not only provides the tools you need to create, edit, and delete announcements, it also provides controls for determining when an announcement is published and when it expires and is consequently removed from the task flow. Additionally, after you create an announcement, you are automatically offered the option to mail the announcement to whomever you choose.
This section provides information about viewing, creating, and managing announcements through the Announcement Manager task flow. It section contains the following subsections:
20.2.1.1 Viewing Announcements in the Announcement Manager
The Announcement Manager task flow is available only to authorized users, typically application administrators in custom applications, and group space moderators in WebCenter Spaces.
To view announcements in the Announcement Manager task flow:
-
Log in to your application.
For information about logging into WebCenter Spaces applications, see Section 2.2.1, "Logging In to a WebCenter Application."
-
WebCenter Spaces users, click the Announcements tab to bring the Announcements page forward.
If the Announcements tab is not available, click the Settings tab and then the Services tab, and select the Announcements page for display. When the tab appears on the page, click it to bring the page forward. For more information, see Section 2.4, "Hiding, Showing, Opening, and Closing Pages."
Alternatively, custom application and WebCenter Spaces users, click the Open Announcement Manager icon in the Announcements task flow (Figure 20-9) to view the Announcement Manager task flow.
Note:
The Open Announcement Manager icon is not displayed in the Announcements task flow if you do not have the required privileges.Figure 20-9 Open Announcement Manager Icon in Announcement Task Flow

Description of "Figure 20-9 Open Announcement Manager Icon in Announcement Task Flow"
The Announcement Manager displays as follows:
-
In custom applications, the task flow opens in a separate window (Figure 20-10).
Figure 20-10 Announcement Manager Task Flow on a Page

Description of "Figure 20-10 Announcement Manager Task Flow on a Page"
-
In group spaces, the Announcement page containing the Announcement Manager is displayed (Figure 20-11).
Figure 20-11 The Announcements Page in a Group Space

Description of "Figure 20-11 The Announcements Page in a Group Space"
-
In personal spaces, the Announcement Viewer page is displayed containing the task flow (Figure 20-12).
Figure 20-12 Announcement Manager Invoked from Personal Space
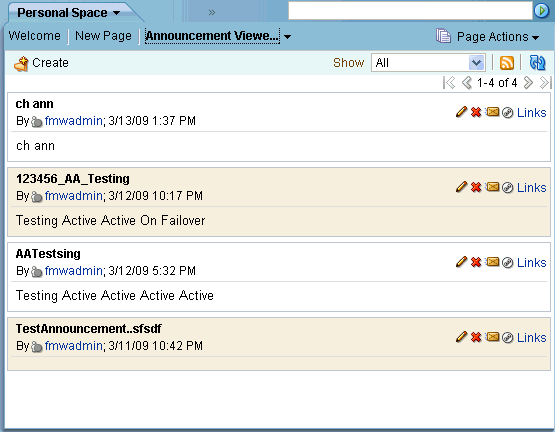
Description of "Figure 20-12 Announcement Manager Invoked from Personal Space"
-
20.2.1.2 Adjusting Your View of the Announcement Manager
You can personalize your own view of the Announcement Manager task flow. A Show list provides options for displaying only those announcements that were created within a selected time range. Choose from displaying all announcements to displaying only those created today, since yesterday, and so on—up to 30 days. For example, you may select the option Today from the Show menu, and only those announcements posted today display in the task flow. For more information, see Section 20.2.1.2, "Adjusting Your View of the Announcement Manager."
Such adjustments affect only your view; all other users' views are not affected.
To adjust your view of the Announcement Manager:
-
Go to the application page that contains the Announcement Manager task flow.
-
In the task flow, expand the Show menu and select from the listed display options (Figure 20-13).
Figure 20-13 Show Menu on Announcements Page in WebCenter Spaces
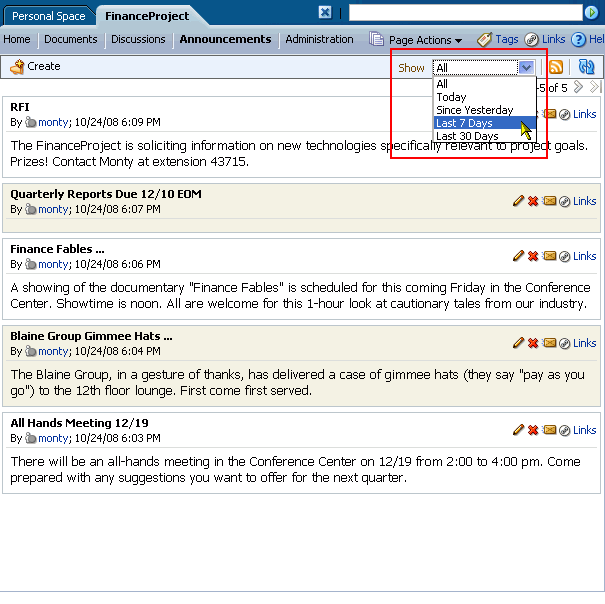
Description of "Figure 20-13 Show Menu on Announcements Page in WebCenter Spaces"
Choose from:
-
All—Display all available announcements.
-
Today—Display only today's announcements.
-
Since Yesterday—Display today and yesterday's announcements.
-
Last 7 Days—Display all announcements made in the last seven days.
-
Last 30 Days—Display all announcements made in the last 30 days.
The Announcement Manager task flow refreshes and displays the announcements that match your selection.
-
20.2.1.3 Creating an Announcement
Create an announcement to distribute information to all members of an application or a group space in one operation. On the publication date you specify while creating the announcement, the announcement appears in the Announcement Manager and Announcements task flows, and on the Recent Activity list.
In custom applications, you can create an announcement if you have been granted the permission to do so. In WebCenter Spaces, all participants can create announcements.
To create a new announcement:
-
Access the Announcement Manager task flow. For more information, see Section 20.2.1.1, "Viewing Announcements in the Announcement Manager."
-
In the Announcement Manager task flow, click the Create button (Figure 20-14).
Figure 20-14 Create Button on an Announcements Page

Description of "Figure 20-14 Create Button on an Announcements Page"
The Create Announcement dialog box opens (Figure 20-15).
Figure 20-15 The Create Announcement Dialog Box
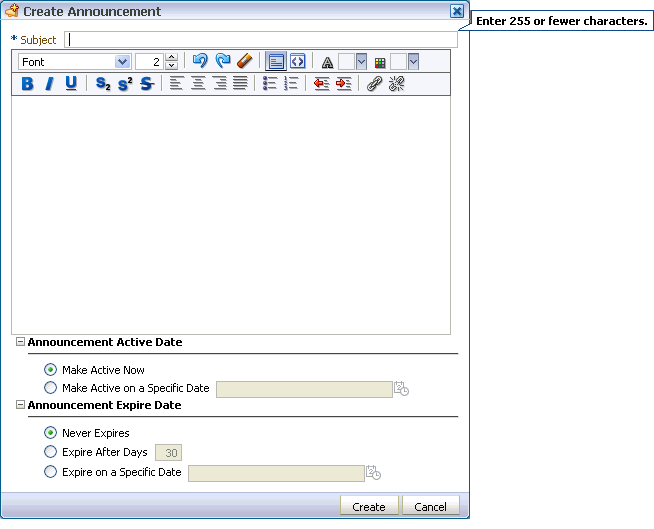
Description of "Figure 20-15 The Create Announcement Dialog Box"
-
In the Subject field, enter a heading for the announcement.
-
In the message body text box, enter the text of the announcement.
The message body is provided through the Rich Text Editor. You can style the announcement with colors, special fonts, and images. For information about Rich Text Editor controls, see Table 14-2, "Rich Text Editor Controls".
Styling information is applied when the announcement is configured with the
Content View Onlyregion parameter set totrue. For more information, see Section 20.3, "Setting Announcements Service Task Flow Properties." -
Under Announcement Active Date, choose from:
-
Make Active Now, to post the announcement immediately (the default option)
-
Make Active on Specific Date, to select a date and time to post the announcement
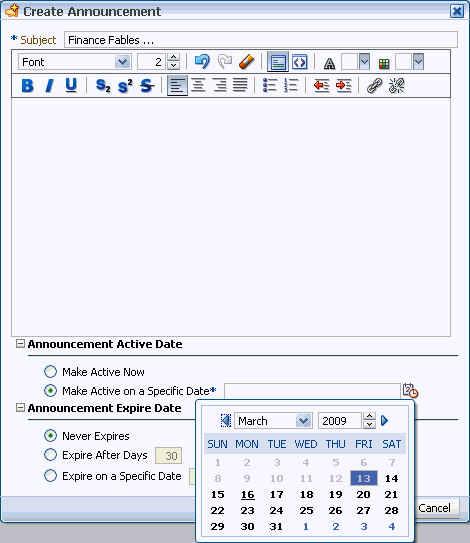
Click the Select Date icon to the right of the text field to open the Select Date pop-up calendar (Figure 20-16).
Figure 20-16 The Select Date Pop-Up Calendar
Description of "Figure 20-16 The Select Date Pop-Up Calendar"
In the calendar, click a date to select it. The current date is marked by a solid box.
As an alternative, use the controls at the top of the calendar to select a month and year for publication.
After you select a date, the calendar closes.
-
-
Under Announcement Expire Date, choose from:
-
Never Expires, to post the announcement indefinitely (the default option)
-
Expire After Days, to specify the number of days the announcement is active
Enter the number of days to display the announcement.
-
Expire on a Specific Date, to set the date and time to expire and remove the announcement
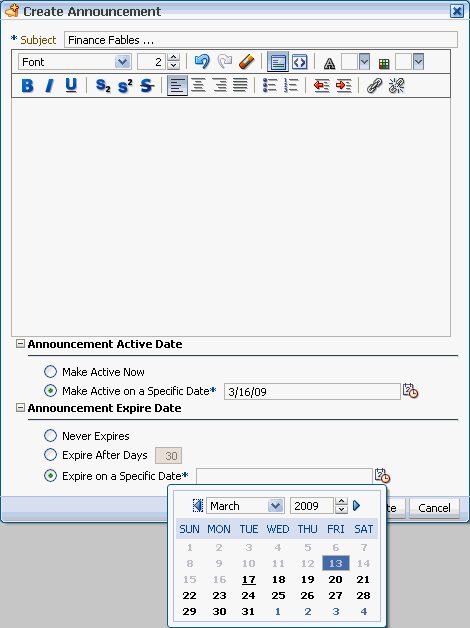
Click the Select Date icon next to the text field to open the Select Date pop-up calendar (Figure 20-17).
Figure 20-17 The Select Date and Time Icon
Description of "Figure 20-17 The Select Date and Time Icon"
In the calendar, only those dates after the publication date are enabled for selection.
-
-
Click the Create button to create the announcement.
If you chose to post the announcement immediately, the new announcement appears in three locations: in any Announcements task flow included on a page in the current group space, on the Recent Activity list, and at the top of the list of announcements in the Announcement Manager task flow.
20.2.1.4 Editing Announcements
If the details of an announcement change, or you discover a typographical error in one of your announcements, it's an easy matter to revise announcement details. You can change an announcement's title and content and, also its expiration date. However, you cannot change its publication date.
Note:
To change an announcement's publication date, you must delete the announcement, and re-create it with the correct publication date. For information about deleting an announcement, see Section 20.2.1.5, "Deleting an Announcement." For information about creating an announcement, see Section 20.2.1.3, "Creating an Announcement."You can edit an announcement only if you created that announcement or have been granted privileges to do so. Typically, application administrators in custom applications and group space moderators in WebCenter Spaces have privileges to edit all announcements in the Announcements task flow.
To edit an announcement:
-
Open the Announcement Manager task flow. For information, see Section 20.2.1.1, "Viewing Announcements in the Announcement Manager.".
-
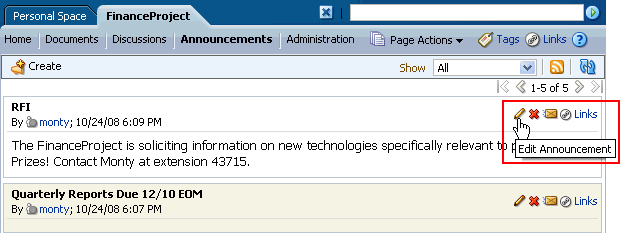
Click the Edit Announcement icon (Figure 20-18) on the announcement you want to edit.
Figure 20-18 Edit Announcement Icon on an Announcement Toolbar
Description of "Figure 20-18 Edit Announcement Icon on an Announcement Toolbar"
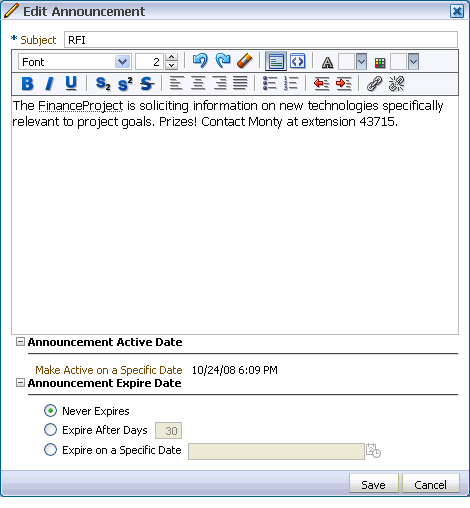
The Edit Announcement dialog box opens (Figure 20-19).
Figure 20-19 The Edit Announcement Dialog Box
Description of "Figure 20-19 The Edit Announcement Dialog Box"
-
Revise the announcement as you prefer, for example, add or change recipients, revise the subject line, change the announcement text.
The Edit Announcement dialog box provides Rich Text Editor controls for styling announcement text. For information on Rich Text Editor controls, see Table 14-2, "Rich Text Editor Controls".
You can change an announcement's title and content and, also its expiration date. However, you cannot change its publication date.
-
Click the Save button to save your changes and close the dialog box.
20.2.1.5 Deleting an Announcement
When you want to remove an announcement entirely, you can do so from the Announcement Manager task flow. This section tells you how.
The Delete icon is displayed only if you are an application administrator for a custom application, or a group space moderator in WebCenter Spaces. Other users do not have privileges to delete announcements.
To delete an announcement:
-
Open the Announcement Manager task flow. For information, see Section 20.2.1.1, "Viewing Announcements in the Announcement Manager."
-
Click the Delete Announcement icon on the announcement you want to delete (Figure 20-20).
Figure 20-20 The Delete Announcement Icon on an Announcement

Description of "Figure 20-20 The Delete Announcement Icon on an Announcement"
-
In the Delete Announcement dialog box (Figure 20-21), click the Delete button to delete the announcement and close the dialog box.
Figure 20-21 Delete Announcement Dialog Box

Description of "Figure 20-21 Delete Announcement Dialog Box"
The selected announcement is removed from the Announcement Manager task flow, the Announcements task flow, and the Recent Activity list.
20.2.2 Working with the Announcements Task Flow
The Announcements task flow is essentially a viewer for convenient access to current announcements. More robust features, for such actions as creating and editing announcements, are offered in the Announcement Manager task flow (see Section 20.2.1). The Announcements task flow offers a small subset of those features.
By default, announcements in the Announcements task flow show announcement titles as links. But you can configure the task flow to display only announcement titles, titles with some amount of content, or only content. For more information, see Section 20.3, "Setting Announcements Service Task Flow Properties."
It is an easy matter to access full announcement details from the Announcements task flow. This section tells you how.
To view announcements in an Announcements task flow:
-
Log in to your application.
For information about logging in to WebCenter Spaces, see Section 2.2.1, "Logging In to a WebCenter Application."
-
Go to the page that contains the Announcements task flow you want to view.
-
In the Announcements task flow, click the announcement you want to view (Figure 20-22).
The announcement details display in the Announcement dialog box (Figure 20-23).
Figure 20-23 An Announcement Accessed from an Announcements Task Flow

Description of "Figure 20-23 An Announcement Accessed from an Announcements Task Flow"
-
Click the Close button to exit the dialog box.
20.2.2.1 Sending Mail from an Announcement
Each announcement in the Announcement Manager or Announcements task flow has an associated Send mail icon in its toolbar (Figure 20-24). Click the Send mail icon to initiate a mail message containing the announcement text.
The Send mail icon is displayed to all users accessing the Announcements task flow, but only if the Mail service is configured in your application.
Figure 20-24 Send Mail Icons on Announcement Headers
Description of "Figure 20-24 Send Mail Icons on Announcement Headers"
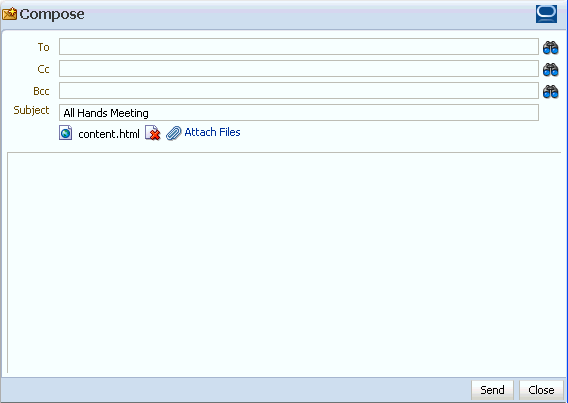
Clicking the Send mail icon invokes the Compose dialog box (Figure 20-25) in which you can compose a mail and forward the announcement as an attachment to the mail.
In the Compose dialog box, the Subject field is populated with the announcement title, and the announcement content is available in a file as an attachment called content.html.
20.2.2.2 Linking a WebCenter Object to an Announcement
Each announcement in the Announcement Manager or Announcements task flow has an associated Links icon in its toolbar to link another WebCenter object to the announcement.
The links icon is displayed to all users accessing the Announcements task flow, but only if the Links service is configured in your application.

For more information, see Chapter 16, "Working with the Links Service."
20.3 Setting Announcements Service Task Flow Properties
Announcements service task flows have associated properties, which users with sufficient privileges can access from the Component Properties dialog box in Oracle Composer. The method for accessing task flow properties is the same from task flow to task flow. For more information, see Section 7.4, "Setting Properties on Page Content."
The task flow parameters listed on the Parameters tab control the default task flow content and facilitate the wiring of the task flow to page parameters and page definition variables. Parameters are unique to the task flow type. This section describes the parameters provided by the Announcements task flows.
Note:
For information about wiring pages and components, see Chapter 8, "Wiring Pages, Task Flows, Portlets, and UI Components".Changes to the display- and style-related properties listed on the other tabs affect the appearance and behavior of the task flow instances for all users. These properties are common to all task flows. For more information, see Section 7.4, "Setting Properties on Page Content."
The contents of the Events tab depend on the events supported by the task flow. For more information, see Section 7.4.7, "Working with Component Contextual Events."
20.3.1 Region Parameters
The region parameters associated with Announcements service task flows vary from one task flow type to another. Table 20-1 lists and describes the region parameters associated with Announcements service task flows and indicates which task flow types use a particular parameter.
Table 20-1 Announcements Task Flow Region Parameters
| Parameter | Available To … | Description |
|---|---|---|
|
|
Announcements |
A boolean value representing whether to remove the announcement title and display just the announcement content. Enter When set to |
|
|
Announcements Announcement Manager |
The ID of the forum under which announcements are created in the back-end discussions server. In WebCenter Spaces, this property is blank by default. However, internally it maps to the forum ID associated with the current group space. For personal spaces, global (system) announcements are returned. You can edit this property to specify a different forum ID. |
|
|
Announcements |
The number of characters to show in announcement details. Use only when If no value is specified, then WebCenter displays 200 characters. This parameter takes effect with Express values using the following formats:
The value you enter for |
|
|
Announcements |
The number of announcements to display announcement details. Announcements exceeding this value display the announcement title only. Use only when Express values using the following formats:
|
For additional information about region parameters, see Section 7.4.3, "Working with Component Parameters."
