Release 10.1.3.4
Part Number E12188-01
Contents
Previous
Next
| Oracle Business Intelligence Publisher Administrator's and Developer's Guide Release 10.1.3.4 Part Number E12188-01 | Contents | Previous | Next |
This chapter covers the following topics:
BI Publisher offers the following security options:
BI Publisher Security
Use BI Publisher's Users and Roles paradigm to control access to reports and data sources. See Understanding BI Publisher's Users and Roles.
LDAP
Set up the BI Publisher roles in your LDAP server then configure BI Publisher to integrate with it. See Integrating with LDAP.
Oracle E-Business Suite
Upload a DBC file to recognize your Oracle E-Business Suite users. See Integrating with E-Business Suite Security.
Oracle BI Server
Set up the BI Publisher roles in your BI Server Administration tool then configure BI Publisher to integrate with it. See Integrating with Oracle BI Server Security.
Oracle Database
Set up the BI Publisher roles in your Oracle Database and then configure BI Publisher to integrate with it. See Integrating with Oracle Database Security.
Oracle's Hyperion Common Shared Services
If you plan to run BI Publisher inside of Oracle Enterprise Performance Management Workspace, you must use this security model. This option is enabled only after you have completed the integration steps with Workspace. For more information , see Integrating with Oracle Enterprise Performance Management Workspace.
BI Publisher allows you to define an administration Superuser. Using the Superuser credentials you can directly access the BI Publisher server administrative functions without logging in through the defined security model.
Set up this Superuser to ensure access to all administrative functions in case of problems with the current security setup.
Select the Admin tab.
Under Security Center select Security Configuration.
Under Local Superuser, select the box and enter the credentials for the Superuser.
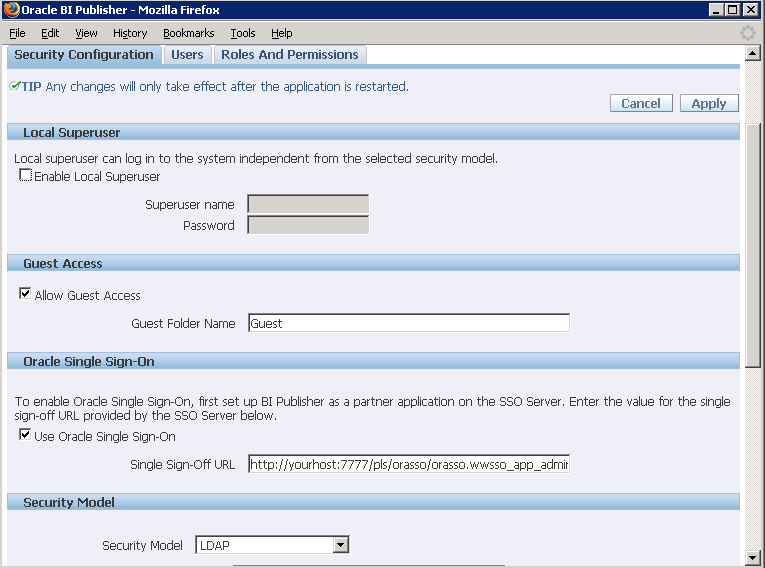
BI Publisher allows you to set up a public access folder. Any user can access the reports in this folder without entering credentials.
Under Shared Folders, create the folder to which you want to grant public access.
Select the Admin tab.
Under Security Center select Security Configuration.
Under Guest Access, select Allow Guest Access.
Enter the name of the folder that you created for public access.
Restart the BI Publisher application.
The next time you access BI Publisher, you will see the Guest button. Users can select this button and view the reports in your chosen guest folder without presenting credentials.
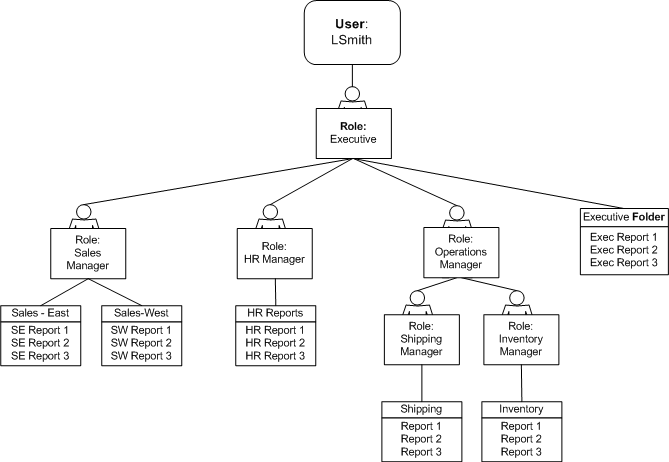
A user is granted one or multiple Roles. A Role defines a user's access to Folders and functions. A role can be assigned one or multiple Folders to which access is granted. Reports are contained within the folders. You can create a hierarchy of roles by assigning roles to other roles. In this way the privileges of multiple roles can roll up to higher level roles. The following graphic shows an example of the hierarchy structure of User, Role, and Folder:
BI Publisher provides five functional roles to grant access to specific tasks within the application. Assign these roles to users based on their need to perform the associated tasks. These roles cannot be updated or deleted.
The following table shows the privileges granted to each functional role:
| Role | Privileges |
|---|---|
| no roles assigned | View (online reports only) Export History |
| BI Publisher Excel Analyzer | View Export History Grants access to the Excel Analyzer |
| BI Publisher Online Analyzer | View Export History (public reports only) Grants access to the Analyzer |
| BI Publisher Scheduler | View Export History Schedule |
| BI Publisher Template Designer | View Export History Enables log on from Template Builder |
| BI Publisher Developer | View Export History Edit Configure Folder and Report Tasks Enables log on from the Template Builder |
| BI Publisher Administrator | View Export Edit Schedule History Configure Folder and Report Tasks Excel Analyzer Online Analyzer Admin tab and all administration tasks Enables log on from the Template Builder |
There are two options for setting up users and roles:
Set up users and roles in the BI Publisher Enterprise Security Center
For this option, follow the instructions in this section.
Integrate BI Publisher Enterprise with an existing LDAP server
For this option, See Integrating with LDAP.
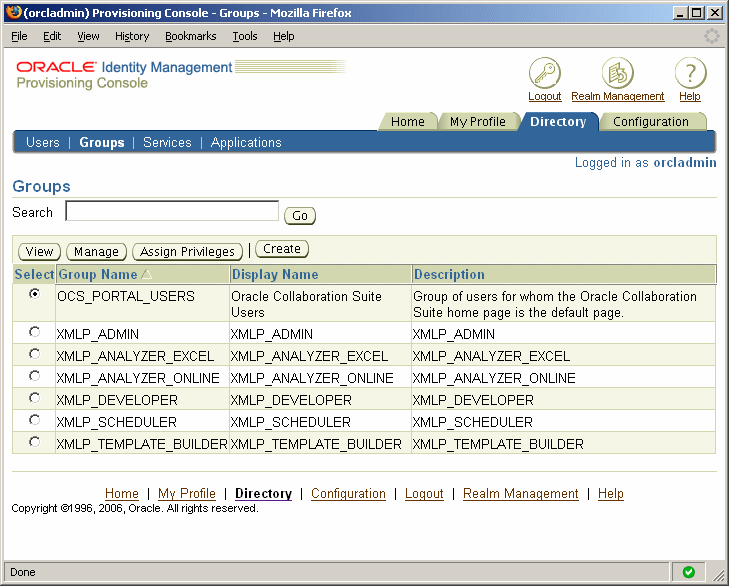
From the Security Center, select Roles and Permissions; this will invoke the Security Center page. Here you can see the list of existing roles and permissions.
Select Create Role.
Enter a Role Name and Description and select Apply.
Grant access to data sources for the role. See Setting Up Data Sources.
From the Security Center, select Users. This will invoke the Security Center Users page. Here you can see the list of existing users.
Select Create User.
Add the User Name and Password for the user.
From the Security Center, select Users. This will invoke the Security Center Users page. Here you can see the list of existing users.
Select the user name. You can update both the user name and the password.
From the Security Center, select Users. This will invoke the Security Center Users page. Here you can see the list of existing users.
Select the Assign Roles icon for the user.
From the Assign Roles page, select the role from the Available Roles list and then select the Move shuttle button to move the role to the Assigned Roles list. When done assigning all roles, select Apply.
From the Security Center, select Roles and Permissions; this will invoke the Security Center page. Here you can see the list of existing roles and permissions.
Select the Add Folders icon.
Select the desired folder from the Available Folders list and use the Move shuttle button to move it to the Allowed Folders list.
Note that the folders are presented as the directory structure is set up in your system. Selecting the top level folder will grant access to all subfolders. Selecting just the subfolder entry will allow access only to the subfolder.
From the Security Center, select Roles and Permissions; this will invoke the Security Center page. Here you can see the list of existing roles and permissions.
Select the Add Data Sources icon for the Role.
Move selections from the Available Data Sources list to the Allowed Data Sources list.
Users with this role will only be allowed to run reports that access data sources on the Allowed Data Sources list.
From the Security Center, select Roles and Permissions; this will invoke the Security Center page. Here you can see the list of existing roles and permissions.
Select the Add Roles icon for the Role.
Select the desired role from the Available Roles list and use the Move shuttle button to move it to the Included Roles.
When you delete a user in any security model (built-in, LDAP, E-Business Suite, or BI Server), ensure that you delete the user folder from the repository. If you are logged in as an Administrator, the user folders are located on the Reports page under Users/<username>. If the individual user folder is not deleted and a new user is created with the same user name, then the new user will have access to the contents of the existing user folder.
BI Publisher can be integrated with your LDAP server to manage users and report access. Create the users and roles within your LDAP server, then configure the BI Publisher server to access your LDAP server.
In the BI Publisher security center module, assign folders to those roles. When a user logs into the server they will have access to those folders and reports assigned to the LDAP roles.
Integrating the BI Publisher server with Oracle LDAP consists of three main tasks:
Set up users and roles
Configure BI Publisher to recognize your LDAP server
Assign report folders and data sources to roles
These tasks can be performed through the Oracle Internet Directory (OID) Web UI, or through the client application. Each method is described in detail.
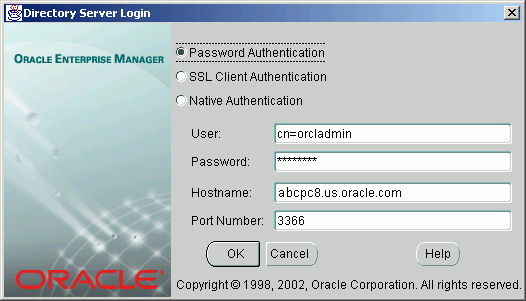
Use the Enterprise Security Manager login to access your LDAP Server.
An example Directory Server Login screen is shown in the following figure:
Create Roles.
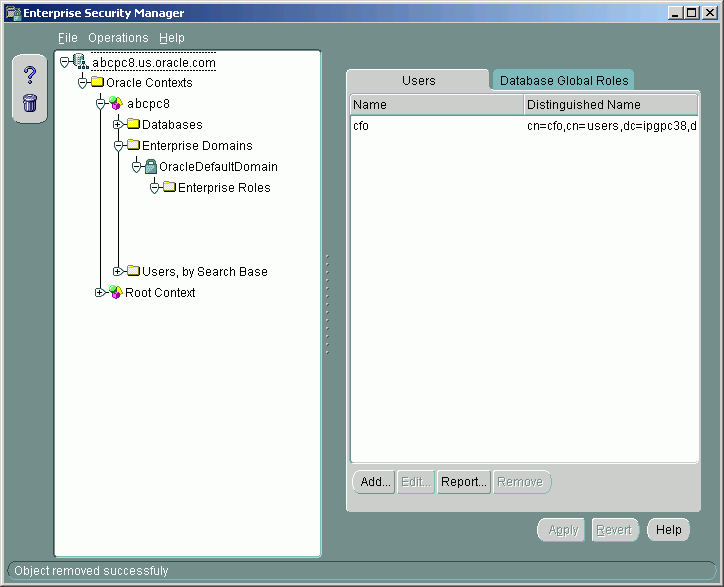
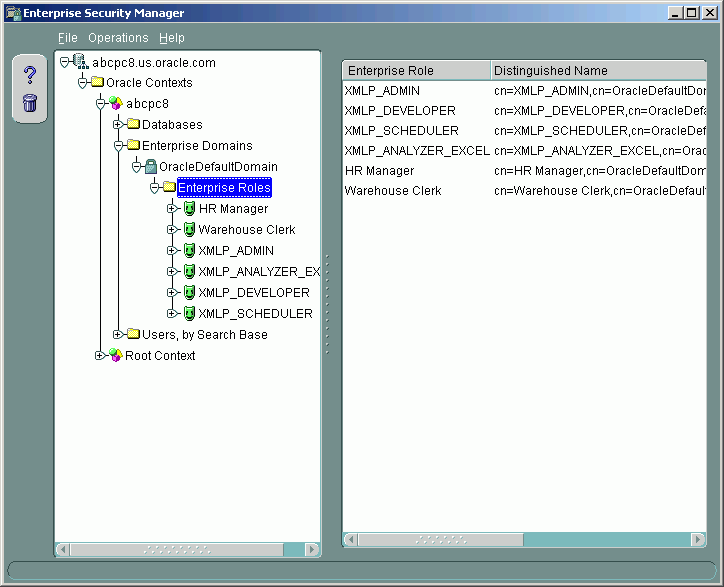
Navigate to the Enterprise Roles node under the OracleDefaultDomain node.
A sample Enterprise Security Manager screen is shown in the following figure:
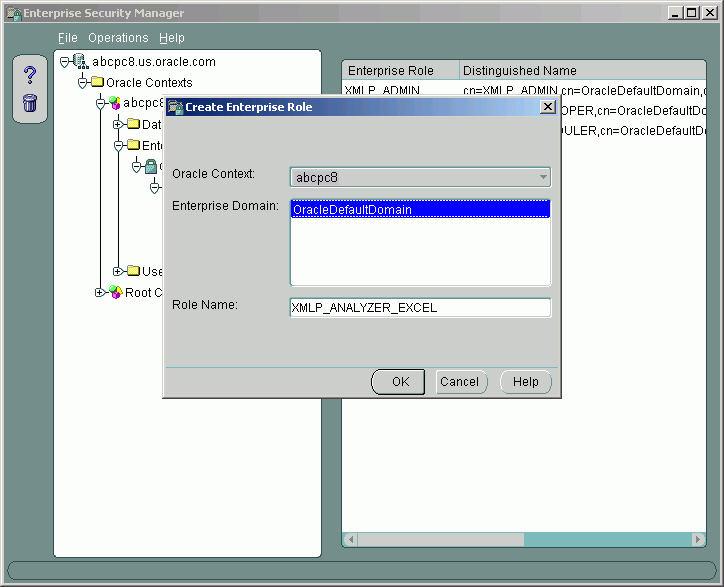
To create a role, select the Enterprise Roles node, then select Create Enterprise Role from the Operations menu.
You must create the following roles to integrate with BI Publisher: See Understanding Users and Roles for full descriptions of the required functional roles.
XMLP_ADMIN – this is the administrator role for the BI Publisher server.
XMLP_DEVELOPER – allows users to build reports in the system.
XMLP_SCHEDULER – allows users to schedule reports.
XMLP_ANALYZER_EXCEL – allows users to use the Excel analysis feature.
XMLP_ANALYZER_ONLINE – allows users to use the online analysis feature.
XMLP_TEMPLATE_DESIGNER - allows users to connect to the BI Publisher server from the Template Builder and to upload and download templates.
The following figure shows a sample Create Enterprise Role dialog:
Create other functional roles as required by your implementation, for example: HR Manager, Warehouse Clerk, or Sales Manager.
The following figure shows an example Enterprise Security Manager screen with multiple roles defined:
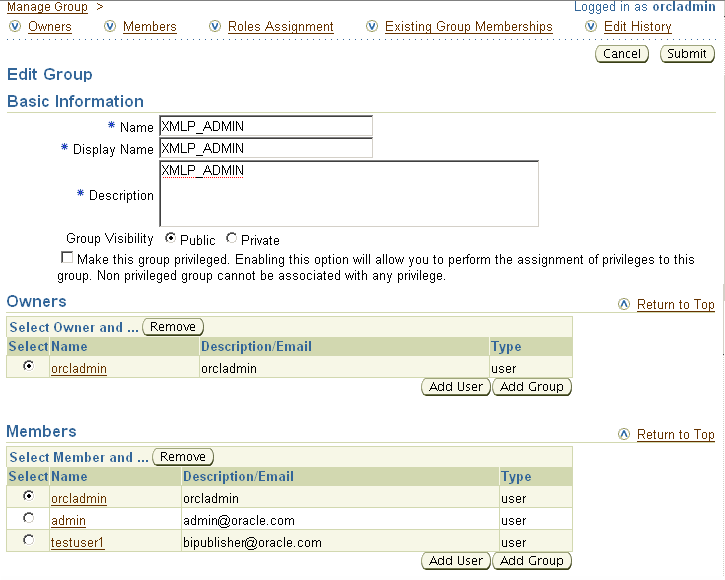
Assign roles to users.
Select the role you wish to add a user to.
Select Add.
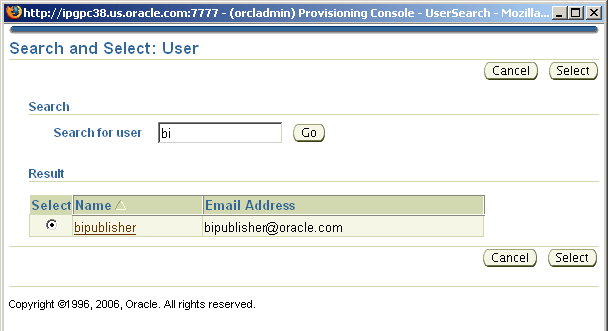
Navigate to the Users node and select Search to find users.
The following figure shows an example Add Enterprise Users dialog:
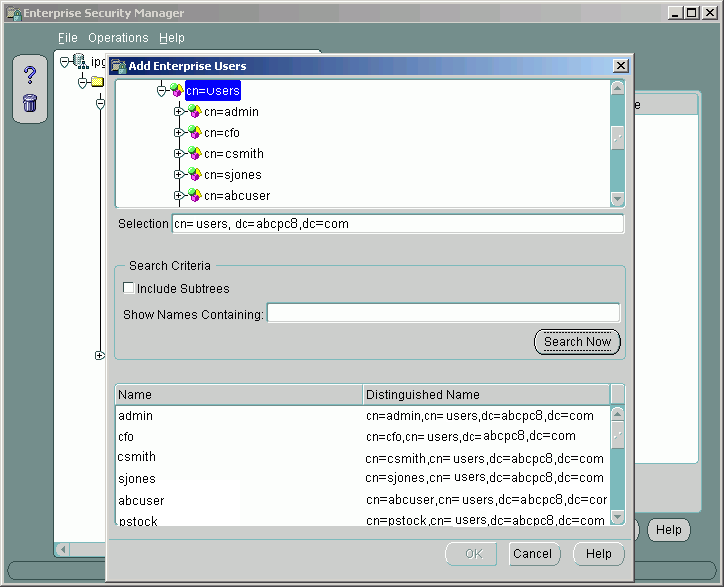
Select the user(s) you wish to add to the role and select OK.
This action will close the dialog. Select Apply on the main form to save your changes.
Now if you expand the Users node under the role, the new users will appear.
To configure the BI Publisher server to recognize your LDAP server, update the Security properties in the BI Publisher Admin interface as follows:
Navigate to the Security Configuration page: Select the Admin tab. Under Security Center select Security Configuration.
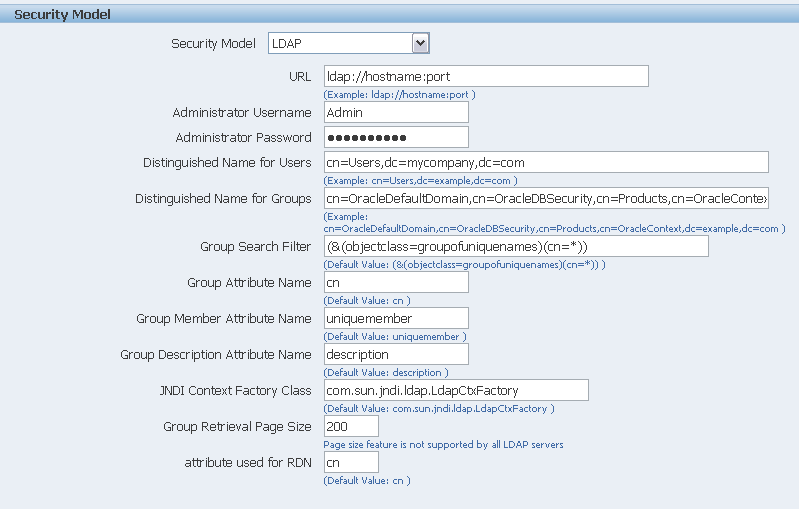
Scroll down to the Security Model region. Select LDAP for the Security Model.
Enter the following:
URL
For example: ldap://ldap.server.com:389/
Administrator Username
For example: orcladmin
Administrator Password:
For example: welcome
Distinguished Name for Users
For example: cn=users,dc=server,dc=com
Important: The distinguished name values are case-sensitive and must match the settings in your LDAP server.
Distinguished Name for Groups
For example: cn=Groups, dc=us,dc=oracle,dc=com
The default value is cn=OracleDefaultDomain,cn=OracleDBSecurity,cn=Products,cn=OracleContext,dc=example,dc=com
Group Search Filter
The default values is (&(objectclass=groupofuniquenames)(cn=*))
Group Attribute Name
The default value is cn
Group Member Attribute Name
The default value is uniquemember
Group Description Attribute Name
The default value is description
JNDI Context Factory Class
The default value is com.sun.jndi.ldap.LdapCtxFactory
Group Retrieval Page Size
Setting this values enables support of the LDAPv3 control extension for simple paging of search results. By default, pagination is not used. This value determines the number of results to return on a page (for example, 200). Your LDAP server must support control type 1.2.840.113556.1.4.319 to support this feature, such as OID 10.1.4. See your LDAP server documentation for information on support of this control type.
For more information about LDAP pagination and the required control type, see the article: RFC 2696 - LDAP Control Extension for Simple Paged Results Manipulation (http://www.faqs.org/rfcs/rfc2696.html) .
attribute used for RDN
Enter the attribute that supplies the value for the Relative Distinguished Name. This value defaults to cn.
Important: You must restart the server for changes to the security model to take effect.
The following figure shows a sample of the LDAP security model entry fields from the Security Configuration page:
Log in with an Administrator role.
Navigate to the Admin tab. From Security Center select Roles and Permissions.
You will see the roles you created and assigned in the security manager application. Note the following:
The XMLP_X roles are not shown because these are controlled through the LDAP interface.
The Users tab is no longer available under the Security Center because users are now managed through your LDAP interface.
Roles are not updateable in the BI Publisher interface, with the exceptions of adding folders and adding data sources.
Select Add Folders to add folders to a particular role using the tree shuttle. Select Add Data Sources to add BI Publisher data sources to the role. A role must be assigned access to a data source to run reports from that data source.
Users can now log in using their LDAP username/password and will have access to reports in the folders assigned to their roles set up in LDAP.
Log in to OID. The URL is typically http://(AS host):(AS port)/oiddas/
Create users for BI Publisher. Select the Directory tab, then the Users subtab, and then click the Create button.
Create the following roles to integrate with BI Publisher: See Understanding Users and Roles for full descriptions of the required functional roles.
XMLP_ADMIN – this is the administrator role for the BI Publisher server.
XMLP_DEVELOPER – allows users to build reports in the system.
XMLP_SCHEDULER – allows users to schedule reports.
XMLP_ANALYZER_EXCEL – allows users to use the Excel analysis feature.
XMLP_ANALYZER_ONLINE – allows users to use the online analysis feature.
XMLP_TEMPLATE_DESIGNER - allows users to connect to the BI Publisher server from the Template Builder and to upload and download templates.
To create the Group, select the Groups subtab, then click Create.
Assign users to the group.
Select each group and click Manage, then click Edit.
Click the Add User button to add users to the Group.
This section describes how to set up Oracle Single Sign-On with Oracle 10g Application Server (OracleAS). These guidelines are written based on the Oracle 10g Application Server 10.1.3 release.
OracleAS 10g Infrastructure installation (including SSO server)
The BI Publisher xmlpserver is set up with Oracle Internet Directory (OID) LDAP server.
Note: If you want to set up the BI Publisher server on a different server, that server must also be OracleAS 10g and must be registered in the main OracleAS 10g Infrastructure. This can be done by installing the new OracleAS 10g J2EE and Web Cache. The procedure for this installation is as follows (for AS 10.1.3):
Run the AS installer
Choose Oracle Application Server 10g 10.1.3
Choose J2EE and Web Cache
Follow the installer instructions. In the OID section, point to the master OracleAS 10g Infrastructure installation on your main server.
Create a BI Publisher Local Superuser. Before performing any security updates, you must set up a BI Publisher Local Superuser to ensure access to BI Publisher regardless of your selected security configuration. See Defining a Local Superuser for more information.
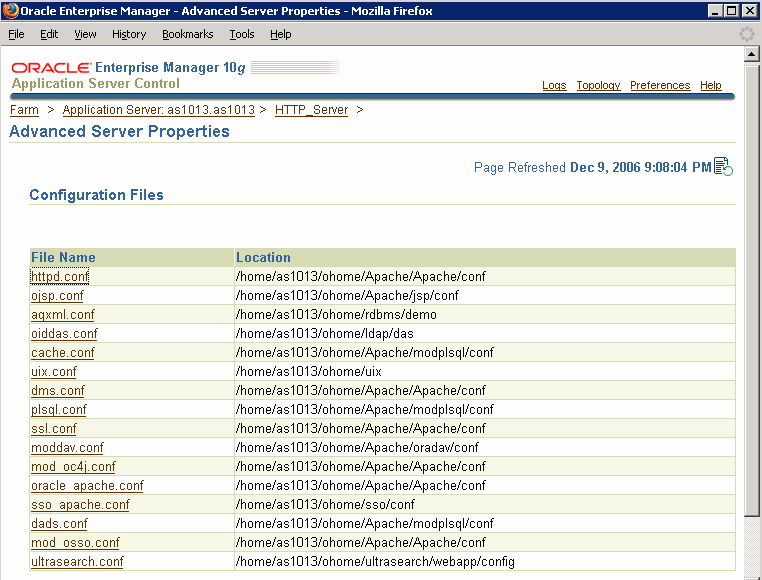
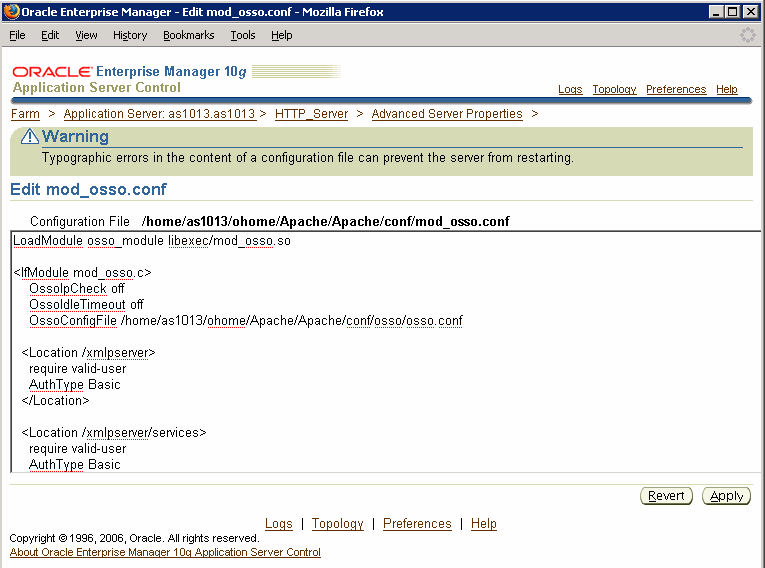
Modify the application server configuration file. Navigate to Application Server Control (ASC). Choose HTTP Server and then choose Advanced Server Properties.
The following figure shows a sample Advanced Server Properties page:
Select mod_osso.conf to open the file for editing. To protect the server, add a new "Location" directive as follows:
<!-- Protect xmlpserver -->
<Location /xmlpserver>
      require valid-user
      AuthType Basic
</Location>
To allow Web service communication between BI Publisher and its client components (the Template Builder and the Excel Analyzer) you must make additional modifications to the mod_osso.conf file. To open up the xmlpserver to allow these Web services, enter the following directives:
<Location /xmlpserver/services/>
  require valid-user
     AuthType Basic
     Allow from All
     Satisfy any
</Location>

<Location /xmlpserver/report_service/>
  require valid-user
     AuthType Basic
     Allow from All
     Satisfy any
</Location>

Location /xmlpserver/ReportTemplateService.xls/>
  require valid-user
     AuthType Basic
     Allow from All
     Satisfy any
</Location>
(Optional) To allow access to the Guest Folder in BI Publisher for users not signed on through SSO, you must make an additional modification to the mod_osso.conf file to allow traffic to the Guest folder without checking the SSO token. To do this, add the following directive:
<Location /xmlpserver/Guest/>
 require valid-user
     AuthType Basic
     Allow from All
     Satisfy any
</Location>
For integration with Oracle BI Presentation Services, you must disable SSO for Web services between the BI Presentation Services server and the BI Publisher server. If you made this entry when performing Step 8, you do not need to repeat this setup.
To open up the xmlpserver to allow the Web service, enter the following directive in the mod_osso.conf file:
<Location /xmlpserver/services/>
 require valid-user
     AuthType Basic
     Allow from All
     Satisfy any
</Location>
You must make a similar entry to open the BI Presentation Services server. For more information on required configuration for BI Publisher Enterprise and Oracle BI Presentation services, see the Oracle Business Intelligence Enterprise Edition Deployment Guide.
A sample mod_osso.conf file with the entries discussed in this section is shown below:
LoadModule osso_module libexec/mod_osso.so

 <IfModule mod_osso.c>
     OssoIpCheck off
     OssoIdleTimeout off
     OssoConfigFile /home/as1013/ohome/Apache/Apache/conf/osso/osso.conf

   <Location /xmlpserver>
     require valid-user
     AuthType Basic
   </Location>


<Location /xmlpserver/services/>
  require valid-user
     AuthType Basic
     Allow from All
     Satisfy any
</Location>

<Location /xmlpserver/report_service/>
  require valid-user
     AuthType Basic
     Allow from All
     Satisfy any
</Location>

Location /xmlpserver/ReportTemplateService.xls/>
  require valid-user
     AuthType Basic
     Allow from All
     Satisfy any
</Location>

<Location /xmlpserver/Guest/>
 require valid-user
     AuthType Basic
     Allow from All
     Satisfy any
</Location>
 #
 # Insert Protected Resources: (see Notes below for how to protect resources)
 #


 #______-
 #
 # Notes
 #
 #______-
 #
 # 1. Here's what you need to add to protect a resource,
 #    e.g. <ApacheServerRoot>/htdocs/private:
 #
 #      <Location /private>
 #      require valid-user
 #      AuthType Basic
 #      </Location>
 #
 </IfModule>

 #
 # If you would like to have short hostnames redirected to
 # fully qualified hostnames to allow clients that need
 # authentication via mod_osso to be able to enter short
 # hostnames into their browsers uncomment out the following
 # lines
 #
 #PerlModule Apache::ShortHostnameRedirect
 #PerlHeaderParserHandler Apache::ShortHostnameRedirect
A sample of edit page is shown in the following figure:
Restart the HTTP server.
Set up the Single Sign-Off URL on the BI Publisher Security Configuration page.
From the Admin tab, select Security Configuration. Enter the following in the Oracle Single Sign-On region:
Select Use Oracle Single Sign-On
Enter the Single Sign-Off URL with the value you wrote down in the preceding step.
A sample BI Publisher Security Configuration page is shown in the following figure:
Restart the application through the Application Server Control page.
Enter the URL to access the BI Publisher Enterprise application, and you will be redirected to the SSO login page.
A sample SSO login page is shown in the following figure:

BI Publisher can leverage your E-Business Suite security to enable your E-Business Suite users to log in to BI Publisher using their E-Business Suite credentials. When you integrate with the E-Business Suite security, your E-Business Suite responsibilities become available as roles in the BI Publisher security center. You can then associate BI Publisher report folders to the imported roles/responsibilities to allow access as you would using the BI Publisher native security. See Understanding Users and Roles.
Note: In this release your users will not be able to access or execute reports stored on the E-Business Suite instance.
Upload the dbc File
In the Oracle E-Business Suite, log in as a System Administrator and create the following responsibilities to correspond to the BI Publisher functional roles:
XMLP_ADMIN – this is the administrator role for the BI Publisher server.
XMLP_DEVELOPER – allows users to build reports in the system.
XMLP_SCHEDULER – allows users to schedule reports.
XMLP_ANALYZER_EXCEL – allows users to use the Excel analysis feature.
XMLP_ANALYZER_ONLINE – allows users to use the online analysis feature.
XMLP_TEMPLATE_DESIGNER - allows users to connect to the BI Publisher server from the Template Builder and to upload and download templates.
Add the new BI Publisher responsibilities to the appropriate Users.
Note: Ensure to assign at least one user to the XMLP_ADMIN group.
Log in to BI Publisher Enterprise. From the Admin tab, select Security Configuration.
In the Security Model section of the page, select Oracle E-Business Suite from the list.
Load your dbc file from the E-Business Suite instance. This is typically located under the $FND_SECURE directory. If you do not have access to this file, contact your E-Business Suite system administrator. This file specifies how BI Publisher should access the E-Business Suite instance.
It is recommended that you create a local super user for the system to allow you to access the Administrator pages once the changes take effect. Select the Enable Local Superuser check box and enter a username and password for the user under the Local Superuser section of the Security Configuration tab.
Restart the BI Publisher server for the security changes to take effect.
Once you restart the system, all your E-Business Suite responsibilities will be visible as roles in the BI Publisher security center. Add folders to the E-Business Suite roles.
Add Folders to the E-Business Suite Roles
From the Admin tab select Roles and Permissions.
All of the responsibilities from your E-Business Suite instance will display as available roles.
Find the responsibility (role) that you wish to attach folders to and select Add Folders.
Now when EBS users log in using their EBS credentials they will have access to the folders and reports that have been attached to their responsibilities.
BI Publisher offers integration with Oracle BI Server security so that you can administer the BI Publisher users through the BI Server Administration tool. To accomplish this you must define the BI Publisher functional roles within the Oracle BI Server Administration tool, assign users to these groups, and then specify Oracle BI Security as your security model in the BI Publisher Admin interface.
Note: For information on setting up Oracle BI security, see the Oracle Business Intelligence Server Administration Guide.
In the BI Server Administration tool, create the following groups to correspond to the BI Publisher functional roles:
XMLP_ADMIN – this is the administrator role for the BI Publisher server.
XMLP_DEVELOPER – allows users to build reports in the system.
XMLP_SCHEDULER – allows users to schedule reports.
XMLP_ANALYZER_EXCEL – allows users to use the Excel analysis feature.
XMLP_ANALYZER_ONLINE – allows users to use the online analysis feature.
XMLP_TEMPLATE_DESIGNER - allows users to connect to the BI Publisher server from the Template Builder and to upload and download templates.
Add the appropriate users to the BI Publisher groups in the BI Server Administration tool.
Note: Ensure to assign at least one user to the XMLP_ADMIN group.
In the BI Publisher Enterprise application, log in with Administration privileges. From the Admin tab select Security Configuration.
In the Security Model section of the page, select Oracle BI Server from the list. Provide the following connection information for the BI Server:
JDBC Connection String - example: jdbc:oraclebi://host:port/
Note that if your Oracle BI Server is SSL-enabled, you must copy the keystore to the BI Publisher server and provide it in the connection string.
If your Oracle BI servers are set up in a clustered configuration, the connection string must use the appropriate syntax. See Adding the Oracle BI Server as a JDBC Data Source for a description of the required syntax.
An example connection string for a clustered, SSL-enabled instance follows: jdbc:oraclebi://mycompanyserver.com:9706/PrimaryCCS=BIdb01;PrimaryCCSPort=9706;ssl=true;sslKeystorefilename=c:\mycompany\SSL\OracleBI\sslc\javahost.keystore;sslKeystorepassword=admin;trustanyserver=true;
For more information on SSL and on clustered configurations, see the Oracle Business Intelligence Enterprise Edition Deployment Guide.
Administrator Username and Administrator Password
Database Driver Class - example: oracle.bi.jdbc.AnaJdbcDriver
It is recommended that you create a local super user for the system to allow you to access the Administrator pages once the changes take effect. Select the Enable Local Superuser check box and enter a username and password for the user under the Local Superuser section of the Security Configuration tab.
Restart the BI Publisher server for the security changes to take effect.
Add Folders to the Oracle BI Server Roles
Log in to BI Publisher as a user with the XMLP_ADMIN role.
From the Admin tab select Roles and Permissions.
All of the groups from your Oracle BI instance will display as available roles.
Find the group (role) that you wish to attach folders to and select Add Folders.
BI Publisher offers integration with Oracle Database security so that you can administer the BI Publisher users with your Oracle Database users. To accomplish this you must define the BI Publisher functional roles in your Oracle Database, assign the roles to your Oracle Database users, and then specify Oracle Database as your security model in the BI Publisher Admin page.
Note: For information on setting up Oracle DatabaseI security, see the Oracle Database Security Guide.
In your Oracle Database, create the following roles to correspond to the BI Publisher functional roles:
XMLP_ADMIN – this is the administrator role for the BI Publisher server.
XMLP_DEVELOPER – allows users to build reports in the system.
XMLP_SCHEDULER – allows users to schedule reports.
XMLP_ANALYZER_EXCEL – allows users to use the Excel analysis feature.
XMLP_ANALYZER_ONLINE – allows users to use the online analysis feature.
XMLP_TEMPLATE_DESIGNER - allows users to connect to the BI Publisher server from the Template Builder and to upload and download templates.
Assign these roles to the appropriate Database users. You may also want to create additional reporting roles that you can utilize when setting up your report privileges on the BI Publisher side. For example, you might create a role called "HUMAN_RESOURCES_MANAGER" that you can assign a Human Resources Folder of reports to. You can then assign that role to any user requiring access to the Human Resources reports.
Ensure to assign the XMLP_ADMIN role to a user with administration privileges, such as SYSTEM.
In the BI Publisher application, log in with Administration privileges. From the Admin tab select Security Configuration.
In the Security Model section of the page, select Oracle Database from the list. Provide the following connection information:
JDBC Connection String - example: jdbc:oracle:thin:@mycompany.com:1521:orcl
Administrator Username and Administrator Password - note that the user that you enter must have privileges to access data from the dba_users/_roles/_role_privs tables.
Database Driver Class - example: oracle.jdbc.driver.OracleDriver
It is recommended that you create a local super user for the system to allow you to access the Administrator pages once the changes take effect. Select the Enable Local Superuser check box and enter a username and password for the user under the Local Superuser section of the Security Configuration tab.
Restart the BI Publisher server for the security changes to take effect.
After you restart the server, you can log in with the Oracle Database user to which you assigned the XMLP_ADMIN role. You will now see all your Oracle Database users and roles.
Assign report folders to the Oracle Database roles so that users can access reports.
Oracle BI Publisher supports digital signatures on PDF output documents. Digital signatures enable you to verify the authenticity of the documents you send and receive. Oracle BI Publisher can access your digital ID file from a central, secure location and at runtime sign the PDF output with the digital ID. The digital signature verifies the signer's identity and ensures that the document has not been altered after it was signed.
For additional information on digital signatures, see the following sources:
Digital ID Introduction by Verisign
http://www.verisign.com/support/tlc/per/whitepaper.htm
http://www.verisign.com/stellent/groups/public/documents/gui des/005326.pdf
Digital Signature by Adobe
http://www.adobe.com/security/digsig.html
Digital Signatures in PDF and Acrobat
http://www.acrobatusers.com/articles/2006/07/digital_ signatures/index.php
Before you can implement digital signatures with Oracle BI Publisher output documents, you need the following:
A digital ID obtained from a public certificate authority or from a private/internal certificate authority (if for internal use only). You must copy the digital ID file to a secure location of the file system on the server that is accessible by the BI Publisher server.
Use of digital signatures with Oracle BI Publisher output documents has the following limitations:
Only a single digital ID can be registered with BI Publisher. Future releases will support multiple digital IDs.
Only reports submitted through BI Publisher's Schedule Report interface can include the digital signature.
The digital signature is enabled at the report level; therefore, multiple templates assigned to the same report share the digital signature properties.
The following steps provide an overview of the tasks required to set up and sign your output PDF documents with a digital signature:
Register the digital ID in the BI Publisher Admin page.
Specify the Roles that are authorized to sign documents.
(Optional for PDF templates) Add a signature field to the PDF template in which to place the digital signature at runtime. See Adding or Designating a Field for Digital Signature, Oracle BI Publisher Report Designer's Guide for instructions on designating a specific field in a PDF template for the digital signature.
Enable Digital Signature for the report in the Runtime Configuration properties and specify the position to place the digital signature on the completed document. This can be a signature field (for PDF templates), general location (top left, top center, or top right), or you can specify x and y coordinates.
Log in to BI Publisher as a user with an authorized role and submit the report through the BI Publisher scheduler, choosing PDF output. When the report completes it will be signed with your digital ID in the specified location of the document.
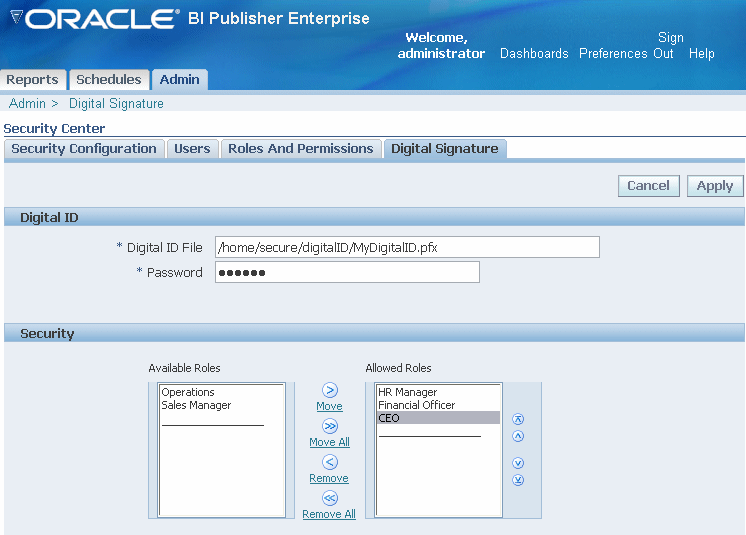
Currently, BI Publisher supports the identification of a single digital ID file only. Register the digital ID in the BI Publisher Admin page as follows:
Log in to BI Publisher with Administrator credentials.
Select the Admin tab, and then from the Security Center list select Digital Signature.
On the Digital Signature subtab, enter the file path to the digital ID file and enter the password for the digital ID.
Enable the Roles that will have the authority to sign documents with this digital ID. Use the shuttle buttons to move Available Roles to the Allowed Roles list.
Click Apply. The following figure shows the Digital Signature subtab:
![]()
Copyright © 2004, 2008, Oracle and/or its affiliates. All rights reserved.