 Understanding the Management of Direct Reports
This chapter provides an overview of managing direct reports, and discusses how to:
View direct reports personal information.
Change part-time or full-time status.
Change reporting managers.
Change work locations.
Promote employees.
Retire employees.
Terminate employees.
Transfer employees.
Change jobs requiring Works Council approval.
Understanding the Management of Direct ReportsThis section provides an overview of eProfile Manager Desktop transactions, prerequisites, and the process flow for these transactions.
 eProfile Manager Desktop Transactions
Managers can use the following eProfile Manager Desktop transactions to:
View a direct report's information on one page.
Change an employee's status to full-time or part-time.
Change an employee's reporting manager.
Assign an employee to another work location.
Promote an employee.
Initiate the employee retirement process.
Initiate the employee termination process.
Transfer an employee.
Request an employee job change that requires works council approval.
Process Flow for TransactionsMost of the transactions can be configured to either:
Use an approval process.
Automatically update the database.
Send notifications to an administrator.
The following table lists each of the self service transactions and the features that can be configured for each:
|
Transaction |
Use Approval Process |
Automatic Database Update |
Send Notifications |
|
Change Full/Part Time Status |
No |
Yes |
Yes |
|
Change Reporting Managers |
Yes |
Yes |
Handled by approval process. |
|
Change Work Locations |
No |
Yes |
Yes |
|
Promote Employees |
Yes |
Yes |
Handled by approval process. |
|
Retire Employees |
No |
Yes |
Yes |
|
Terminate Employees |
No |
Yes |
Yes |
|
Transfer Employees |
Yes |
Yes |
Handled by approval process. |
|
View Employees' Information |
Not Applicable |
Not Applicable |
Not Applicable |
|
Change Jobs (Works Council) |
Not Applicable |
Not Applicable |
Not Applicable |
The following diagram illustrates the basic process flow that the self-service transactions uses:
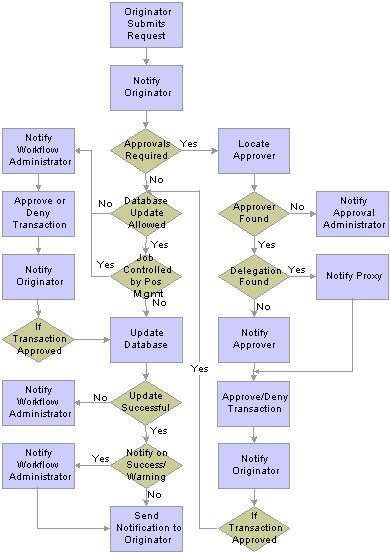
Basic process flow for self-service transactions
There are four main sections to this process flow:
A request is submitted.
The request uses an approval process.
The request allows automatic updates to the database.
The request doesn't allow automatic updates to the database.
When a manager submits a request, an email notification confirming that the request was successfully submitted maybe sent to the manager. The following table lists the eProfile Manager Desktop transaction, the criteria that determines whether a notification is sent, and the template that is used:
|
Transaction |
Criteria |
Template |
|
Change Full/Part Time Status Change Location Retire Employee Terminate Employee |
Notify - on Submit check box is selected on the System Workflow Rules page. |
|
|
Promotion Transfer |
Handled by approval process. The email that is sent depends on is determined by the following conditions:
|
For requests that:
|
|
Reporting Change |
Handled by approval process. The email that is sent depends on is determined by the following conditions:
|
For requests that:
|
Approvals apply only to the Change Reporting Manager, Promote Employee, and Transfer Employee transactions. PeopleSoft delivers the following approval process IDs that are set up using the Register Transactions (PTAF_TXN) component.
ReportingChgEmployee
PromoteEmployee
TransferEmployee
When approvals are required, the system uses the following rules to identify the approving manager:
For promotions and transfers, the originator must select a promotion or transfer method. If the method is By Position, the Reports To field on the Job Code page determines the approving manager. If the method is By Job Title/Department, the Supervisor ID field on the Job Code page for the new position determines the approving manager.
For reporting changes, the Supervisor ID corresponding to the reporting change determines the approving manager.
Note. If an approving manager cannot be found, AWE automatically routes the transaction to any person who is in the administrator role listed on the process definition.
Once the approving manager is determined, the system checks to see if a proxy is active for the manager. If so, that proxy becomes the approving manager. A notification is sent to either the approving manager or the proxy that states there is a request that requires his or her attention.
|
For |
Template |
|
Promote Employee Transfer Employee |
HR_APPROVAL_REQUEST_SINGLE_EE |
|
Reporting Change |
HR_ APPROVAL_REQUEST_MULTI_EE |
The approving manager either approves or denies the request. If the manager approves the request, the following notification is sent to the originator stating that the request has been approved.
|
For |
Template |
|
Promote Employee Transfer Employee |
HR_STEP_APPROVAL_SINGLE_EE |
|
Reporting Change |
HR_STEP_APPROVAL_MULTI_EE |
If the manager denies the request, the following notification is sent to the originator stating the request has been denied.
|
For |
Template |
|
Promote Employee Transfer Employee |
HR_STEP_DENY_SINGLE_EE |
|
Reporting Change |
HR_STEP_ DENY_REPCHG_EE |
You can add more approvers to the approval process, either by modifying the approval process using the 9.0 Approvals component.
See Setting Up and Working with Approvals.
The system checks to see if automatic updates to the database are allowed. If the Allow DB Update check box on the Self Service Workflow Configurations page is not selected, the system sends the following notification to the administrator stating the transaction requires their approval:
|
For |
Template |
|
Change Full/Part Status Change Location Retire Employee Terminate Employee |
|
|
Promote Employee Transfer Employee |
HR_ADMIN_APV_REQ_SINGLE_EE |
|
Reporting Change |
HR_ADMIN_APV_REQ_MULTI_EE |
If the administrator approves the transaction, the system sends the following email to the originator stating the request has been approved and applied to the database:
|
For |
Template |
|
Change Full/Part Status Change Location Retire Employee Terminate Employee |
|
|
Promote Employee Transfer Employee |
HR_ADMIN_APV_MANUAL_PROC_SINGL |
|
Reporting Change |
HR_ADMIN_APV_MANUAL_PROC_REPCH |
If the administrator does not approve the transaction, the system sends the following email to the originator stating the request has been denied:
|
For |
Template |
|
Change Full/Part Status Change Location Retire Employee Terminate Employee |
|
|
Promote Employee Transfer Employee |
HR_ADMIN_DENY_SINGLE_EE |
|
Reporting Change |
HR_ADMIN_DENY_REP_CHG_EE |
Database Updates Allowed
The system checks to see if automatic updates to the database are allowed. This processing occurs if the Allow DB Update check box on the Self Service Workflow Configurations page is selected.
If automatic updates are allowed, the system also checks to see if the transaction involves an employee whose job is controlled by position management. If the job is controlled by position management, an administrator must update the database. The following email notification is sent to the workflow administrator stating that a transaction requires his or her attention:
|
For |
Template |
|
Change Full/Part Status Change Location Retire Employee Terminate Employee |
|
|
Promote Employee Transfer Employee |
HR_MANUAL_PROC_REQ_SINGLE_EE |
|
Reporting Change |
HR_MANUAL_PROC_REQ_REPCHG_EE |
If the update to the database is a success, the system sends the following email to the originator:
|
For |
Template |
|
Change Full/Part Status Change Location Retire Employee Terminate Employee |
|
|
Promote Employee Transfer Employee |
HR_TRANSACTION_SAVED_SINGLE_EE |
|
Reporting Change |
HR_TRANSACTION_SAVED_MULTI_EE |
If the update to the database is a success, the system checks to see if the administrator needs to be notified. The system sends the following email, if the check boxes for Notify On Success or Notify on Warnings on the Admin Notification Setup page are selected, or if the system updated the database with a future dated row:
|
For |
Template |
|
Change Full/Part Status Change Location Retire Employee Terminate Employee |
|
|
Promote Employee Transfer Employee |
HR_CI_UPDATE_SUCCESS HR_CI_WARNINGS_SINGLE HR_CI_FUTURE_ROWS_EXIST |
|
Reporting Change |
HR_CI_UPDATE_SUCCESS_MULT HR_CI_WARNINGS_MULTI HR_CI_FUTURE_ROWS_EXIST_MULTI |
Prerequisites for Managing Direct Reports
Before you can use the eProfile Manager Desktop transactions you must:
Activate eProfile Manager Desktop on the Installation Table.
See Selecting PeopleSoft Applications for Your Installation.
Define position management on the HRMS Options page.
The position management setting determines whether automatic updates, by nonadministrators, are allowed for certain transactions. Automatic updates can only occur if position data is not affected.
Set up security.
eProfile Manager Desktop uses permission lists, roles, and user profiles to authorize or deny access to transactions and data. PeopleSoft delivers the following permission lists and roles for eProfile Manager Desktop:
|
Permission Lists |
Roles |
|
HCCPSS2000 |
Manager |
|
HCCPFE2000 |
Manager Self-Service - Fed |
|
HCCPFE1060 |
Personal Info-Employee - Fed |
Note. Remember to enter an email address for each user profile, otherwise, email routings used by workflow will not work.
Define whether a transaction uses an approval process.
You can activate an approval process for the Promote Employee, Reporting Change, and Transfer Employee transactions using the Self Service Workflow Configurations page. If the system identifies that an approval process is used by a transaction, the HCM Approval Framework for the transaction is followed. PeopleSoft delivers the PromoteEmployee, TransferEmployee, and ReportingChgEmployee approval processes.
Define if a transaction automatically updates the database.
Use the Self Service Workflow Configurations page to define whether the transaction will update the database without an administrator's intervention.
Link the self-service transaction to the approval process ID in the Approved Workflow Engine Transaction grid on the Workflow Transaction page.
PeopleSoft delivers the PromoteEmployee, ReportingChgEmployee, and TransferEmployee approval processes already linked to their appropriate self-service transaction.
Define rules for workflow notifications.
Workflow can be set up to notify the administrator when a transaction successfully updates the database and when the system detects a warning with the update.
Set up the manager's data access to their direct reports.
eProfile Manager Desktop uses access types to control a manager's access to employee data. Normally, the manager who initiates a transaction can only view data for his or her direct reports. Access types enable the system to determine who reports to the initiating manager.
Note. This does not apply to the Promote Employee, Reporting Change, and Transfer Employee transactions.
Viewing Direct Reports' Personal Information
This section provides an overview of viewing personal information and lists the pages used to view employees' personal information
Understanding View Personal Information
The View Personal Information transaction enables managers to view information about their direct reports. The View Employee Personal Information page displays basic job information and provides links to other information such as:
Email addresses.
Phone numbers.
Emergency contacts.
Accomplishments and competencies.
Pages Used to View Personal Information|
Page Name |
Object Name |
Navigation |
Usage |
|
HR_DR_ADDL_INFO |
Manager Self Service, Job and Personal Information, View Employee Personal Info, View Employee Personal Information |
Enter the date to use to view the information. |
|
|
View Employee Personal Information |
HR_DR_SELECT_EMPS |
Click theContinue button on the View Employee Personal Information page. |
Select the employee whose information you want to review. |
|
HR_EE_INF_HOME |
Click the Continue button on the View Employee Personal Information page. |
View job information for a specific direct reports. |
|
|
HR_EE_PHOTO |
Click the Photo button on the Employee Information page. |
View a photo of the employee. |
|
|
HR_EE_ADDRESS_MGR |
Click the Home and Mailing Addresses link on the Employee Information page. |
View the employee's home and mailing address information. |
|
|
HR_EMAIL_ADDRESSES |
Click the Email Addresses link on the Employee Information page. |
View the employee's home and mailing address information. |
|
|
HR_PERSONAL_PHONE |
Click the Phone Numbers link on the Employee Information page. |
View the employee's phone numbers. |
|
|
HR_EMERGENCY_CNTCT |
Click the Emergency Contacts link on the Employee Information page. |
View the employee's emergency contact information. |
|
|
HR_EE_BIRTHDATE |
Click theBirthday link on the Employee Information page. |
View the employee's birthdate information. |
|
|
HR_MEMBERSHIPS |
Click theMemberships link on the Employee Information page. |
View the employee's membership information. |
|
|
HR_MEMBER_DETAIL |
Click the organization link on the Memberships page. |
View details of the organizational membership. |
|
|
HR_HONORS_AWARDS |
Click the Honors and Awards link on the Employee Information page. |
View the employee's honors and award information. |
|
|
HR_HONOR_DETAIL |
Click the honor/award link on the Honors and Awards page. |
View details of the honor or award. |
|
|
HR_COMP_SUMMARY |
Click the Competencies link on the Employee Information page. |
View the employee's competency information. |
|
|
HR_LANGUAGES |
Click the Languages link on the Employee Information page. |
View the employee's language information. |
|
|
HR_LANGUAGE_DETAIL |
Click the language link on the Languages page. |
View details of the employee's proficiency in the selected language. |
|
|
HR_TRN_SUMMARY |
Click the Training link on the Employee Information page. |
View the employee's internal and professional training information. |
|
|
HR_TRN_CRSDESC |
Click the course name link on the Training page. |
Review the course description. |
|
|
HR_EDUCATION |
Click the Education link on the Employee Information page. |
View the employee's education information. |
|
|
HR_EDUCATION_DET |
Click the degree link on the Education page. |
View the details of the employee's degree. |
|
|
HR_LIC_CERT |
Click the Licenses and Certificates link on the Employee Information page. |
View the employee's license and certificate information. |
|
|
HR_SS_MG_COMP_HIST |
Click the Compensation History link on the Employee Information page. |
View the employee's salary, variable cash, and variable noncash information. |
|
|
ST_GRANT_SUMM_MGR |
Click the Review Employee Options link on the Compensation History page. |
View the employee's stock option information. |
|
|
HR_SS_TC_MG_REVIEW |
Click the Total Compensation link on the Employee Information page. |
View the employee's total compensation information. |
Changing Full-Time or Part-Time StatusThis section provides an overview of part-time or full-time status changes and lists the pages used to change part- or full-time status.
Understanding Changing Full-Time or Part-Time Status
PeopleSoft provides the Change Full/Part Time Status transaction that enables managers to change employees from part-time status to full-time status and back. To change the full or part-time status, managers
Access the Change Full/Part Time Status page.
Enter the effective date for the change and click the Continue button.
Select the employee and click the Continue button.
You may select more than one employee.
Select the new status and click the Submit button.
Once the Submit button is clicked, the system proceeds according the parameters that have set up for Retire Employees.
See Understanding the Management of Direct Reports.
Pages Used to Change Part- or Full-Time Status
|
Page Name |
Object Name |
Navigation |
Usage |
|
HR_DR_ADDL_INFO |
Manager Self Service, Job and Personal Information, Change Full/Part Time Status |
Enter the effective date for the change. |
|
|
Change Full/Part Time Status |
HR_DR_SELECT_EMPS |
Click the Continue button on the Change Full/Part Time Status page. |
Select the employee whose status you want to change. |
|
HR_MGR_FULL_PART |
Click theContinue button on the Change Full/Part Time Status page. |
Initiate the request to change an employee's status to full or part-time. |
|
|
EO_SUBMIT_CONFIRM |
Click the Submit button on the Full/Part Time Status Change page. |
Confirms the request was successfully submitted. |
Changing Reporting Managers
This section provides an overview of change reporting managers and list the pages used:
Understanding Changing Reporting Managers
PeopleSoft provides three transactions to facilitate the changing of an employee's reporting manager:
Request Reporting Change.
Approve Reporting Change.
View Reporting Change Status.
Requesting a Reporting Change
To request a change in an employee's reporting manager, managers:
Access the Reporting Change page.
Enter the effective date for the change and click the Continue button.
Click the check box next to the name of the employee or employees for which the change is to be made and click the Continue button.
Select the new Supervisor or Department ID and click the Submit button.
Approving a Reporting Change
To approve a request:
Access the Select a Reporting Change Request page.
Select the reporting change you want to approve.
Enter a comment relevant to the approval or denial of the request.
Click the Approve or Deny button.
Viewing a Reporting Change Status
To view the status of a reporting change request:
Access the Select a Reporting Change Request page.
Select the transaction you want to view.
Pages Used to Change Reporting Managers
|
Page Name |
Object Name |
Navigation |
Usage |
|
HR_DR_ADDL_INFO |
Manager Self Service, Job and Personal Information, Request Reporting Change, Reporting Change |
Enter the effective date for the change. |
|
|
Reporting Change |
HR_DR_SELECT_EMPS |
Click the Continue button on the Reporting Change page. |
Select the employee whose reporting you want to change. |
|
Reporting Change |
HR_MGR_REPORT_CHNG |
Click the Continue button on the Reporting Change page. |
Select the ID of the new manager. |
|
HR_MGR_REP_APPR_L |
Manager, Self Service, Job and Personal Information, Approve Reporting Change, Select a Reporting Change Request |
Select the transaction to approve or deny. |
|
|
HR_MGR_REPORT_CHNG |
Click the transaction number link on the Select a Reporting Change Request page. |
Approve or deny the request. View the status of reporting change requests that you have submitted. |
|
|
HR_REPORT_CONFIRM |
Click the Approve and Deny button on the Reporting Change Details page. |
Confirms the request was successfully submitted. |
|
|
HR_MGR_REP_VW_L |
Manager Self Service, Job and Personal Information, View Reporting Change Status, Select a Reporting Change Request |
Select the transaction to view. |
Changing Work Locations
This section provides an overview of the changing work locations process and lists the pages used:
Understanding Changing Work Locations
PeopleSoft provides the Request Location Change transaction that enables managers to initiate the work location change process. To change the work location for an employee, managers
Access the Location Change page.
Enter the effective date for the change and click the Continue button.
Select the employee and click the Continue button.
You may select more than one employee.
Select the new location and click the Submit button.
Once the Submit button is clicked, the system proceeds according the parameters that have set up for Retire Employees.
See Understanding the Management of Direct Reports.
Pages Used to Change Locations
|
Page Name |
Object Name |
Navigation |
Usage |
|
HR_DR_ADDL_INFO |
Manager Self Service, Job and Personal Information, Request Location Change |
Enter the effective date for the change. |
|
|
Location Change |
HR_DR_SELECT_EMPS |
Click theContinuebutton on the Location Change page. |
Select the employee whose location you want to change. |
|
Change Location |
HR_MGR_LOCATION |
Click the Continuebutton on the Location Change page. |
Initiate the request to change the employee's location. |
|
Submit Confirmation |
EO_SUBMIT_CONFIRM |
Click the Submit button on the Change Location page. |
Confirms the request was successfully submitted. |
Promoting EmployeesThis section provides an overviews of employee promotions, promoting employees, approving promotions, and viewing promotion status, and list the pages used for employee promotions.
Understanding Employee Promotions
PeopleSoft provides three self-service transactions to facilitate employee promotions:
Promote Employees, which enables managers to submit a promotion request.
Approve Promotion, when enables approving managers to either approve or deny the request.
View Promotion Status, which enables managers to review where the request stands in the approval process.
Requesting a Promotion
To request an employee's promotion, managers:
Access the Promote Employee page.
Enter the effective date and click the Continue button.
Select the employee or employees to promote and click the Continue button.
Enter the reason for the promotion and the promotion method, and click the Submit button.
If position management is set to None, then the only promotion method allowed is By Job Title/Department. If position management is set to Full, then By Position is the only promotion method allowed.
Approving a Promotion
To approve a promotion, the approving manager or proxy:
Access the Approve Promotion page.
Click the Approve or Deny button.
To add an approver, click the (+) plus button and select the approver from the list.
Click the Submit button.
Viewing a Promotion Status
To view the status of an employee's promotion:
Access the Select a Transaction page.
Select the transaction you want to view.
Pages Used to Promote Employees|
Page Name |
Object Name |
Navigation |
Usage |
|
HR_DR_ADDL_INFO |
Manager Self Service, Job and Personal Information, Promote Employee |
Enter the effective date of the promotion. |
|
|
Promote Employee |
HR_DR_SELECT_EMPS |
Click the Continue button on the Promote Employee page. |
Select the employee to promote. |
|
Promotion Details |
HR_PROMOTE_EE |
Click the Continue button on the Promote Employee page. |
Request a promotion for one of your direct report employees. |
|
HR_PROMOTE_APPR_L |
Manager Self Service, Job and Personal Information, Approve Promotion |
Approve or deny a request to promote an employee. |
|
|
HR_PROMOTE_VW_L |
Manager Self Service, Job and Personal Information, View Promotion Status |
View the status of an employee's promotion request that you have submitted. |
Retiring EmployeesThis section provides an overview of retiring employees and list the pages used to retire employees.
Understanding Retiring Employees
PeopleSoft provides the Retire Employee transaction that enables managers to initiate the retirement process. To retire an employee, managers
Access the Retire Employee page.
Enter the effective date for the retirement and click the Continue button.
Select the employee to retire and click the Continue button.
Enter the reason for the retirement and click the Submit button.
Once the Submit button is clicked, the system proceeds according the parameters that have set up for Retire Employees.
See Understanding the Management of Direct Reports.
Pages Used to Retire Employees|
Page Name |
Object Name |
Navigation |
Usage |
|
HR_DR_ADDL_INFO |
Manager Self Service, Job and Personal Information, Retire Employee |
Enter the effective date for the retirement. |
|
|
Retire Employee |
HR_DR_SELECT_EMPS |
Click theContinue button on the Retire Employee page. |
Select the employee to retire. |
|
Retire Employee |
HR_RETIRE_EE |
Click the Continue button on the Retire Employee page. |
Initiate the retirement process for one of your direct reports. |
|
Submit Confirmation |
EO_SUBMIT_CONFIRM |
Click the Submit button on the Retire Employee page. |
Confirms the request was successfully submitted. |
Terminating Employees
This section provides an overview of terminating employees and lists the pages used:
Understanding the Terminating Employees Process
PeopleSoft provides the Terminate Employee transaction that enables managers to initiate the termination process. To terminate an employee, managers
Access the Terminate Employee page.
Enter the effective date for the termination and click the Continue button.
Select the employee to terminate and click the Continue button.
Enter the reason for the termination and click the Submit button.
Once the Submit button is clicked, the system proceeds according the parameters that have set up for Terminate Employees.
See Understanding the Management of Direct Reports.
Pages Used to Terminate Employees
|
Page Name |
Object Name |
Navigation |
Usage |
|
HR_DR_ADDL_INFO |
Manager Self Service, Job and Personal Information, Terminate Employee |
Enter the effective date for the termination. |
|
|
Terminate Employee |
HR_DR_SELECT_EMPS |
Click the Continue button on the Terminate Employee page. |
Select the employee to terminate. |
|
Terminate Employee |
HR_EE_TERMINATE |
Click theContinue button on the Terminate Employee page. |
Initiate the termination process for one of your direct reports. |
|
Submit Confirmation |
EO_SUBMIT_CONFIRM |
Click the Submit button on the Terminate Employee page. |
Confirms the request was successfully submitted. |
Transferring Employees
This section provides an overview of transferring employees and list the pages used:
Understanding Changing Reporting Managers
PeopleSoft provides three transactions to facilitate the changing of an employee's reporting manager:
Transfer Employee
Approve Transfer
View Transfer Status
Transferring an Employee
To request an employee transfer:
Access the Transfer Employee page.
Enter the effective date for the transfer and click the Continue button.
Select the employee to transfer and click the Continue button.
Enter the detail information about the transfer and click the Submit button.
Approving a Transfer
To approve an employee transfer:
Access the Select a Transaction page.
Select the transaction you want to approve or deny.
Click the Approve or Deny button.
Viewing a Transfer Status
To view an employee transfer:
Access the Select a Transaction page.
Select the transaction you want to view.
Pages Used to Transfer Employees
|
Page Name |
Object Name |
Navigation |
Usage |
|
HR_DR_ADDL_INFO |
Manager Self Service, Job and Personal Information, Transfer Employee, Transfer Employee |
Enter the effective date for the transfer. |
|
|
Transfer Employee |
HR_DR_SELECT_EMPS |
Click theContinue button on the Transfer Employee page. |
Select the employee to transfer. |
|
HR_TRANSFER_EE |
|
Request a transfer for one of your direct report employees. View summary information for submitted transfers. Approve or deny a transfer. |
|
|
Submit Confirmation |
HR_TRANSFER_CONFRM |
Click theSubmit button on the Transfer Details page. Click the Approve or Deny button on the Transfer Details page. |
Confirms the request was successfully submitted. |
|
HR_TRANSFER_APPR_L |
Manager Self Service, Job and Personal Information, Approve Transfer, Select a Transaction |
Select a transaction to approve or deny. |
|
|
Select a Transaction |
HR_TRANSFER_VW_L |
Manager Self Service, Job and Personal Information, View Transfer Status |
Select a transfer transaction to view. |
Changing Jobs Requiring Works Council Approval
This section provides an overview requesting job changes requiring Works Council approval and lists the pages used:
Understanding Job Changes
The Request Job Change transaction is the self-service transaction that works with Manage Labor Administration. Managers use this transaction to enter the regulatory region, action code, and reason for the action. The HR Administrator is notified and reviews the request. If the HR Administrator approves the request, the Works Council is notified.
Managers can use the Review Job Change Request transaction to see the status of the request.
See Requesting Works Councils Approval.
Pages Used to Change Jobs
|
Page Name |
Object Name |
Navigation |
Usage |
|
WC_JCR_SEARCH |
Manager Self Service, Job and Personal Information, Request Job Change |
Enter the required data and initiate the job change request. The Job Change Request page requires different data entry depending on the type of request—either hire, transfer or termination. |
|
|
WC_JCR_STATUS_INQ |
Manager Self Service, Job and Personal Information, Review Job Change Request |
Review Job Change requests. |
|
|
WC_JCR_STATUS2_INQ |
Workforce Administration, Job Information, Review My Job Change Request |
Review the status of a job change request requiring Works Councils approval. |
|
|
WC_JCR_APPR_INQ |
Workforce Administration, Labor Administration, Job Change Request Approval |
Mass-approve job change requests. |