JRockit Management
Console User Guide
(JRockit 5.0 R26)
Using the BEA JRockit Management Console
To help you navigate in the Management Console, there are several information tabs (the number of tabs depends on which mode of operation you are using, see Developer Mode). You can also customize the display to fit your personal preferences. This section contains information on the following subjects:
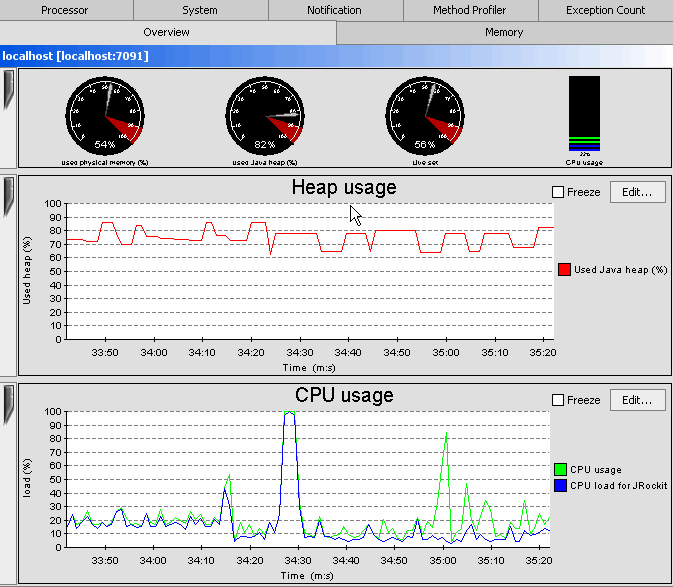
The Overview tab (Figure 6-1) shows a summary of selected connections. To select more than one connection, select the folder containing the connections you want to view. They will appear simultaneously. The page is divided into a “dashboard” with gauges in the upper part and graphs in the lower part.
Note:
The figure shows the Overview tab when the console is connected to JRockit, see Creating a New Connection.
Figure 6-1 Overview Tab
The Used physical memory gauge shows the percentage of occupied physical memory on the computer.
The Used Java heap gauge shows the percentage of occupied Java heap memory in the VM.
The CPU usage gauge shows the usage rate of the processor—or the average processor load—on a multi-processor machine.
The Heap usage chart shows the percentage of used Java heap over time.
The CPU usagechart shows the average usage rate of the processor(s) over time.
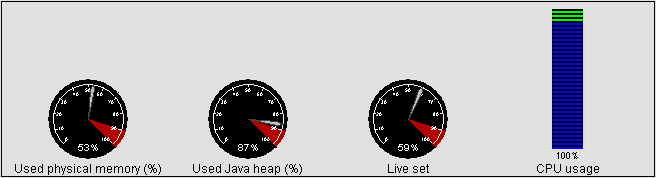
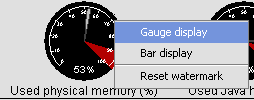
The gauges and bars are graphical devices showing memory and processor usage (Figure 6-2).
Figure 6-2 Gauges and Bars
To change from a gauge display to a bar display, right-click when pointing at the gauge and select Bar display, as shown in Figure 6-3.
Figure 6-3 Gauge Context Menu (Bar Display Selected)
The selected gauge will appear as a bar (Figure 6-3).
To change back to a gauge, repeat the above, but select Gauge display.
To reset the watermark—which indicates the highest level measured so far—right-click when pointing at the gauge or bar and click Reset Watermark.
Customizing Graphs
Graphs appear on the Management Console to show specified information about BEA JRockit.
To change a graph timeline on any of the charts, right-click the graph and choose: Show Hours, Show Minutes, or Show Seconds.
To hide a graph click the vertical tab at the left of the diagram you want to hide. When the diagram is hidden, the tab appears horizontally.
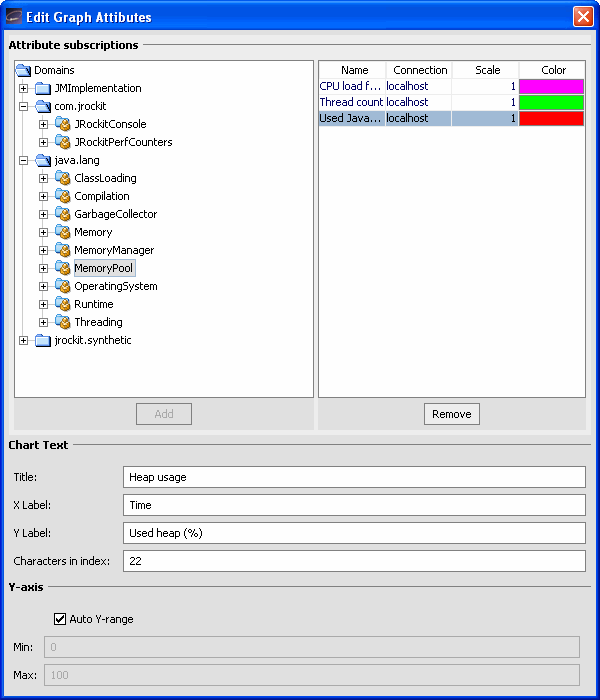
To view more graph attributes, click the Edit button, the Edit Graph Attributes window appears (see Figure 6-4).
Figure 6-4 The Edit Graph Attributes window
Changing Graph Attributes
Click Edit. The Edit Graph Attributes window appears (see Figure 6-4).
In this window, you can do the following:
Add attribute subscriptions to a graph. Highlight the attribute subscription and click Add.
Change color of an active attribute subscription.
Remove an attribute subscription. Highlight the attribute subscription and click Remove.
Change the texts, such as the title of the graph, the X and Y labels, and the number of characters in the index name.
Set the Y-axis to an auto range, which is useful if you have attributes plotted over a wide spectra.
Close the window when you are done with the settings.
If you have trouble seeing all attributes on a graph, try to rescale the attribute in the Edit Graph Attribute window.
Monitoring Memory Usage
The Memory tab (Figure 6-5) shows information about the memory status of the system, as shown.
Figure 6-5 Memory Tab
The Used physical memory gauge shows the percentage of machine memory in use.
The Used Java heap gauge shows the percentage of occupied Java heap.
The Heap usage chart shows the percentage of occupied heap over time. In this example, you can see that the JVM performs a garbage collections when the cure dips.
At the bottom of the page the following text information is displayed (in kilobytes):
Used heap shows the size of the used Java heap.
Free heap shows the free Java heap size.
Total heap shows the size of the entire Java heap.
Used memory shows the amount of occupied physical memory.
Free memory shows the amount of free physical memory.
Total memory shows the total physical memory size.
Total nursery shows the amount of the physical memory that is used for the nursery (only visible when running a generational garbage collector)
To study the graph a bit closer, you can freeze the monitoring by selecting Freeze.
Memory Tab Functionality
You can manipulate certain memory aspects of the JVM from the Memory Tab. These aspects are described in Table 6-1.
Table 6-1 Memory Tab Functionality
Function
Procedure
Manipulating the heap size
You can manipulate the heap size in any of the following ways:
Reset the size of your heap by entering a numeric value in the New heap size field and click Change heap size. The size set here, expressed in megabytes, represents the current heap size, not the maximum heap size.
Make the current size the maximum heap size by selecting lock heapsize.
If you want to exit the JVM when JRockit encounters an Out of memory (OOM) error, select Exit on OOM.
Changing the nursery size
If you are running a generational garbage collector, you can reset the nursery size by typing a new value in New nursery size and click Change nursery size. This action is not setting the nursery size to exactly the size you specify, it only tries to get as close as possible to the value.
Note:
If you are not running a generational collector, these fields are disabled.
To study the graph a bit closer, you can freeze the monitoring by selecting Freeze.
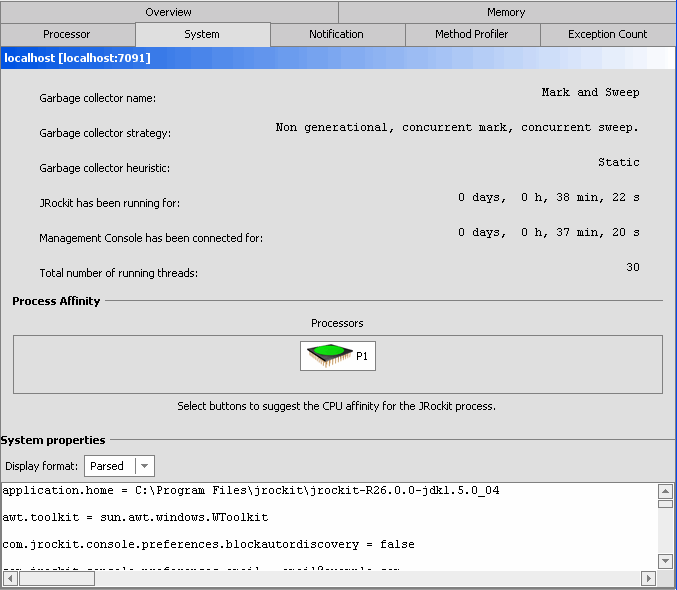
Viewing Information about JRockit
The System tab (Figure 6-7) shows various information about the system status.
Figure 6-7 System Tab
Garbage collector name shows which garbage collector the BEA JRockit JVM is running. If you are using the default dynamic garbage collector (-Xgcprio), the garbage collector name changes during the run of the JVM.
To learn more about garbage collection, please see the Memory Management Guide.
Garbage collector strategy shows which strategy the garbage collector used for the latest collection.
Garbage collector heuristics shows which heuristics the garbage collector used for the latest collection.
JRockit has been running for shows how long BEA JRockit has been running.
Management Console has been connected for shows how long the currently displayed connection has been connected.
Total number of running threads shows the number of active threads at any given time in the application run.
Process affinity contains buttons that correspond to processors. It displays a green icon if BEA JRockit is running on this processor and a red icon if it is not. By clicking on a processor, the BEA JRockit process can be bound to one or more processors. JRockit might be released from such a connection by deselecting the button again. This is only a suggested affinity, which means that the operating system might not follow the suggestion.
Note:
A question mark is displayed until the processor information has had time to be displayed. If you cannot see the information right away, please check back later.
Changing the process affinity is a feature that is only available when monitoring a JRockit instance running on the Windows platform. The Process Affinity display is only activated when the Management Console is in the Developer mode, described in Mode of Operation.
System properties shows which Java system properties that are loaded in the VM.
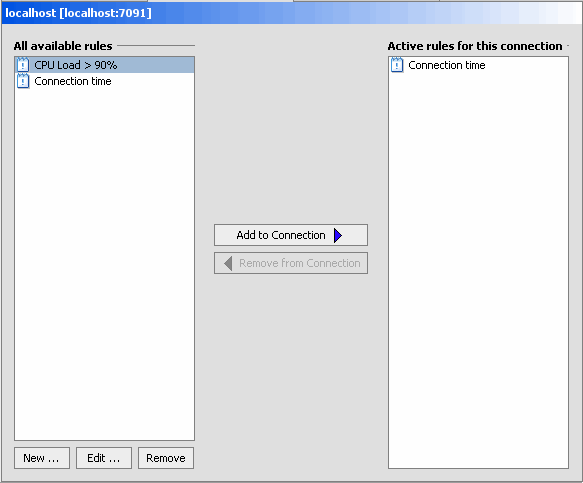
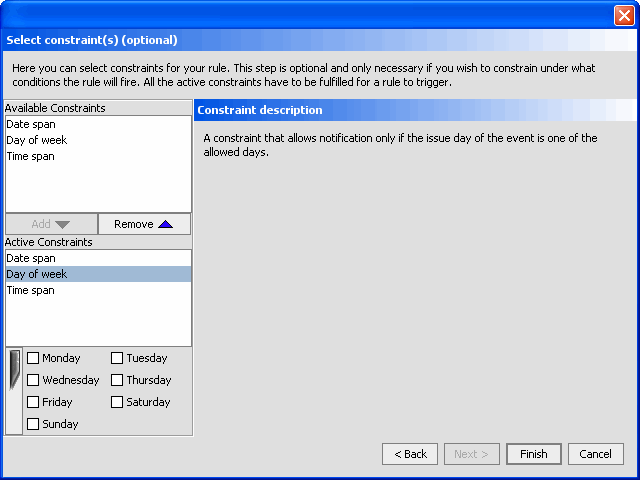
Viewing and Creating Custom Alerts and Notifications
The Notification tab (Figure 6-8) lists all available rules for the alerts that you have created; the active rules for the specific connection are listed under Active rules for this connection (the right pane). When you start using the Management Console, the list of available rules is empty. When you exit the Management Console, the rules that you have created are saved in the console settings file (see Console Settings File). You create your own notification rules by combining an attribute subscription with a trigger, with optional constraints. The trigger alerts you with a prescribed notification (see Creating a New Rule) as soon as the rule option is met.
Figure 6-8 Notification Tab (Rules Defined)
You can programatically create custom notification actions and constraints, which are also stored in the console settings file. Once added, these actions and constraints will also appear on the Notification tab of the Management Console. This document does not cover how to do that.
About Notification Triggers
A notification trigger can be a certain event, for example, that the connection to BEA JRockit JVM was lost, or that an attribute reaches a certain value, for example, the used memory reaches 90%. A notification constraint can limit when a rule is triggered; for example, by not sending alerts at night or on certain dates.
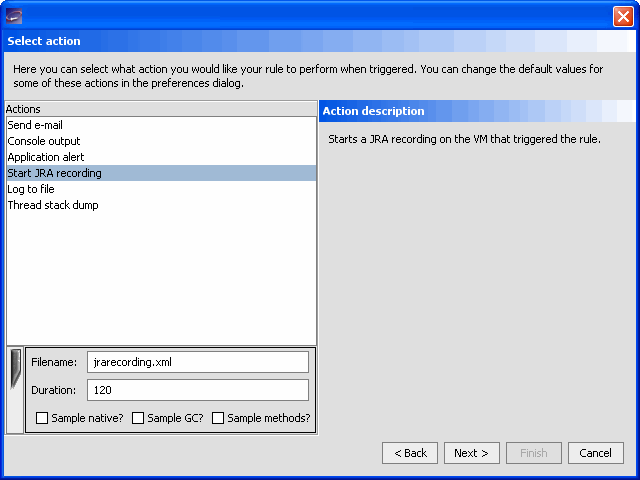
The notification action is how the alert is communicated to the user. It can be one of the following:
E-mail shows an e-mail when the notification is sent to the specified address by using the specified SMTP server.
System out action displays the notification in the command window where you started the BEA JRockit Management Console.
Application alert displays the notification in an alert dialog in the Management Console.
Log to file logs the notification to the specified file.
Creating a New Rule
Select the Notification tab.
Click New.
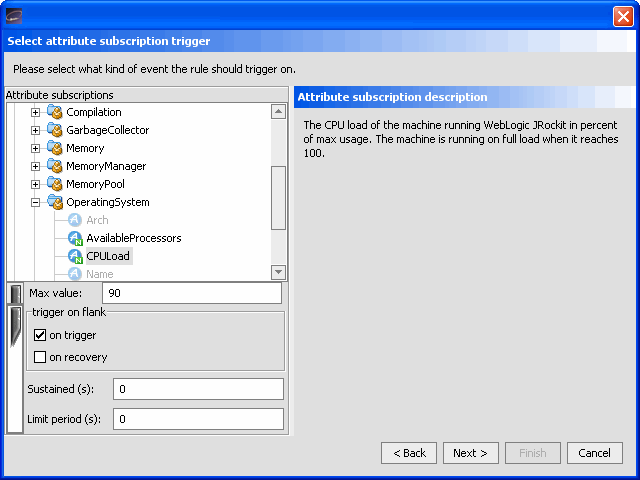
The Select attribute subscription trigger dialog appears (Figure 6-9):
Figure 6-9 Select Trigger Dialog
Select a trigger (the individual triggers are described to the right in the window).
Enter a threshold in Max value below the trigger list (not required for all triggers).
Set a trigger flank:
on trigger triggers the notification when the attribute reaches the trigger value from a lower value (for example, if the trigger is 80 and the attribute value goes up from a lower value, the trigger will set off).
on recovery triggers the notification when the aspect reaches the trigger value from a higher value (for example, if the trigger is 80 and the attribute value goes down from a higher value, the trigger will set off).
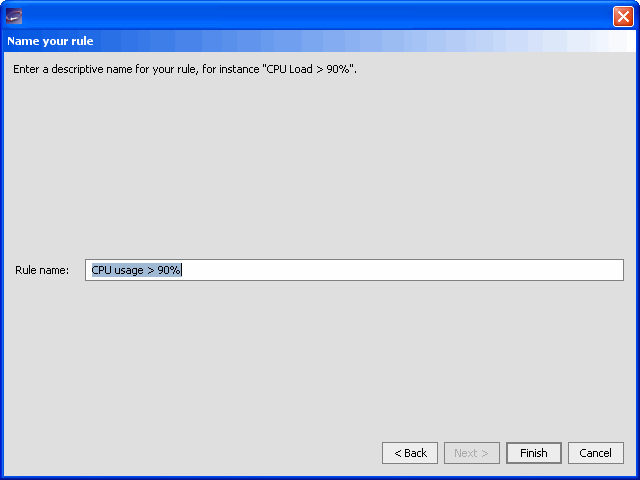
Type in a descriptive name for the rule and click Finish.
The new rule appears in the All available rules list on the Notification tab, as shown in Figure 6-8. If you want to use the rule for your connection, add it as described in Using a Rule to Monitor a Connection.
Creating Your Own Notification Actions and Constraints
The rule appears in the Active rules for this connection list, as shown in Figure 6-13.
Figure 6-13 Rule Added to Active rules for This Connection List
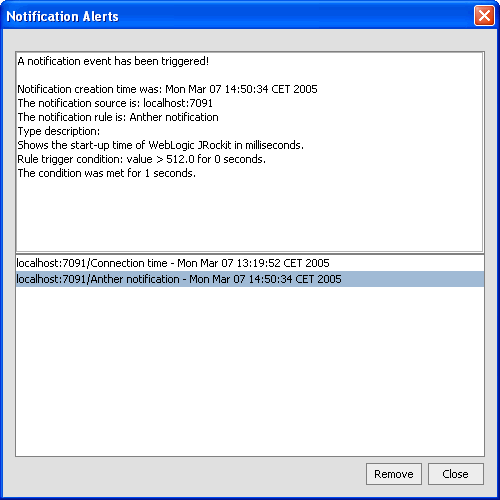
Viewing a Notification Alert
Click View > Notification Alert.
A Notification Alerts window appears (see Figure 6-14 for an example of an alert that was sent to the application):
Figure 6-14 Notification Alert Sent to Application
Select the notification, from the bottom half of the Notification Alerts window, you want to view.
In the Notification Alerts window you can view how the notification was triggered, when, for how long the condition was met, etc.
Click Close to close the window or Remove if you want to delete the selected alert.
Note:
The application alerts are not saved when you exit the Management Console.
Removing a Rule from a Connection
Select the rule, in the Active rules for this connection list, you want to stop using.
Click Remove from Connection.
The rule now only appears in the Active rules for this connection list.
Removing a Rule from the Available Rules List
Select the rule to be removed from the All available rules list.
Click Remove.
A removal confirmation dialog box appears.
Click Yes.
The rule disappears from the All available rules list.
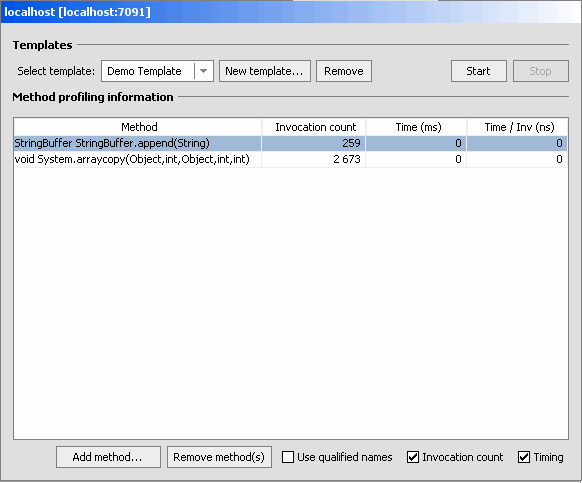
Getting Method Profiling Data
The Method Profiler tab (see Figure 6-15) contains templates that allows you to monitor method execution in a non-intrusive way. Method profiling can provide information about the average time spent in selected methods and the number of times methods are invoked. A template is a collection of different monitoring methods (the Management Console is shipped with a Demo Template). The template settings are stored in the console settings file (see Console Settings File) and can be used with all connections.
Figure 6-15 Method Profiler tab
By creating your own method templates, you get a powerful tool to monitor you running application’s methods and find out where in the code you might have glitches.
Starting and Stopping a Method Profiling Template
From the Select template list, select the template you want to start.
If you have not created a template yet, you can start the template called Demo Template.
Click Start or Stop.
The numbers in the Invocation count cells for each method begin to increment as method calls are made. If you select Stop, this activity will cease.
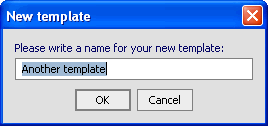
Creating a New Method Profiling Template
Click New template.
The New template dialog box appears (Figure 6-16).
Figure 6-16 New Template Dialog Box
Type in a name for the new template in the text field.
Click OK.
You can now add methods to your own template.
Removing a Method Profiling Template
Select the template you wish to remove.
Click Remove.
A confirmation dialog box appears.
Click Yes.
Adding a Method to a Template
Select the template you wish to add methods to from the Select template list.
Click Add Method.
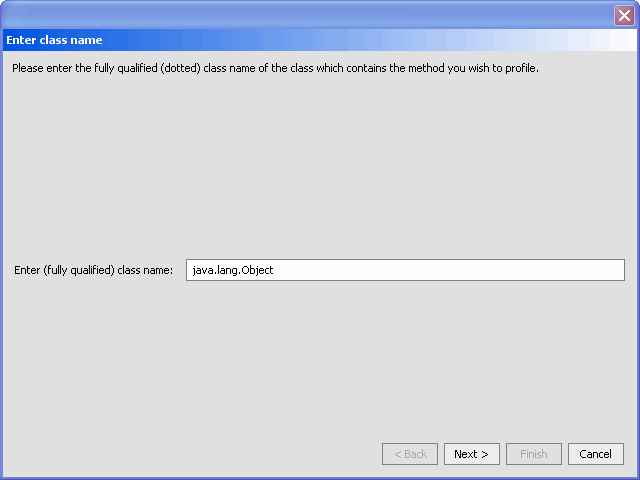
The Enter class name dialog appears (Figure 6-17).
Figure 6-17 Enter Class Name Dialog
Enter a fully qualified class name, for example, java.lang.Object in the text field and click Next.
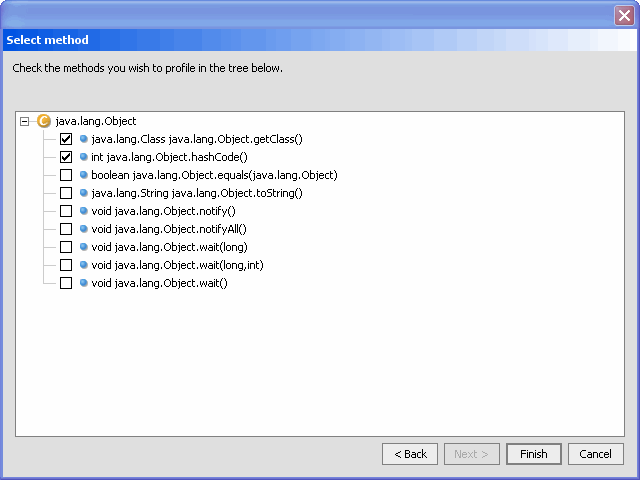
Select the methods to be added to the template and click Finish.
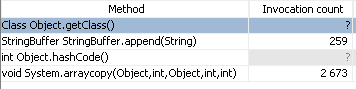
The method name will appear in the Method list for that template, as shown in Figure 6-19.
Figure 6-19 Method Profiling Information List with Method Added
Removing a Method from a Template
From the Select template list, select the template you want to modify.
From the Method list, select the method(s) to be removed from the template.
Click Remove Method(s).
Method Profiling Settings
You can switch between using qualified method names or short names in the method profiling table.
To enable invocation count, select the Invocation count checkbox at the bottom of the page.
To enable timing, select Timing at the bottom of the page.
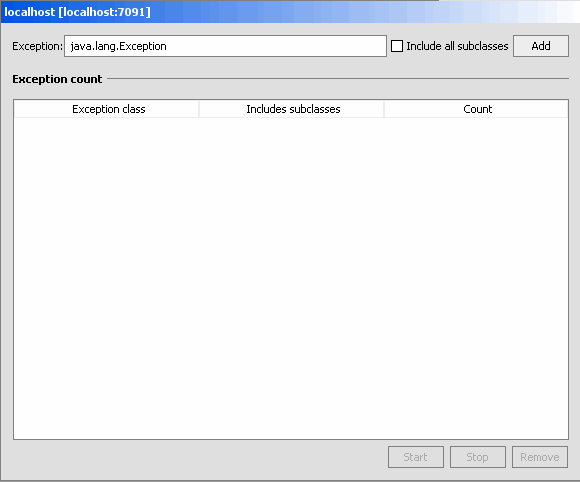
Counting Exceptions in BEA JRockit
The Exception Count tab (Figure 6-20) shows exceptions thrown in BEA JRockit JVM. It counts the number of exceptions of a certain type. This information is helpful when you are troubleshooting your Java application.
Figure 6-20 Exception Counting Tab
Adding an Exception
Enter the fully qualified name of the exception into the text field at the top of the page, e.g., “java.io.IOException”.
Choose whether or not all subclasses of that exception should be included in the count by selecting or deselecting the Include all subclasses checkbox.
Click Add. You can only add subclasses of java.lang.Throwable which are loaded in BEA JRockit JVM and you can only add exceptions while connected.
The exception should now be displayed in the table.
Starting, Stopping, and Removing an Exception Count
To start the exception count, click Start. The results should now appear next to the name of the exception being counted. Similarly, to stop the exception count, click Stop.
To remove an exception from the count, select the exception to be removed and click Remove.