

|
Before you start running and using the Management Console, it is a good idea to set up the different connections for the JVMs you want to view. The Management Console is best run remotely on a computer connected to the management server. That way the console is the least intrusive on the JRockit that is running in your system.
Configuring—or “setting up”—the Management Console includes these tasks:
The connection browser (Figure 4-2) displays a collection of saved connections to BEA JRockit JVMs organized in folders. If necessary, you can add your own folders and connection nodes to the tree structure.
The Add new connection dialog box (Figure 5-1) appears:
| Note: | If you have enabled auto discovery when you started the Management Console, you will see a list of all running JRockit instances under Server name (for more information see Auto Discovery Settings). |
The new folder appears in the connection browser (Figure 5-2).
Sometimes you only want to display information about the active BEA JRockit JVM connections. To hide information about disconnected connections:
To show the information about disconnected connections again, simply deselect Hide Disconnected in same way that you made the selection.
| Note: | If you have one connection only, it will be visible at all times. |
In the Ignore List you hide those connections that you do not want to access.
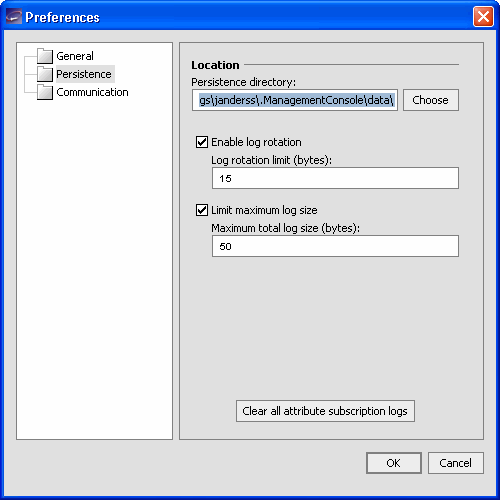
The Management Console has different preferences that can be set. These preferences are grouped into the following main groups: General, Persistence, and Communication (see Figure 5-3). The Communication preference is only visible in developer mode.
This section is divided into the following subsections:
The Preferences dialog box (Figure 5-3) appears.
The Management Console can be run in two different operating modes depending on the type of information you want to access:
In addition to setting the operation mode, you use General Preferences to change the following:
The Auto discovery option allows you to have the Management Console look for additional JRockit instances in your network. By leaving Block auto discovery messages unselected, the Management Console automatically searches for other JRockit instances in your network. The JRockits that are found will appear in the Server name drop down list in the Add New Connection window (see Figure 5-1).
The persistence directory is where the Management Console saves the persisted values of attributes (in the attribute subscription log). Values that are saved are, for example, any changes that you make to MBeans, i.e., name changes or such. The attribute subscription logs are saved upon exiting the Management Console. If there, for some reason, arises problems with the logs, you can clear the logs by deleting them and then have the Management Console create a new one for you (see Clearing All Attribute Subscription Logs).
When you enable log rotation, you can set a size on the persisted log. By doing so, you let the Management Console create a new log file as soon as the limit is reached. If you combine the log rotation setting with a setting for the maximum log size, you will enable full log rotation, i.e. the Management Console will delete the oldest log file as soon as the maximum log size limit is reached, and you will always know how much space the log files take on your computer.

The default location for the files are <User_Home>\.ManagementConsole\data\.
Every time you exit the Management Console, a new aspect value log is saved in the specified directory. It i not recommended to change these logs by hand.
| Note: | If you delete all persistence logs by clicking this button, you will also delete any other files stored in the <User_Home>\.ManagementConsole\data\. |
The possibility to change communication settings is on if you have set the Management Console to Developer mode (see Mode of Operation). The available communication setting is the default update interval.
For the Management Console to remember your specific settings, for example, your connections, it automatically creates a settings file when you exit. This file is called consolesettings.xml and is located in the folder:
<user home directory>\.ManagementConsole
The exact path to the user home directory will vary on different platforms. On Windows it is usually something like \Documents and Settings\<username>, for example:
C:\Documents and Settings\<username>\.ManagementConsole
If you do not currently see such a file in the above directory, one has probably not been created yet. As soon as you exit the Management Console one is created.
| WARNING: | Do not edit the settings file by hand! Doing so may cause the Management Console to crash on startup. |
If you are experiencing problems with the settings file, you can always delete it and let the Management Console create a new one for you.
The consolesettings.xml file is located in your home directory, under the \ManagementConsole folder. If you are using Windows, the path should be:
C:\Documents and Settings\<user_name>\ManagementConsole
(where <user_name> is the user name under which you are running the Management Console)
If you are using Linux, the path will normally be:
/home/<user_name>/ManagementConsole
(where <user_name> is the user name under which you are running the Management Console)


|