


|
|
The following sections provide information that you need to know before installing your Oracle software:
The installation program provides a complete framework for the installation and uninstallation of your entire Oracle software product, or individual components, as desired. You can install Oracle Enterprise Repository using one of the following options:
| Note: | Both options provide the same functionality; all installation procedures described in this document apply to both versions of the installation program. |
The following sections provide an overview on:
You can use the Oracle Products installation program in one of the following modes:
Graphical-mode installation is an interactive, GUI-based method for installing your software. It can be run on both Windows and UNIX systems. For installation procedures, see Running the Installation Program in Graphical Mode.
If you want to run graphical-mode installation, the console attached to the machine on which you are installing the software must support a Java-based GUI. All consoles for Windows systems support Java-based GUIs, but not all consoles for UNIX systems do.
| Note: | If you attempt to start the installation program in graphical mode on a system that cannot support a graphical display, the installation program automatically starts console-mode installation. |
Console-mode installation is an interactive, text-based method for installing your software from the command line, on either a UNIX system or a Windows system. For instructions for using this method, see Running the Installation in the Console Mode.
Silent-mode installation is a noninteractive method of installing your software that requires the use of an XML properties file for selecting installation options. You can run silent-mode installation in either of two ways: as part of a script or from the command line. Silent-mode installation is a way of setting installation configurations only once and then using those configurations to duplicate the installation on many machines. For information on running the installation program in the silent mode, see Running the Installation in the Silent Mode.
Using the Oracle Products installation program, you can install the following components on your system:
For additional information about:
Oracle Enterprise Repository manages the metadata for any type of software asset, from business processes and Web services to patterns, frameworks, applications, and components. It maps the relationships and interdependencies that connect those assets to improve impact analysis, promote and optimize their reuse, and measure their impact on the bottom line.
Oracle Enterprise Repository consists of the following subcomponents that can be installed on your system:
| Note: | You can specify whether or not you want to install the new Eclipse plug-ins for Oracle Enterprise Repository into a new Eclipse location or to use an existing Eclipse installation. For more information, see Using the Oracle Enterprise Repository Eclipse plug-in for Repository Access. |
You can download your software from the Oracle Web site at the Oracle Enterprise Repository Downloads page.
| Note: | You must register before you can download the installer. |
The following sections specify the installation prerequisites:
The system requirements for your installation are given in the following table.
A supported configuration of hardware, operating system, application server, JDK, and database is required. See
Oracle Products Supported Configurations.
|
|
The Oracle Products installation program requires a Java run-time environment (JRE) to run. A Java Development Kit (JDK), which includes a JRE, is bundled in the Windows installation program and in some UNIX installation programs (those with filenames ending in
.bin). For other UNIX platforms, the installation program does not install a JDK. Filenames for these installation programs end in .jar.
To run the
.jar installation programs, you must have the appropriate version of the JDK installed on your system, and include the bin directory of the JDK at the beginning of the PATH variable definition. It is important that you use a JDK because the installation process assigns values to JAVA_HOME and related variables to point to the JDK directory.
|
The Oracle installation program uses a temporary directory into which it extracts the files necessary to install the software on the target system. During the installation process, your temporary directory must contain sufficient space to accommodate the compressed Java run-time environment (JRE) bundled with the installation program and an uncompressed copy of the JRE that is expanded into the temporary directory. The extracted files are deleted from the temporary directory at the end of the installation process. As a general rule, installation programs require approximately 2.5 times the amount of temporary space that is ultimately required by the installed files.
By default, the installation program uses the following temporary directories:
| Note: | If you do not have enough temporary space to run the installation program, you are prompted to specify an alternate directory or exit the installation program. |
To make sure that you have adequate temporary space, you may want to allocate an alternate directory for this purpose. To do so, follow the instructions provided in the following table.
On Windows systems, Administrator privileges are required to create Start menu shortcuts in the All Users folder.
When you are installing the software as a user with Administrator privileges, you are presented with the option to create the Start menu shortcuts in the All Users folder, or in the Local user’s Start menu folder. The following table describes the options available.
If a user without Administrator privileges installs the software, the Start menu entries are created in the user’s local Start menu folder.
The database administrator must create an empty database for Oracle Enterprise Repository to install its files into. A user for this database must also be created (e.g., OER_USER) and that user must have database owner privileges on the Oracle Enterprise Repository database.
If you are installing Oracle Enterprise Repository with the Advanced Registration Flows feature, then during the installation process, additional database administrator credentials will need to be supplied during the OBPM portion of the procedure so that the installer can create two new databases and two new users. These two databases are used by the OBPM process engine for transaction tracking and management.
Appropriate administrative privileges are necessary to complete this process.
| Tip: | A known bug on Oracle XE may cause an ORA-12519 error after the database is running for some period of time. To permanently fix this problem, run the following statement:ALTER SYSTEM SET PROCESSES=150 SCOPE=SPFILE; COMMIT; |
The following is an overview of the process required to migrate database character encoding from ISO-8859 to Unicode/UTF-8. The specific operations for your database server should be performed by a database administrator.
You will need to verify the following database prerequisites before beginning the Oracle Enterprise Repository installation process.
ojdbc14.jar (driver version 10.2.0.2)| Note: | Do not supply the Oracle installer with the classes12.jar file used in previous releases of Oracle Enterprise Repository. |
Follow these steps to create the necessary tablespaces before installing Oracle Enterprise Repository:
The following example scripts show how to create the OER_DATA and OER_INDEX tablespaces.
| Note: | These scripts are for a Unix/Linux based DataFile. For Windows, a file path value of c:\oracle\...\file.dbf is appropriate syntax. |
CREATE TABLESPACE OER_DATA
    DATAFILE '/opt/oracle/oradata/oer/oer_data.dbf' SIZE 100M AUTOEXTEND ON NEXT 10240K MAXSIZE UNLIMITED
    EXTENT MANAGEMENT LOCAL AUTOALLOCATE
    LOGGING
    ONLINE
    SEGMENT SPACE MANAGEMENT AUTO;
CREATE TABLESPACE OER_INDEX
    DATAFILE '/opt/oracle/oradata/oer/oer_index.dbf' SIZE 100M AUTOEXTEND ON NEXT 5120K MAXSIZE UNLIMITED
    EXTENT MANAGEMENT LOCAL AUTOALLOCATE
    LOGGING
    ONLINE
    SEGMENT SPACE MANAGEMENT AUTO;
Follow these steps to create the necessary database user before installing Oracle Enterprise Repository:
The following example script show how to create a user for newly created OER Tablespaces.
CREATE USEROERIDENTIFIED BYOER_PWD
DEFAULT TABLESPACE OER_DATA
TEMPORARY TABLESPACE TEMP
PROFILE DEFAULT
ACCOUNT UNLOCK;
GRANT "CONNECT" TO OER;ALTER USER OER DEFAULT ROLE "CONNECT", "RESOURCE";GRANT CREATE MATERIALIZED VIEW TO OER;GRANT CREATE SEQUENCE TO OER;GRANT CREATE SESSION TO OER;GRANT CREATE SYNONYM TO OER;GRANT CREATE SNAPSHOT TO OER;GRANT CREATE TABLE TO OER;GRANT CREATE TRIGGER TO OER;GRANT CREATE VIEW TO OER;GRANT UNLIMITED TABLESPACE TO OER;The Oracle Enterprise Repository 10.3 Installer does not support the installation into Oracle Real Application Cluster (RAC) environments, but supports RAC post-install configurations. The Oracle Enterprise Repository installer requires a standard SID to connect and create relations, and also to insert the sample data for use with the initial installation of Oracle Enterprise Repository.
The Oracle Database administrators should assist in the database configuration of Oracle Enterprise Repository when the migration from SID to a RAC environment is required. Once the RAC environment is configured and verified by the Oracle Database administrator, then the database.properties file in the Oracle Enterprise Repository application contains the appropriate values for the db.url property, as mentioned in the following example:
db.url=jdbc:oracle:thin:@(DESCRIPTION = (load_balance = true) (failover =
true) (ADDRESS = (PROTOCOL = TCP)(HOST = db_host1)(PORT = 1521)) (ADDRESS =
(PROTOCOL = TCP)(HOST = db_host2)(PORT = 1521)) (CONNECT_DATA = (SERVICE_NAME = siprc)(failover_mode = (type = session) (method = basic) (retries = 0) (delay = 0))))
Appropriate administrative privileges are necessary to complete this process. These instructions assume the use of Enterprise Manager.
You will need to verify the following database prerequisites before beginning the Oracle Enterprise Repository installation process.
| Note: | Do not supply the Oracle installer with the msbase.jar, msutil.jar, mssqlserver.jar files as was required previous releases of Oracle Enterprise Repository. |
Follow these steps to create the necessary database before installing Oracle Enterprise Repository:
OER as the database name.OER_DATA.OER_USER as the database owner (or choose a Windows login account as appropriate for your security policy).Follow these steps to create the necessary user before installing Oracle Enterprise Repository:
| Note: | This step is only necessary if you are using SQL Server Authentication for the Oracle Enterprise Repository application installation. |
OER_USER as the Login name (or choose a Windows login account as appropriate for your security policy).public and db_owner.These sections explain how to configure supported databases for UTF-8/Unicode character encoding.
SQL Server is automatically configured to support UTF-8/Unicode character encoding. No additional configuration is necessary.
--#SET TERMINATOR
-- UDB Client Invocation Command:
-- db2 -tv (allows semicolons as the command terminator)
-- Dependencies:
-- UDB Client
-- In DB2 ADDNODE of server - 8 character alias (@NODE-NAME)
-- Create the OER database
DROP DATABASE OER;
CREATE DATABASE OER USING CODESET UTF-8 TERRITORY US;
-- Connect to the OER database
CONNECT TO OER USER OER_USER USING OER_USER_PWD;
-- Create the OER 32K Buffer Pools
CREATE BUFFERPOOL OER32KDATAbp SIZE 1000 PAGESIZE 32K;
CREATE BUFFERPOOL OER32KINDXbp SIZE 1000 PAGESIZE 32K;
CREATE BUFFERPOOL OER32KBLOBbp SIZE 1000 PAGESIZE 32K;
CREATE BUFFERPOOL OER32KTEMPbp SIZE 1000 PAGESIZE 32K;
CONNECT RESET;
CONNECT TO OER USER OER_USER USING OER_USER_PWD;
CREATE REGULAR TABLESPACE oerdatats PAGESIZE 32 K MANAGED BY DATABASE USING(file '/opt/IBM/DB2/data/oerdatats.dat' 300M) extentsize 512k BUFFERPOOL OER32KDATAbp;
CREATE REGULAR TABLESPACE oerindxts PAGESIZE 32 K MANAGED BY DATABASE USING(file '/opt/IBM/DB2/data/oerindxts.dat' 300M) extentsize 512k BUFFERPOOL OER32KINDXbp;
CREATE REGULAR TABLESPACE oerlobts PAGESIZE 32 K MANAGED BY DATABASE USING(file '/opt/IBM/DB2/data/oerlobts.dat' 300M) extentsize 512k BUFFERPOOL OER32kBLOBbp;
-- Create the OER Temp Tablespace
CREATE TEMPORARY TABLESPACE oertempts PAGESIZE 32 K MANAGED BY DATABASE USING(file '/opt/IBM/DB2/data/oertempts.dat' 128M) BUFFERPOOL OER32KTEMPbp;
-- TUNING PARAMETERS
-- Default Values
-- UPDATE DATABASE CONFIGURATION FOR OER USING APP_CCTL_HEAP_SZ 128;
-- UPDATE DATABASE CONFIGURATION FOR OER USING CHNGPGS_THRESH 60;
-- UPDATE DATABASE CONFIGURATION FOR OER USING DBHEAP 600;
-- UPDATE DATABASE CONFIGURATION FOR OER USING LOCKLIST 50;
-- UPDATE DATABASE CONFIGURATION FOR OER USING LOGPRIMARY 3;
-- UPDATE DATABASE CONFIGURATION FOR OER USING MAXAPPLS 40;
-- UPDATE DATABASE CONFIGURATION FOR OER USING MINCOMMIT 1;
-- UPDATE DATABASE CONFIGURATION FOR OER USING NUM_IOCLEANERS 1;
-- UPDATE DATABASE CONFIGURATION FOR OER USING STMHEAP 2048;
-- UPDATE DATABASE CONFIGURATION FOR OER USING DFT_DEGREE 1;
-- New Values Growth
UPDATE DATABASE CONFIGURATION FOR OER USING LOGBUFSZ 131;
UPDATE DATABASE CONFIGURATION FOR OER USING MAXLOCKS 60;
UPDATE DATABASE CONFIGURATION FOR OER USING DFT_PREFETCH_SZ 32;
UPDATE DATABASE CONFIGURATION FOR OER USING LOGFILESIZ 1024;
UPDATE DATABASE CONFIGURATION FOR OER USING SOFTMAX 120;
UPDATE DATABASE CONFIGURATION FOR OER USING SORTHEAP 737;
UPDATE DATABASE CONFIGURATION FOR OER USING CATALOGCACHE_SZ 526;
UPDATE DATABASE CONFIGURATION FOR OER USING NUM_IOSERVERS 6;
UPDATE DATABASE CONFIGURATION FOR OER USING PCKCACHESZ 859;
UPDATE DATABASE CONFIGURATION FOR OER USING UTIL_HEAP_SZ 39963;
UPDATE DATABASE CONFIGURATION FOR OER USING LOGSECOND 50;
CONNECT TO OER USER OER USING OER_USER_PWD;
ALTER BUFFERPOOL OER32KDATAbp SIZE 14532;
ALTER BUFFERPOOL IBMDEFAULTBP SIZE 3633;
COMMIT;
CONNECT RESET;
When installing into an Apache Tomcat environment, you need to know the location of the top-level directory of the tomcat installation, which is CATALINA_HOME. The Oracle Enterprise Repository installer prompts for this directory location.
When the installer prompts for the CATALINA_HOME directory, it will check for the presence of 'standard' apache tomcat classes being present within the installed tomcat to verify that the directory supplied is correct. The Oracle Enterprise Repository installation will deploy, two separate web applications that are related, into the CATALINA_HOME/webapps directory. The name of the web application directory defaults to oer and oer-web. The resulting deployments are as follows (assuming the user selects the default application context name):
CATALINA_HOME/webapps/oer
CATALINA_HOME/webapps/oer-web
The oer context is a servlet container with a number of JSP and servlets deployed to perform the automation of the web application.
The oer-web context contains static content for use with the Oracle Enterprise Repository servlet context's views (JSP/HTML) components and client-side components that are served statically. This context can be moved and/or served from a single or load balancing HTTP server depending on your choice. If the context is moved to another URL, the Oracle Enterprise Repository application must be updated to reference the new URL paths. To accomplish this, change three properties within the Oracle Enterprise Repository application require modification:
cmee.server.paths.image
cmee.server.paths.resource
cmee.server.paths.jnlp-tool
These properties can be altered within the Oracle Enterprise Repository Admin -> System Settings links, or they can be updated in the CATALINA_HOME/webapps/oer/WEB-INF/classes/cmee.properties file. These properties should reference a URL where these directories can be found once they are moved.
During the installation process, you need to specify locations for the following directories:
During the installation of the Oracle software, you are prompted to specify a Oracle Home directory. This directory serves as a repository for common files that are used by various Oracle products installed on the same machine. For this reason, the Oracle Home directory can be considered a central support directory for all the Oracle products installed on your system.
The files in the Oracle Home directory are essential to ensuring that Oracle software operates correctly on your system. These files:
The following illustration shows the structure of a sample Oracle Home directory, on a Windows platform, which includes both the Sun and Oracle JRockit JDKs.
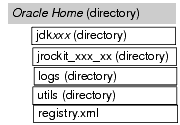
This illustration depicts only the files and directories required in the Oracle Home directory. If you choose the default product installation directory, however, you will see an additional directory in the Oracle Home directory, repostoryXXX,XXX refers to a variable version number for the OER product. Although the default location for the product installation directory is within the Oracle Home, you can select a different location outside the Oracle Home directory.
| Notes: |
CLASSPATH may not be resolved properly. You can install only one instance of each version of a Oracle product in a single Oracle Home directory. For example, you can install only one instance of Oracle Enterprise Repository in a Oracle Home directory, but that Oracle Home directory may also contain an instance of Oracle Enterprise Repository or its products. registry.xml, or if any of the other installation directories are not empty, the following messages will be displayed. You will then be prompted to continue installation, or return to the directory selection task with the one of the error message as shown in Listing 2-1:For Oracle Home directory selection task: Oracle_HOME directory is not empty. Proceed with installation?For product installation directories selection task:One or more installation directories are not empty. Proceed with installation?The files and directories in the Oracle Home directory are described in the following table.
Although it is possible to create more than one Oracle Home directory, Oracle recommends that you avoid doing so. In almost all situations, a single Oracle Home directory is sufficient. There may be circumstances, however, in which you prefer to maintain separate development and production environments, with a separate product stack for each. With two directories, you can update your development environment (in a Oracle Home directory) without modifying the production environment until you are ready to do so.
The product installation directory contains all the software components that you choose to install on your system, including program files and examples. You are prompted during your initial installation to choose a product installation directory. If you accept the default on a Windows system, for example, your software is installed in the following directory:
where, C:\Oracle is the Oracle Home directory and repostoryXXX is the product installation directory for the Oracle Enterprise Repository software. However, you can specify any name and location on your system for your product installation directory; you need not name the directory repostoryXXX or create it under the Oracle Home directory.
If you launch the installation from the command line or from a script, you can specify the -log option to generate a verbose installation log. The installation log stores messages about events that occur during the installation process, including informational, warning, error, and fatal messages. This type of file can be especially useful for silent installations.
| Note: | You may see some warning messages in the installation log. However, unless a fatal error occurs, the installation program completes the installation successfully. The installation user interface indicates the success or failure of each installation attempt, and the installation log file includes an entry indicating that the installation was successful. |
To create a verbose log file during installation, include the -log=full_path_to_log_file option in the command line. For example:
OER103xx_win32.exe -log=C:\logs\OER_install.log
The path must specify a file. You cannot create a folder simply by including a name for it in a pathname; your path should specify only existing folders. If your path includes a nonexistent folder when you execute the command, the installation program does not create the log file.
For information about upgrading your software in the Upgrade Guide.


|