


|
ALDSP 3.0 provides two types of security:
This chapter explains how you can configure and manage runtime security and access control for different users through the ALDSP Administration Console. It contains the following sections:
To work with ALDSP security features, you must first define and create users who will access the ALDSP Administration Console. For more information about creating users, refer to Create Users in WebLogic Server Administration Console Online Help.
ALDSP 3.2 provides enhanced security support. See the ALDSP 3.2 New Features Supplement.
To secure ALDSP artifacts you can create runtime security policies. ALDSP artifacts or resources include dataspaces, services, operations, library procedures, and data elements.
For more information on runtime security policies, refer to Understanding Runtime Security Policies
After creating users in an ALDSP-enabled WebLogic Server domain, you can control administrative access of these users by applying administrative access control policies. Access control on ALDSP Administration Console is based on user entitlements. Entitlements are assigned to users by a domain user, who is a super user for a particular domain. A domain user is created when you create an ALDSP domain and specify the user name and password for it.
For more information on administrative access control, refer to Working with Administrative Access Control Policies.
The runtime security feature enables you to configure access to resources such as dataspaces, data services, operations, and data elements. For a secured resource, a requesting client must meet the condition of the runtime security policy applicable to that resource, whether accessing the resource through the typed mediator API, an ad hoc query, or any data access interface. ALDSP exposes its deployed artifacts as resources that can be secured through runtime security policies.
For example, you can control access to an entire ALDSP dataspace or just to a credit card number element within Customer_Order.ds.
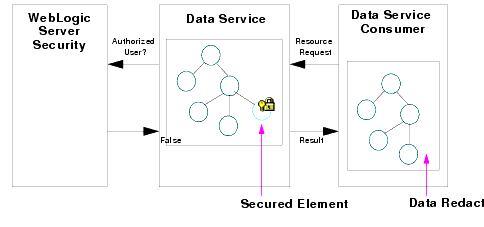
When a request comes to a running ALDSP instance for a secured resource, ALDSP passes an identifier for the resource to WebLogic Server. WebLogic Server, in turn, passes the resource identifier, user name, and other context information to the authorization provider, such as XACMLAuthorizer. The provider evaluates the policy that applies to the resource. As a result of the evaluation, access to the resource is either permitted or blocked.
If the user does not satisfy the requirements of an element-level policy, the element is redacted from the result object, and therefore does not appear.
| Note: | By default, WebLogic Server security uses the XACML Authorization Provider. Other authenticators can use any external resource necessary to implement the policy evaluation. |
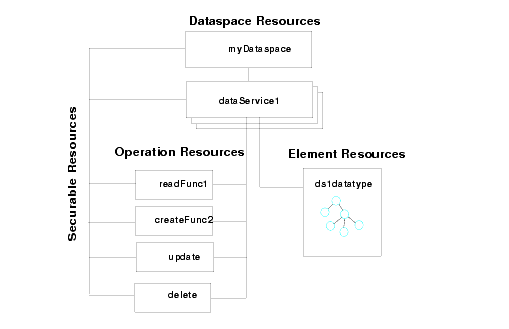
A securable resource is an ALDSP artifact, such as a data service, operation, or element, to which you can apply a runtime security policy. The resources you can protect using runtime security include:
After you secure individual resources, you can enable or disable security for the dataspace. Security policies are inherited. This means that security enabled at the dataspace level applies to all data services, operations, and elements within the dataspace. However, if several policies apply to a particular resource, the more specific policy prevails. For example, a policy on an element supercedes a policy for the data service.
The hierarchy of ALDSP artifacts is as follows:
Figure 5-2 illustrates the securable resources in an ALDSP dataspace.
At the dataspace level, you can enable anonymous access by creating a policy. If you apply this policy, all users, including unauthenticated users, can access resources by default. For more information on creating runtime policies at the dataspace level, refer to Configuring Dataspace-Level Security.
The anonymous access policy works only with the WebLogic Authorization provider. The ALDSP security policies are intended to work with the default WebLogic Authorization provider. If you are using another authorization provider, you will need to create policies using the facilities of the other provider. For more information, see WebLogic Authorization Provider: Provider Specific in the Administration Console Online Help.
The Security Configurations tab on ALDSP Administration Console provides the configurable runtime security policies. Setting up runtime security in ALDSP Administration Console involves the following tasks:
ALDSP directly supports runtime security policies for its resources. The WebLogic Platform supports extensive security features that can be applied to your implementation as well, including encryption-based, transport-level security. For runtime security configuration, ALDSP provides the following policies, called predicates, in ALDSP Administration Console:
The security policies in the ALDSP Administration Console are similar to the conditions used by WebLogic Server security. For more information on WebLogic Server security policies and conditions, refer to Securing WebLogic Resources Using Roles and Policiesin the WebLogic Server documentation.
In addition to creating runtime security policies, you can create service accounts to map security configurations of external data sources such as web services and Java functions. This feature ensures secure storage of the credentials of external data sources and allows runtime identity mapping.
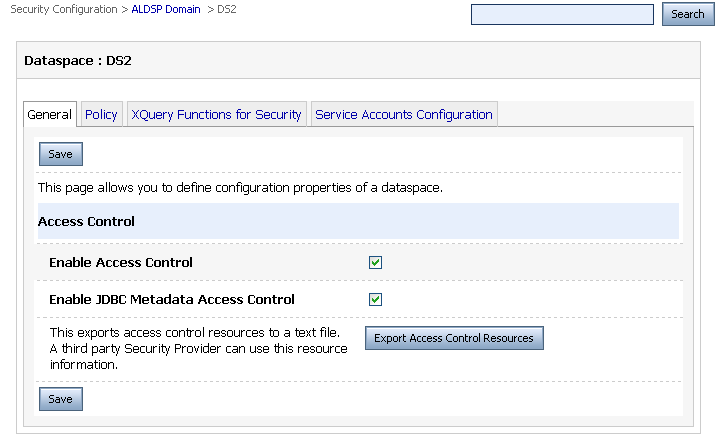
Before you start creating and applying runtime policies, make sure that the Enable Access Control checkbox in the General tab is selected, as shown in Figure 5-3. This activates the security policy configurations. If access control is not selected, then security is not enabled for your dataspace. The General tab is available only at the dataspace level.
The steps to create and apply runtime security policy for a dataspace, data service, and operations are the same. However, you must make sure that you select the ALDSP resource from the navigation pane. To create and apply the runtime security policy:
| Note: | If you select the User predicate, it implies that you are allowing a particular user to access the dataspace. Make sure that this user is authenticated by WebLogic Server. |
You can configure runtime policies that would ensure access to users who are assigned entitlements to access the entire dataspace. At the dataspace level, the Security Configuration tab provides the following tabs:
| Note: | If an access policy is time-dependent or is changed and the metadata access control option is enabled, you may not be able to access the tables and procedures that had been listed. |
For more information, refer to Exporting Access Control Resources.
If a third-party authorization provider is used, then this tab displays a message as follows:
“Policies for AquaLogic Data Service Platform domain have to be defined in the configured external policy provider.”
For more information about creating and applying security policies, refer to Creating and Applying Runtime Security Policies.
XQuery security functions allow data-driven security of ALDSP resources. At the dataspace level, you can create and maintain XQuery functions to ensure that data elements are returned only when the conditions are met. However, to associate these functions to data service elements, go to the data service and specify the element for which the function applies.
| Note: | If both a standard security policy and an XQuery function applies to a given data element, the results of both policy evaluations must be true for access to be permitted (logical and is applied to the results). |
Applying data-driven security policies involves the following steps:
You can create one or more XQuery functions to apply to data elements within a dataspace.
To create an XQuery function for security:
import schema namespace t1 = 'ld:DataServices/CUSTOMER_ORDER' at
	'ld:DataServices/Schema/CUSTOMER_ORDER.xsd';
declare namespace f1 = "ld:CUSTOMER_ORDER";
declare function f1:secureOrders($order as
		element(f1:CUSTOMER_ORDER)) as xs:boolean {
if (fn-bea:is-access-allowed("CUSTOMER_ORDER/LimitAccess",
		"ld:CUSTOMER_ORDER.ds")) then
	fn:true()
else if ($order/TotalOrderAmount lt
	(fn-bea:get-property("total_order_amount", "1000000") cast as
			xs:decimal)) then
		fn:true()
	else
		fn:false()
};
Notice that the function uses the BEA extension XQuery function is-access-allowed(). This function tests whether a user associated with the current request context can access the specified resource, which is denoted by an element name and a resource identifier.
ALDSP provides the following additional convenience functions for security purposes:
is-user-in-group ($arg as xs:string) as xs:boolean Checks whether the current user is in the specified group.
is-user-in-role ($arg as xs:string) as xs:boolean Convenience method that checks whether the current user is in the specified role.
userid() as xs:string Returns the identifier of the user making the request for the protected resource.
| Note: | For details on creating XQuery functions, see the XQuery and XQSE Developer’s Guide. |
| Note: | A security XQuery function must be applied to a data element for it to take effect. For more information, see Applying an XQuery Function for Security on page 5-13. The functions are applied to elements by qualified function name. The only requirement for the function is that it returns a Boolean value and that the name should be qualified by a namespace URI. |
You can use XQuery functions for security to control access to data elements. After you define the XQuery function for security, as described in Creating an XQuery Function for Security on page 5-11, you must apply the function to the corresponding data element for it to take effect. In addition, you define policies for securing the data elements, which provide additional security along with the XQuery functions for security. For more information, refer to Configuring Data Element-level Security.
| Note: | ALDSP 3.2 provides support for data redaction behavior for data elements. See “Encryption-based Data Redaction” in the ALDSP 3.2 New Features Supplement. |
To make any changes to the security configurations of a data element, you must first acquire the lock by clicking Lock & Edit. To apply the XQuery function for security to a data element:
This option allows you to assign a constant value for the element or attribute. However, it supports only primitive types, so you cannot have a default value for complex types.
| Note: | If you select this check box, then it is mandatory to specify the default value for the resource. |
Service accounts provide the option to store user credentials for external data sources. It provides a mapping between the local WebLogic user and a remote external data source user by configuring the user credentials within the ALDSP Administration Console.
You can configure service accounts for web services and Java functions. For JDBC identity mapping, ALDSP depends on WebLogic Server 9.2 and 10.0 built-in support.
Service accounts provide different types of mappings, which include:
| Note: | After you create and define the type of a service account, you cannot change it. If you have to change a service account type, delete the account and create a new one. |
| Note: | Based on the selected resource type, the Next button is enabled. |
On this page, you can define the remote (external data source) users.
On this page, you can define the authorized remote (external data source) users, and add them as authenticated external data source users.
Authorization is the process whereby the interaction between users and resources are limited to ensure integrity, confidentiality, and availability. WebLogic uses resource identifiers to identify deployed ALDSP artifacts, such as dataspaces, data services, and operations. This identifier is used to associate a client request to any security policies configured for the requested resource.
Resource identifiers are managed for you when you use the default WebLogic Authorization provider and the ALDSP Administration Console to configure your policies. In particular, resource identifiers already exist for ALDSP dataspaces, data services, and data service operations. In addition, when you choose elements to be secured in the console, an identifier is generated for the element.
However, when using a custom authorizer, you must know the resource identifiers for your deployment and configure policies for the resources in the form expected by the other authorization module. This means that you need to identify the element resources that need to be protected.
| Note: | The WebLogic security documentation provides details on how to connect another security authenticator to WebLogic Server. For more information, see WebLogic Authorization Provider in the Administration Console Online Help. |
You can view the list of resource identifiers by exporting the access control resources from the ALDSP Administration Console.
An example of a portion of the file follows:
<ld type="admin"><app>DOMAIN</app></ld>
<ld type="admin"><app>ADMIN</app></ld>
<ld type="admin"><app>MONITOR</app></ld>
<ld type="admin"><app>BROWSER</app></ld>
<ld type="admin"><app>ADMIN</app><ds>DSP_TEST</ds></ld>
<ld type="admin"><app>MONITOR</app><ds>DSP_TEST</ds></ld>
<ld type="admin"><app>BROWSER</app><ds>DSP_TEST</ds></ld>
<ld type="app"><app>DSP_TEST</app></ld>
<ld type="service"><app>DSP_TEST</app><ds>ld:CREDIT_CARD.ds</ds></ld>
<ld type="function"><app>DSP_TEST</app><ds>ld:CREDIT_CARD.ds</ds><res>{ld:CREDIT_CARD}CREDIT_CARD:0</res></ld><ld type="function"><app>DSP_TEST</app><ds>ld:CREDIT_CARD.ds</ds><res>{ld:CREDIT_CARD}createCREDIT_CARD:1</res></ld><ld type="function"><app>DSP_TEST</app><ds>ld:CREDIT_CARD.ds</ds><res>{ld:CREDIT_CARD}deleteCREDIT_CARD:1</res></ld><ld type="function"><app>DSP_TEST</app><ds>ld:CREDIT_CARD.ds</ds><res>{ld:CREDIT_CARD}updateCREDIT_CARD:1</res></ld><ld type="service"><app>DSP_TEST</app><ds>ld:CUSTOMER.ds</ds></ld>
The format of a resource identifier is shown in Figure 5-13.

The type can be admin, service, or function. The resource can be any of the following:
These are generated when you select an element in the Secured Element tab of the ALDSP Administration Console.
A data service has several operations, including one or more read, create, update, delete, navigation, and library operations. The security policies that you apply at the data service level apply to data service operations and data elements. You can also select the data elements that you want to secure at the data service level.
Operation-level security policies enable you to control:
| Note: | Make sure that you configure policies on the data service resources that are accessed directly by the user. Security policies on data services that are used by other data services are not inherited by the calling data service. This means that if a data service with a secured resource is accessed through another data service, the policy is not evaluated against the caller. For more information, refer to Creating and Configuring Security Policies for Operations. |
| Note: | Data service operations are identified by name and number of parameters for setting security configurations. If you modify the number of parameters, you will need to reconfigure the security settings for the operation. |
The steps to create the security policy at the data service and operation level are the same as the dataspace level. Refer to Creating and Applying Runtime Security Policies for details.
| Note: | ALDSP 3.2 provides enhanced security support. See the ALDSP 3.2 New Features Supplement. |
At the data service level, you can select all the data elements in a data service by selecting the top-level element (Customers in Figure 5-14) or individual data elements that you want to secure using the Secured Elements tab.
For example, if you create an XQuery function for security and you want to associate it with a data element, you can select the data element from the Secured Elements tab and then configure the data-element level security. (For more information about XQuery function for security, refer to Working with XQuery Functions for Security.)
| Note: | You should only secure the root element of a data service if you are confident that none of the elements used by read functions in the service must return a value. Since a secured element does not return a value, a schema which requires that one or more values be returned will fail with a runtime error. Alternatively, you can modify the schema so that elements are optionally returned. |
To select the data element to be secured:
To apply security policy to the data element, select the element from the navigation tree. You can also select the secured element using the Secured Elements tab. For more information, refer to Configuring Data Element-level Security.
To set runtime security policy for an operation:
This setting ensures that every time this operation is accessed, the runtime policy is adhered to. Consider the following example:
In this scenario, if you access fn1 using user1, then access will be denied because the runtime security policy configuration does not allow user1 to access fn2.
If you do not select the Always Secured check box for fn2, then you will be able to access fn1 if using either user1 or user2 because the system will check the security policy for fn1 only and not fn2.
Element-level security associates a security policy with a data element for the Return type within a data service. If the policy condition is not met, the corresponding data is not included in the result.
When configuring element-level security, you first identify the element as a securable resource, then set a policy on the resource.
The data element security policy can be configured using the steps described in Creating and Applying Runtime Security Policies.
To associate an XQuery function for security with a corresponding data element, select the Secured Elements Configuration tab and follow the steps mentioned in Applying an XQuery Function for Security.
| Note: | Element-level security is only applied when all of the following conditions are met: |
To ensure the security of elements, you need to manage and layer data services properly. This means being careful not to create insecure holes in the layers and not depending on security settings for data services which are not being directly invoked by the client.
| Note: | Secured elements, in general, should never offer public read or navigate functions that accept a secured element value as an input argument as this can permit guessing-style attacks to reveal otherwise secure data. |
You can set the security policies for native web services using the Basic Auth Required property in the Eclipse IDE. You can create runtime security policies for a native web service and then set this property to true. This applies the security policy for the native web service. For more information about the Basic Auth Required property, refer to the Add Security Resources to Data Services topic in the Designing Logical Data Services section of the Data Services Developer’s Guide.
The Service Explorer in ALDSP Administration Console allows you to check if the Basic Auth Required property is set to true or false.
To view information about this property in the Service Explorer:
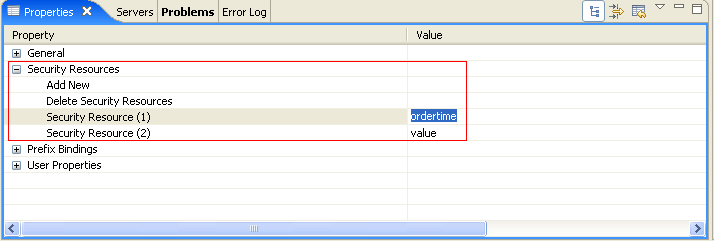
User-defined security resources are created in the Eclipse IDE Property Editor, as shown in Figure 5-17.
For more information about setting the security resource values, refer to Declare a Security Resource in Data Services Developer’s Guide.
After you assign a value to the security resource, you can create runtime security policies for the user-defined security resource. In the preceding figure, ordertime is the value of the security resource. After you deploy the dataspace, this resource is displayed in ALDSP Administration Console. Figure 5-18 shows the ordertime security resource in the navigation tree for the customerorder data service.
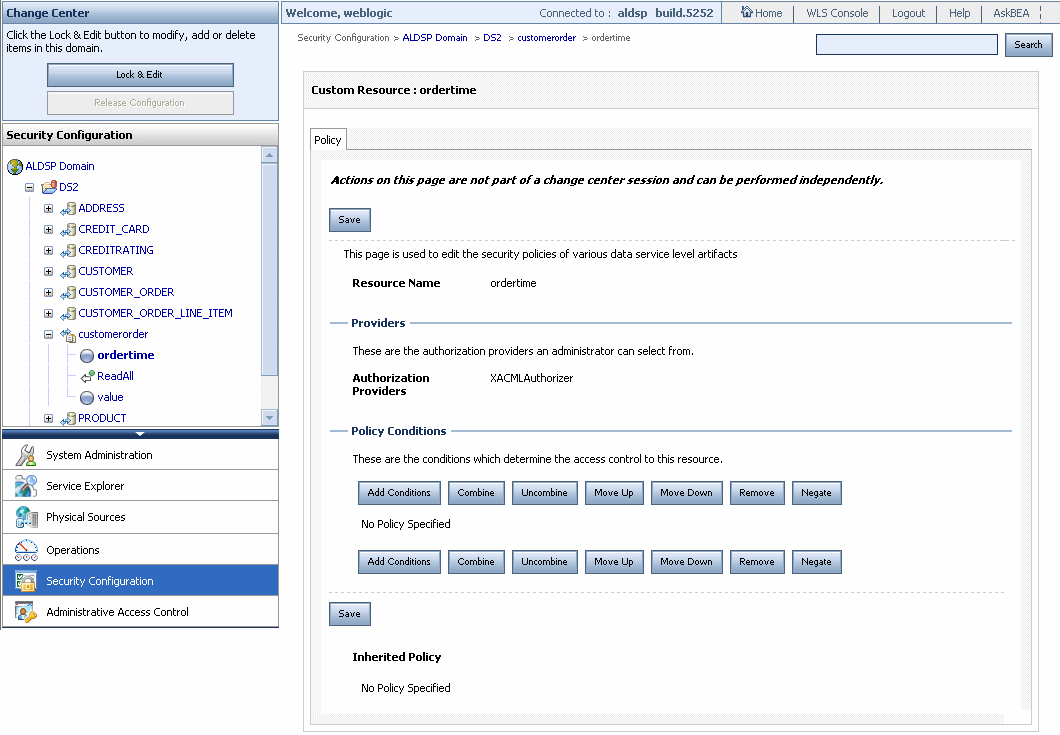
You can create a runtime security policy for the ordertime security resource using the console.
Administrative roles require entitlements to access ALDSP Administration Console. These entitlements can be assigned through the Administrative Access Control category, as shown in Figure 5-19.
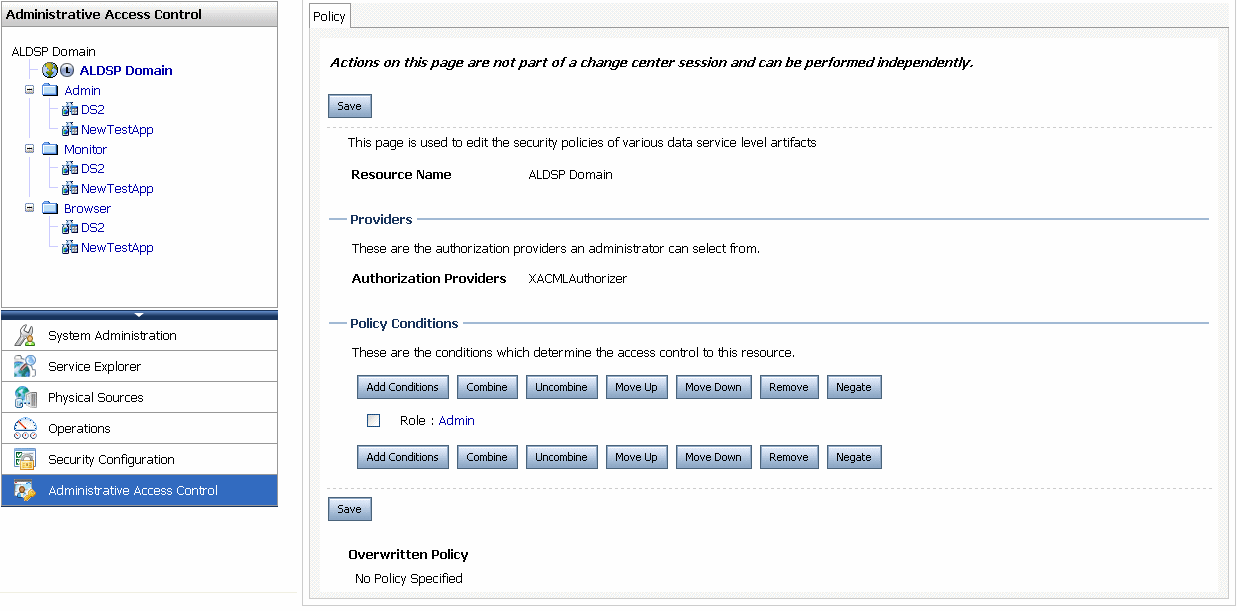
A domain user, who is the super user for the console, assigns entitlements to users. In addition to the domain entitlement, other predefined entitlements are admin, monitor, and browser, which allow access to information for different categories and resources. The hierarchical structure of the entitlements is as follows:
This hierarchy implies that the domain entitlement allows you to perform all the tasks on ALDSP Administration Console, depending on whether the domain entitlement is for all the dataspaces within a domain or a particular dataspace. However, other entitlements cannot perform all the tasks that can be performed by a user with domain entitlement.
For example, you can set the administrative access control policies only if you have domain entitlement. Similarly, the admin entitlement allows you to perform more tasks on a dataspace than monitor or browser entitlements.
| Note: | Entitlements can be assigned at the dataspace level or for all the dataspaces. For example, for User A, you can assign admin entitlement for DS1, monitor entitlement for DS2, and browser entitlement for DS3. Alternatively, you can assign the Admin entitlement for all the dataspaces within the domain to User A. For more information, refer to Assigning Entitlements. |
A default domain user is created on WebLogic Server when you create the ALDSP domain. There can be more than one domain user for the console and one domain user can create other domain users.
| Note: |
By default, an Admin role is created for a domain user in ALDSP Administration Console which is mapped from WebLogic Server Administrator role, as shown in Figure 5-19.
Table 5-1 lists the tasks that can be performed by a user for each entitlement.
Entitlements are created for users that are created on WebLogic Server 9.2 and can be managed through the WebLogic Server Administration Console.
You can also assign an entitlement to a user for all dataspaces within the domain. For example, if you want to assign the Admin entitlement for dataspaces DS1, DS2, and DS3 to a user, then select the Admin entitlement option. Similarly, you can assign, monitor and browser entitlements to a user for all dataspaces by selecting the Monitor or Browser option from the navigation tree.
| Note: | In this case, the Admin entitlement is selected for the dataspace DS1. |
| Note: | You can also select other options from the list of predicates. For more information, refer to Understanding Runtime Security Policies. |
A user views the category-list based on the entitlement assigned to that user for that dataspace. For example, User A with admin entitlement for DS1 can view the Security Configurations tab, however, if User A has monitor entitlement for DS2, then the Security Configuration tab for DS2 will not appear for User A.
Security policies configured for assigning Admin entitlement to a user may get deleted inadvertently. If that is the only Admin user entitlement for ALDSP Administration Console, then the Admin user is locked out of the console.
In this case, you can configure the com.bea.dsp.security.admin.bootstrap system property for WebLogic Server. This property allows you to specify a user name, who gains domain access rights. However, this property should only be used if the ALDSP Administration Console is locked due to some policy editing.
To configure this system property:
setDomainEnv.cmd file located in: <aldsp_home>\samples\domains\aldsp\bin
where <aldsp_home> is the home directory for ALDSP, for example, c:\bea\aldsp_3.0
com.bea.dsp.security.admin.bootstrap system property. For example:set JAVA_OPTIONS=%JAVA_OPTIONS% %JAVA_PROPERTIES%-Dwlw.iterativeDev=%iterativeDevFlag%-Dwlw.testConsole=%testConsoleFlag%-Dwlw.logErrorsToConsole=%logErrorsToConsoleFlag%-Dcom.bea.dsp.security.admin.bootstrap=<username>
where <username> is the place to specify the Admin user for ALDSP Administration Console.
| Note: | The user name specified in the com.bea.dsp.security.admin.bootstrap system property should be a user that has already been created using the WebLogic Server console. |
A domain user can take back the control of the lock from ALDSP Administration Console. The lock may need to be taken back from a user in cases where a user, such as an admin user, has acquired the lock but has not released it for a long period and another admin user needs to acquire the lock to modify configurations. One domain user can acquire the lock from another domain user also.
When lock is acquired by a user, the Take Lock & Edit option is enabled for the domain user as shown in Figure 5-21.

The domain user can click the Take Lock & Edit option from the change center to acquire the lock. In this case, the user whose lock is acquired will see the core configuration values on the console and the domain user or the other admin user will be able to view all the changes made by the other user using the pending changelist. For more information about pending changelist, refer to Pending Changelist on page 2-9.


|