|
|
With ALDSP 3.0 release, you need to create and configure WebLogic Server 9.2.x unlike the previous ALDSP releases, which used WebLogic Server 8.1. Before you start working with ALDSP development environment, you need to deploy your dataspace project on a WebLogic domain enabled for ALDSP. Using WebLogic Server 9.2.x, you can create users and groups for ALDSP and manage their permissions.
Most of the other administrations tasks for ALDSP 3.0, can be performed through the ALDSP Administration Console and therefore you may not need to launch the WLS Administration console frequently. Table 2-1 lists the tasks that you can perform using ALDSP Administration Console and the ones that you need to perform using WebLogic Server Administration console.
ALDSP Users and Groups: Securing ALDSP Resources
Also refer to
WebLogic Server user and groups.
|
|
Deployment: Deploying Dataspaces
|
|
Security: Securing ALDSP Resources
|
|
Caching: Configuring Query Results Cache
|
|
Auditing: Working With Audit and Log Information
|
For more information about creating and configuring a new server for ALDSP, refer to Post-Installation Tasks in AquaLogic Data Services Platform Installation Guide:
This chapter describes the tasks that you can perform using ALDSP Console and also provides steps to start and stop the WebLogic Server. It contains the following sections:
ALDSP requires a valid product license to run. The ALDSP license is included as a component in the WebLogic Server license file, license.bea. To apply or update an ALDSP license file, use the BEA UpdateLicense utility to update the license.bea file.
For details about BEA product licensing, see Installing and Updating WebLogic Platform License Files in Installing WebLogic Platform of the WebLogic Server documentation.
To start working with the ALDSP development environment and to administer the WLS enabled for ALDSP, you must first start WebLogic Server. Although you may not need to stop WebLogic Server frequently, it may be required in certain situations. This section describes how to start and stop WebLogic Server (WLS) in a standalone WebLogic domain, after you have configured your WebLogic Server 9.2.x.
| Note: | If you are already running an instance of WebLogic Server that uses the same listener port as the one to be used by the server you are starting, you must stop the first server before starting the second server. |
The domain directory is BEA_HOME/user_projects/domain_name. An example could be c:\bea\user_projects\domains\mydomain.
startWebLogic.cmd (Windows) or startWebLogic.sh (UNIX).The startup script displays a series of messages, finally displaying a message similar to the following:
<Dec 8, 2004 3:50:42 PM PDT> <Notice> <WebLogicServer> <000360> <Server started in RUNNING mode>
You can also start WebLogic Server through the eclipse-based IDE for ALDSP. To start the server:
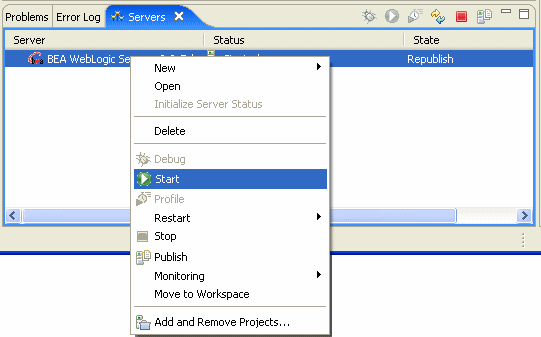
To stop the WebLogic Server using the eclipse-based IDE, right-click the server listed in the Servers tab, as shown in Figure 2-1 and select Stop.
Alternatively, you can stop a WebLogic Server instance that is running a dataspace project from the WebLogic Administration Console.
The AquaLogic Data Services Platform Administration Console is a web-based interface that enables you to administer and manage dataspace projects, access metadata, and configure security and caching policies.
Before you launch the ALDSP Administration Console, make sure that the WebLogic Server is started. For more information about starting WebLogic Server, see Starting the Server on page 2-3. To launch ALDSP Administration Console:
http://hostname:port/dspconsole
hostname is the machine name or IP address of the host serverport is the address of the port on which the host server is listening for requests (7001 by default)For example, to start the ALDSP Administration Console on a local instance of WebLogic Server (running on your computer), navigate to the following URL:
The default user name and password is weblogic/weblogic, respectively.
| Note: | The discussion and examples in the following chapters of this book (Administration Guide) assume that you have: |
In case you need to launch the WLS Administration console, click the WLS Console link on the top-right corner of ALDSP Administration Console, as shown in Figure 2-3.
| Note: | For more information about starting the WebLogic Administration Console, refer to Starting the Administration Console section in Introduction to WebLogic Server and WebLogic Express. |
| Note: | http://download.oracle.com/docs/cd/E13222_01/wls/docs91/intro/console.html#1122070 |
This section provides details about using different components of the ALDSP administration console. It includes the following topics:
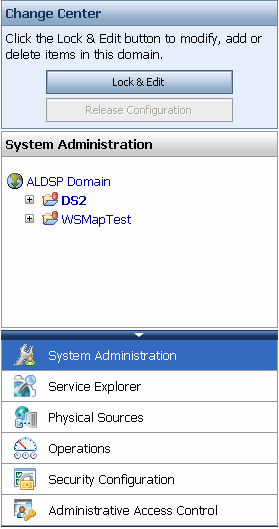
You can use the navigation pane to view the navigation tree and all the data services, functions, and web services. The change center allows you lock and edit the configuration settings within the console and then save or discard changes depending on your requirement. Using the category-based tabs from the category list, you can view and manage the artifacts related to each tab, including the system administration tasks such as deployment of data services, importing and exporting data service JAR files, and auditing.You can also view metadata, manage caching, and configure security settings using the category-list.
Figure 2-4 displays the components of the navigation pane.
This section describes the functions of some of the components of the navigation pane in detail.
The change center feature in ALDSP Administration console is similar to the WLS Administration console. It enables you to acquire a global lock over the console configuration, make one or more changes to the configuration, if required, and then activate or discard the changes. The configuration settings are edited in a transactional manner, therefore, only one user can acquire the lock to the console.
To acquire the lock and then activate or discard changes:
The change center feature is available only to the domain and admin entitlements for a resource configured for security in ALDSP. Other ALDSP entitlements cannot use the change center. For more information about user entitlements, refer to the Administrative Access Control section in Securing ALDSP Resources.
You do not need to acquire a lock to edit the configuration within the administration console in the following cases:
Based on the operations performed using the change center, the change center behavior may differ. Table 2-2 lists and describes the change center behavior in different situations:
For more information about using the change center, you can also refer to: http://download.oracle.com/docs/cd/E13222_01/wls/docs92/intro/console.html#wp1122447
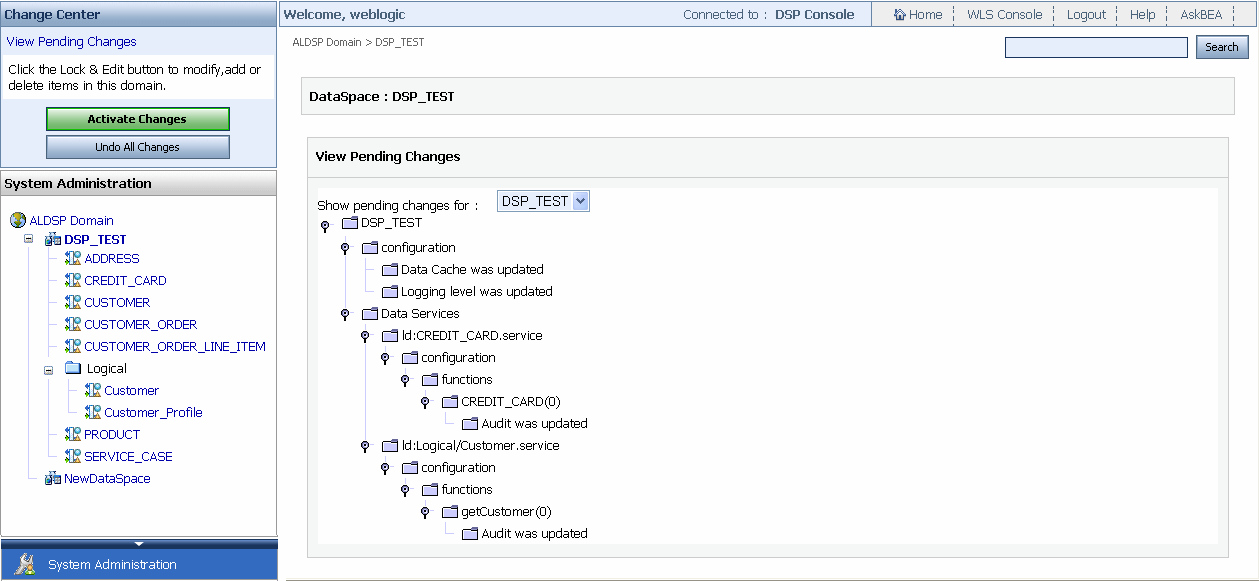
The pending change list displays the difference between the current session values and the core values. The dataspace artifacts that are created, updated, or deleted are displayed in the pending changelist. Pending changes are shown in the tree view, as shown in Figure 2-6, whereas the configuration changes are shown in the leaf node.
There are six categories in the ALDSP administration console. The artifacts displayed in the workspace content area for a data service, function, or web service depend on the category-based tab that you select from the category list.
The workspace content area displays artifacts based on the tab selected in the category list and the node selected from the navigation tree. It consists of various options that enable you to view, search, configure, and audit ALDSP resources. Figure 2-7 displays the workspace content area that is displayed when you log in to the console.
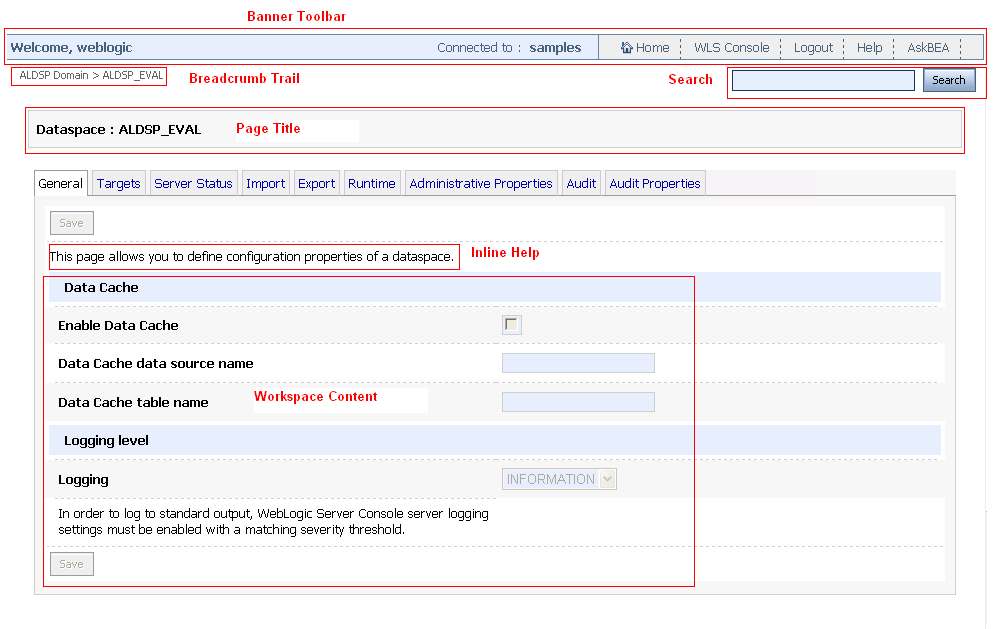
As illustrated in this figure, the workspace content area constitutes the following:


|