Getting Started with ALES 3.0

     Previous  Next    Open TOC in new window    View as PDF - New Window  Get Adobe Reader - New Window
Content starts here

Tutorial 5: Creating Authorization Policies

This section contains the following sections:


Overview

Once you define the necessary Resources, Roles, and Identities (Groups and Users), you can make use of them in the Authorization Policies. An Authorization Policy specifies who can access a resource and what rights they have when they do so.


Scenario

Two Authorization policies will be used to define access to the patient roster:
Policy
Description
Authorization Policy 1
This policy allows any user in the AdmissionsOperators group to view and edit the Patient Roster. Since the roster is a JSP page, required access rights are POST and GET.
Effect: Grant
Actions: GET, POST
Subjects: AdmissionsOperators
Resources: policy/ParkerHospital/Admissions/url/roster_index.jsp
Authorization Policy 2
This policy allows any user in the HealthProviders Role to view the roster.
Effect: Grant
Actions: GET
Subjects: HealthProviders role
Resources: policy/ParkerHospital/Admissions/url/roster_index.jsp


Create Authorization Policy 1

  1. In the left navigation pane, expand the Policies node and select Authorization Policies. Then click New in the lower part of the right pane. This displays the New Authorization Policy window.

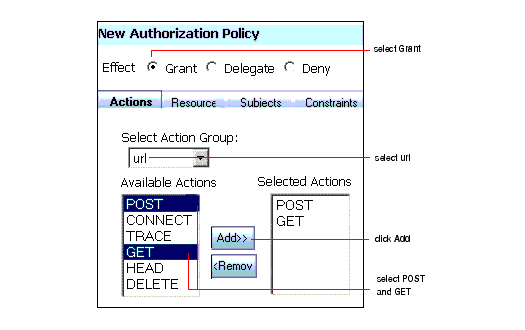
  2. Select the Grant radio button.
  3. On the Actions tab, select url in the Select Action Group field. Then select POST and GET in the Available Actions list and click Add>>.
  4. Click on the Resource tab and expand the Resources tree under Available Resources until you see the roster_index.jsp Resource. Then select roster_index.jsp and click Add>>.


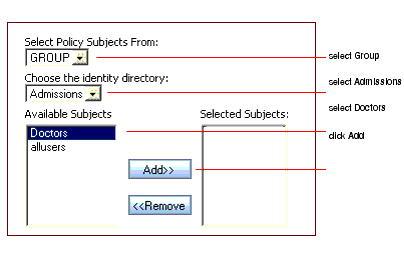
  5. On the Subject tab, select GROUP in the Select Policy Subjects field and Admissions in the Chose Identity Directory field. Finally, select AdmissionsOperators in the Available Subjects list and click Add>>.


  6. Click Ok at the bottom of the New Authorization Policy window.


Create Authorization Policy 2

  1. In the left navigation pane, expand the Policies node and select Authorization Policies. Then click New in the lower part of the right pane. This displays the New Authorization Policy window.
  2. In the Effect field, select the Grant radio button.
  3. On the Actions tab, select url in the Select Action Group field. Then select GET in the Available Actions list and click Add.
  4. On the Resource tab, expand the Resources tree under Available Resources until you see the roster_index.jsp. Then select it and click Add.
  5. On the Subject tab, select GROUP in the Select Policy Subjects field and Admissions in the Chose Identity Directory field. Finally, select Doctors in the Available Subjects list and click Add>>.
  6. Click Ok at the bottom of the New Authorization Policy window.


Save the Policies

After creating the Policies as described, return to the main window and click Save Changes.


Summary

In this tutorial you defined two Authorization policies that restrict access to the Patient Roster.

Had an actual SSM been in place, the policies could have been distributed to the SSM and enforced immediately.

Note that these policies as defined allow only John Kildaire and Harry Hopkins to access the roster. Once a resource is secured by an ALES policy, users must be explicitly granted access to it. To grant other users access, they could be added to the AdmissionsOperators or Doctors group -- or additional policies could be created that grant access in some other way.


  Back to Top       Previous  Next