
eDocs Home > BEA AquaLogic Service Bus 3.0 Documentation > Accessing ALDSP Data Services Through ALSB
Introduction
AquaLogic Data Services Platform can be accessed through an AquaLogic Service Bus Transport. In this way AquaLogic Service Bus can make full use of data services. This approach also allows a more efficient and flexible approach to accessing data services as compared with exposing such services as Web services.
Topics
ALDSP and ALSB Compatability Matrix
Data services created in ALDSP can be accessed through ALSB using the DSP Transport. The following table identifies compatibilities between ALDSP and ALSB releases. In most cases, instructions for making ALDSP Data Services available to ALSB using the DSP transport are provided.
ALSB and ALDSP Version Compatibility
| AquaLogic Data Services Platform | AquaLogic Service Bus (DSP Transport) |
Instructions for Making ALDSP Data Services Available to ALSB Using the DSP Transport |
|---|---|---|
| Version 2.5 | Version 2.5 | HTML |
| Version 2.5 | Version 2.6 | |
| Version 3.0 | Version 2.5 |
|
| Version 3.0 | Version 2.6, 2.6.1 |
HTML PDF |
| Version 3.0 | Version 3.0 | HTML PDF |
Enabling Data Services for ALSB
To make an ALDSP data service available to an ALSB client you need to:
![]() Generate a WSDL file for your data service and import the new WSDL into ALSB using the recommended procedure.
Generate a WSDL file for your data service and import the new WSDL into ALSB using the recommended procedure.
![]() Configure or create a business service based on the WSDL.
Configure or create a business service based on the WSDL.
![]() Configure or create a proxy service based on the business service.
Configure or create a proxy service based on the business service.
After you have completed these tasks you can invoke data services through the appropriate version of ALSB.
From Data Source to Web Service Client
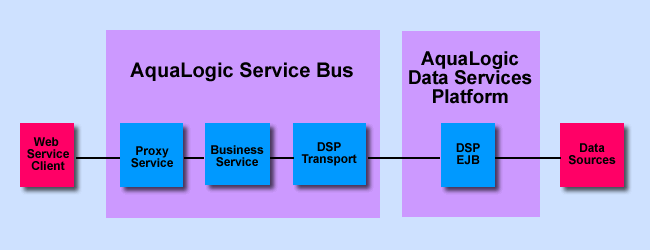
Using the DSP Transport
The example in this section illustrates use of a data service in ALSB using the following versions.
| ALDSP | ALSB | |
|---|---|---|
| Version(s) | 3.0 | 3.0 |
| WebLogic Server | 9.2 | 10.0 |
Actions Needed Within ALDSP
Step 1. Start Your Server
Start the AquaLogic Data Services server, if it is not already running. (For the purpose of this discussion, the sample RetailDataspace provided with AquaLogic Data Service Platform is used.)
Start > Programs > BEA Products > BEA AquaLogic Data Services Platform 3.0 >
Examples > Start Examples Server
| See also: Getting started ALDSP tutorial: Creating Your First Data Services |
Step 2. Generate a WSDL from the Data Service
You can generate a WSDL from your data service in two ways.
Option A. Generating a WSDL File Using Data Services Studio
| Detailed instructions available at: How To Generate a Web Service Map and WSDL from a Data Service |
Option B. Export a WSDL Through the ALDSP Console
If a WS file is available, you can use the ALDSP Console to generate a WSDL file.
- Launch the AquaLogic Data Services Console. On Windows you can do this by choosing:
Start > Programs > BEA Products > BEA AquaLogic Data Services Platform 3.0 >
Examples > AquaLogic Data Services Console Alternatively, type http://localhost:7001/dspconsole in your Web browser.
 - Log in. The sample uses 'weblogic' (without quotes) as both the username and password.
- Click Service Explorer.
- Navigate to the web service map (example: RetailWebServices.ws) corresponding to the data service for which you want to create the WSDL file.
- Click View WSDL Definition in the General tab. ALDSP Console opens a new window and displays the WSDL definition.
- Using a text editor, copy and paste the WSDL definition into a new text document and save the WSDL file.
If you've not already done so, build your data service application (deployment is automatic with a build). A deployed application is needed in order for a client processes to access data through your data services.
Getting Started with ALDSP Administration
Step 3: Obtaining the Web Service Address
The URL address to the WSDL is needed. To obtain this address in Data Services Studio:
- Right-click on the WS file (example: OrderService.ws)
- Select Test Web Service
- When the Test Client opens save the URL address. Here is the address for the OrderService example:
http://localhost:7001/RetailDataspace/RetailApplication/OrderManagement/OrderService.ws?WSDL
Actions Needed Within ALSB
Step 4: Import the Data Service WSDL into AquaLogic Service Bus
The following generally describes the steps needed to import a WSDL generated in ALDSP into AquaLogic Service Bus.
- Start the AquaLogic Service Bus server, if it is not already running. For the purposes of this example, the AquaLogic Service Bus example server and the Default project is used. On Windows you can do this by choosing:
Start > Programs > BEA Products > Examples > AquaLogic Service Bus 3.0 > Start Examples Server
- Launch the AquaLogic Service Bus Console. On Windows, choose:
Start > Programs > BEA Products > Examples > AquaLogic Service Bus 3.0 > Service Bus Console
Alternatively, type http://localhost:7021/sbconsole in your Web browser. - Log in. The default user name and password is 'weblogic' (without quotes).
- Click Project Explorer
- Enter a new project name (example: dataServiceTest).
- Click on the name of your new project.
- In the Project Explorer locate the Create Resource option.
- From the Select Resource Type dropdown select:
Bulk > Resources from URL
This opens the wizard from which you can import a WSDL and its associated schema. The following table covers the actions needed to continue the example.
Importing a WSDL as a Bulk Resource
| Wizard Page | Option | Action |
Comment |
|
|---|---|---|---|---|
| 1. | Load Resources from URL |
URL/Path |
paste the WSDL URL |
The URL / Path is to the address of the WSDL you created (for an example see Obtaining the Web Service Address) |
| 2. | Resource Name | enter any name |
example: orderService | |
| 3. | Resource Type | enter WSDL | ||
| 4. | Next |
|||
| 5. | Review Loaded Resources |
click Import |
Load Resources from ALDSP WSDL Import
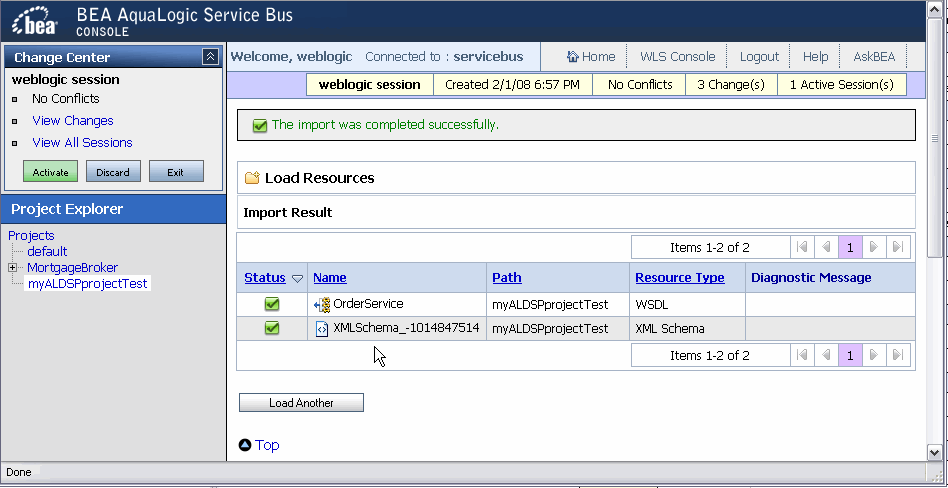
| See also: Loading Resources from a URL |
Step 5: Create the Business Service
The following generally describes the steps needed to create a business service from a WSDL imported from ALDSP.
- In the Project Explorer locate the Create Resource option.
- From the Select Resource Type dropdown select Business Service.
This opens the wizard from which you can create a business service. The following table covers the actions needed to continue the example.
Creating Business Service for the ALDSP Sample Data Service
| Wizard Page | Option | Action | Comment | |
|---|---|---|---|---|
| 1. | Creating a Business Service - General Config | Service Name | enter name | example: orderService |
| 2. | Description | any description | ||
| 3. | Service Type | WSDL Web Service | |
|
| 4. | click Browse... | browse to web service; example: orderService | ||
| 5. |
Select a WSDL | click on the WSDL | |
|
| 6. |
Select WSDL definitions | bindings or ports | click on a SoapBindings or SoapPort | example: OrderServiceSoapBinding |
| 7. |
click Submit | |||
| 8. |
Creating a Business Service - General Config | Next | ||
| 9. |
Creating a Business Service - Transport Config | Protocol | dsp | |
| 10. |
Endpoint URI | enter name of ALDSP project example:
t3://localhost:7001/RetailDataspace |
||
| 11. | click Add | |||
| 12. | Next | Accept defaults | ||
| 13. | Next | Accept defaults | ||
| 14. | Save |
| See Also: Creating and Configuring Business Services |
Step 6: Create the Proxy Service
The following generally describes the steps needed to create a proxy service.
- In the Project Explorer locate the Create Resource option.
- From the Select Resource Type dropdown select Proxy Service.
This opens the wizard from which you can create a proxy service. The following table covers the actions needed to continue the example.
Creating a Proxy Service for the ALDSP Sample Data Service
| Wizard Page | Option | Action | Comment | |
|---|---|---|---|---|
| 1. | Creating a Proxy Service - General Config | Service Name | enter name | example: orderService |
| 2. | Description | any description | ||
| 3. | Service Type | click on Business Service | |
|
| 4. | Business Service | click Browse | browse to created business service; example: orderService | |
| 5. |
Select Business Service | Select a WSDL | click on the radio button associated with the relevant business service | |
| 6. |
click Submit | |||
| 7. |
Creating a Proxy Service - General Config | Next | example: defaults are OK |
|
| 8. |
Creating a Proxy Service - Transport Configuration | |
Next |
example: defaults are OK |
| 9. |
Create a Proxy Service - HTTP Transport Configuration | Next |
example: defaults are OK |
|
| 10. | Create a Proxy Service - Operation Selection Configuration | |
Next | example: defaults are OK |
| 11. | Save |
In practice you would most likely identify the encryption key, digital signature key, and SSL client authentication key. However, for the example, none of these need to be identified.
![]() The AquaLogic Data Service Platform transport uses the character set provided by the proxy service. Therefore if the default character set needs to be changed prior to invoking a data service transport, the conversion encoding needs to be handled within the proxy service itself.
The AquaLogic Data Service Platform transport uses the character set provided by the proxy service. Therefore if the default character set needs to be changed prior to invoking a data service transport, the conversion encoding needs to be handled within the proxy service itself.
| See also: Creating and Configuring Proxy Services |
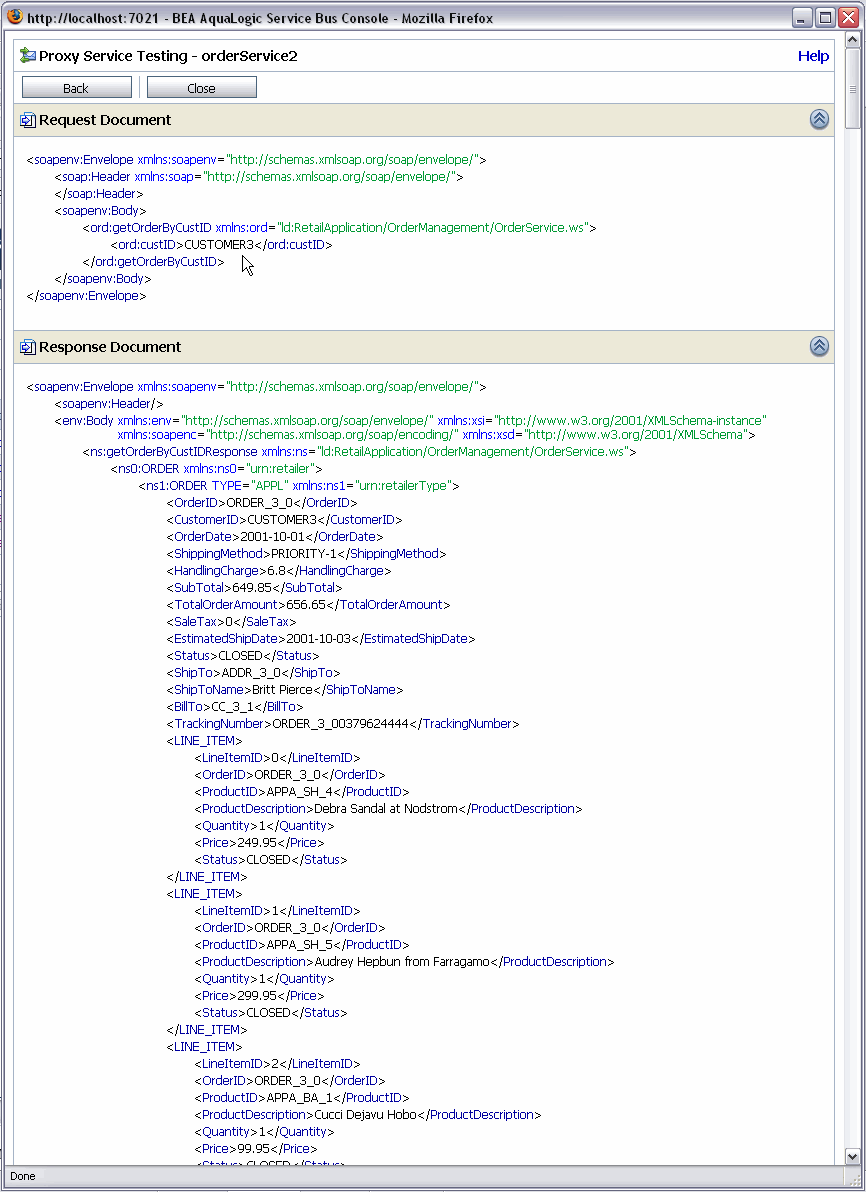
Step 7: Test Your Setup
The following steps would allow you to test access to the ALDSP data service through the proxy generated in the above steps.
- Activate your session; click Submit.
- In the Project Explorer locate the created proxy service (example: orderService).
- Select the Launch Test Console icon under Actions. The Proxy Service Testing console appears.
- From the Available Operations dropdown select your data service operation (example: getOrderByCustID)
- Modify the Payload with the information needed by the data service (example: CUSTOMER3)
<ord:getOrderByCustID xmlns:ord="ld:RetailApplication/OrderManagement/OrderService.ws"> <ord:custID>CUSTOMER3</ord:custID> </ord:getOrderByCustID>
- Click Execute. The data appears in the response document.
Request and Response from the ALSB Test Console
See Also
Using the AquaLogic Service Bus Console