Publishing Locate
Publishing in BEA AquaLogic Service Registry has several components:
Publish UDDI core structures:
Publishing Assertions - Asserting relationships between business entities.
Publishing Subscriptions - Subscribing interest in receiving alerts regarding changes made to a registry.
Publish Custody Transfer - Transferring ownership of selected UDDI structures.
Publish Resources
Publishing WSDL Documents - Publishing Web Services Description Language documents (WSDL) to BEA AquaLogic Service Registry.
Publish XML - Publishing XML Documents.
Publish XSD - Publishing XML Schema Definition (XSD) Documents.
Publish XSLT - Publishing Extensible Stylesheet Language Transformation (XSLT) Documents.
![[Note]](../images/note.gif) | Note |
|---|---|
You must be logged into BEA AquaLogic Service Registry to publish to it. There is a limitation of how many UDDI structures a user can store. See Administrator's Guide, Account Limits | |
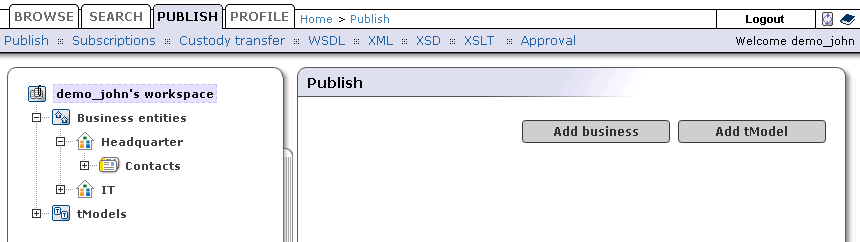
The main Publish page is divided into two panels. The left panel displays UDDI data structures that belong to the logged-in user or to which this user has access permissions. The panel on the right displays details about the data structure selected in the left panel. As you can see, if no structures are selected, buttons for adding businesses and tModels are displayed.
Publishing a Business Locate
This section explains how to publish a businessEntity and edit businessEntity-related structures:
Add business name and description
Add Contact
Add a Discovery URL
Add a Category
Add an Identifier
Add Business Services
Add Projected Services
Assert Business Relationships
To publish a business:
Click the Add Business button in the right-hand panel of the publish page, or select Add Business from the context menu that appears when you right-click the Business Entities node.
Enter the business name and a description, then click Add Business.
The business will appear in the left tree panel under the Business entities node

To edit a business entity:
Select the Publish menu tab.
Click the Publish link.
In the left tree panel, click on the business entity node you wish to edit.
After you modified the business entity, click the Save changes button.
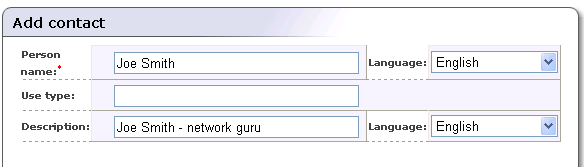
Adding a Contact Locate
The contact structure provides you with a space where you can list the people associated with the business entity. It is comprised of six properties: name, phone, email, address, description, and use type.
It is recommended that you use the description field to give a brief explanation of how the contact should be used.
Use types can be used to indicate the expected way in which the contact should be used. For example, "New Franchises", "Sales contact", "Technical Questions".
To add a contact:
On the Contacts tab of the Edit business or View business page, click the Add contact button. This displays the Add contact page where you can specify the contact's name and use type, as shown in Figure 71:
Click Add contact.
Build your lists of information for descriptions, phone numbers, and addresses. Each collection page, with the exception of Address collection, functions in the same manner. Click the Add button for the element you want to add. You will see two or more edit fields to be completed.
![[Important]](../images/important.gif)
Important Once the fields have been edited, you must click the Update icon on the right.
For addresses, click the Addresses tab. On this tab, add, edit, or delete existing address structures by clicking through the appropriate buttons.
When you add or edit an address, fill in the desired fields, add the data to your list, and click Update when finished.
Once you have updated all of the contact's information, click Save changes at the bottom of the Edit contact page. You will see the name and use type of your new contact entry in the contacts list.
Adding a Discovery URL Locate
To add a Discovery URL:
On the Edit business page click on the Add discovery URL button at the bottom of the Discovery URLs tab.
Complete the Discovery URL and Use Type edit fields with the relevant data.
When the fields are complete, click Update on the right to add this information to the list.
Click Save changes
Adding a Category Locate
With categories you can make your business more visible to searches by associating it with a number of accepted taxonomies. These taxonomic categories identify a business and its services by location, product or service line, and industry.
BEA AquaLogic Service Registry comes with keys for three basic checked taxonomies by default: These are the ISO 3166 geographical classification system and the NAICS and SIC industry and product classifications.
A key is also provided for Microsoft GeoWeb 2000, but as this is an unchecked taxonomy, key names and key values must be entered by hand.
To add a category to your list:
On the Categories tab of the Edit business page, click the Edit button. If there are already categories associated with this business entity, a list of them will be returned along with the Add category button. Otherwise, only the button will be displayed.
Click the Add category button beneath the Categories tab. This returns a list of available taxonomies from which you can choose categories to add to the list.
Click on an available taxonomy. Checked taxonomies will expand to a tree of categories valid for that model. You can type a known key name in the search box for faster retrieval. Note that larger branches are limited to ten items per page.
You can also search for the name of the taxonomy through the search box at the top of the taxonomy form. Use the starts with, contains, and exact match radio buttons as necessary. Like standard wild cards, these buttons search for the entered string as specified. For example, The pattern Cana, when used with the starts with button and a geographic taxonomy, returns the set {"Canada" "Canarias"}. The result set is limited to a maximum of 250 items.
Note If you provide too broad a search pattern, the resulting list will be truncated to 100 items.
With unchecked taxonomies (for example, Microsoft's GeoWeb taxonomy), it is possible to supply the key name and value through edit fields.
To add multiple categories, for example Albania and Armenia from the uddi-org:iso-ch:3166:1999 taxonomy, check the boxes to the right of those key names, and click Add category. If you would like to add categories from different pages, you must click Add category on the first page before continuing to the next page containing your selections. For example, to choose Albania and Kazakhstan:
Select Albania and click Add category.
Click Add category on the Find service page.
Click the link for page 8 on the expanded Find service page.
Check the box next to Kazakhstan and click Add category.
When you find the taxonomic classification you want, click the Add category button for checked taxonomies. For unchecked taxonomies, click Add category once the edit fields have been completed.
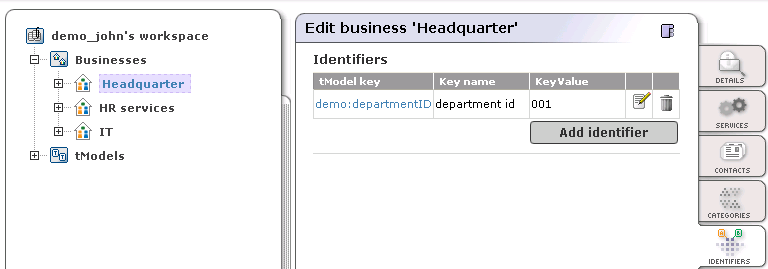
Adding an Identifier Locate
You can also make your organization more visible by supplying any of your public or private identifiers, such as D-U-N-S, Tax, or Geographical Locator numbers to the registry. UDDI identifier structures are composed of the following elements:
- tModel Key
Identifies a namespace or service in which the key name and key value have significance
- keyName
The name or description of the key being used
- keyValue
The value of the key
To add an identifier to your list:
On the Edit business page, switch to the Identifiers tab.
Click the Add identifier button at the bottom of the Identifiers list.
Choose the identifier type from the displayed list of available taxonomical tmodels. This returns a field in which you enter key names and key values.
When you have filled in the fields, click the Add identifier button to the right to add the new identifier to the list.
| Important |
|---|---|
If you use a tModel for a checked identifier, the key value must be of a recognizable form and value. For example, if you want to use a uddi-org:isReplacedBy key, you must supply the valid business entity UUID key in the keyValue field. Failure to do so will generate an error when you attempt to submit your business data to the database. | |
Publishing a Service Locate
To publish a service:
Select the Publish menu tab and click the Publish link
In the left panel, click on the business to which you want to add a service. The right display area will show business details.
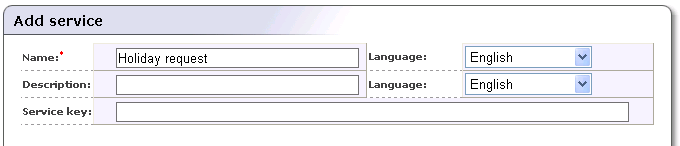
Select the Services tab, and click the Add Service button.
Alternately, right-click on the business node to which you want to add a service, and select Add Service from the context menu.
Enter the service name and description and click Add service.
The service is added to the left panel tree.
Publishing a Binding Template Locate
Once you have declared and defined a business service, you must establish how current and potential business partners can access that service, a technical description of the service including where it can be found. This is accomplished through bindingTemplates.
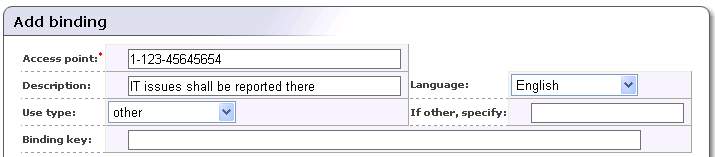
A bindingTemplate represents a Web service instance where you obtain (among other things) the access point of an instance of the parent business service. Every bindingTemplate has a unique bindingKey for identification. (An access point contains contact information such as a URL, email address, or telephone number used to locate the service.)
The AccessPoint in a bindingTemplate structure can contain a URL of the endpoint of the web service. If there is more than one businessEntity that provides the same business service we recommend you reuse this information in a bindingTemplate. Create a bindingTemplate on the businessService that holds technical information. Other businessServices should contain bindingTemplates with accessPoints containing the key of the first technical bindingTemplate. These accessPoints should also contain useTypes with the value hostingRedirector.
| Note |
|---|---|
Alternatively, reference to another bindingTemplate can be stored in a hostingRedirector structure instead of in an accessPoint. However the hostingRedirector structure (not the hostingRedirector value of useType) is a relic of UDDI v2 and is deprecated in UDDI v3. | |
To add a bindingTemplate:
Select the Publish menu tab and click the Publish link
In the left panel, click on the service to which you want to add a binding. The right display area will show service details. Select the Bindings tab and click the Add Binding button.
Alternatively, right-click the service node to which you want to add a binding, and select Add Binding from the context menu.
Publishing a tModel Locate
The tModel is a structure that takes the form of keyed metadata (data about data). In a general sense, the purpose of a tModel within BEA AquaLogic Service Registry is to provide a reference system based on abstraction. Among the roles that a tModel plays in UDDI is the ability to provide and to describe compliance with a specification or concept, to a taxonomy, for example.
To publish a tModel:
Select the Publish tab, and click the Publish link.
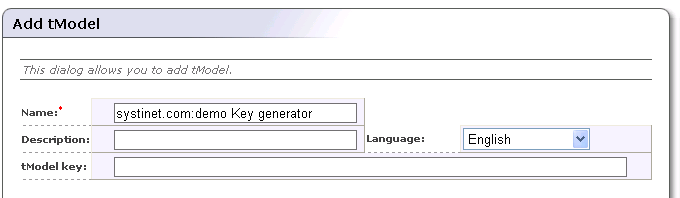
On the right Publish panel, click the Add tModel button.
Alternatively, right-click on the tModels node in the left panel and select Add tModel from the context menu.
Enter tModel name and description, and click the Add tModel button.
| Note |
|---|---|
If you delete an unused tModel, the tModel will be deleted from the database. The BEA AquaLogic Service Registry Administrator can change this behavior that tModels will be only marked as deleted. See Administrator's Guide, Node. | |
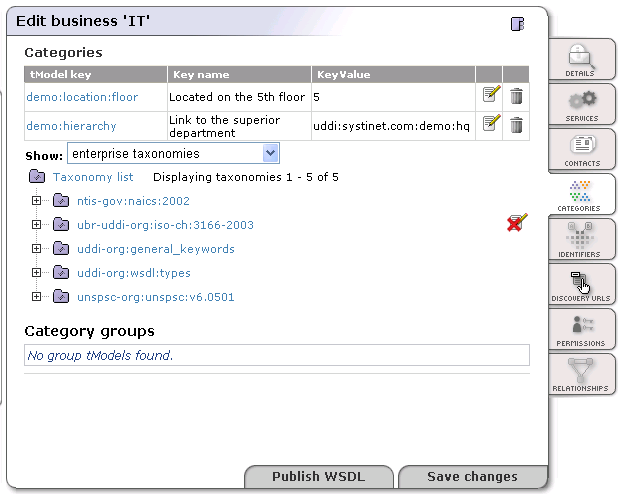
Adding a Category Locate
In this section we will show you how to assign demo:location:floor taxonomy to the numeric ordering as show at Figure 42.
Log on as demo_john user. ( password is the same as the username).
Click the Publish tab in the main menu. Click on the tModel demo:location:floor item in the tree in the left part of the page. Edit tModel 'demo:location:floor' page will appear.
Click Add category button. A taxonomy list will appear.
Select the taxonomy systinet-com:isOrderedBy, enter Key value uddi:systinet.com:comparator:numeric.
Click the button Add category , then Save changes button.
Publishing Assertions Locate
You can assert relationships that businesses under your BEA AquaLogic Service Registry custody have with others under your custody or with those under the custody of another user registered at the same operator node. The success of the latter assertion depends upon the approval of the user to whom the assertion is made.
When making an assertion you must supply:
The identity of the business from which the assertion is being made
The identity of the business to which it is making a claim. BEA AquaLogic Service Registry specifies these business identities through their UUID keys.
A reference explaining the nature of the relationship. References about the nature of the asserted relationship are derived from your own tModels or from the uddi-org:relationships tModel.
Adding an Assertion Locate
To add a new assertion:
On the Edit business panel, switch to the Relationships tab. This displays the Relationship assertions page. If you have already set assertions you will see a list of those previously published. If not, you will see the message "No assertions found."
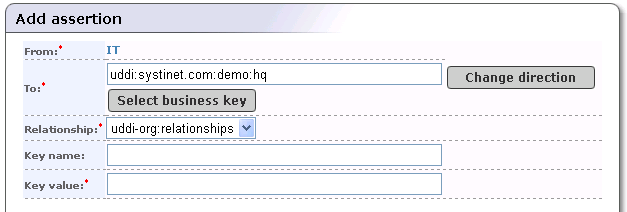
Click the Add new assertion button to display the Add assertion page shown in Figure 76.
If the business for which you are making an assertion will assume the "To" role, click the Change Direction button.
Find the business with which you want to assert a relationship in the same way you would on the inquiry side of UDDI. The difference is that, along with the business name, you will see the business descriptions in the retrieved record set and a Select business key icon next to each record.
When you locate the target business among the records, click its Select business key icon. This returns you to the Add assertion page with the UUID key of the selected business as the previously missing role.
Important A Keyed Reference will be required for the assertion to be valid. Click the Set button on the right of the Keyed Reference line. The Set keyed reference page displays.
Locate a tModel for your reference in the same way you would on the inquiry side of UDDI. The difference is that there are edit fields for Key Names and Key Values next to the tModel names and a Set button at the end of each row. Pertinent tModels include uddi-orgs:relationship and those you have published yourself.
Enter the key value and the key name or description. For uddi-orgs:relationship, the key value may be parent-child, peer-peer, or identity.
Click the Set value. This returns you to the Add assertion page. The tModel, key name, and key value added to the Keyed Reference record are displayed there.
Click the Add assertion button.
If the assertion is made to a business of which you have custody, the assertion will be completed automatically. If it is made to a business in the custody of another user, that user will need to review the assertion and complete it through his or her own account. This process is described below.
Accepting an Assertion Locate
Assume that you have been notified by a parent company, a subsidiary, a peer, or a cooperative member that they have asserted a relationship with your company. Now you must review that assertion and, if you are in agreement, complete it.
To accept the assertion:
On the Edit business page, switch to the Relationships tab.
View the incomplete assertions made toward your business in the Requested assertions list. Each assertion will have a Complete assertion button next to its status message.
Click the Complete assertion button to accept the assertion.
If you wish to refuse, leave the assertion incomplete by omitting step 3. Return to the Publisher assertions page by clicking the link at the top of the page. Contact the business making the assertion to resolve the details of your relationship. Incomplete assertions will not appear when users query for related businesses.
Publishing Subscriptions Locate
Subscriptions give you the ability to register interest in receiving information about changes made to BEA AquaLogic Service Registry. It allows the monitoring of new, changed, and deleted UDDI structures. Each subscription has a filter that limits the subscription scope to a subset of registry entities.
You can establish a subscription based on a specific query or set of entities in which you are interested. Query-based subscriptions notify the user if the result set changes within a given time span; entity-based subscriptions notify the user if the contents of the specified entities change.
Subscriptions enable:
notification of the registration of new businesses or services
monitoring of existing businesses or services
acquiring registry information for use in a private registry
acquiring data for use in a marketplace or portal registry
This filter should be one of the following ordinary UDDI inquiry calls:
find_business
find_relatedBusinesses
find_service
find_binding
find_tModel
get_businessDetail
get_serviceDetail
get_bindingDetail
get_tModelDetail
Adding Subscriptions Locate
To add new subscription:
Click on the Subscriptions link under the Publish menu tab to display the Subscriptions page.
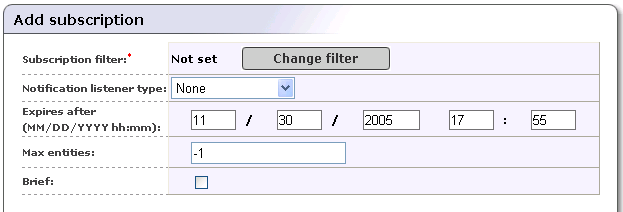
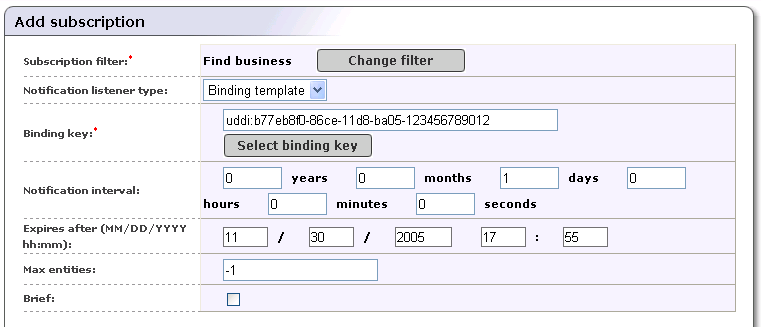
Click the Add subscription button to display the Add subscriptions page shown in Figure 77.
Click Change filter to specify a filter for your subscriptions. This returns the Subscription filter type page.
Select the filter type from the drop down list labeled Subscription filter type.
Click Select filter.
Set the filter properties in the same way you would for ordinary search calls.
Click the Preview results button to check filter results.
Click Save filter to return to the page with the filter settings shown in Figure 77.
Fill in the other subscription fields if needed. These are described below.
Subscription filter - Specifies on which UDDI structure change the notification will occur.
Notification listener type - Select notification listener type
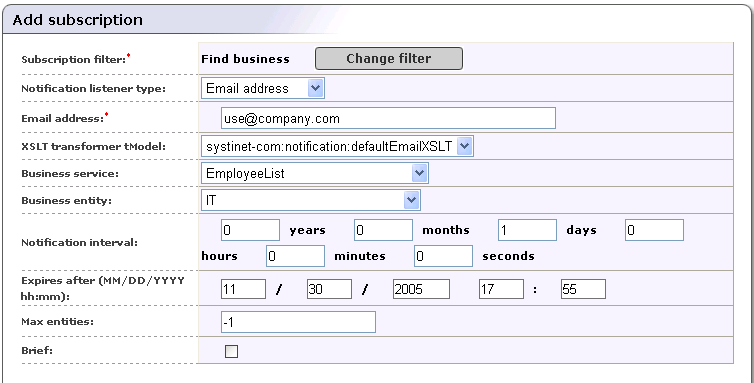
Email address
Service endpoint
Binding template
Email address - Email address to which notifications will be sent
XSLT transformer tModel - tModel that references XSLT
Business service and Business entity - Business service and business entity to which the bindingTemplate representing the notification listener service will be saved. These drop down lists lists only business entities and business services under which you have the permission to create the binding template.
Notification interval - Specifies how often change notifications are to be provided to a subscriber. Required only for asynchronous notifications.
Expires after - Specifies the period of time for which the administrator would like the subscription to exist.
Max entities - Contains the maximum number of entities in a notification returned to a subscription listener.
Brief - Controls the level of detail returned to a subscription listener.
Subscription filter - Specifies on which UDDI structure change the notification will occur.
Notification listener type - Select notification listener type here.
Email address
Service endpoint
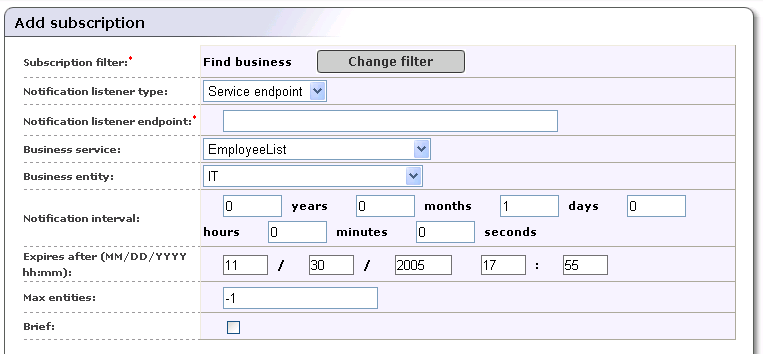
Binding template
Notification listener endpoint - URL to which the notification will be sent
Business service and Business entity - business service and business entity to which the bindingTemplate representing the notification listener service will be saved. These drop down lists lists only business entities and business services under which you have the permission to create the binding template.
Notification interval - Specifies how often change notifications are to be provided to a subscriber. Required only for asynchronous notifications.
Expires after - Specifies the period of time for which the administrator would like the subscription to exist.
Max entities - Contains the maximum number of entities in a notification returned to a subscription listener.
Brief - Controls the level of detail returned to a subscription listener.
Subscription filter - Specifies on which UDDI structure change the notification will occur.
Notification listener type - Select notification listener type here.
Email address
Service endpoint
Binding template
Binding Template - The bindingTemplate representing the notification listener service.
Notification interval - Specifies how often change notifications are to be provided to a subscriber. Required only for asynchronous notifications.
Expires after - Specifies the period of time for which the administrator would like the subscription to exist.
Max entities - Contains the maximum number of entities in a notification returned to a subscription listener.
Brief - Controls the level of detail returned to a subscription listener.
Editing Subscriptions Locate
To edit an existing subscription:
Click on the Subscriptions link under Publish menu tab to display the Subscriptions page.
Click the Edit button beside the subscription you want to edit. This returns the Edit subscription page. Here you can edit all subscription arguments except Subscription filter.
Deleting Subscriptions Locate
To delete subscription:
Click on the Subscriptions link under Publish menu tab to display the Subscriptions page.
Check the boxes beside subscriptions you want to delete.
Click the Delete selected button. This returns a confirmation page.
The confirmation page contains a list of subscriptions marked for deletion. If it is correct, press the Yes button to delete subscriptions permanently.
Publish Custody Transfer Locate
Custody transfer is a service used to transfer ownership of a selected structure (business entity, business service, binding template or tModel) from one user to another. It consists of two steps: selecting structure(s) to transfer and generating a custody transfer token. When the potential new owner receives the transfer token (by a secure transport such as encrypted email), that user may accept or reject the custody transfer.
| Important |
|---|---|
This token must be kept secret, as it is sufficient information to transfer custody of the structure to any user! | |
If you decide to cancel the request (for example the transfer token has been compromised), use the Discard transfer token button.
Requesting Custody Transfer Locate
To request custody transfer:
Click on the Custody link under Publish menu tab to display the Custody transfer page.
Click the Request transfer token link. This returns a list of UDDI data structures you own.
Check the box next to the UDDI structure(s) you wish to transfer, and click Request transfer token.
The next page will generate the transfer token. Copy the text of the transfer token to a file and send this file to the user who shall become the new owner of selected structures. Keep the token secret, as anyone who knows it can use it to transfer custody of that structure. Unencrypted email, for example, is not good data transfer choice.
Accepting Custody Transfer Locate
To accept custody transfer:
Click on the Custody link under Publish menu tab to display the Custody transfer page.
Click on the Transfer custody link.
Open the file with the transfer token, copy its contents to clipboard and paste it to the edit area on the Transfer structures page.
Click Transfer button.
Publishing WSDL Documents Locate
BEA AquaLogic Service Registry WSDL to UDDI (WSDL2UDDI) mapping is compliant with OASIS's technical note Using WSDL in a UDDI registry Version 2.0. It enables the automatic publishing of WSDL documents to UDDI, enables precise and flexible UDDI queries based on specific WSDL artifacts and metadata, and provides a consistent mapping for UDDI v2.
Publish WSDL Locate
To publish a WSDL document:
Click on the WSDL link under the Publish main menu tab.
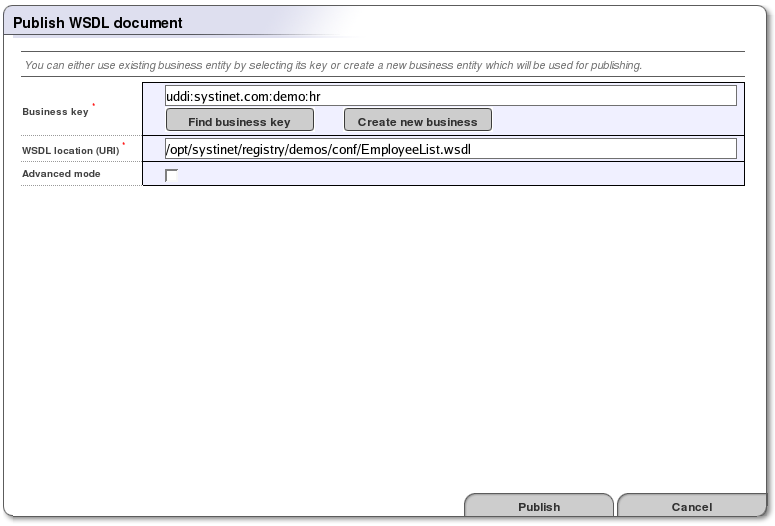
The page shown at Figure 81 will appear.
Enter the Business key of the business where services from WSDL document will be published. You can find a business key by clicking on the Find business key button.
Enter a WSDL location. You can try the WSDL document from BEA AquaLogic Service Registry demos from REGISTRY_HOME/demos/conf/employeeList.wsdl.
Leave the Advanced mode check box unchecked, then click Publish button.
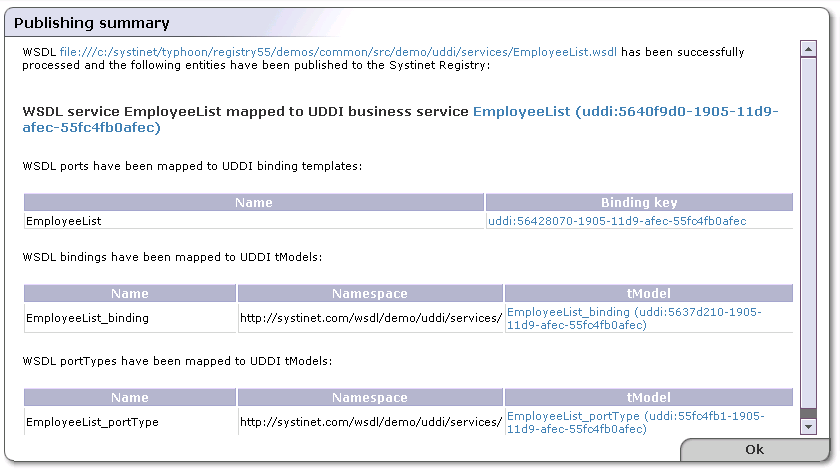
The WSDL document will be published to BEA AquaLogic Service Registry. You can review how WSDL artifacts of the document have been mapped to BEA AquaLogic Service Registry at Figure 82.
Publishing WSDL Documents (Advanced Mode) Locate
The advanced publishing mode allows you to specify certain details of how the WSDL document will be mapped to the UDDI registry. To publish in this mode, follow the steps from the previous section, and toggle the Advanced mode check box on. Once you click on the button Publish the Advanced Mode Publish page shown in Figure 83 will appear.
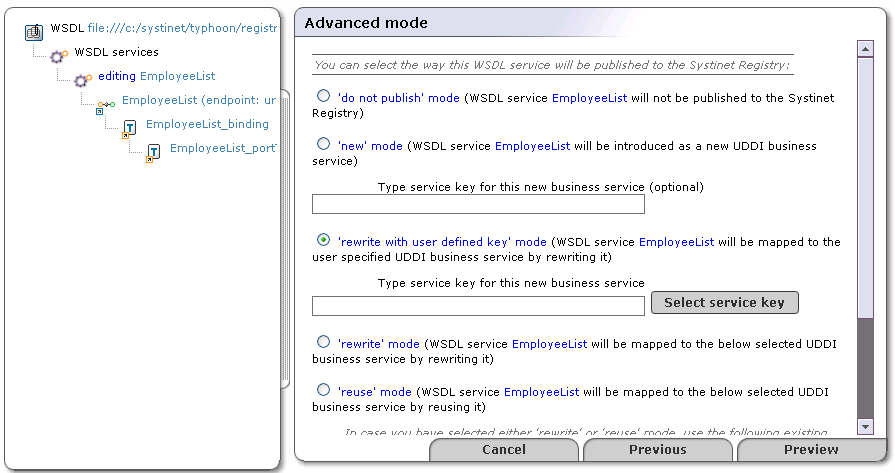
In the left tree panel, you can see how artifacts of the WSDL document will be published. Click on a tree branch to edit how WSDL artifacts will be mapped to BEA AquaLogic Service Registry. Explanatory instructions in the right panel describe the mapping options. Click Preview to see how each part of the WSDL document will be mapped to the registry. From the Preview page, you can go back to adjust the WSDL mapping.
The wizard's default selection in Figure 83 is based on the following rules:
If a possible mapping of a WSDL artifact already exists in the registry, and the user owns this UDDI structure, the wizard will suggest rewriting that mapping in the registry.
If a possible mapping of a WSDL artifact already exists in the registry, and the user does not own this UDDI structure, the wizard will suggest reusing that UDDI entity.
If no mapping of the WSDL artifact exists in the registry, the wizard will suggest creating a new UDDI entity to represent the mapping.
BEA AquaLogic Service Registry applies these rules automatically when you publish a WSDL document without the Advanced mode option.
| Note |
|---|---|
Publishing of WSDL operations and WSDL messages is not implemented in this BEA AquaLogic Service Registry release. | |
Unpublish WSDL Locate
To unpublish a WSDL definition:
Search for the WSDL document in the registry.
In the result view, click on a business service.
The page with business service details will appear, click the Unpublish button at the page.
The Unpublish WSDL document wizard will appear.
Publish XML Locate
BEA AquaLogic Service Registry XML to UDDI (XML2UDDI) mapping enables the automatic publishing of XML documents to UDDI, enabling precise and flexible UDDI queries based on specific XML artifacts and metadata
If you want to unpublish an XML document, use the Find XML button, then click the Unpublish button in the search result page.
Publishing an XML Document Locate
To publish an XML document:
Click on the XML link under the Publish main menu tab.
The page shown in Figure 84 will appear.
Enter an XML location. To demonstrate, choose the file REGISTRY_HOME/demos/conf/employees.xml from the BEA AquaLogic Service Registry demos.
Leave the Advanced mode check box unchecked, and click Publish.
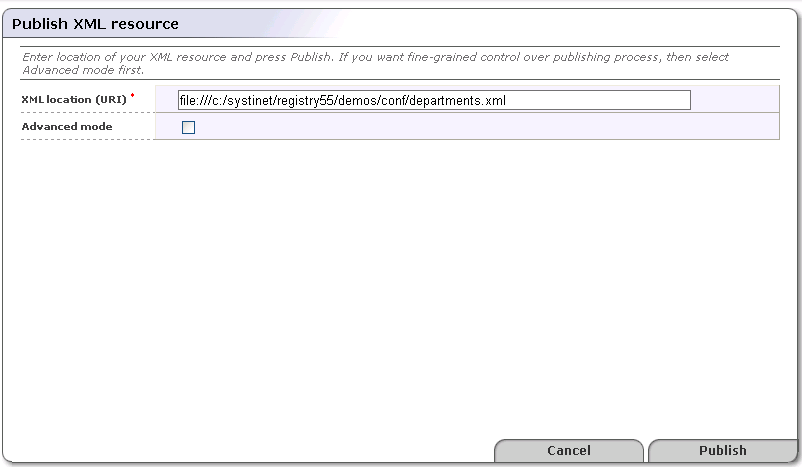
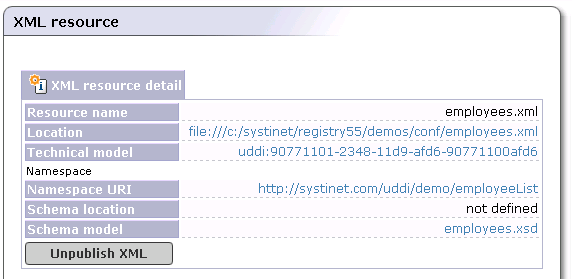
The XML document will be published to BEA AquaLogic Service Registry You can review how the XML document has been mapped to BEA AquaLogic Service Registry at Figure 85.
| Note |
|---|---|
The content of the XML document is not copied into the registry | |
Publishing an XML Document - Advanced Mode Locate
The advanced publishing mode allows you to specify certain details of how the XML document will be mapped to the UDDI registry. To publish in this mode, follow the steps from the previous section, check the box labeled Advanced mode, and click Publish. This returns the Advanced Mode Publish page shown in Figure 86 will appear.
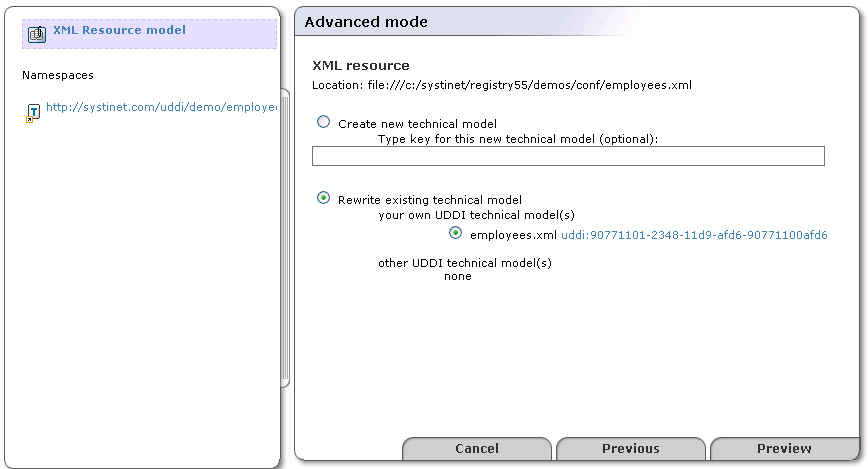
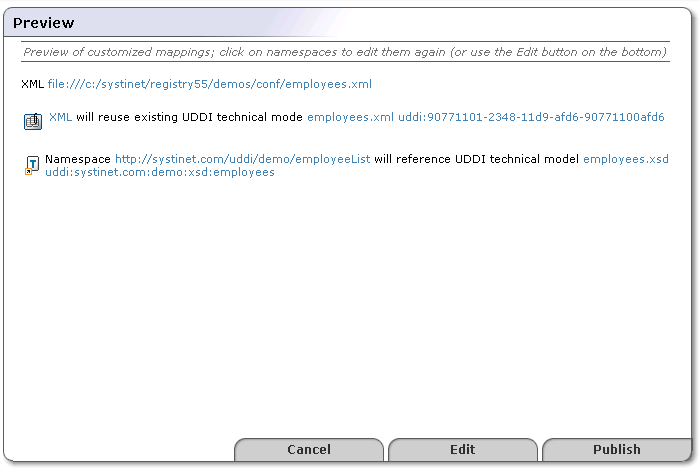
In the left tree panel, you can see how Namespaces of the XML document will be published. Click on a Namespace to edit how the Namespace will be mapped to BEA AquaLogic Service Registry. Explanatory instructions in the right panel describe the mapping options. Click Preview to see how the XML document and its Namespaces will be mapped to BEA AquaLogic Service Registry. From the Preview page, you can go back to edit the XML mapping.
Unpublish an XML Document Locate
The Unpublish XML operation allows you to delete an XML mapping from BEA AquaLogic Service Registry To unpublish an XML document, you must search for the XML document first.
Publish XSD Locate
BEA AquaLogic Service Registry XSD to UDDI (XSD2UDDI) mapping enables the automatic publishing of XML schema documents to UDDI, enabling precise and flexible UDDI queries based on specific XML schema artifacts and metadata.
If you want to unpublish an XML schema document, use the Find XSD button and click the Unpublish button in the search result page.
Publishing an XML Schema Locate
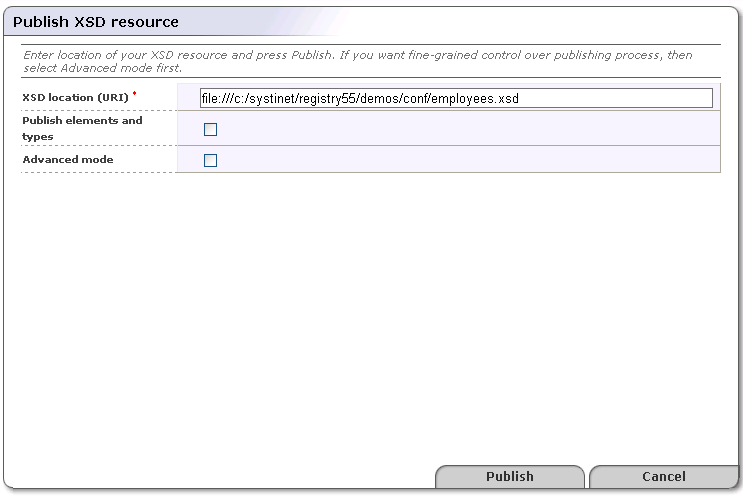
To publish an XML Schema document:
Click on the XSD link under the Publish main menu tab.
The page shown in Figure 88 will appear.
Enter an XML Schema location. To demonstrate, use the file REGISTRY_HOME/demos/conf/employees.xsd from the BEA AquaLogic Service Registry demos.
Leave the Advanced mode check box unchecked, then click Publish.
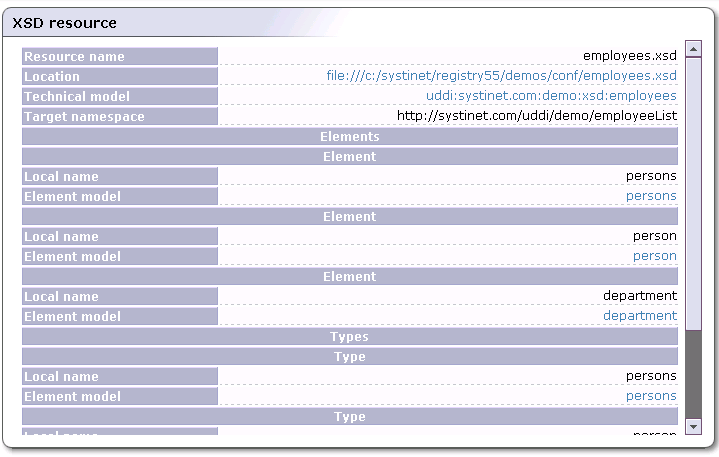
The XML Schema document will be published to the registry. You can review mappings of the XML Schema document itself and its elements at Figure 89.
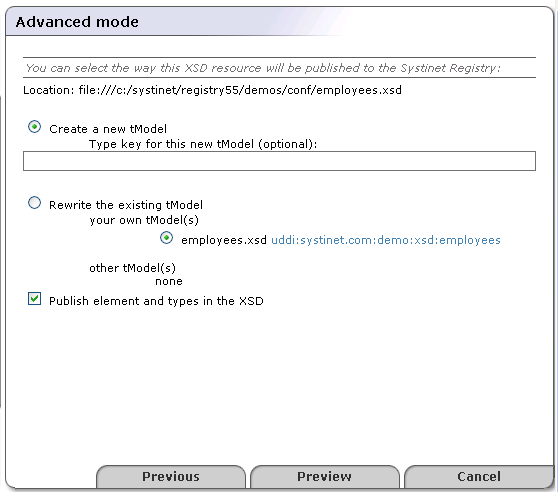
Publishing an XML Schema (Advanced Mode) Locate
The advanced publishing mode allows you to specify certain details of how the XML Schema document will be mapped to the UDDI registry. To publish in this mode:
Follow the steps from the previous section, but check the Advanced mode box
Click Publish. This returns the Advanced Mode Publish page shown in Figure 90.
In the left tree panel, you can see how the XML Schema and its possible XML Schema imports will be published. Click on an XML Schema model node to edit how the parts of the XML Schema will be mapped to the BEA AquaLogic Service Registry. The explanatory instructions in the right panel describe the mapping options.
Click the Preview to see how the XML Schema document will be mapped to BEA AquaLogic Service Registry. From the Preview page, you can go back to edit the XML Schema mapping.
Unpublish an XML Schema Locate
The Unpublish XML operation allows you to delete the XML Schema mapping from BEA AquaLogic Service Registry. To unpublish an XML Schema document, you must search for the XML Schema document first.
Publish XSLT Locate
BEA AquaLogic Service Registry XSLT to UDDI (XSLT2UDDI) mapping enables the automatic publishing of XSL Transformations to UDDI, enabling precise and flexible UDDI queries based on specific XSLT artifacts and metadata.
If you want to unpublish an XSL transformation, click the Find XSLT button, then click the Unpublish button in the search result page.
Publishing an XSL Transformation Locate
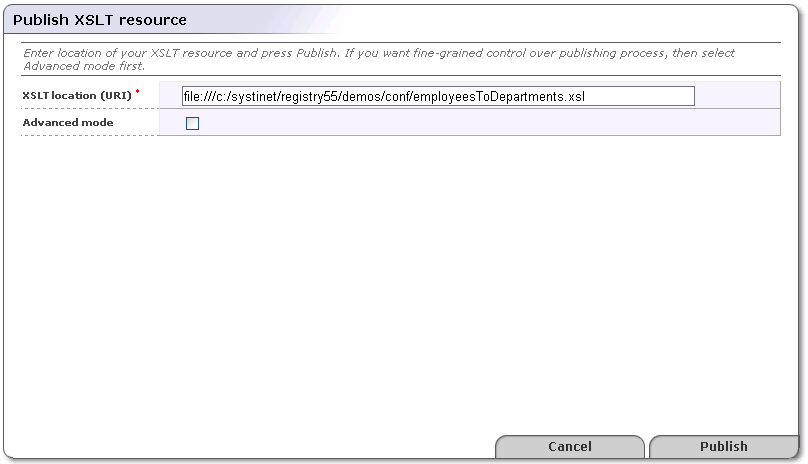
To publish an XSL transformation:
Click on the XSLT link under the Publish main menu tab.
The page shown in Figure 91 will appear.
Enter an XSLT location. To demonstrate, use the REGISTRY_HOME/demos/conf/employeesToDepartments.xsl file from the BEA AquaLogic Service Registry demos.
Leave the Advanced mode check box unchecked, then click Publish.
The XSL transformation will be published to BEA AquaLogic Service Registry. You can review how XSLT artifacts have been mapped to BEA AquaLogic Service Registry at Figure 92

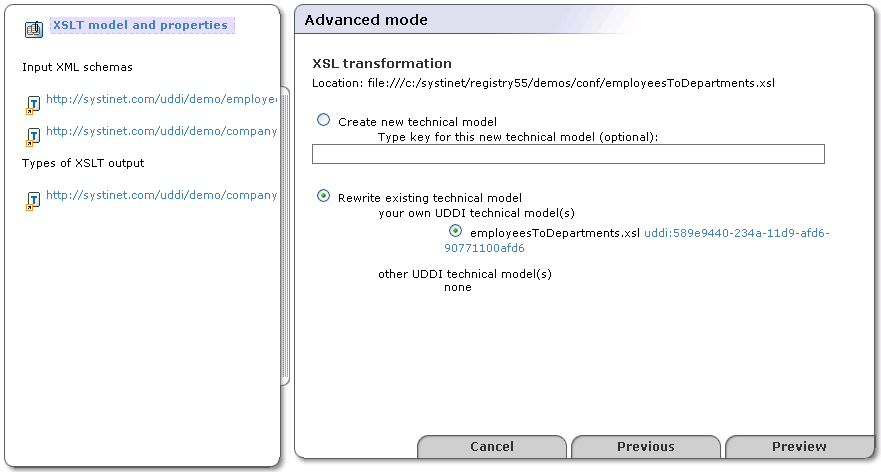
Publishing an XSL Transformation (Advanced Mode) Locate
The advanced publishing mode allows you to specify certain details of how the XSL transformation will be mapped to the UDDI registry. To publish in this mode:
Follow the steps from the previous section, but check the Advanced mode box.
Click Publish. This returns the Advanced Mode Publish page shown in Figure 86.
In the left tree panel, you can see how XSLT and its input and output schemas will be published.
Click on an XSLT node itself, its input XML Schemas, and types of XSLT output to edit how these artifacts will be mapped to BEA AquaLogic Service Registry. Explanatory instructions in the right panel describe the mapping options.
Click Preview to see how the XSLT will be mapped to BEA AquaLogic Service Registry. From the Preview page, you can go back to edit the mapping.