Selecting a campus or clicking the New button on the Campus Summary page takes you to the Campus Details page for that campus. From other pages, the Campus Details page may be accessed by clicking Topography > Campus at the top of the Admnistrator Details section, or through the Administrator Navigator. On the Campus Details page you can update your campus information and access additional levels of detail where you can make changes to the attributes for campus buildings, floors, and rooms.
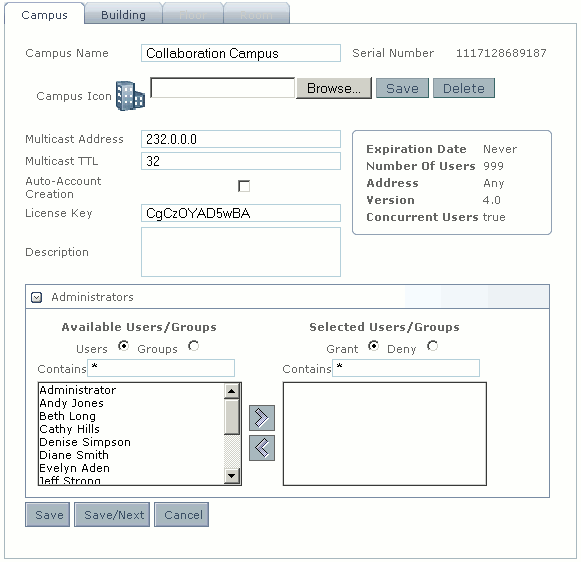
Figure 2-1 Campus Details
Campus Details
The Campus Details page is accessed by adding or selecting a campus from the Campus Summary page, or by selecting a campus from the Administrator Navigator. The Campus Details page allows administrators to add, view, or modify campus details. This page also allows access to additional levels of detail where changes can be made to the attributes for buildings, floors, and rooms. For further navigation instructions, see Navigating Administration.
Details that may be viewed, modified, or added at the campus level are as follows:
Campus Name: A name used to identify the campus.
Serial Number: A read-only unique identifier used in creating remote campus connections.
Campus Icon: (Optional) Clicking the Browse button opens an explorer to locate an image file on your computer that will serve as the icon for the new campus.
Multicast Address: The multicast address used for Audio/Video conferencing. Contact your network administrator if you are unsure of the correct address value.
Note:
If connecting multiple campuses using the Remote Campus feature, please make sure that each campus has a unique mulitcast address, (using unique values in the higher two octets) between 232.0.0.0 and 239.0.0.0. One possibility is to use 232.0.0.0 for the first campus, 233.0.0.0 for the second, 234.0.0.0 for the third, etc.
Multicast Time To Live (TTL): The multicast TTL used for Audio/Video conferencing. This is the number of network segments the broadcast traffic is permitted to traverse. Contact your network administrator if you are unsure of the correct TTL value.
Auto-Account Creation: (Optional) Selecting the checkbox allows users to automatically enroll and create an account for this campus when they access the system for the first time.
License Key: The license key field does not appear in CollabraSuite, BEA Edition.
Licenses should be received from BEA and updated via the BEA UpdateLicense tool by running the command UpdateLicense "NAMEOFNEWLICENSEFILE"
Description: (Optional) A description of the campus.
Administrators: The list of users permitted to administrate the campus. See Selecting Administrators for step-by-step instructions on selecting administrators.
To view or modify campus details:
Select a campus from the Campus Summary page or select a campus from the Administrator Navigator. The Campus Details page will appear.
Make changes to campus details as desired.
Note:
To generate a new eval license key for the current version, clear the license key field and save. Upon saving a campus with a blank license key, a new eval license key is generated for the campus.
Click the Save button to save your changes.
Or
Click the Save/Next button to save these changes and add another new campus
Figure 2-2 Campus Details
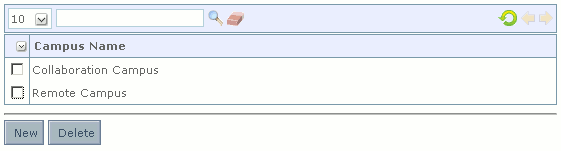
Adding and Deleting a Campus
Several campuses may be added to the collaborative environment, each with its own set of buildings, floors, and rooms. Administrators may create as many campuses as are necessary for their organization, and connections may be created between campuses using the Remote Campus feature. From the Campus Summary page, administrators may also delete existing campuses. All rooms, floors, and buildings within that campus will be deleted. There must be at least one campus created within the CollabraSuite, BEA Edition environment at all times. If creating multiple campuses, make sure each campus has a unique multicast address (see Campus Details). Administrators may disable a connection to a remote campus without deleting the campus by using the Remote Campus page.
The Campus Summary page has a list of campuses located in the Campus Name column. This page is used to select, add, and delete campuses.
To add a new campus:
On the Campus Summary page, click the New button to access a new Campus Details page.
Complete campus details.
Campus Name.
Campus Icon: (Optional) Clicking the Browse button opens an explorer to locate an image file on your computer that will serve as the icon for the new campus.
Multicast Address: The multicast address for this campus. Contact your network administrator if you are unsure of the correct address value.
Note:
If connecting multiple campuses using the Remote Campus feature, please make sure that each campus has a unique mulitcast address, (using unique values in the higher two octets) between 232.0.0.0 and 239.0.0.0. One possibility is to use 232.0.0.0 for the first campus, 233.0.0.0 for the second, 234.0.0.0 for the third, etc.
Auto-Account Creation: (Optional) Selecting the checkbox allows users to automatically enroll and create an account for this campus when they access the system for the first time.
License Key: The license key field does not appear in CollabraSuite, BEA Edition.
Note:
Licenses should be received from BEA and updated via the BEA UpdateLicense tool by running the command UpdateLicense "NAMEOFNEWLICENSEFILE"
Description: (Optional) A description of the campus.
Administrators: See Selecting Administrators for step-by-step instructions on selecting administrators.
Click the Save button to save the new campus details and return to the campus list. Changes will not be recorded unless you save.
Note:
To add another campus without returning to the campus list page, click the Save/Next button. A new Campus Details page will appear.
To delete a campus:
On the Campus Summary page, select the check box next to the campus you wish to delete. A checkmark will appear in the box when the campus has been selected.
Click the Delete button at the bottom of the page. A confirmation window will appear.
Select OK to delete the campus or Cancel to return to the main page.
Figure 2-3 Campus Summary
Select Campus Administrators
Administrators may assign administrative access to users within the collaborative environment. This will allow individual users to change campus details, assign user access, and access other administrative functions to the campus they are assigned. In addition to the users and groups listed as campus administrators, any user belonging to the CollabraSuiteAdministrators role may also administer the campus. Remote users may not be administrators for a local campus.
To select administrators for the campus:
From the Campus Details page, select the arrow button next Administrators to view the administrator selection tool.
Select the Users or Groups radio button to view available users.
Type criteria into the Contains field and press Enter to quickly search for users or groups in the list. A * will display all users/groups in the list
Highlight the desired user(s) or group(s) in the Available Users/Groups list.
Select the right arrow button to move the highlighted users to the Selected Users/Groups list on the right.
Select the Grant or Deny radio buttons to either grant all users in the selected users/groups list administrative access or to deny all selected users/groups access.
Note:
If you choose to deny all users in the Selected Users/Groups access, those users listed in the Available Users/Groups list will be granted administrative access.