CollabraSuite, BEA Edition users can manage their own profile information via the user information management tool. Account information, including name and user icon, may be changed by the individual user. Additionally, the account owner maintains their home room, contact information, and skills. Information concerning other users can be viewed by browsing the user list in the user information management tool.
To access the User Information dialog:
Right-click in any of the collaboration components and select the Info menu option.
Note:
Or
Where available, click the User Information icon in the toolbar.
The User Information dialog will appear.
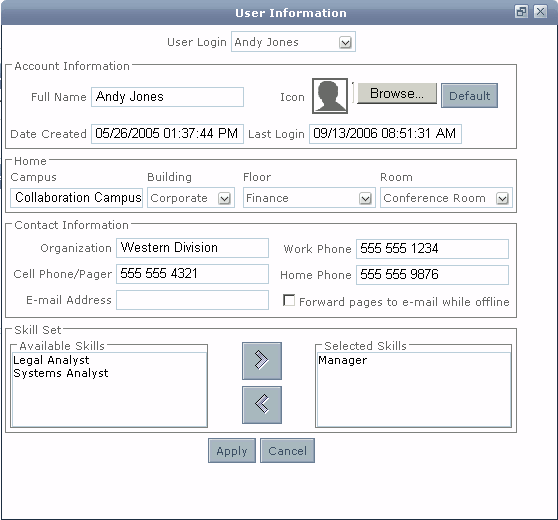
Figure 8-1 User Information
The User Information dialog contains the following information:
User Login—the selected user for displaying information in the User Information dialog.
Account Information—full name, user icon, date the account was created, and the last login date of the user.
Home—the room designated as the user's home room, the floor, the building, and the campus of the home room.
Contact Information—organization, cell phone/page number, email address, work phone, home phone, and a box to check if the user would like to automatically redirect pages to the email specified.
Skill Set—a field allowing an administrator or users themselves to apply a set of skills for user accounts.
To retrieve information on another user account:
Select a user from the User Login pull down menu. The data in the window will change to reflect the user selected.
To change the Icon:
Select the Browse button just to the right of the Icon field in the User Information dialog to display the Choose Image dialog window.
Browse to the file that contains the new image icon (e.g. a gif or jpeg file).
Click Open to close the Choose Image dialog window.
To change home room:
Select the building, floor, and room from the pull-down menus in the Home section.
To change contact information:
Type the new information in the Contact Information fields.
To receive page notifications while off line:
Select the checkbox area for the Forward Pages to Email while off-line option.
To add skills to the Skill Set:
Select items from the All Skills List and click the right arrow to move the selected skill from the All Skills List to the Selected Skills List.
To remove skills from the Skill Set:
Select items from the Selected Skills List and click the left arrow to move the selected skill from the Selected Skills List to the All Skills List.
Click at the bottom of the User Information dialog window to save any changes made to the fields on this dialog.
Preferences Editor
CollabraSuite, BEA Edition provides a preferences editor for customizing the collaborative experience on an individual basis. Items configured using the preferences editor are saved for the user account and are reused for future login sessions.
To launch the Preferences Editor:
Select the Preferences Editor icon from the toolbar.
The Preferences Editor window will display.
Figure 8-2 Preferences Editor
General Preferences
To customize the user icons displayed throughout the application:
Select Show User Icons
Click OK to save the changes and exit the window, or click Cancel to exit the window without saving the selection.
User Icons will now be displayed
To customize the dates and timestamps:
Select the desired date and time formats from the selection lists.
Click OK to save the changes and exit the window, or click Cancel to exit the window without saving the selection.
Figure 8-3 Preferences Editor
To change the idle comment in the chat monitor:
Type a new entry in theIdle comment field.
Press the enter key or click Apply for future reporting of an idle session.
To display only chat messages:
Select the Show Chat Only check box.
Click Apply to save the settings for your user account.
The Chat Messages field will now display only chat messages and hide user enter and exit room events.