| SIP Servlet Engine© Documentations |
| Top > System Administration > Installation > Installation Manual (WebLogic Server Edition) |
Installation Manual (WebLogic Server Edition)
1. Introduction
This document describes how to install SIP Servlet Engine (WebLogic Server Edition).
2. File Configuration
The following table shows the contents of the distribution file.
| File name | Summary |
|---|---|
| sip-license.xml | The SIP Servlet Engine evaluation license file. |
| build.xml | The Ant file used to install SIP Servlet Engine. |
| install.properties | The properties information file which contains configuration information which is set for each installation environment. |
| constants.properties | The properties information file which contains configuration information which does not need to be changed in normal installation. |
| legal/ | The license file for the library contained in the auxlib. |
| bin/ | The scripts or its templates. |
| conf/ | The template of a config file, and a DTD file |
| lib/ | The jar files provided by OKI. |
| auxlib/ | The jar files introduced from an open source product and so on. |
| sql/ | SQL and the script files for setting DB. |
| apps/ | The war (or ear) files which contain the demo applications. |
The apps/sip-docs.war file contains the documents about this product. All contents of this file are made up of static files (such as HTML files, image files). Therefore, you can see these documents directly on your PC by decompressing the file*1, instead of deploying them as Web applications.
3. Preparations
a. Software
Make sure that the following software are already installed in the target machine.
- OS
- Solaris8
(Solaris 8 Recommended Patch Cluster and J2SE Solaris 8 Recommended Patch Cluster should be already applied.)
http://sunsolve.sun.com/pub-cgi/show.pl?target=patchpage - RedHat Enterprise Linux 3.0.1 AS, ES
- Windows2000 Server
- Windows XP
- WebLogic Server 8.1 SP3
- J2SE 1.4.2_04 (or later)
- One of the following RDBMS products
- Oracle 9.2.0 (or later)
- SQLServer 2000 SP3a
- PostgreSQL 7.3.4 (or later)
- MySQL 3.23.58 (or later)
- Ant 1.6.1 (Above.The number of versions newer than Ant of WebLog attachment is required.)
http://ant.apache.org/bindownload.cgi - JMF 2.1.1e
http://java.sun.com/products/java-media/jmf/2.1.1/download.html
Note that the above software indicated in Italics can be used only for development. That is, they can not be used for production.
Install JMF only when you want to try all functions of the sip-demo. JMF enables you to use the voice mail demo function. But if you use Linux-like operating systems, JMF does not work correctly*2.
The WebLogic Server distribution file includes Ant-1.5.3.
b. Environment Variables
Make sure that the following environment variables are set properly.
- BEA_HOME
- JAVA_HOME
- ANT_HOME
c. Creating Your WebLogic Domain
Create your WebLogic domain in which SIP Servlet Engine is installed. This document describes on the assumption that your domain name is mydomain.
d. Locating Your License File
If you have your SIP Servlet Engine license file, copy it to the $BEA_HOME/ directory as sip-license.xml.
Because the evaluation license file is contained in the distribution file, you do not need to obtain another license file if you use this evaluation license.
4. Installation
Install SIP Servlet Engine with the same OS user privilege that you used when you installed WebLogic Server.
a. Decompressing the Distribution File
Decompress the distribution file into the appropriate directory.
$ cd /tmp
$ jar xvf sipap-3.0.0.zip
$ cd sipap-3.0.0/ (Hereafter this directory will be referred to as $SIPAP.)
b. Initializing Your Database
(i) Oracle
Create a database using the Database Configuration Assistant. Select the UTF-8 character set to prevent Japanese characters contained in the DB from being garbled.
Execute the script in the sql/oracle directory to create a table space, and its users and tables. And if you use the demo applications provided with the distribution file, execute the script initSIPAP_app.sh in the same directory.
Here is an example. The following table describes the values and meanings of the arguments.
| Value of the argument | Meaning of the argument |
|---|---|
| system/manager | The account/password of the DB administrator (system). |
| sipns/passwd | The DB account/password of CenterStage-NS. |
| sipap/passwd2 | The DB account/password of SIP Servlet Engine. |
| assipdb | ORACLE_SID |
$ cd $SIPAP/sql/oracle
$ sh crtTblspaces.sh system/manager /export/home/oracle/app/product/9.2.0/oradata/assipdb
$ sh crtUser.sh system/manager sipns passwd
$ sh crtUser.sh system/manager sipap passwd2
$ sh initAll.sh sipns passwd sipap passwd2
$ sh initSIPAP_app.sh sipap/passwd2
(ii) PostgreSQL
Start the database server if it is not already running.
Execute the script createDB.sh in the sql/pgsql directory to create a database and its tables. Specify the name of the database to be created as an argument of this script. And if you use the demo applications provided with the distribution file, execute the script creareAppDB.sh in the same directory. Here is an example when the database name is set to sipdb.
$ cd $SIPAP/sql/pgsql
$ sh ./createDB.sh sipdb
$ sh ./createAppDB.sh sipdb
(iii) MySQL
"root" is the default DB user registered during installation. Add the DB user for SIP Servlet Engine (sipap) as follows:
$ mysql --user=root mysql
mysql> insert into user set user="sipap", host="localhost";
mysql> grant all on *.* to sipap@localhost;
mysql> flush privileges;
mysql> quit
In addition, edit the my.cnf file so that Japanese characters can be contained in the DB.
- For RedHat9
# cd /etc
# vi my.cnf
Add the following two lines in the [myslqd] group.
language=/usr/share/mysql/japanese
default-character-set=ujis
- For Windows
Start WinMySQLadmin located under C:\mysql\bin\, etc. and click the "my.init Setup" tab.
Add the following two lines in the [myslqd] group.
language=C:/mysql/share/japanese
default-character-set=sjis
Create a database as follows. Specify the DB name and the DB user name as arguments of the script "createDB.sh".
$ sh ./createDB.sh sipdb sipap
$ sh ./createAppDB.sh sipdb sipap
The above example creates the user "sipas" who has the same privileges as "root" with no password. If you need to specify its password in terms of security, modify the script accordingly.
(iv) SQLServer
Create a database as follows:
$createDB.bat
$createAppDB.bat
Specify the following items as arguments of the batch file.
- DBServer: The SQL Server name (and its instance name).
- DBName: The database name.
- DBUser: The database user name. If not specified, the osql option "-E" is used.
- DBPasswd: The database password. If DBUser is not specified, you do not need to specify it.
Example
$ cd sip-cage/db/sqlserver/
$ createDB.bat (local)\sipap sipas sa rootUser
$ createAppDB.bat (local)\sipap sipas sa rootUser
c. Editing the install.properties File
Edit the install.properties file to set values of the various items for installing.
$ cd $SIPAP
$ vi install.properties
For more information about the items specified in this file, see this page.
d. Installing Using Your Ant (1)
Install the SIP Servlet Engine configuration files in WebLogic Server (referred to as WLS).
$ cd $SIPAP
$ sh ./wlinstall.sh install
If the file installation has completed successfully, a splash screen appears for three seconds. When it does not appear, check if any configuration is incorrect.
However, in some situations, such as when you are installing from a serial console, where the splash screen can not appear, add the -nogui option as follows so that the splash screen does not appear.
$ sh ./wlinstall.sh -nogui install
The following files are created by this task*3.
$BEA_HOME/sip-license.xml
$BEA_HOME/sip/lib/*
$BEA_HOME/sip/auxlib/*
$BEA_HOME/user_projects/domains/mydomain/startsSIPonWebLogic.sh
$BEA_HOME/user_projects/domains/mydomain/startsManagedSIPonWebLogic.sh
$BEA_HOME/user_projects/domains/mydomain/sipserver.xml
$BEA_HOME/user_projects/domains/mydomain/log4j.xml
$BEA_HOME/user_projects/domains/mydomain/sip_jaas.config
$BEA_HOME/user_projects/domains/mydomain/logs/
For a sample output of this task, see wlinstall-install-log.txt.
e. Starting WebLogic Server
When you use PostgreSQL or MySQL as a DB server, install the appropriate JDBC driver in the $BEA_HOME/sip/auxlib.
$ cd $BEA_HOME/sip/auxlib
$ cp .../pg73jdbc3.jar .
$ cp .../mysql-connector-java-3.0.9-stable-bin.jar .
Start WLS when the SIP Servlet Engine file installation has completed. Note that you should run the startSIPonWebLogic.sh copied in the previous step (d. Installing Using Your Ant (1)) rather than the standard startup script startWebLogic.sh.
$ cd $BEA_HOME/user_projects/domains/mydomain
$ ./startSIPonWebLogic.sh
This script is used to add the class path required to run SIP Servlet Engine and start the startWebLogic.sh. For a sample output of this task, see wlinstall-install-wls.txt.
f. Installing Using Your Ant (2)
Set the WLS configuration for SIP Servlet Engine.
$ cd $SIPAP
$ sh ./wlinstall.sh config
If the configuration has completed successfully, a splash screen appears for three seconds as when installing. When it does not appear, check if any configuration is incorrect.
The following configuration information is added by this task.
- Startup class and shutdown class (StartupClass, ShutdownClass)
- Database access (JDBCConnectionPool, JDBCTxDataSource)
In addition, SPI sample implementation required to run SIP Servlet Engine should be deployed here.
For a sample output of this task, see wlinstall-config-log.txt.
Sometimes, this task fails because of database -related configuration errors, etc. In this case, run "wlinstall config" again after returning to the state prior to the installation through the Admin Console. For the nodes added by this config process, see 5. a. described below.
g. Configuring the Log4J
Perform this step only when you use a domain created for WebLogic Portal or WebLogic Integration. You do not need to configure it when you use a normal WebLogic Server domain.
WebLogic Portal (WLP) and WebLogic Integration (WLI) use the same Log4J as SIP Servlet Engine for outputting log messages. Because the normal WLP (or WLI) installation process overwrites logging configuration for SIP Servlet Engine, log messages output by SIP Servlet Engine are no longer recorded.
Therefore, edit the Log4J configuration file according to the following step.
$ cd $BEA_HOME/weblogic81/common/lib
$ vi workshopLogCfg.xml (or workshopLogCfgVerbose.xml)
For a sample configuration file that combines logging configurations for WLP and SIP Servlet Engine, see workshoplogcfg.xml.txt.
h. Restarting WebLogic Server
Please stop WLS in order to confirm renewal of a configuration, and please start WLS by startSIPonWebLogic.sh once again.
$ cd $BEA_HOME/user_projects/domains/mydomain
$ ./startSIPonWebLogic.sh
For a sample output of this task, see wlinstall-config-wls.txt.
With this, you come to the end of the SIP Servlet Engine itself installation task.
i. Deploying the Demo Applications
If you deploy the demo applications and the related documents, perform the following task to deploy the Web applications.
$ sh ./wlinstall.sh deploy
Perform the above task to deploy the Web applications.
The demo applications are provided only when you use a development or evaluation license. They are not provided when you use a production license.
If the deployment has completed successfully, a splash screen appears for three seconds as when performing other tasks. When it does not appear, check if any configuration is incorrect.
For a sample output of this task, see wlinstall-deploy-log.txt.
The deployed Web application files will be contained in the directory shown below.
$BEA_HOME/sip/applications/
Restart WLS using the startSIPonWebLogic.sh after deploying.
$ cd $BEA_HOME/user_projects/domains/mydomain
$ ./startSIPonWebLogic.sh
j. Installing WebLogic Server as a Windows Service (Windows Platforms Only)
To install WebLogic Server as a Windows service, follow these steps. For general information about setting up a WebLogic Server instance as a Windows service, see the WebLogic Server document.
First, run the installSIPonWebLogicAsService.cmd to install WebLogic Server as a Windows service. To run this batch file, you must log into the Windows computer with a user account that has privileges to modify the Windows registry.
$ cd $BEA_HOME/user_projects/domains/mydomain
$ installSIPonWebLogicAsService.cmd
Then, set the user who runs the WebLogic Server instance as follows. For more information, see WebLogic Server document.
- Open the Services control panel.
- On the Services control panel, right click the WebLogic Server Windows service and click Properties.
- In the Properties window, click the Log On tab.
- Under Log on, select This account. Then enter the user name and password who has administrative privileges.
- Click OK.
To uninstall WebLogic Server installed as a Windows service, run the uninstallService.cmd.
$ cd $BEA_HOME/user_projects/domains/mydomain
$ uninstallService.cmd
5. Checking the Operations
a. Verifying the Settings through the Admin Console
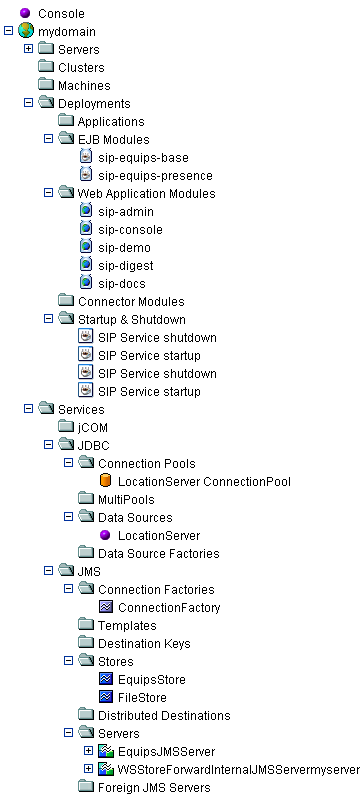
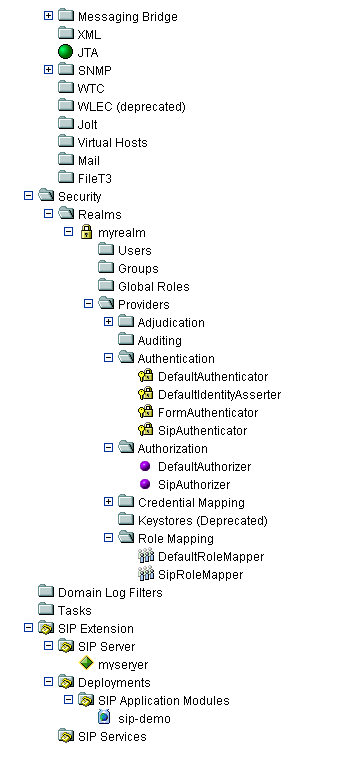
If the installation has completed successfully, the nodes are added in the Admin Console as shown above.
| Target folder | Added nodes |
|---|---|
| Deployments-->EJB Modules | sip-spi-ejb and sip-spi-mdb |
| Deployments-->Web Application Modules | sip-admin, sip-console, sip-demo, sip-digest, and sip-docs (These are added only if you performed the above step "Deploying the Demo Applications".) |
| Deployments-->Startup & Shutdown | SIP AdminService Startup, SIP AdminService Shutdown, SIP Service Startup, and SIP Service Shutdown |
| Services-->JDBC-->Connection Pools | LocationServer ConnectionPool |
| Services-->JDBC-->Data Sources | LocationServer |
| Services-->JMS-->Connection Factories | ConnectionFactory |
| Services-->JMS-->Stores | EquipsStore |
| Services-->JMS-->Servers | EquipsJMSServer |
| Service-->XML | SipXmlRegistry |
| Security-->Realms-->myrealm-->Providers-->Authentication Providers | FormAuthenticator and SipAuthenticator |
| Security-->Realms-->myrealm-->Providers-->Role Mappers | SipRoleMapper |
| SIP Extension |
The following steps should be performed only when you deployed the demo applications.
The demo applications are not provided when you use a production license as described above. They are provided only when you use a development or evaluation license.
b. Registering Users through the Sip-Admin
The sip-admin is the Web application which can manage SIP users and demonstrate how to use the Service Provider Interfaces (SPIs). You can access this application with the following URL.
http://hostname:portnumber/sip-admin/
For information about how to use the sip-admin, see this page.
c. Login to the Sip-Demo
You can log into the sip-demo using the user information you created in the sip-admin. The sip-demo is the application demo site which uses HTTP and SIP. In this site you can try the functions, such as Click2Dial and voice mail. You can access this site with the following URL.
http://hostname:portnumber/sip-demo/
For information about how to use the sip-demo, see this page.
d. Connecting to Softphone
You can connect to Softphone using the same user information that is used to log into the sip-demo.
Appendix 1. Setup of JMF (Java Media Framework API)
JMF is needed when using the voice mail demonstration of demonstration application.
Refer to the following site for installation of JMF, and the details of a setup.
http://java.sun.com/products/java-media/jmf/2.1.1/setup.html
The notes at the time of installation
It is necessary to include jmf.jar in a class path. Like the following example, the method of copying jmf.jar to jre/lib/ext of JavaVM is easy.
# cp /usr/local/java/JMF-2.1.1e/lib/jmf.jar /usr/local/bea/jrockit81sp3_142_04/jre/lib/ext/jmf.jar
The notes at the time of a setup.
Please set up to permit the file writing from Applet using JMF Registry Editor.
User Settings
[x] Allow File Writing for Applets
[x] Allow Capture for Applets
[x] Allow Caching
-
*1: Use the jar command or a tool that can decompress zip files (WinZip, etc.) to decompress the war file.
*2: Because JMF 2.1.1e Linux Edition has a problem with its RTP function.
*3: They are based on the assumption that your domain name is "mydomain".
Last Modified:Sat Jan 22 14:35:13 JST 2005
| Copyright © 2003, 2004 Oki Electric Industry Co.,Ltd. All rights reserved. |