

|

|
|
|
|
Getting Started
This section provides an example of the Information Integrator transformation process. In order to use the example, you must have BEA eLink Information Integrator and eLink platform (BEA Tuxedo) already installed on your system.
This example illustrates how to perform data transformation. The example constructs an FML32 input buffer containing the three fields STREET, CITY, and STATE. The iiServer reformats these fields in the response buffer by concatenating them into a single output field called ADDRESS.
The files for this example are shipped with BEA eLink Information Integrator in the C:\BEAII\InfoInt\sample directory. The sample directory contains:
This section describes the following topics, which you should perform in the order listed:
Defining Message Formats
Message formats define the layout of data that is processed by the iiServer. This layout defines the actual format of the data that is communicated between collaborating applications. Each data item, such as a person's name, is defined as a field. For example, if a message consisted of an employee's name and social security number, the message contains two fields.
For the example, you need to define a message format for the request buffer. The request buffer contains three fields: STREET, CITY, and STATE. The response buffer that the iiServer returns only contains the ADDRESS field. Because the response buffer is an FMLVO buffer (which is formatted by the iiServer), you do not need to define its format.
You can define the request buffer format using the steps described in the following procedure.
Listing 2-1 II_address_msg1.xml
<?xml version='1.0'?>
<!DOCTYPE MessageFormat SYSTEM 'mfl.dtd'>
<MessageFormat name="II_address_msg1">
    <FieldFormat name="STREET" type="String" delim="," />
    <FieldFormat name="CITY" type="String" delim="," />
    <FieldFormat name="STATE" type="String" />
</MessageFormat>
Note: The document type definition (DTD) for MFL is stored in mfl.dtd. Refer to MFL Document Type Definition for a listing of mfl.dtd.
For more information about defining message formats, refer to Building Format Definitions.
Storing Formats in the iiDatabase
Once you define the message format for the FML32 input buffer, you need to store it in the iiDatabase using the MsgDefAdmin utility.
Note: The MsgDefAdmin utility uses configuration settings specified in sqlsvses.cfg. Refer to BEA eLink Information Integrator Installation and Administration Guide for more information about the sqlsvses.cfg file syntax.
You can store format definitions by using the steps described in the following procedure.
Listing 2-2 MsgDefAdmin Importer Utility
-  Copyright (c) 2000 BEA Systems, Inc.
All Rights Reserved.
Distributed under license by BEA Systems, Inc.
BEA eLink Information Integrator is a registered trademark
This product includes software developed by the
Apache Software Foundation (http://www.apache.com/).
-  -  -    BEA eLink Information Integrator 1.0    -  -  -
-  -  -    Message Definition Importer Tool       -  -  -
Enter Choice:
1) Add Message Definition
2) Get Message Definition
3) Delete Message Definition
4) List Message Definition
Q) Quit
>
Defining Rules
You now need to specify what actions the iiServer should take if a specific message type is received. Examples of general actions include reformatting a message, calling a Tuxedo service with a message, exploding a message into multiple messages, and enqueuing a message to a queue.
In the example, you need to define rules specifically for reformatting and returning a message using the Rules interface. This definition process includes the following steps:
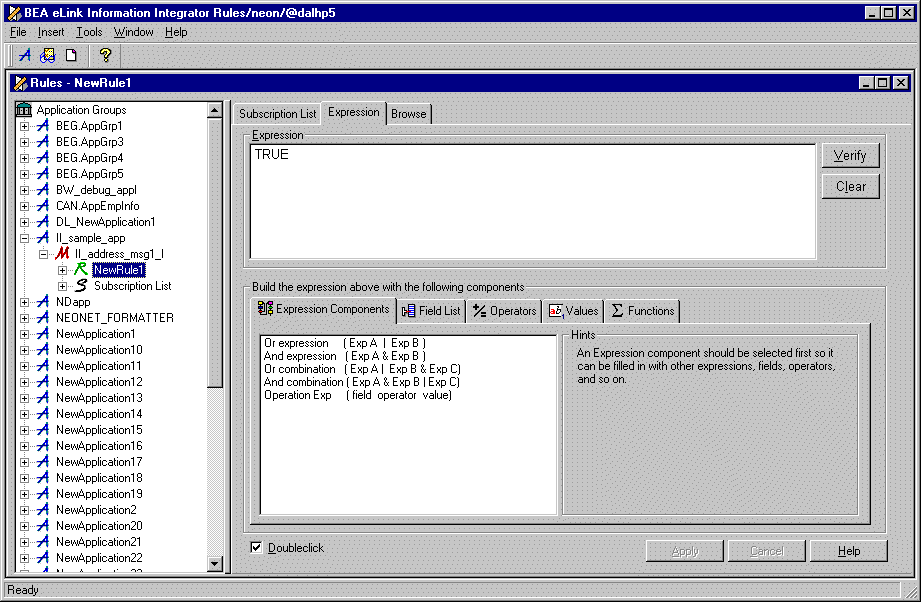
Figure 2-1 shows how the Rules interface should appear when defining the rule's expression. Note that for this example, the value in the Expression window must be set to TRUE.
Figure 2-1 Defining a Rule's Expression 
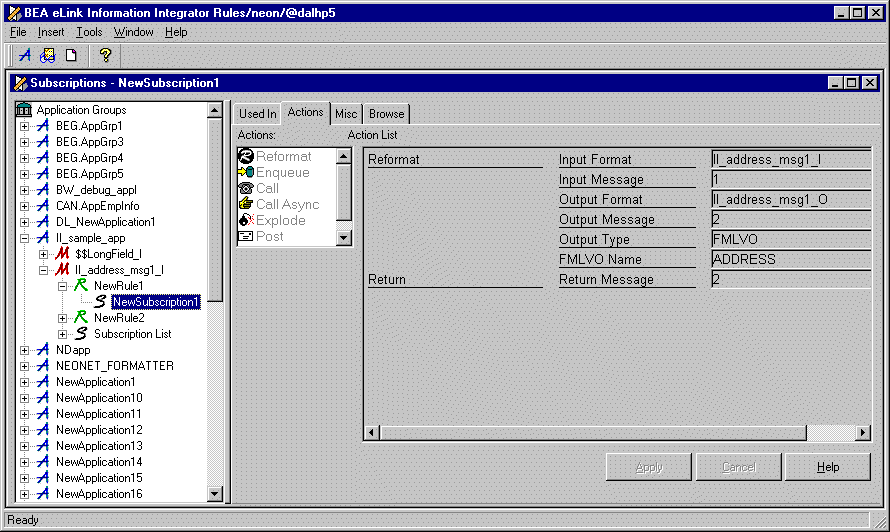
Figure 2-2 shows how the Rules interface should appear when defining the actions to associate with a rule's subscription.
Figure 2-2 Defining Actions 
Once the subscription and its actions are defined, they must be associated with the rule. You can do this by dragging the subscription and dropping it on the rule in the left-hand pane..
Refer to Building Rules for more information about the rules definition process.
Configuring the eLink Platform
Once you define appropriate rules, you need to configure your eLink platform. This includes the following tasks:
The ii.cfg file contains service definitions. For each message translation you want to do, you must enter an appropriate service definition in ii.cfg.
You can update this file by using the steps described in the following procedure.
Listing 2-3 ii.cfg
*SERVICE
NAME=II_addr1
APPL_NAME=II_sample_app
INPUT_FORMAT=II_address_msg1_I
Notes: The NAME field specifies the name that Tuxedo clients must use to request services from the iiServer. The value of the NAME field is used when testing an application (in the ud32.in file) or running an application as a C source client (in the address.c file). You can choose any service name you like.
The APPL_NAME and the INPUT_FORMAT fields specify the application group name and the input message format defined in the Rules interface.
You must restart the iiServer after you change the ii.cfg file.
Setting Environment Variables
You can set environment variables by using the steps described in the following procedure.
Listing 2-4 setenv.bat
set TUXDIR=<Tuxedo directory>
set APPDIR=<Application directory>
set TUXCONFIG=<Full pathname of the binary Tuxedo config file>
set FLDTBLDIR=%APPDIR%;%TUXDIR%\udataobj
set FIELDTBLS=Fieldtable.txt,Usysflds
set FLDTBLDIR32=%FLDTBLDIR%
set FIELDTBLS32=%FIELDTBLS%
set PATH=%PATH%;%TUXDIR%\bin
Notes: On NT, Tuxedo sets TUXDIR and adds TUXDIR\bin to the PATH environment variable. On UNIX, Tuxedo generates a TUX.ENV file that sets these variables for you.
You need to set the INCLUDE, LIB, APPDIR, TUXCONFIG, FIELDTBLS32, and FLDTBLDIR32 variables on NT and UNIX, and the SHLIB_PATH (or LD_LIBRARY_PATH or LIBPATH) variable on UNIX.
LD_LIBRARY_PATH must include $TUXDIR/lib on systems that use shared libraries (except HP-UX and AIX).
SHLIB_PATH (HP_UX only) must include $TUXDIR/lib.
LIBPATH (AIX only) must include $TUXDIR/lib.
Updating sample.ubb
The sample.ubb file (Tuxedo UBB configuration file) defines the resources, machines, groups, servers, and services that Tuxedo should use.
You can update this file by using the steps described in the following procedure.
Listing 2-5 sample.ubb
*RESOURCES
#Example:
#IPCKEY		123456
IPCKEY 123456
DOMAINID		IIAPP
MASTER		II
MAXACCESSERS		10
MAXSERVERS		10
MAXSERVICES		100
MODEL		SHM
LDBAL		N
*MACHINES
DEFAULT:
		APPDIR=<Application directory>
		TUXCONFIG=<Location of the Tuxedo config file>
		TUXDIR=<Tuxedo directory>
<Machine Name> LMID=II
*GROUPS
GROUP1
	LMID=II	GRPNO=1	OPENINFO=NONE
*SERVERS
DEFAULT:
		CLOPT="-A"
IISERVER SRVGRP=GROUP1 SRVID=1 CLOPT="-- -C ii.cfg"
*SERVICES
II_SERVICE
Notes: You need to set the APPDIR, TUXDIR, and TUXCONFIG variables independently of external variables.
Be sure that the variable values you set match the environment variables in setenv.bat or setenv.sh.
The value of the Machine Name field must be entered in upper case on NT.
Note: You must restart Tuxedo after you change the sample.ubb file.
Creating a Tuxedo Field Table
You must create a Tuxedo field table if your messages are contained in FML buffers. You can create this table by using the steps described in the following procedure.
Listing 2-6 Fieldtable.txt
*base 1000
STREET                   1      string      -  Street Address
CITY                     2      string      -  City Name
STATE                    3      string      -  State Name
ADDRESS                  4      string      -  Combined address
ELINK_ADAPTER_ERR       20      string      -  eLink error message
ELINK_ADAPTER_ERR_CODE  21      string      - eLink error code
Note: The Fieldtable.txt file contains entries for the three input fields (STREET, CITY, and STATE), one entry for the reformatted output field (ADDRESS), and two entries for the eLink adaptor error message/code (these entries return errors if the test fails).
Running the Application
You are now ready to run the application. You can test the application using the ud32 utility or run the application as a C source client.
Using the ud32 Utility
The ud32 utility reads a tab-delimited text file and uses the information to construct an FML32 buffer. The ud32 client sends this buffer to the service defined in a ud32 input file called ud32.in.
You can create the ud32.in file using the steps described in the following procedure.
Listing 2-7 ud32.in
STREET	2315 First North Street
CITY	San Jose
STATE	CA
SRVCNM	II_addr1
Notes: Make sure that there is a blank line at the end of the ud32.in file.
The value for the SRVCNM variable must match the value of the NAME variable in the ii.cfg file
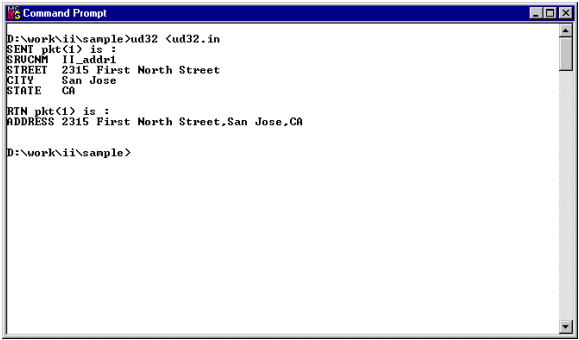
Figure 2-3 shows the invocation of ud32 and the accompanying system messages.
Figure 2-3 Invocation of ud32
Running as the C Source Client
You can a create a C application to run as a source client. You can create this application and build it using the steps described in the following procedure.
The address.c file shipped with the example is shown in Listing 2-8.
Listing 2-8 address.c
/****************************************************************
 *  BEA eLink Information Integrator V1.0 - Sample Client
 *  Application
 *
 *              Copyright (c) 2000, BEA Systems, Inc.
 *                      All rights reserved
 *
 * This example constructs an FML32 buffer containing three fields
 * (STREET, CITY, STATE) and sends the buffer to the iiServer for
 * reformatting. The response buffer contains a single ADDRESS
 * field containing the concatenation of the three input fields.
 *
 ****************************************************************/
#include <stdio.h>
#include <stdlib.h>
#include <stdarg.h>
#include <atmi.h>
#include <fml32.h>

#define MAXDIM(array)           (sizeof(array) / sizeof(array[0]))
static void         ErrorMsg(char* msg, ...);

int main(int argc, char** argv)
{
    auto     int i;
    auto     TPINIT*        initBuf;
    auto     FBFR32*        fmlBuf;
    auto     long           fmlLen = 0;
    auto     FLDID32        fldId;
    auto     char*          respVal;
    auto     char*          buf;
    auto     char           bufType[32] = "*Unknown*";
    static   struct
             {
                char*       inFldName;
                char*       inFldValue;
} inFields[] =
{
{ "STREET", "2315 North First Street" },
{ "CITY", "San Jose" },
{ "STATE", "CA" }
};
    /* Allocate the TPINIT buffer */
    initBuf = (TPINIT*) tpalloc("TPINIT", 0, 0);
    if (NULL == initBuf)
    {
        ErrorMsg("Error %d allocating TPINIT [%s]",
                    tperrno, tpstrerror(tperrno));
    }
    /* Join Tuxedo */
    if (tpinit(initBuf) < 1)
    {
        ErrorMsg("Error %d on tpinit [%s]", tperrno,
        tpstrerror(tperrno));
    }
    /* Allocate a FML32 buffer for the request data */
    fmlBuf = (FBFR32*) tpalloc("FML32", "", 0);
    if (NULL == fmlBuf)
    {
        ErrorMsg("Error %d allocating FML32 [%s]",
                    tperrno, tpstrerror(tperrno));
    }
    /* Place input data values in the request FML32 buffer */
    for (i = 0; i < MAXDIM(inFields); ++i)
    {
        fldId = Fldid32(inFields[i].inFldName);
        if (BADFLDID == fldId)
            ErrorMsg("Unknown FML field name [%s]",
            inFields[i].inFldName);
        if (Fadd32(fmlBuf, fldId, inFields[i].inFldValue, 0) < 0)
        {
            ErrorMsg("Error %d adding field %s [%s]",
                        Ferror32, inFields[i].inFldName,
                        Fstrerror32(Ferror32));
        }
    }
buf = (char*) fmlBuf;
    /* The value of the first tpcall argument, "II_addr1", must
    match the value of the NAME parameter in the ii.cfg file.*/
    if (tpcall("II_addr1", buf, fmlLen,
                    &buf, &fmlLen, TPNOFLAGS) < 0)
    {
        ErrorMsg("Error %d on tpcall [%s]", tperrno,
         tpstrerror(tperrno));
    }
    fmlBuf = (FBFR32*) buf;
    fldId = Fldid32("ADDRESS");
    if (BADFLDID == fldId)
        ErrorMsg("Unknown FML field name [ADDRESS]");
    tptypes((char*) fmlBuf, bufType, NULL);
    printf("Received a successful response from the II Server\n");
    printf("The returned buffer type is %s\n", bufType);
    printf("The response ADDRESS field is [%s]\n",
            Fvals32(fmlBuf, fldId, 0));
    /* Free the FML32 buffer */
    tpfree((char*) fmlBuf);
    /* Leave Tuxedo */
    tpterm();
    return(EXIT_SUCCESS);
}
static void ErrorMsg(char* msg, ...)
{
    auto     va_list            ap;
    va_start(ap, msg);
    vprintf(msg, ap);
    printf("\n");
    va_end(ap);
    exit(EXIT_FAILURE);
}
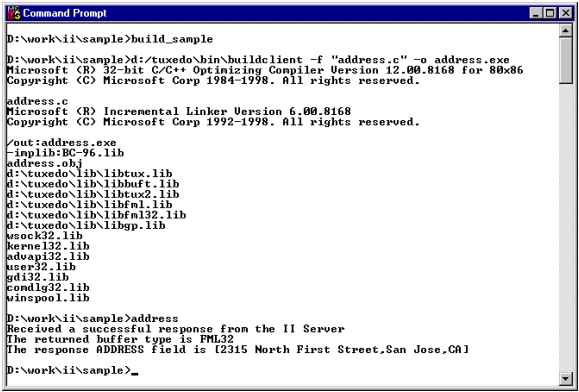
Figure 2-4  Building address.c

|

|

|
|
|
|
Copyright © 2000 BEA Systems, Inc. All rights reserved.
|