


|

|
|
|
|
Configuring Information Integrator and the IISERVER
In order to run Information Integrator, you must configure the operating environment and define users. The configuration steps differ depending on whether you are running the Design environment or the Execution environment. In the Design environment, you create the formats and rules you want to use for processing your data. In the Execution environment, the IISERVER translates your data using the formats and rules you created during the Design environment.
This chapter discusses the following topics:
Configuring the Design Environment
The following tasks are required to configure the Design environment of Information Integrator:
The first step in configuring the Design environment of Information Integrator is to set up the appropriate tables and stored procedures in the database. A script that does this for you is included on the installation CD-ROM. When you install Information Integrator, this script is placed in the \InfoInt\install.sql directory under your eLink Platform directory. Execute this script in a DOS window (for Windows NT systems) or at a UNIX command prompt by typing one of the following commands:
set SQLPLUS=<plus name>
inst_db.sh SYS <SYS password> <Service Name>
For Oracle 7, <plus name> is plus33. For Oracle 8, <plus name> is plus80.
inst_db.sh <username> <password> <servername> <dbname>
If you have not defined a password for your database username, use two single quotes to specify the password. For example:
inst_db.sh sa '' mycomputer
The required tables and stored procedures are automatically created in the Information Integrator database. A log of the schema creation procedure is written to temp\inst_db.log.
Creating the Database Session Configuration File
The next configuration step is to create the Database Session Configuration file (sqlsvses.cfg). A sample sqlsvses.cfg file that is commented out is provided on the installation CD-ROM. To edit the sample file with your site-specific information, uncomment the section that applies to your database type and edit the appropriate parameters.
Listing 7-1 shows the syntax for the Database Session configuration file.
Listing 7-1 Syntax for sqlsvses.cfg
<sessionname>:<servername>:<userID>:<password>:<databasename>
The character length for the parameters in the sqlsvses.cfg file is dependent on your server platform and operating system. Line size in the sqlsvses.cfg file is limited to 1024 bytes. Each parameter must be separated by a colon.
Required Parameters
The following parameters must be defined in the sqlsvses.cfg file:
Note: The DATABASENAME parameter is not used for Oracle environments.
There must be a colon after the password in Oracle environments, even though the last parameter is not used.
Optional Parameters
There are no optional parameters for the sqlsvses.cfg file.
Sample Database Session Configuration File
Listing 7-2 shows the sample sqlsvses.cfg file included on the installation CD-ROM.
Listing 7-2 Sample Database Session configuration file
# ----------------------------------------------------------------
#
# Sqlsvses.cfg - Defines sessions to be used to access the Formatter
# database. The format of each line depends on the database in which
# the Formats are to be stored.
#
# Four fields are required in order to specify a connection to a
# Oracle database. Five fields are required to specify a connection
# to a SQLServer database.
#
# Entries can be commented by placing a "#" in column 1.
# ------------------------------------------------------------
#
# Format of lines for the various supported database types:
#
# MS SQLServer:
# SessionName:dBaseServer:dBaseUserid:dBasePassword:dBaseInstance
#
# Oracle:
# SessionName:dBaseService:dBaseUserid:dBasePassword:
# (note that the fifth field is blank, so the last colon is required)
#
# ----------------------------------------------------------------
#
# The SessionName "import" is required to run the Message Definition
# Importer Tool (MsgDefAdmin).
#
# -----------------------------------------------------------------
#
# Example SessionNames (uncomment the SessionNames needed):
#
# MS SQL Server database: import:Server:Userid:Password:Instance
# (change Server, Userid, Password, and Instance above)
#
# Oracle database (final colon required on each line):
# import:Service:Userid:Password:
# (change Service, Userid, Password above)
# ---------------- ( End of File ) --------------------------------
Creating User Accounts
In order to use BEA eLink Information Integrator, each user must have an account created for them.
Creating Users on Oracle Systems
Users must have a user name and password for each database they want to access. Creating these user names and passwords can be done by the system administrator, security officer, or database owner. A single person can occupy one or more of these roles. Check with your database administrator for information about your specific environment.
During installation of Information Integrator on Oracle systems, the II_USER role is created for each user. This role gives users access to the Information Integrator database. To access databases, users must be created and associated with the II_USER role using the procedures described in the following sections.
Creating User Names
After you install Information Integrator, you must create user names in your database. User names identify individual users to the database. Listing 7-3 shows the syntax for creating users.
Note: This action must be performed while connected to the database as an administrator.
Listing 7-3 Syntax for creating users
create user <username> identified by <password>;
USERNAME and PASSWORD are required parameters.
For example, the following command creates a user with the login name "JOHNDOE" and the password "JDOE1":
create user JOHNDOE identified by JDOE1;
Granting Roles to Users
Users must be given permissions to access the database data. You can either grant permissions to an individual user or create roles with certain permissions and associate users with specific roles. II_USER is a role created by the Information Integrator installation process. Listing 7-4 shows the syntax for granting user roles.
Note: This action must be performed while connected to the database as an administrator.
Listing 7-4 Syntax for granting user roles
grant II_USER to "username";
The II_USER role is granted to the user identified by USERNAME.
Defining User Synonyms
Once a user has been created, you must define the synonyms for that user. Connect to the database using the newly created USERNAME and PASSWORD; then, run the SQL_Plus executable nn_synonyms.sql, found in the install.sql directory. Listing 7-5 shows the syntax for defining synonyms.
Note: This action must be performed while connected to the database as the user for whom the synonym is being created.
Listing 7-5 Syntax for synonyms.sql
@nn.synonyms.sql
Creating Users on SQL Server Systems
Users must have login accounts and a user name in each database they want to access. Adding login accounts, database users, and object permissions can be done by the system administrator, security officer, or database owner. A single person can occupy one or more of these roles. Check with your database administrator for information about your specific environment.
Creating Login Accounts
Login accounts give users access to the SQL Server. They are created by the system administrator or security officer using the sp_addlogin system procedure. Listing 7-6 shows the syntax for sp_addlogin.
Listing 7-6 Syntax for sp_addlogin
sp_addlogin loginName, password [, defdb [, deflang [,
full-name]]]
Login accounts only give access to the SQL Server. To access a database, a login must be assigned to a user name to the databases the user wants to access.
Assigning Users to a Database
To use a database, the server login must be associated with a user name in the database. Users can be added to a database by the database owner (DBO) using the sp_adduser system procedure. This procedure must be run from the database in which the user is to be added. Listing 7-7 shows the syntax for sp_adduser.
Listing 7-7 Syntax for sp_adduser
sp_adduser loginName [, nameInDB] [, group]
Defining User Groups
Each user added to the database must be granted permissions to access objects within that database, unless they are the database owner. During installation, the group II_USER is created for Information Integratorusers. To access Information Integrator databases, users must be linked to the II_User group.
Users can be added using either the sp_adduser or sp_changegroup system procedures. Listing 7-7 describes the syntax for sp_adduser.
Listing 7-8 Syntax for sp_changegroup
sp_changegroup groupName, userName
Configuring the Execution Environment
The following tasks are required to configure the Execution environment of Information Integrator:
Setting the Environment Variables
You need to set several environment variables before using Information Integrator. Table 7-1 lists the environment variables you need to set.
Table 7-1 Environment Variables Used By Information Integrator
|
Variable Name |
Description |
|---|---|
|
TUXDIR |
Base directory of the eLink Platform software. |
|
APPDIR |
Base directory for applications. |
|
PATH |
Must include $TUXDIR/bin. |
|
TUXCONFIG |
Full pathname of binary tuxconfig file. |
|
LD_LIBRARY_PATH |
Path where the libraries for the product and database reside. Must include $TUXDIR/lib on systems that use shared libraries (except HP-UX and AIX). |
|
SHLIB_PATH |
Path where the libraries for the product and database reside. HP-UX only - Must include $TUXDIR/lib. |
|
LIBPATH |
Path where the libraries for the product and database reside. AIX only - Must include $TUXDIR/lib. |
|
FLDTBLDIR |
Path where FML field table resides. |
|
FIELDTBLS |
Name of the FML field table file. |
|
FLDTBLDIR32 |
Path where FML32 field table resides. FML32 only. |
|
FIELDTBLS32 |
Name of the FML32 field table file. FML32 only. |
Scripts are often used to save time in setting environment variables in a development directory. The following scripts are provided to set these variables for you, but the scripts must be edited for your environment.
A sample setenv.bat file is shown in Listing 7-9.
Listing 7-9 setenv.bat
set TUXDIR=<eLink Platform directory>
set APPDIR=<Application directory>
set TUXCONFIG=<Full pathname of the binary Tuxedo config file>
set FLDTBLDIR=%APPDIR%;%TUXDIR%\udataobj
set FIELDTBLS=Fieldtable.txt,Usysflds
set FLDTBLDIR32=%FLDTBLDIR%
set FIELDTBLS32=%FIELDTBLS%
set PATH=%PATH%;%TUXDIR%\bin
Notes:
On NT systems:
On UNIX systems:
Adding the IISERVER to the UBBCONFIG File
A message format and routing server (IISERVER) is part of Information Integrator. This server identifies available service names and their associated application names and input formats.
Before running Information Integrator, you must add the IISERVER to the eLink Platform configuration. This is done by identifying the IISERVER in the eLink Platform UBBCONFIG file. The UBBCONFIG file is a text file that defines an eLink application.
Table 7-2 describes the variables you need to set in the UBBCONFIG file for Information Integrator.
Table 7-2 UBBCONFIG File Variables used by Information Integrator
|
Variable Name |
Description |
|---|---|
|
APPDIR |
Base directory for Information Integrator software. Make sure this value is the same as the APPDIR value in the environment file. |
|
TUXCONFIG |
Full pathname of binary tuxconfig file. Make sure this value is the same as the TUXCONFIG value in the environment file. |
|
TUXDIR |
Base directory of the eLink Platform software. Make sure this value is the same as the TUXDIR value in the environment file. |
|
MACHINE_NAME |
Name of the machine where Information Integrator is installed. On Windows NT systems, this value must be in uppercase. |
|
*SERVERS |
Defines the name of the Information Integrator server (IISERVER) and the server configuration file (-- CLOPT -C ii.cfg). For more information on the server configuration file, see Creating the Configuration File. |
|
*SERVICES |
Defines the name of the default service provided by the IISERVER (IISERVICE). |
A sample UBBCONFIG file (called SAMPLE.UBB) is provided on the installation CD-ROM. You can use this sample file as a base for creating your own UBBCONFIG file.
Listing 7-10 shows the SAMPLE.UBB file. The variables you need to change are shown in boldface type.
Listing 7-10 Sample UBBCONFIG File
*RESOURCES
#Example:
#IPCKEY		123456
IPCKEY 123456
DOMAINID		IIAPP
MASTER		II
MAXACCESSERS		10
MAXSERVERS		10
MAXSERVICES		100
MODEL		SHM
LDBAL		N
*MACHINES
DEFAULT:
		APPDIR="application directory"
		TUXCONFIG="TUXEDO config file directory"
		TUXDIR="TUXEDO directory"
<MACHINE NAME> LMID=II
*GROUPS
GROUP1
		LMID=II GRPNO=1 OPENINFO=NONE
*SERVERS
DEFAULT:
		CLOPT="-A"
IISERVER SRVGRP=GROUP1 SRVID=1 CLOPT= " -- -C ii.cfg"
*SERVICES
II_SERVICE
Creating the Configuration File
A configuration file, typically named ii.cfg, controls the operation of the Information Integrator server (IISERVER). Following are the sections of the configuration file and the parameters you can define for each section. A sample configuration file is provided in Listing 7-14.
Note: ii.cfg is a generic filename. You can name this file anything you choose, but the filename must match the name you specify in the UBBCONFIG file. (See Adding the IISERVER to the UBBCONFIG File for instructions on defining the IISERVER server in the UBBCONFIG file.) If you do not specify a path for the location of the configuration file, the system will search the current directory, then the path specified in the APPDIR variable in the UBBCONFIG file.
The Information Integrator configuration file is divided into the following sections:
Contains the general parameters required during server startup. The configuration file can contain only one SERVER section.
Contains the name of a service to be advertised and the parameters required for the service. The configuration file can contain multiple SERVICE sections. One SERVICE section is required for each service advertised.
There are two ways to create the Information Integrator configuration file:
The Rules application supports the creation and editing of Information Integrator configuration files. This accomplished by the use of two windows: Configure Server (Figure 7-1) and Configure Service (Figure 7-2). To create an II Server configuration file you need to complete the following tasks:
Using the Configure Server Window to Create a New Configuration File
Figure 7-1 Configure Server Window
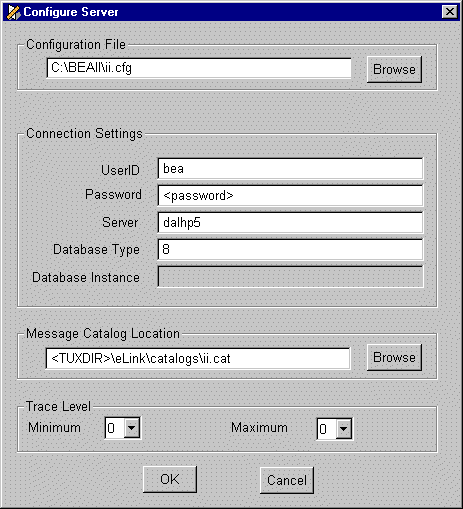
Note: The first time that the Configure Server window is used all text areas will be blank. After the initial use of the Configure Server window, it will display with the Server information from the configuration file that was most recently edited. This occurs even if the Rules application has been restarted.
Note: When you enter a new configuration file name, the default values are filled in for the rest of the parameters. The default parameters for the Connection settings come from the connection information you entered when logging into Rules. However, for security the password is not displayed and must be edited manually.
4 = MS SQL
8 = Oracle 7
9 = Oracle 8
Note: Note: If you change the Database Type field, press Enter after the change is made to indicate to Rules that it needs to enable or disable the Database Instance field. The Database Instance field is disabled if the Database Type is 8 or 9, for Oracle, and enabled if the Database Type is 4 for MS SQL.
Note: If at anytime you click Cancel before clicking OK, the Configure Server window closes, and none of the information entered is written to the configuration file.
The correspondence between the labels of the text fields in the Configure Server window and the names of the parameters in the configuration file is shown in Table 7-3.
Table 7-3 Configuration File Server Parameter Labels
|
Label in Configure Server window |
Parameter Name in the Configuration File |
|---|---|
|
UserID |
DB_USERID |
|
Password |
DB_PASSWORD |
|
Server |
DB_LOCATION |
|
Database Type |
DB_TYPE |
|
Database Instance |
DB_INSTANCE |
|
Message Catalog Location |
MSG_CATALOG |
|
Minimum |
MINMSGLEVEL |
|
Maximum |
MAXMSGLEVEL |
Editing an Existing Configuration File
To edit the Server section of an existing configuration file, follow the procedure for creating a new configuration file, using the Browse button in the configuration file group box to locate the desired configuration file. The parameter values are read from the file and displayed. After editing the desired text areas, click OK to save the data to the configuration file. Clicking Cancel at anytime before the clicking OK closes the Configure Server window without updating the configuration file.
Configuring Services
You use the Configure Service window (Figure 7-2) to create one Service section for each service that is to be configured. Prior to opening a Configure Service window, you must have used the Configure Server window to set the current configuration file (see Using the Configure Server Window to Create a New Configuration File).
To access the Configure Service window, follow these steps.
Figure 7-2 Configure Service Window

Notes: If you open a Configure Service window before setting up the configuration file in the Configure Server window, all editing, inserting, or deleting of services takes place in the last configuration file accessed, even if the Rules application has been restarted.
The name of the last configuration file edited is always saved between uses of the Rules application.
If the configuration file has never been set using the Configure Server window, you will receive an error when trying to open the Configure Service window.
For the IISERVER, configured services must have the Name, the Application, and the Input Format fields filled in. Table 7-4 shows the correspondence between these fields in the Configure Service window and the parameter names in the configuration file:
Table 7-4 Configuration File Service Parameter Labels
|
Label in Configure Service window |
Parameter Name in the Configuration File |
|---|---|
|
Name |
NAME |
|
Application |
APPL_NAME |
|
Input Format |
INPUT_FORMAT |
When the Configure Service window is displayed, the names of all of the Services that are currently configured appear in the Services data window. You can perform any of the following tasks from the Configure Service Window:
Adding a new service
The following parameters are required:
The following values are optional:
Note: The Format Key value must be in upper case characters.
Editing an Existing Service
Deleting a Service
Note: Make sure you have selected the correct service prior to clicking Delete. If you selected an incorrect service, click Cancel to clear your selection PRIOR TO clicking Delete.
Saving the information to the configuration file
When you have finished adding, editing, and deleting services, click OK to save the information to the configuration file and close the dialog.
Notes: Choose names for your services that are related to their roles in the application.
When you access the Configure Service window through the popup menu associated with a Message item in the Rules window, the Application name and Input Format name are recorded. Any new service that is configured through this instance of the window will have, by default, the Application name and Input Format name (which is the same as the Message name) of this Message. Therefore, for each service that is to be configured, you should access the Configuration Service window through the popup menu associated with the appropriate Message item in the tree view.
You can also access the Configure Service window from the Tools menu on the Rules window. However, if accessed this way, no specific Application name or Input Format name appear by default.
The Rules application does not allow you to enter comments into the configuration file and will not preserve any comments were manually entered in the file.
Using a Text Editor
You can use any text editor to create the Information Integrator configuration file. A default configuration file (ii.cfg) is provided on the installation CD-ROM. You can use this file as a base and customize it to fit your particular needs.
The sections of the configuration file are and the parameters in each section are described below.
Defining the SERVER Section
The syntax for the SERVER section of the Information Integrator configuration file is as follows:
Listing 7-11 Syntax for SERVER section
*SERVER
DB_USERID=userID
DB_PASSWORD=password
DB_LOCATION=location
DB_INSTANCE=instance
# MS SQL Server=4
# Oracle 7.x=8
# Oracle 8.x=9
DB_TYPE=integer
MSG_CATALOG=catalog file name
MINMSGLEVEL=integer
MAXMSGLEVEL=integer
Required Parameters
The following parameters must be defined in the SERVER section:
Optional Parameters
The following parameters are optional in the SERVER section:
Defining a SERVICE Section
The syntax for a SERVICE section of the Information Integrator configuration file is as follows:
Listing 7-12 Syntax for SERVICE section
*SERVICE
NAME=service name
APPL_NAME=application name
INPUT_FORMAT=input format
FML32_VAL_FLD=field name
FML32_DDR_FLD=field name
FML32_SELECT_FLD=field name
<select value>=<input format>
Required Parameters
The following parameters must be defined in the SERVER section:
Optional Parameters
<SELECT VALUE>=<input format>
Note: The <select value> must be in upper case characters.
Listing 7-13 shows an example of a SERVICE section of the ii.cfg file. An explanation of the processing defined by the sample follows the listing.
Listing 7-13 Sample SERVICE Section
*SERVICE
NAME=II_ADDRESS
APPL_NAME=II_ADDRESS_APPL
INPUT_FORMAT=II_ADDRESS_IN
FML32_VAL_FLD=ADDRESS1
FML32_DDR_FLD=ADDRESS1_TARGET_ID
FML32_SELECT_FLD=STATE
CA=II_ADDRESS2_IN
NY=II_ADDRESS3_IN
The parameters defined by this sample are as follows:
Sample Information Integrator Configuration File
This section contains a sample Information Integrator configuration file.
Listing 7-14 Sample configuration file
*SERVER
DB_USERID=bea
DB_PASSWORD=bea
DB_LOCATION=dal1
DB_INSTANCE=dal1
#   MS SQL Server = 4
#   Oracle 7.x = 8
#   Oracle 8.x = 9
DB_TYPE=4
MSG_CATALOG=$TUXDIR/eLink/catalogs/ii.cat
MINMSGLEVEL=0
MAXMSGLEVEL=1
*SERVICE
NAME=II_ADDRESS
APPL_NAME=II_ADDRESS_APPL
INPUT_FORMAT=II_ADDRESS_IN
FML32_VAL_FLD=ADDRESS1
FML32_DDR_FLD=ADDRESS1_TARGET_ID
FML32_SELECT_FLD=STATE
CA=II_ADDRESS2_IN
NY=II_ADDRESS3_IN
*SERVICE
NAME=II_payroll
APPL_NAME=II_payroll_app
INPUT_FORMAT=II_payroll_msg1_IN
FML32_VAL_FLD=II_payroll_msg1
FML32_DDR_FLD=II_payroll_target_ID
FML32_SELECT_FLD=II_payroll_STATE
CA=II_payroll_msg2_IN
NY=II_payroll_msg3_IN
*SERVICE
NAME=IIRESET
APPL_NAME=DUMMY
INPUT_FORMAT=DUMMY
Creating the FML Field Table
You must create a field table if the messages you want to process with Information Integrator are contained in FML buffers. A sample field table (Fieldtable.txt) is included with Information Integrator. You can update this file to fit your particular environment by following these steps.
A sample Fieldtable.txt file is shown in Listing 7-15.
Listing 7-15 Sample Fieldtable.txt
*base 1000
STREET			 1	string	-	Street Address
CITY			 2	string	-	City Name
STATE			 3	string	-	State Name
ADDRESS			 4	string	-	Combined address
ELINK_ADAPTER_ERR			20	string	-	eLink error message
ELINK_ADAPTER_ERR_CODE			21	string	-	eLink error code
The sample Fieldtable.txt file shown above contains entries for the three input fields (STREET, CITY, and STATE), one entry for the reformatted output field (ADDRESS), and two entries for the eLink adaptor error message/code (ELINK_ADAPTER_ERR and ELINK_ADAPTER_ERR_CODE). These entries return error messages and codes if the application fails.
Understanding the IISERVER
The IISERVER translates messages from one format to another, simplifying message exchange between different systems and applications. The IISERVER breaks down complex messages into simple messages for processing. It can translate formats containing fixed, tagged, or delimited fields, as well as multi-part nested formats.
The IISERVER uses message format definitions within the database to recognize and parse input and output messages. You created these format definitions using either the Formatter GUI (see Using Formatter to Build Definitions) or the MsgDefAdmin tool (see Using MsgDefAdmin). The IISERVER uses this information to interpret values from incoming messages and dynamically construct outgoing messages. The IISERVER is run as an eLink server and is managed using eLink commands (see BEA eLink Platform Reference for more information).
The IISERVER determines its configuration from the Information Integrator configuration file. There is a direct correlation between the data entered in the Information Integrator Rules application (see Defining Rules) and the parameters you define in the SERVICE section of the configuration file. Figure 7-3 illustrates this relationship.
Figure 7-3 Relationship between Configuration File and Rules

In the above illustration, the APPL_NAME configuration parameter corresponds to the Application Group name in Rules, and the INPUT_FORMAT configuration parameter corresponds to the Message Type in Rules.
Understanding Message Processing
The IISERVER supports the following basic message-passing models:
These models are briefly described in the following sections.
Request/Response Translation
In this model, a client application sends a message to the IISERVER for some type of transformation. A series of actions associated with a business service advertised by the IISERVER is executed, and the resulting buffer is returned to the client.
The actions associated with this model include:
The request/response translation process is shown in Figure 7-4.
Figure 7-4 Request/response Translation Process

The following actions take place in the process illustrated above:
Figure 7-5 Request/Response Translation Expression

Notes: For more information on Rules and Expressions, refer to Building Rules.
This type of message routing is illustrated in the example described in Using Information Integrator and in the "Example" sections in each chapter.
Data Enrichment
This processing model is similar to Request/Response Transformation, with the exception that the message can be processed by an external service (such as an eLink Third Party Adapter) to provide data enrichments that are not possible with the IISERVER. This external enrichment of the message is transparent to the requesting application.
The actions associated with this model include:
The data enrichment process is shown in Figure 7-6.
Figure 7-6 Data Enrichment Process

The following actions take place in the process illustrated above.
Figure 7-7 Data Enrichment Expression
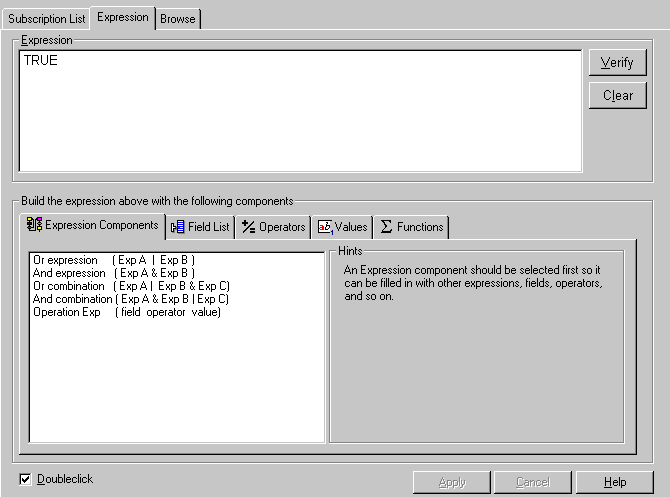
Note: The Expression is TRUE because, in this example, we always want the Subscription to execute.
Figure 7-8 Data Enrichment Subscription
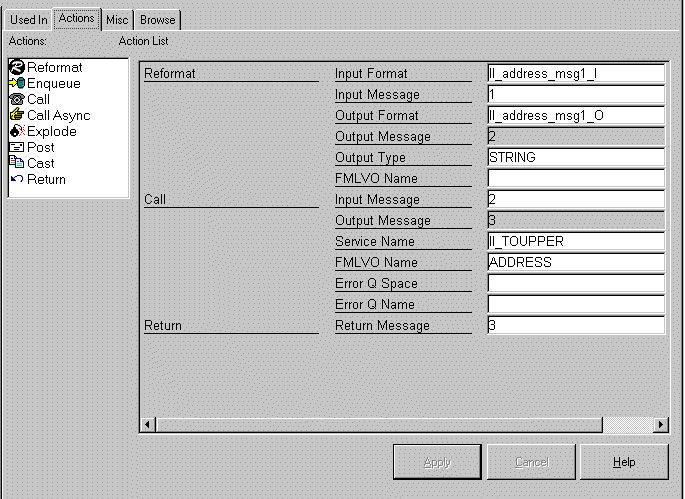
Notes: The Input Format is the same as the Message Type. The original message buffer is 1. The buffer that is formatted in the Output Format II_address_msg1_O is buffer 2 (the output message number that is automatically generated). The output type is STRING.
The message that is the result of the original Reformat action will be the input buffer for the Call action to the eLink service II_TOUPPER (Call's Input Message = 2 = Output Message from Reformat). The return from the service call is stored in an FMLVO buffer named ADDRESS.
The buffer returned form the Call action to the service II_TOUPPER will be returned to the client (Return Message = 3 = Output Message from the Call).
For more information on Rules, Expressions, and Subscriptions, refer to Building Rules.
Content-Based Routing
This processing model evaluates elements of the input message and determines how the message should be distributed.
Typical actions associated with this model include:
The content-based routing process is shown in Figure 7-9.
Figure 7-9 Content-based Routing Process
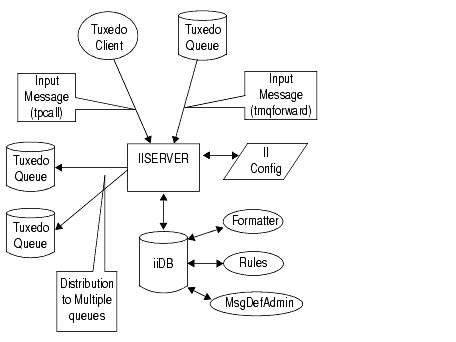
The following actions take place in the process illustrated above.
Figure 7-10 Content-Based Routing Expression

Note: The field "STATE" in the input buffer is compared to the string "CA." If STATE = CA, the Subscription associated with the Rule will be executed.
For more information on Rules, Expressions, and Subscriptions, refer to Building Rules.
Message Explosion
This model accepts a single input message, breaks it into component parts, and distributes selected components as individual messages.
Typical actions associated with this model include:
The message explosion process is shown in Figure 7-11.
Figure 7-11 Message Explosion Process
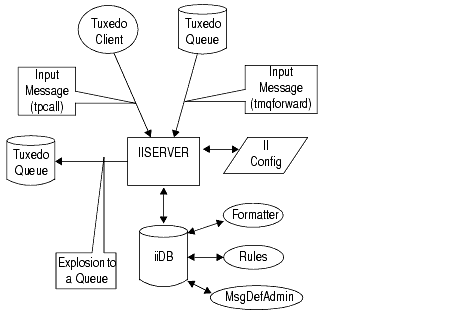
The following actions take place in the process illustrated above.
Figure 7-12 Message Explosion Expression

Note: The Expression is TRUE because, in this example, we always want the Subscription to execute.
Figure 7-13 Message Explosion Subscription

Note: Refer to Message Explosion Example for a complete explanation of the Rules and Subscriptions used in this model.
Example - Step 2
This section outlines the procedure required to complete Step 2 in Using Information Integrator. In Step 2, you define your database.
# Example SessionNames (uncomment the SessionNames needed):
#
#       MS SQL Server database:
# new_format_demo:Server:Userid:Password:Instance
# rules:Server:Userid:Password:Instance
# import:Server:Userid:Password:Instance
#       (change Server, Userid, Password, and Instance above)
#
#       Oracle database (final colon required on each line):
# new_format_demo:Service:Userid:Password:
# rules:Service:Userid:Password:
# import:Service:Userid:Password:
#       (change Service, Userid, Password above)
Example - Step 7
This section outlines the procedure required to complete Step 7 in Using Information Integrator. In Step 7, you configure the IISERVER to advertise the services required to perform the data transformation. This involves editing several configuration files provided on the Information Integrator installation CD-ROM.
First, we will edit the ii.cfg file to set the correct user ID and password for the database, and to add the payroll sample as a service to be recognized by the IISERVER.
DB_USERID=userid
DB_PASSWORD=password
DB_LOCATION=location
DB_INSTANCE=instance
Note: The line DB_INSTANCE is only applicable for SQL Server installations. If you are running on Oracle, this line will be commented out.
*SERVICE
NAME=II_payroll
APPL_NAME=II_Sample
INPUT_FORMAT=II_payroll_msg1_I
Note: The APPL_NAME is the name of the application group and the INPUT_FORMAT is the name if the input message. These two items were created in Rules (see the Example section in Defining Rules for more information).
Next, we will edit the setenv.bat file to set the correct locations for the eLink Platform and Information Integrator installations, and the payroll sample files.
set TUXDIR=c:\tuxedo
set APPDIR=c:\beaii\sample\payroll
set TUXCONFIG=%APPDIR%\tuxconfig
where
Next, we will edit the sample.ubb file to set the correct locations for the payroll sample files, the eLink Platform installation, and the binary version of the eLink Platform configuration file, as well as to set the correct machine name.
*MACHINES
DEFAULT:
	APPDIR="c:\beaii\sample\payroll"
		TUXCONFIG="c:\beaii\sample\payroll\tuxconfig"
	TUXDIR="c:\tuxedo"
Machine Name  LMID=II
where
Note: The values you enter in this file for the TUXDIR, APPDIR, and TUXCONFIG parameters must match the values you entered in the setenv.bat file.
Example - Step 8
This section outlines the procedure required to complete Step 8 in Using Information Integrator. In Step 8, the final step in the sample, you execute the files to perform the data transformation.
First, we will run the environment file to set the values we entered.
Next, we create the binary version of the eLink Platofrm configuration file (see Example - Step 7).
tmloadcf -y sample.ubb
Refer to eLink Commands for more information on the tmloadcf command.
Next, we will start the eLink Platform software.
tmboot -y
Refer to eLink Commands for more information on the tmloadcf command.
Now, we will use the SendBuf utility to test our formats and configurations.
sendbuf ii_payroll.data
Refer to Using the sendBuf Utility for more information on this tool.

|

|

|
|
|
|
Copyright © 2000 BEA Systems, Inc. All rights reserved.
|