Installing JRockit
|
|
Installing BEA JRockit SDK
This section describes how to install BEA JRockit 1.4.2 as a standalone application. It includes information on the following subjects:
- Java 2 Standard EditionTM (J2SETM) Compatibility
- Platform Support
- Important Note on SDK Version Numbering in this Chapter
- Installing and Uninstalling BEA JRockit SDK
- Installing and Uninstalling BEA JRockit SDK in Console Mode
- Installing and Uninstalling BEA JRockit SDK in Silent Mode
- Using the Linux man Pages
- Special Note About Root Access
Be aware that BEA JRockit 1.4.2 SDK can be used by any application and does not interact with or create a BEA registry. Also note that BEA WebLogic Platform is not certified with this version of BEA JRockit.
Java 2 Standard EditionTM (J2SETM) Compatibility
BEA JRockit 1.4.2 is certified by Sun Microsystems, Inc. to be compatible with Java 2 Standard Edition (J2SE), versions 1.4.2_08.
The JRE class files that are distributed with JRockit come directly from Sun except for a small number, which are tightly coupled to the JVM and are therefore overridden in BEA JRockit. The class files that are overridden are in the java.lang, java.io, java.net and java.util packages. There are no omitted classes. For procedures on installing the JRE only, please refer to Installing the BEA JRockit 1.4.2 JRE.
Platform Support
For a complete list of supported platforms, please go to:
http://download.oracle.com/docs/cd/E13188_01/jrockit/docs142/certif.html
Note: For Red Hat Linux AS, the only supported versions of kernel, glibc and pthreads are the ones that ship as the defaults with RH AS 2.1.
Important Note on SDK Version Numbering in this Chapter
Installing BEA JRockit SDK describes how to install BEA JRockit SDK with 1.4.2_08 class libraries. After step 1 in Installing the SDK, below, the SDK version will be referenced throughout this guide as 1.4.2_<version>; for example, instead of jrockit-24.5.0-j2sdk1.4.2_08, you will see jrockit-24.5.0-j2sdk1.4.2_<version>. As you use this guide, please assume that <version> refers to 08.
Installing and Uninstalling BEA JRockit SDK
This section explains how to install and uninstall a standalone version of BEA JRockit 1.4.2 SDK for Windows 2000 and Windows Server 2003 EE and on the Red Hat Linux 32-bit and 64-bit platforms from a GUI.
Note: When installing on Linux, the default location for system prefs will be:
JAVAHOME/.systemPrefs, where JAVAHOME=<SDK_INSTALLDIR>/jre or <JRE_INSTALLDIR>
Alternatively, a root user may use the installer option -Djava.util.prefs.SystemRoot.location=system, changing the location for system prefs to:
-Djava.util.prefs.SystemRoot.location=javahome is the default if not specified.
Installing the SDK
Note: The following procedure assumes that you have already downloaded the appropriate version of BEA JRockit SDK for your operating system.
To install BEA JRockit SDK, do the following:
- On you local drive, locate the executable file for the version of BEA JRockit SDK you want to install:
jrockit-24.5.0-j2sdk1.4.2_08-win-ia32.exefor Windows 2000 and Windows 2003jrockit-24.5.0-j2sdk1.4.2_08-win-ipf.exefor Windows 2003 Server EEjrockit-24.5.0-j2sdk1.4.2_08-linux-ia32.binfor supported Linux 32-bit versionsjrockit-24.5.0-j2sdk1.4.2_08-linux-ipf.binfor supported Linux 64-bit versionsIf you are using a linux x-terminal, type
./jrockit-24.5.0-j2sdk1.4.2_<version>-linux-ia32.bin.The install process begins and the BEA installer window appears, followed shortly thereafter by the Welcome window.
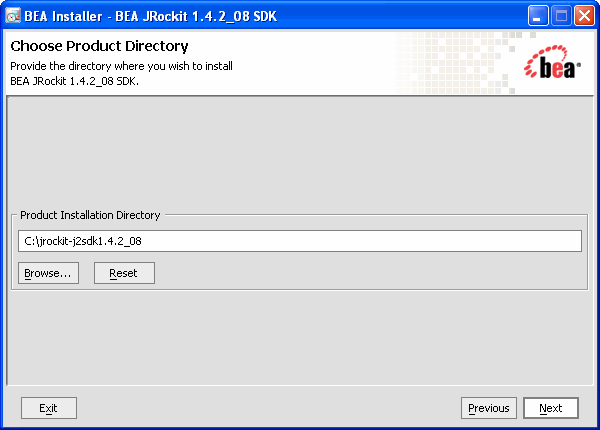
- Select a product directory as described in Table 1-1.
- Click Next. If you are installing JRockit on other platforms than for Windows 2000 and Windows 2003, please proceed to step 10. in Installing the SDK.
If installing on Windows 2000 or Windows 2003, the Install Public JRE window appears, prompting you to install or not install the public JRE (see Java Runtime Environment (JRE) for more information about the JRE).
- To install the Public JRE, click Yes Install Public JRE
- To omit the public JRE, click No Don't Install Public JRE
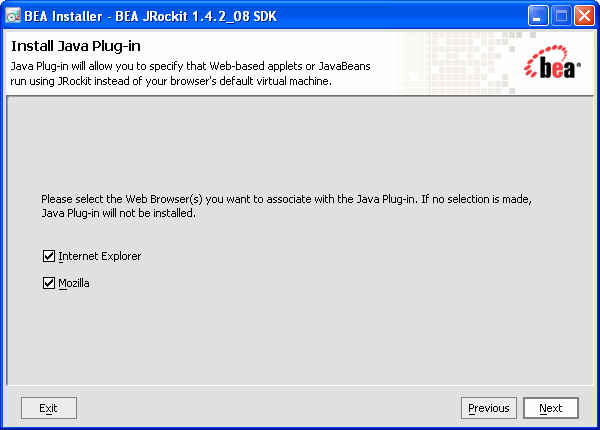
The Install Java Plug-in window appears (Figure 1-2).The Java Plug-in extends the functionality of a web browser. For more information on the Plug-in, please refer to Using the Java Plug-in.
Figure 1-2 Install Java Plugin Window
- Select the browser(s) you want to associate with the Java Plug-in and click Next. This screen will only list the browsers installed on your computer and the screen only appears on Windows platforms.
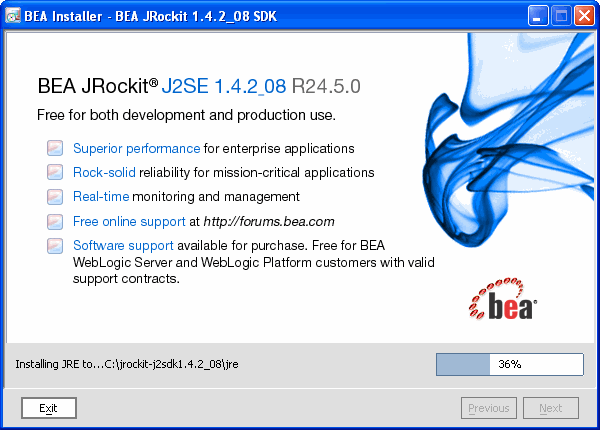
The install splash screen appears and the installation process continues, as indicated on the progress meter in the lower right corner of the window (Figure 1-3).
Figure 1-3 Install Splash Screen with Progress Meter
When the installation is complete, the Installation Complete screen appears.
BEA JRockit SDK is now installed. To use JRockit, you need to add it to your path.
export PATH=<your_install_dir>/bin:$PATH
Replace <your_install_dir> with the absolute path of the directory where you installed jrockit. The command could look like the following example:
export PATH=/home/user/jrockit-24.5.0-j2sdk1.4.2_<version>/bin:$PATH
set PATH=c:\jrockit-24.5.0-j2sdk1.4.2_<version>\bin;%PATH%
Uninstalling the SDK
This section describes how to uninstall both Windows and Linux versions of BEA JRockit SDK
Uninstalling Windows Versions
To uninstall BEA JRockit SDK, do the following:
This removes the SDK from your computer.
Uninstalling Linux Versions
To uninstall Linux versions of BEA JRockit, do the following:
This removes the SDK from your computer.
Installing and Uninstalling BEA JRockit SDK in Console Mode
You can install SDK in console mode, rather than from a GUI. This section describes how to install BEA JRockit using console mode for both Windows and Linux operating systems.
Installing Windows Versions in Console Mode
To install Windows version of BEA JRockit in console mode, enter the command for the version you want to install at the command line; for example, to install the Win-ia32 version of the SDK, do the following:
The installation will commence with a new DOS window showing the extraction process. Once the extraction process is complete, the system will prompt you though the installation, replicating in text the option GUIs described in Installing and Uninstalling BEA JRockit SDK.
jrockit-24.5.0-j2sdk1.4.2_<version>-win-ia32.exe -mode=console
Note: If you don't specify -mode=console at the command line, the installer will revert to GUI mode, as described in Installing and Uninstalling BEA JRockit SDK.
Uninstalling Windows Versions in Console Mode
You cannot uninstall Windows versions of BEA JRockit SDK in console mode at this time. You must use the method described in Uninstalling the SDK
Installing Linux Versions in Console Mode
To install BEA JRockit in console mode, do the following:
Note: If you install the SDK in Linux by using the .bin file, you need to ensure the file is executable. You can use chmod +x <filename> to set the executable.
(where
xxis your machine type, either 32 or 64; the following example is for a 32-bit machine) and press Enter.Extracting 0%....................................100%Once the extraction process is complete, the system will prompt you though the installation, replicating in text the option GUIs described in Installing and Uninstalling BEA JRockit SDK.
jrockit-24.5.0-j2sdk1.4.2_<version>-linuxxx.bin-mode=console
Uninstalling Linux Versions in Console Mode
You cannot uninstall Linux versions of BEA JRockit 1.4.2 in the console mode. Instead, use the method described in Uninstalling the SDK.
Installing and Uninstalling BEA JRockit SDK in Silent Mode
The silent installation mode lets you set installation configurations only once and then use those configurations to duplicate the installation on many machines. During installation in silent mode, the installation program reads installation options from an XML file that you create prior to beginning the installation (see The silent.xml File). The installation program does not display any configuration options during the installation process. For more information on the silent mode, please refer to Installing WebLogic Server Using Silent-Mode Installation in the BEA WebLogic Server Installation Guide.
The silent.xml File
For a silent mode installation to be successful, you will need to create the file silent.xml and store it on your computer. This file contains the values you want included in your set-up; for example, whether or not you want the Public JRE installed, and which browser(s) you want to associate with the Java Plugin. Listing 1-1 shows an example of a typical silent.xml file.
Listing 1-1 Typical silent.xml File
<?xml version="1.0" encoding="UTF-8" ?>
<domain-template-descriptor>
 <input-fields>
   <!--  Installation dir   -->
   <data-value name="USER_INSTALL_DIR" value="C:\jrockit-24.5.0-j2sdk1.4.2_08" />
   <!--
      Install Public JRE
        This option is available in Win-ia32 SDK installer
   -->
   <data-value name="INSTALL_PUBLIC_JRE" value="true" />
   <!--
      Install Java plugin for Internet Explorer
        if IE is installed on the system.
        This option is available in Win-ia32 JRE installer.
        It also works in Win-ia32 SDK installer, but the
        INSTALL_PUBLIC_JRE option must be "true"
    -->
<data-value name="REGISTER_PLUGIN_WITH_IE" value="true" />
  <!--
     Install Java plugin with Netscape web browser
       if Netscape is installed on the system.
       This option is available in Win-ia32 JRE installer.
       It also works in Win-ia32 SDK installer, but the
       INSTALL_PUBLIC_JRE option must be "true"
  -->
<data-value name="REGISTER_PLUGIN_WITH_NS" value="true" />
  <!--
     Install Java plugin with Mozilla web browser
       if Mozilla is installed on the system.
       This option is available in Win-ia32 JRE installer.
       It also works in Win-ia32 SDK installer, but the
       INSTALL_PUBLIC_JRE option must be "true"
  -->
  <data-value name="REGISTER_PLUGIN_WITH_MOZILLA" value="true" />
 </input-fields>
</domain-template-descriptor>
Installing and Uninstalling Windows Versions in the Silent Mode
These procedures apply to supported Windows 32-bit and 64-bit platforms. See BEA JRockit 1.4.2 SDK Platform Support for a list of supported Windows platforms.
Installing the SDK in the Silent Mode
To install the SDK in the silent mode on Windows machines, enter at the command line (this procedure assumes that silent.xml is stored in D:\Works\):
>jrockit-24.5.0-j2sdk1.4.2_<version>-win-ia32.exe -mode=silent -silent_xml="D:\Works\silent.xml"
>jrockit-24.5.0-j2sdk1.4.2_<version>-win-ipf.exe -mode=silent -silent_xml="D:\Works\silent.xml"
You will receive a message advising that files are being extracted and no other confirmation. If you want to confirm installation, click Start>Programs. If the installation is successful, you will see BEA JRockit 1.4.2_08 SDK on your Program menu. If you installed the JRE (that is, you specified <data-value name="INSTALL_PUBLIC_JRE" value="true" /> in the silent.xml file, you will also see BEA JRockit 1.4.2_08 JRE on your program menu.
Note: If you want to create an install log, add the option -log=log.log at the end of the command.
Uninstalling the SDK in the Silent Mode
To uninstall the SDK in the silent mode, from any directory, enter the command:
>C:\WINNT\Installer\BEA\jrockit-24.5.0-j2sdk1.4.2_<version>\uninstall.exe -silent
Note: If you want to create an uninstall log, add the option -log=c:\uninstall.log at the end of the command.
Installing Linux Versions in the Silent Mode
Note: These procedures apply to supported Linux 32-bit and 64-bit platforms. See BEA JRockit 1.4.2 SDK Platform Support for a list of supported Linux platforms.
To install the SDK in the silent mode on Linux machines, enter at the command line (this procedure assumes that silent.xml is stored in D:\Works\):
>jrockit-24.5.0-j2sdk1.4.2_<version>-linux-ia32.bin -mode=silent -silent_xml="D:\Works\silent.xml"
>jrockit-24.5.0-j2sdk1.4.2_<version>-linux-ipf.bin -mode=silent -silent_xml="D:\Works\silent.xml"
Note: You need to ensure the .bin file is executable. You can use chmod +x <filename> to set the executable.
You will receive a message advising that files are being extracted and no other confirmation. You can confirm installation by looking at your file system and finding the product directory you specified for BEA JRockit 1.4.2.
Note: If you want to create a log of your installation, add the option -log=log.log at the end of the command.
Uninstalling Linux Versions in the Silent Mode
You cannot uninstall Linux versions of BEA JRockit 1.4.2 in the silent mode. Instead, use the method described in Uninstalling Linux Versions.
Using the Linux man Pages
The Linux version of BEA JRockit 1.4.2 SDK and BEA JRockit 1.4.2 JRE now ships with tools documentation on "man" (manual) pages. Most tools in <installdir>/bin has a man page. English man pages are located in <installdir>/man1 and Japanese man pages are located in <installdir>/ja/man1.
If you have the BEA JRockit JDK as your default JDK, i.e. updated PATH as in the following example:
export PATH=/home/user/jrockit-24.5.0-j2sdk1.4.2_<version>/bin:$PATH
then you simply enter the command man followed by the tool name, for example:
Special Note About Root Access
If you choose to install the JRockit Java 2 Runtime Environment into a system-wide location such as /usr/local, you must first become the root in order to gain the necessary permissions. If you do not have root access, simply install the JRockit Java 2 Runtime Environment into your home directory or a subdirectory to which you have permission to write.


