Working with Sample Code

The Application Builder generates sample code according to how you set the default options on the main window and on the Sample Code options windows. You can specify the target client tool for sample code generation on the main window. Additionally, you can bring up task windows to set "basic" and "advanced" sample code options.

Specifying the Target Client Tool for Sample Code

To specify the target client development environment for sample code:

  1. On the main window tool bar, click the arrow next to the client tool menu to display the list of client tools.

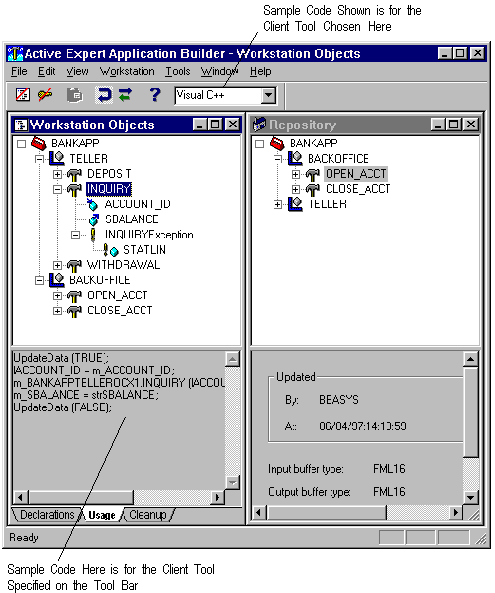
    Figure 3-9 Specifying the Client Tool for Sample Code Generation

  2. In the menu, highlight the development tool you want to use and click on it to choose it.

    The client tool field updates to show the new target development environment, and the Sample Code panel (lower left in figure) updates to show sample code for the newly specified client tool.

    Figure 3-10 Sample Code Generation Example
Setting Basic Sample Code Options

To set basic sample code defaults:

  1. Choose Tools->Options from the menu bar (or use keyboard shortcut Alt T O).

  2. Click on the Sample Code tab.

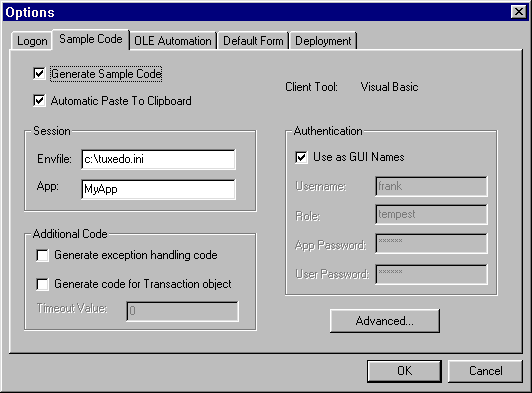
    This brings up the default options window for sample code. These settings control how sample code is generated. You can change these at any time and immediately see the new sample code for an object.

    Figure 3-11 Sample Code Options (Basic)

    The table below explains the options available on the basic Sample Code options window. Following the table is an example of the sample code that would be generated based on the settings shown in the figure. (Refer to Listing 3-1.)

    Table 3-5 Sample Code Options (Basic)

    Topic Section Field Description

    Generate Sample Code

    Indicates whether you want sample code to be generated. This box must be checked for sample code to be generated. If it is not checked, every other control on this window is disabled. (In the figure, this is on.)

    Automatic Paste to Clipboard

    Indicates whether you want the code that appears in the sample code window (for a selected object) to be copied into the clipboard automatically. (In the figure, this is on.)

    Client Tool

    Indicates the client application development tool you are using. Sample code is generated for the specified client development environment (Visual Basic, PowerBuilder, or Visual C++). In the figure, this is set to Visual Basic.

    You can specify this option from the tool bar on the main window. (See Specifying the Target Client Tool for Sample Code.)

    Session

    Envfile and App

    Indicates the name of the TUXEDO environment file (Envfile) you want to use and TUXEDO application (App) to which you want to connect.

    Authentication

    Use as GUI Names

    Indicates whether you want to generate the authentication parameters as default GUI controls (for example, txtUserName.Text) if checked, or as text (for example, "frank") if unchecked. (In the figure, this is on, so authentication parameters will be generated as GUI controls.)

    The authentication parameters are your entries for Username, Role, Application Password, and User Password.

    Username

    Authentication parameter for user name. (Required to join a secure TUXEDO application.)

    Role

    Authentication parameter for role. (Required to join a secure TUXEDO application.)

    Application Password

    Authentication parameter for application password. (Required to join a secure TUXEDO application.)

    User Password

    Authentication parameter for user password. (Required to join a secure TUXEDO application.)

    Additional Code

    Generate exception handling code

    Enables or disables the generation of client tool error handling code when an operation is selected in the Workstation Objects window. (In the figure, this is off.)

    Generate code for Transaction object

    Indicates whether to generate transaction object code. Checking this option on also enables the Timeout Value editable field. (In the figure, this is off.)

    Timeout Value

    Forces generation of the parameter of the transaction object's Begin method. (In the figure, this is disabled.)

    The values in the Sample Code options window shown in Figure 3-11 cause the following code to be generated when a module is selected.

    Listing 3-1 Generated Sample Code Based on Settings in Figure 3-11
    Set Session = CreateObject ("Tobj.Session")
    Call Session.set_env_var ("WSENVFILE", "c:\tuxedo.ini")
    Call Session.set_env_var ("WSAPP", "MyApp")
    ret = Session.Logon (txtUsername.Text, txtRole.Text,
    txtApppwd.Text, txtUpwd.Text, UserData)
    If ret = SecAuthFailure Then
    MsgBox "Logon Failed"
    End
    End If

  3. When you have filled in the fields, click OK to save your changes and close the window. (You can also click Cancel to close the window without saving.)

    Note: You must click OK to activate your latest changes to this window. If you go directly into the Advanced Sample Code window without first saving your basic changes, the basic options will not be current. If you have reset the basic options and now want to reset options on the Advanced Sample Code window, you must first verify your new "basic" options by clicking OK and closing the basic window.

See also help on the Sample Code Options (Basic).

Setting Advanced Sample Code Options

To set advanced sample code defaults:

  1. Choose Tools->Options from the menu bar (or use keyboard shortcut Alt T O).

  2. Click on the Sample Code tab.

    This brings up the default options window for sample code. An example of this window is shown in Figure 3-11.

  3. On the Sample Code Options window, click on Advanced.

    This brings up the Advanced Sample Code window.

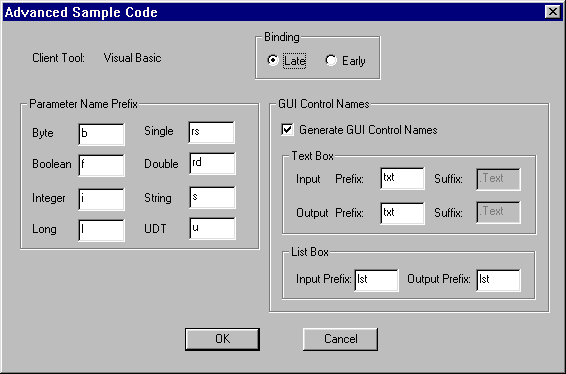
    Figure 3-12 Sample Code Options (Advanced)

    The following table explains the options available on the Advanced Sample Code options window.

    Table 3-6 Sample Code Options (Advanced)

    Topic Section Field Description

    Binding Type

    Late or Early

    Determines whether the sample code generated when declaring OLE automation server objects is written for early or late binding.

    With Late binding, the Account interface would be declared in Visual Basic as:

    Dim Account As Object

    With Early binding, the declaration is:

    Dim Account As DIBank_Account

    Parameter Name Prefix

    Byte, Boolean, Integer, Long, Single, Double, String, UDT

    Controls the names of variables that correspond to operation parameters.

    Note that the parameter types shown in the figure are for Visual Basic. These differ slightly in PowerBuilder and Visual C++.

    GUI Control Names

    Generate GUI Control Names (checkbox)

    Determines whether GUI controls or variables are used in the sample code. Unchecking this check box disables text box and list box prefix and suffix values.

    Text Box and List Box prefix and suffix fields

    Prefix and suffix values are used to decorate the control name; "Input" corresponds to those controls that populate variables used as parameters, and "Output" corresponds to controls populated by service output.

    The following code shows the Inquiry service being called with the input parameter ACCOUNT_ID, a long, coming from a text box. Subsequently, the output of the service is stored in a text box:

    lACCOUNT_ID = txtACCOUNT_ID.Text
    BANKAPPTELLEROCX1.INQUIRY lACCOUNT_ID, sSBALANCE
    txtSBALANCE.Text = sSBALANCE

  4. When you have filled in the fields, click OK to save your changes and close the window. (You can also click Cancel to close the window without saving.)

See also help on the Sample Code Options (Advanced).

Viewing Sample Code

You can view sample code on an object in the bottom panel of the Workstation Objects window in three different modes; Declarations, Usage, and Cleanup. To change the sample code mode click on one of these three tabs. For more information on viewing sample code, refer to the section "Sample Code" under Working with Objects on the Local Workstation.