Opening an Existing Configuration File or Creating a New One

Before you can view a configuration or available resources, you must either create a new application configuration file or open an existing one.

The following sections describe how to:

Create a New Configuration File

When you create a new configuration file, the Configuration Expert leads you through a series of windows that prompt you to define the information needed (or confirm the given defaults) to establish a new file. The information you provide in these initial steps is:

The Configuration Expert opens the new file for you and displays it in the Expert main window as a hierarchical tree control. The following procedure takes you through these steps in detail.

To create a new configuration file:

  1. Choose File->New from the menu bar (or click on the New tool button).

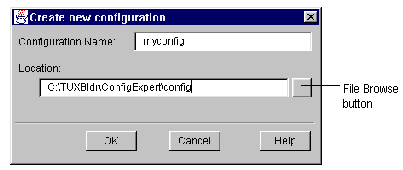
    This brings up the Create New Configuration window as shown in Figure 3-1.

    Figure 3-1 Create New Configuration

    The following table explains the fields on the Create New Configuration window.

    Table 3-1 Create New Configuration

    Field Description

    Configuration Name

    Enter the name of your application. The Configuration Expert automatically appends a.ce suffix to the configuration name for the application configuration file.

    Location

    Enter a full path name to indicate where you want this new file to reside. By default, the Configuration Expert expects to store configuration files as <ConfigExpertDirectory>config\myconfig.ce.

    If you specify a different location, the Configuration Expert will then use the location you specify as the default. (In other words, you have the option to change this default every time you create a new configuration file.)

    You can use the file browse button to the right of the Location field to browse directories and select a location.

  2. When you have filled in the fields, click OK to save your changes and close the window.

    This brings up the Application Properties window. For more information, see the task Specifying Application Properties.

    The new configuration file is displayed in the main window. The tree contains your application as the root node, and the master machine as the first component under your application.

    Figure 3-2 Creating a New Configuration File
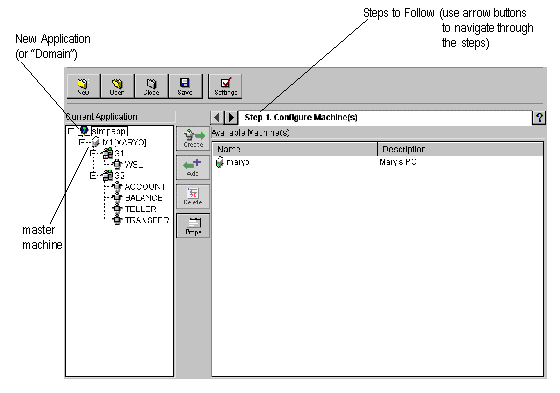
    You can now begin adding other components to the configuration (that is, other machines, groups, servers, and optional components like a Jolt server or /WS). We suggest that you follow the sequence suggested earlier to accomplish these other configuration tasks.

    Note: Remember that just because you select a component in the right panel, the component is not active in your application until you Add it, and the component appears in the left panel.

Remember to save that file! Although you have created a new configuration file, you have not yet saved it. If you close without saving, the file is not retained. A confirmation window appears asking you if you want to save the current application. For information on how and where to save the new file, refer to the section Save a New File.

Open an Existing Configuration File

To open an existing configuration file:

  1. Choose File->Open (or click on the Open tool button on the main window).

    This brings up the file browser as shown in Figure 3-3.

    Figure 3-3 File Browser

  2. Use the file browser to navigate to the directory that contains the file you want to open. The Configuration Expert automatically appends the files with a.ce extension. The default location for configuration files is <ConfigExpertDirectory>\config.

  3. Select the file you want to open, and click Open.

    The configuration file you chose is displayed in the main window.

    Figure 3-4 Opening an Existing File