Configuring Optional Components (Step 4)

You can add optional configuration elements to your application. These configuration elements are BEA TUXEDO utility server or add-ons, such as communication gateways. The defined optional components for the Configuration Expert are:


/WS Configuration

This configuration allows you to add or modify settings to the BEA TUXEDO/WS Workstation Listener, or WSL in your application.

Adding a WSL

To add a WSL:

  1. On the main window, select the WS tab and select the Workstation Listener server you want to add, as shown in Figure 3-18.

    Note: You must select a group for the WSL to be added.

    Figure 3-18 Configure Optional Components (/WS)
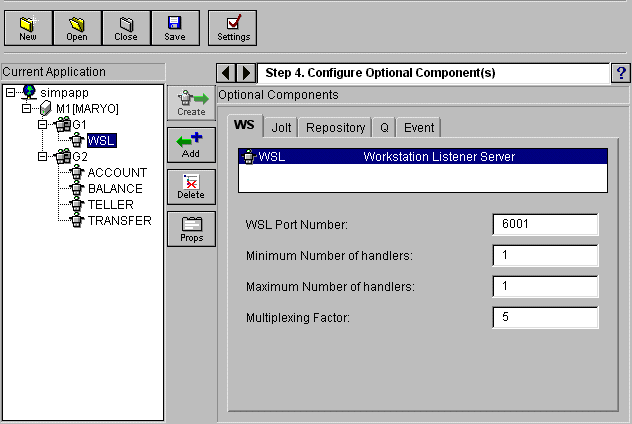
  2. Fill in the fields on the WS tab sheet.

    The following table explains the fields available on the WS Optional Components window.

    Table 3-12 Workstation Server (WSL) Optional Component Properties

    Field Description

    WSL Port Number

    The port number assigned to the workstation listener

    Minimum number of handlers

    The minimum number of workstation handlers, or WSH, that are started when the application is booted.

    Maximum number of handlers

    The maximum number of workstation handlers, or WSH, that may be started.

    Multiplexing factor

    The maximum number of clients per WSH.

  3. Click Add on the Configuration Tool bar.

    The new WSL server is added to the tree list in the left panel.
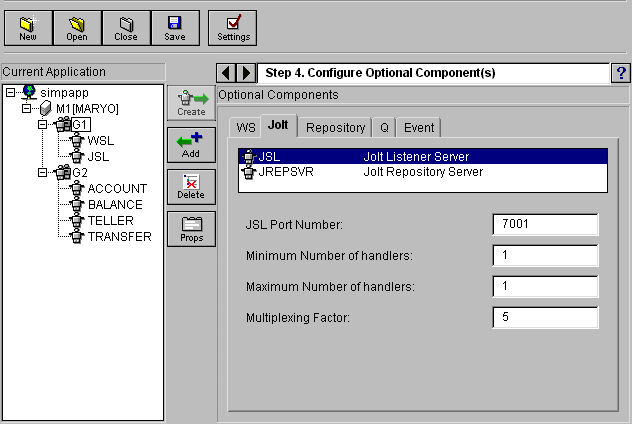
For more information, see WSL(5) in the BEA TUXEDO Reference manual.
 

Jolt Configuration

This configuration allows you to modify settings to the Jolt Listener and the Jolt Repository Server components in your application.

Adding a Jolt Listener or Jolt Repository Server

To add a Jolt Listener or Jolt Repository Server:

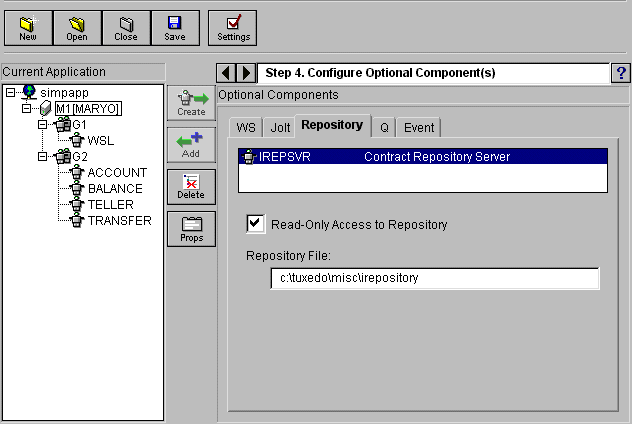
  1. On the main window, select the Jolt tab and select the component you want to add, as shown in Figure 3-19.

    A group must be selected in order to add a Jolt component.

    Figure 3-19 Configure Jolt Component

    The following tables explains the fields available on the Jolt Server Listener (JSL) and on the Jolt Repository Server Optional Components window.

    Table 3-13 Jolt Server Listener (JSL) Optional Component Properties

    Field Description

    Jolt Port Number

    The port number assigned to the JSL.

    Minimum number of handlers

    The minimum number of Jolt handlers, or JSH, that are started when the application is booted.

    Maximum number of handlers

    The maximum number of Jolt handlers, or JSH, that may be started.

    Multiplexing factor

    The maximum number of clients per JSH.

    Table 3-14 Jolt Repository Server (JREPSRV) Optional Component Properties

    Field Description

    Read-only access to Repository

    If selected, this parameter provides read only access to the repository file. If deselected, the user has read/write access to the repository file.

    Repository File

    Location of the Jolt Repository file.

  2. Fill in the fields on the appropriate Jolt component.

  3. Click Add on the Configuration Tool bar.

    The new Jolt Listener or JREPSVR is added to the tree list in the left panel.
    You can change the server properties at a later time. See the task Modify Server Properties for more information.

    Note: For the JSL, you cannot change the Process parameters except for the Restart capability.

The Jolt Repository file is, by default jrepository and is located in $TUXDIR/misc
 

Repository Configuration

This configuration allows you to add or modify settings to the Builder Contract Repository component in your application. This option affects the IREPSVR component which is the Builder contract repository server, and is used by Builder tools.

Adding a Repository

To add a Repository:

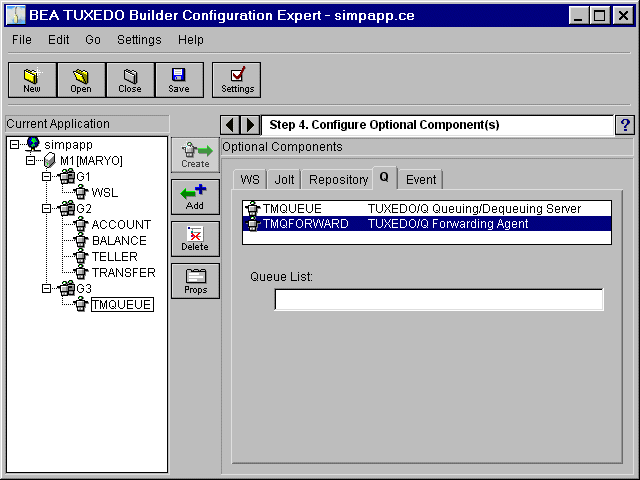
  1. On the main window, select the Repository tab and select the Repository server you want to add, as shown in Figure 3-20.

    Figure 3-20 Configure Optional Components (Repository)

    The following table explains the fields available on the Repository Optional Components window.

    Table 3-15 Repository (IREPSRV) Optional Component Properties

    Field Description

    Read-Only Access check box

    If selected, this parameter provides read only access to the repository file. If deselected, the user has read/write access to file.

    Repository File

    Location of the Builder Corporate Repository.

  2. Fill in the fields on the Repository Optional Component.

  3. Click Add on the Configuration Tool bar.

    The new Repository is added to the tree list in the left panel.
    You can change the server properties at a later time. See the task Modify Server Properties for more information.

The Repository file is, by default, irepository, and is located in either the $TUXDIR\misc (on Windows NT) or the $TUXDIR/udataobj(on UNIX) directory.
 

/Q Configuration

This configuration allows you to modify settings to the components in your application.

Note: The /Q elements, TMQUEUE and TMQFORWARD, can only be added to a /Q server group. These groups must have been added to the configuration in the Server Group selection (Step 3).

Adding a /Q Component

To add a /Q component:

  1. On the main window, select the /Q tab and then select the /Q element you want to include, as shown in Figure 3-21.

    Figure 3-21 Configure /Q Component

    The following table explains the elements available on the /Q Optional Components window.

    Table 3-16 /Q Optional Components

    Element Description

    TMQUEUE

    TUXEDO/Q Queueing and Dequeueing Server

    TMQFORWARD

    TUXEDO/Q forwarding agent.

  2. Click Add on the Configuration Tool bar.

    The new component is added to the tree list in the left panel.
    If you select the TMQFORWARD component: The TMQFORWARD component has a queue list property that displays a Queue list field in the window. In Queue list field you can enter the list of queue names separated by a comma.

    Note: At this time, parameters such as transaction time-outs and idle delays are not supported in the Configuration Expert. If you want to modify these parameters, you must add them manually in the ubbconfig file. You can also modify this file by adding command line options in the General Properties tab.


/Event Configuration

The /Event configuration allows you to add /Event system and user event brokers.

Note: The /Event elements, TMSYSEVT and TMUSREVT, should be added to a non transactional server group. These groups must have been added to the configuration in the Server Group selection (Step 3). However, if transactional event posting is used in the application, a NULL transactional server group should be used.

Add an Event Component

To add an Event component:

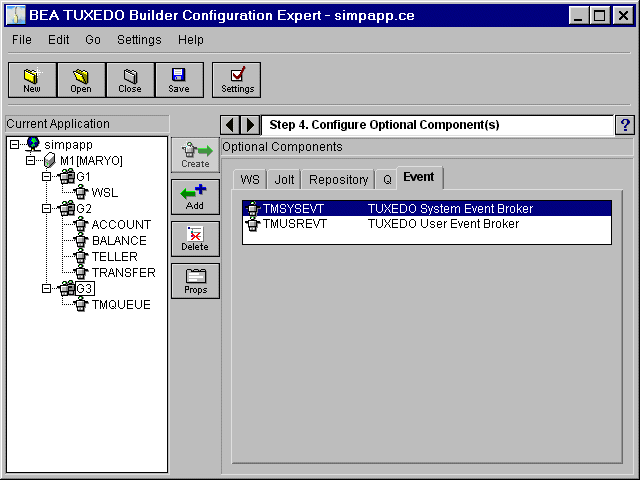
  1. On the main window, select the /Event tab and then select the component you want to add, as shown in Figure 3-22.

    Figure 3-22 Configure Event Component

  2. Click Add on the Configuration Tool bar.

    The new element is added to the tree list in the left panel.

The /Event configuration includes the System Event broker, TMSYSEVT, and the User Event broker TMUSREVT. There are no configurable parameters for these elements.