Before starting the Contract Repository Editor, make sure that you have installed all necessary software. The CD-ROM includes all the software needed to run the Contract Repository Editor, with the exception of BEA TUXEDO, Netscape Communicator, and the Jolt Repository Editor on UNIX platforms. For details on system requirements, supported platforms, and Contract Repository software installation, refer to the BEA TUXEDO Builder Release Notes and the BEA TUXEDO Builder Setup and Installation Guide included with your CD-ROM.
If you have an existing Jolt installation and you want to migrate the Jolt Repository to the Contract Repository database, you need to use the Migration Utility before you start the Contract Repository Editor (see Migrating the Jolt Repository). Otherwise, just start the Contract Repository Editor (see Starting the Contract Repository Editor) and log on (see Logging On to the Contract Repository Editor).
The Migration Utility is required only if you have an existing Jolt installation and you want to migrate the Jolt Repository to the Contract Repository database. The utility is provided with the Contract Repository and is a part of the Contract Repository Server. This utility calls a special service in the Contract Repository Server that performs the actual migration and loading of the Contract Repository database.
When migrating the Jolt Repository to the Contract Repository:
Start the Migration Utility by following the steps in Migration Utility Instructions.
To run the migrate program:
Migration Utility Instructions
jmigrate <old Jolt repository file> <output log file>
In this example, bldr_upgrade -r <old_data_file> -u <irepository>
old_data_file is replaced by your repository data file name and irepository refers to the new repository data file included in the BEA TUXEDO Builder 2.0 release.
To start the Contract Repository Editor:
Starting the Contract Repository Editor
When the Contract Repository Editor is started, the opening window in Figure 3-1 displays.
Figure 3-1 Contract Repository Editor at Start Up

After starting the Contract Repository Editor, follow the directions to log on:
Or
Click on the Logon toolbar button.
Figure 3-2 Logon Window
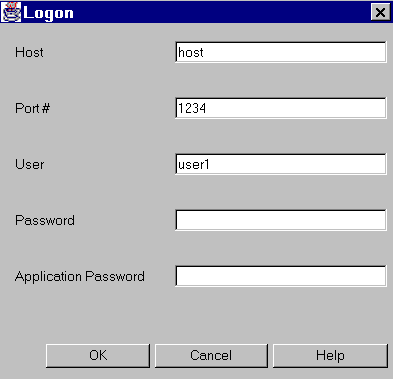
Note:
The first three fields in the Logon window can be set up as defaults in the Settings window to save retyping the fields during future logons. See Setting the Logon Default Instructions.
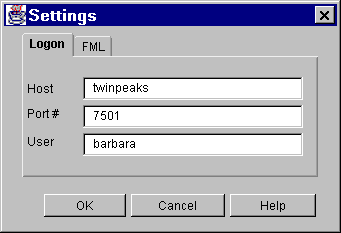
To save keystrokes at logon, you can customize your logon default settings. The first three fields in the Logon window can be set up as defaults in the Settings window to provide defaults for the text entry fields for future logons. Set the logon values to avoid retyping the values at each logon to the Contract Repository.
Figure 3-3 Logon Settings Window
To set the logon default:
Or
Click on the Settings toolbar button.