

|

|
|
|
|
Quick Configuration
If you are already familiar with BEA Jolt and BEA Tuxedo, Quick Configuration provides efficient guidelines for the configuration procedure. If you have not used Jolt, refer to Jolt Background Information before you begin any configuration procedures.
Quick Configuration contains the information you need to configure the Jolt Server Listener (JSL) on BEA Tuxedo and covers the following procedures:
Editing the UBBCONFIG File
Note: If MAXWSCLIENTS is not set, JSL does not boot.
Lines within this section have the form:
JSL required parameters [optional parameters]
where JSL specifies the file (string_value) to be executed by tmboot(1).
Required parameters are:
SVRGRP=string_value
SRVID=number
CLOPT="-A...-n...//host port"
You can use the following parameters with the JSL, but you need to understand how doing so affects your application. Refer to Parameters Usable With JSL for additional information.
MAX # of JSHs
MIN # of JSHs
Configuring the Jolt Repository
In the Groups Section:
In the Servers Section:
The BEA Jolt Repository Server (JREPSVR) contains services for accessing and editing the Repository. Multiple JREPSVR instances share repository information through a shared file. Include JREPSVR in the SERVERS section of the UBBCONFIG file.
Initializing Services That Use BEA Tuxedo and the Repository Editor
Define the BEA Tuxedo services that use BEA Tuxedo and BEA Jolt in order to make the Jolt services available to the client.
Getting Started with the Repository Editor
Before you start the Repository Editor, make certain that you have installed all of the necessary BEA Jolt software.
Note: You cannot use the Repository Editor until JREPSVR and JSL are running.
To use the Repository Editor, you must:
You can start the Repository Editor from either the JavaSoft appletviewer or from your Web browser. Both of these methods are detailed in the following sections.
Starting the Repository Editor Using the Java Applet Viewer
appletviewer full-pathname/RE.html
If loading the applet from the Web server, type the following at the URL location:
http://www.server/URL path/RE.html
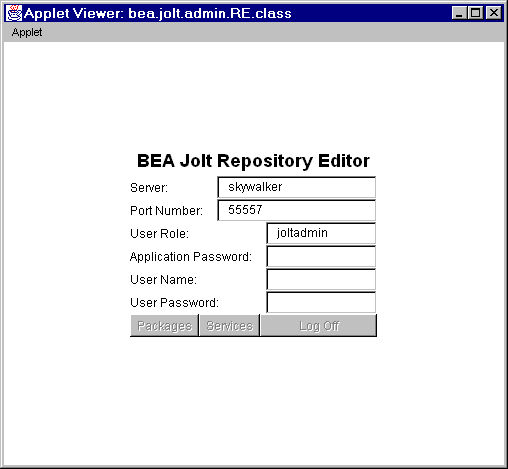
The window is displayed as shown in the figure BEA Jolt Repository Editor Logon Window.
Starting the Repository Editor Using Your Web Browser
Use one of the following procedures to start the Repository Editor from your Web browser.
To start the Repository Editor from a local file:
file:full-pathname/RE.html
The window is displayed as shown in the figure BEA Jolt Repository Editor Logon Window.
To start from a Web server:
http://www.server/URL path/RE.html
Note: If jolt.jar and admin.jar are in the same directory as RE.html, the Web server provides the classes. If they are not in the same directory as RE.html, modify the applet code base.
The Repository Editor Logon window is displayed as shown in the figure BEA Jolt Repository Editor Logon Window.
Logging on to the Repository Editor
After starting the Jolt Repository Editor, follow these directions to log on:
Note: The BEA Jolt Repository Editor Logon Window must be displayed before you log on. Refer to this figure as you perform the following procedure.
The system validates the server and port information.
Note: Unless you are logging on through Jolt Relay, the same port number is used to configure the Jolt Listener. Refer to your UBBCONFIG file for additional information.
Depending upon the authentication level, complete Steps 5 and 6 as required.
The Packages and Services command buttons are enabled.
Note: The BEA Jolt 1.2.1 Repository Editor uses the hardcoded joltadmin for the User Role value.
BEA Jolt Repository Editor Logon Window

The following table, Repository Editor Logon Window Description, contains details about each of the fields and buttons.
Repository Editor Logon Window Description
Repository Editor Logon Window Description
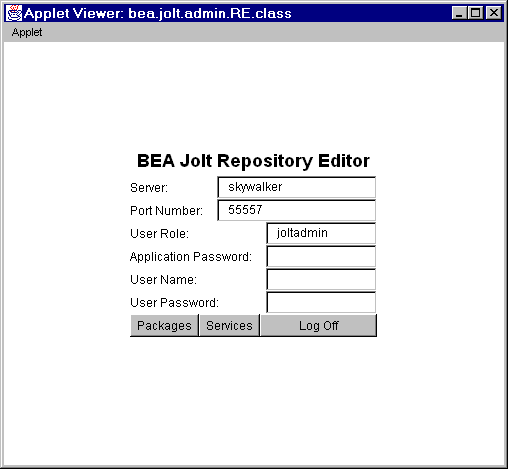
Exit the Repository Editor when you finish adding, editing, testing, or deleting packages, services, and parameters. Prior to exit, the window is displayed as shown in the figure BEA Jolt Repository Editor Logon Window Prior to Exit.
BEA Jolt Repository Editor Logon Window Prior to Exit
 .
.
Note that only the Packages, Services, and Log Off command buttons are enabled. All of the text entry fields are disabled.
Follow the steps below to exit the Repository Editor.
The Repository Editor Logon window shows disabled fields.
Configuring the BEA Tuxedo TMUSREVT Server for Event Subscription
Jolt Event Subscription receives event notifications from either BEA Tuxedo services or other BEA Tuxedo clients. Configure the BEA Tuxedo TMUSREVT server and modify the application UBBCONFIG file. The following listing, TMUSREVT Parameters in the UBBCONFIG File, shows the relevant TMUSREVT parameters in the UBBCONFIG file:
TMUSREVT Parameters in the UBBCONFIG File
TMUSREVT        SRVGRP=EVBGRP1  SRVID=40        GRACE=3600
                ENVFILE="/usr/tuxedo/bankapp/TMUSREVT.ENV"
                CLOPT="-e tmusrevt.out -o tmusrevt.out -A --
                -f /usr/tuxedo/bankapp/tmusrevt.dat"
                SEQUENCE=11
In the SERVERS sections of the UBBCONFIG file, specify the SRVGRP and SRVID.
Configuring Jolt Relay
On UNIX
Start the JRLY process on UNIX by typing the following command at the system prompt:
jrly -f <config_file_path>
If the configuration file does not exist or cannot be opened, the JRLY writes a message to standard error, attempts to log the startup failure in the error log, then exits.
On UNIX and NT
The format of the configuration file is a TAG=VALUE format. Blank lines or lines starting with a "#" are ignored. The following listing, Formal Configuration File Specifications, is an example of the formal specifications of the configuration file.
Formal Configuration File Specifications
LOGDIR=<LOG_DIRECTORY_PATH>
ACCESS_LOG=<ACCESS_FILE_NAME in LOGDIR>
ERROR_LOG=<ERROR_FILE_NAME in LOGDIR>
LISTEN=<IP:Port combination where JRLY will accept comma-separated connections>
CONNECT=<IP:Port1, IP:Port2...IP:PortN:Port(List of IP:Port combinations associated with JRADs: can be 1...N)>
On NT only (optional):
SOCKETTIMEOUT is the time in seconds for which JRLY NT service blocks for network activity (new connections, data to be read, closed connections). SOCKETTIMEOUT also affects the Service Control Manager (SCM). When the SCM requests the NT service to stop, the SCM must wait for at least SOCKETTIMEOUT seconds before quitting.
Note: The format for directory and file names is determined by the operating system. UNIX systems use the forward slash (/). NT systems use the backslash (\). If any files specified in LOGDIR, ACCESS_LOG, or ERROR_LOG cannot be opened for writing, JRLY prints an error message on stderr and exits.
The formats for the host names and the port numbers are shown in the following table
.
Start the Jolt Relay Adapter (JRAD)
Configure the JRAD
A single JRAD process can only be connected to a single JRLY. A JRAD can be configured to communicate with only one JSL and its associated JSH. However, multiple JRADs can be configured to communicate with one JSL. The CLOPT parameter for BEA Tuxedo services must be included in the UBBCONFIG file.
Note: The format is 0x0002PPPNNN, or, in dot notation, 100.100.10.100.
Jolt is now configured.

|

|

|
|
|
|
Copyright © 2000 BEA Systems, Inc. All rights reserved.
|