Tuxedo
0

Installing the Tuxedo System

 Previous Next Contents Index View as PDF  

Installing BEA Tuxedo Using GUI-Mode Installation

The following sections describe how to install BEA Tuxedo using graphical user interface (GUI) mode installation on both Windows and UNIX systems:


What Is GUI-Mode Installation?

The graphical user interface mode installation is the graphics-based method of executing the BEA Installation program. It can be run on both Windows and UNIX systems.

To run GUI-mode installation, the console attached to the machine on which you are installing the software must support a Java-based GUI. All consoles for Windows systems support Java-based GUIs, but not all consoles for UNIX systems do.

Note: To install BEA Tuxedo on a UNIX system with a non-graphics console, see Installing BEA Tuxedo on UNIX Systems Using Console-Mode Installation.


Before You Start

If you are upgrading from BEA WebLogic Enterprise or BEA Tuxedo 8.0 or earlier software, see Upgrading the BEA Tuxedo System to Release 8.1 and follow the instructions given there. Then return here to continue your BEA Tuxedo installation.

On a Windows machine that has the BEA WebLogic Enterprise software or an older version of the BEA Tuxedo software installed, a window named "Previous Version Detected!" will display at the very beginning of the BEA Tuxedo installation. This window contains a message that encourages you to exit the installation program and remove the older software before installing BEA Tuxedo 8.1.

If you choose to remove the older software, refer to Upgrading the BEA Tuxedo System to Release 8.1, follow the instructions to remove the older software from your machine, and then restart the installation.

If you choose not to remove the older software, install the BEA Tuxedo 8.1 software to a different directory than the directory in which the BEA WebLogic Enterprise software or the older version of the BEA Tuxedo software is installed.


Starting GUI-Mode Installation on a Windows System

To start the GUI-mode installation process on a Windows system, follow these steps:

  1. Select a Windows system that meets the hardware and software requirements described in BEA Tuxedo 8.1 Platform Data Sheets.

    The Windows 98 and XP systems support only BEA Tuxedo client components.

  2. Log in to the Windows system as the Administrator or as a member of the Administrator group.

    You need administrative privileges to install BEA Tuxedo server components on a Windows system. If you are going to install only BEA Tuxedo client components, you do not need administrative privileges.

  3. Ensure that you have enough free space for the BEA Tuxedo installation.

    For disk space requirements, see BEA Tuxedo 8.1 Platform Data Sheets. For important disk space allocation information, see File and Database Management and Disk Space Allocation.

  4. If installing BEA Tuxedo by downloading from the BEA Web site:

    1. Go to http://commerce.bea.com/downloads/tuxedo.jsp#tuxedo and download the BEA Tuxedo 8.1 installation file specific to your platform, including the 30-day evaluation license file needed to complete the BEA Tuxedo installation.

    2. Go to the directory where you downloaded the BEA Tuxedo installer and double-click the installer filename to start the installation.

  5. If installing BEA Tuxedo from the product software CD:

    Insert the BEA Tuxedo 8.1 product software CD into the CD-ROM drive. The Windows autorun feature automatically starts the installation.

    To bypass the autorun feature, press and hold the Shift key for approximately 10 seconds while inserting the CD into the CD-ROM drive. You can then start the installation manually by double-clicking the CD-ROM icon.

  6. Proceed to Running GUI-Mode Installation.


Starting GUI-Mode Installation on a UNIX System

To start the GUI-mode installation process on a UNIX system, follow these steps:

  1. Select a UNIX system that meets the hardware and software requirements described in BEA Tuxedo 8.1 Platform Data Sheets.

  2. Log in to the UNIX system as the BEA Tuxedo administrator.

  3. Ensure that you have enough free space for the BEA Tuxedo installation.

    For disk space requirements, see BEA Tuxedo 8.1 Platform Data Sheets. For important disk space allocation information, see File and Database Management and Disk Space Allocation.

  4. If installing BEA Tuxedo by downloading from the BEA Web site:

    1. Go to http://commerce.bea.com/downloads/tuxedo.jsp#tuxedo and download the BEA Tuxedo 8.1 installation file specific to your platform, including the 30-day evaluation license file needed to complete the BEA Tuxedo installation.

    2. Go to the directory where you downloaded the installer and invoke the installation procedure by entering the following command:

      prompt> sh filename.bin

      where filename is the name of the BEA Tuxedo installer file.

  5. If installing BEA Tuxedo from the product software CD:

    1. Mount the CD-ROM as a filesystem and insert the BEA Tuxedo CD-ROM into the CD-ROM drive.

    2. Go to the top-level directory of the mounted CD-ROM.

    3. Invoke the installation procedure by entering the following command:

      prompt> sh filename.bin

      where filename is the name of the BEA Tuxedo installer file specific to your platform.

  6. Proceed to Running GUI-Mode Installation.


Running GUI-Mode Installation

The BEA Tuxedo installer program is currently available in English and Japanese. By checking the value of a certain language-related environment variable on the target platform, the installer program automatically determines (1) the language displayed during the installation and (2) the language-specific message catalog installed during the installation. If the language-related environment variable is not set or is set to a value unknown to the installer program, both the language displayed and the message catalog installed default to English.

The BEA Tuxedo installer program prompts you to enter specific information about your system and configuration. For instructions on responding to the prompts during installation, see the following table.

In This Window . . .

Perform the Following Action . . .

Introduction

Click Next to proceed with the installation. You may cancel the installation at any time by clicking Exit.

License Agreement

Read the BEA Software License Agreement and indicate your acceptance of the terms of the agreement by selecting Yes. The default is No. To continue with the installation, you must accept the terms of the license agreement and then click Next.

Choose Install Set

Select one of six install sets to be installed on your system:

For a detailed list of software component for each install set, see Install Sets.

On a Windows 98 or XP system, select Full Client Install, Jolt Client Install, ATMI (/WS) Client Install, or CORBA Client Install from the installation menu. A Windows 98 or XP system cannot be used as a BEA Tuxedo server machine.

Select an install set and then click Next to launch the Choose BEA Home Directory window—your selection includes the appropriate encryption software for Link-Level Encryption (LLE) and/or Secure Sockets Layer (SSL). Or select an install set and then click Customize to launch the Customize Install window.

Customize Install

Select (add) or deselect (clear) one or more software components from the selected install set, or choose one of the other five install sets or Custom Set from the drop-down list menu and customize its software components. For a description of the JRLY component, see Jolt Internet Relay.

Observe the following software component mappings:

After selecting or deselecting one or more software components from the selected install set, click Next to continue with the installation. The appropriate encryption software for LLE and/or SSL is automatically included.

Choose BEA Home Directory

Specify the BEA Home directory that will serve as the central support directory for all BEA products installed on the target system. If you already have a BEA Home directory on your system, you can select that directory (recommended) or create a new BEA Home directory. If you choose to create a new directory, the BEA Tuxedo installer program automatically creates the directory for you. For details about the BEA Home directory, see BEA Home Directory.

Choose a BEA Home directory and then click Next to continue with the installation.

Choose Product Directory

Specify the directory in which you want to install the BEA Tuxedo software. You may select the default product directory (tuxedo8.1) or create a new product directory. If you choose to create a new directory, the BEA Tuxedo installer automatically creates the directory for you.

Choose a product directory and then click Install to start the BEA Tuxedo software installation.

Installing . . .

No user input is required here. The installation program is installing BEA Tuxedo in the user-specified product directory.

It is normal for the installation progress bar to stop for a fairly long time, especially at the end. The BEA Tuxedo installer is still working when this occurs.

Create Tlisten Password

Enter a tlisten password of your choice. Your password must be a string of alphanumeric characters in clear-text format that is no more than 80 characters in length. You use this password to log in to the BEA Tuxedo Administration Console.

BEA Tuxedo uses the tlisten password to protect the local machine from administrative requests and operations that are not authorized. Whenever administrative communications arrive on the local machine through tlisten(1) or wlisten(1) gateway processes, BEA Tuxedo authenticates them by means of the tlisten password.

Enter and re-enter a tlisten password and then click Next to continue.

SSL Installation Choice

This window appears only if you have installed CORBA server and/or client software components. BEA Tuxedo provides a Lightweight Directory Access Protocol (LDAP) based certificate retrieval mechanism that supports certificate-based authentication when using SSL. The BEA Tuxedo certificate retrieval mechanism has been certified for use with the LDAP Directory server included with Netscape Enterprise Server.

Choose whether or not you want to install SSL support. If you intend to use SSL encryption in your application, select Yes and then click Next to launch the LDAP Configuration window. If you do not intend to use SSL encryption in your application, select No and then click Next to launch the License Installation Choice window.

LDAP Configuration

Enter the following LDAP configuration information and then click Next to continue:

License Installation Choice

Choose whether or not you want to install the BEA Tuxedo product license now. To install the license now, select Yes and then click Next to launch the License File Browser window. To install the license later, select No and then click Next to launch the Install Complete window.

For instructions on installing the product license manually, see Installing the Product License After You Install BEA Tuxedo.

Choose License Location Directory

Read the following important information, specify the location of the license file on your machine, and then click Next to continue.

Install Complete

Click Done to exit the installation program.


Congratulations! Your installation of the BEA Tuxedo software is complete!


Assigning File Ownership on a UNIX System

If you installed the BEA Tuxedo software on a UNIX system, BEA strongly recommends that you create a separate user account for the BEA Tuxedo administrator and give ownership of the BEA Tuxedo files to that account. To change ownership of the BEA Tuxedo software on a UNIX machine, enter the following command:

chown -R adm_account full_path_of_tux_prod_dir
chgrp -R adm_group full_path_of_tux_prod_dir

Replace adm_account with the BEA Tuxedo administrator account, replace adm_group with the BEA Tuxedo administrator group ID, and replace full_path_of_tux_prod_dir with the full pathname of the product directory in which you installed the BEA Tuxedo software.


Understanding the BEA Tuxedo Shortcuts on a Windows System

When installing the BEA Tuxedo software on a Windows system, the installer program automatically uses BEA WebLogic E-Business Platform as the parent folder for BEA Tuxedo. As additional BEA Home directories are added to the system, the installer program continues to create new BEA WebLogic E-Business Platform folders using the convention shown in the following figure.

Figure 2-1 Tracking Multiple BEA Home Directories on the Same Windows System


Each BEA Home directory has an associated BEA WebLogic E-Business Platform folder. Each BEA WebLogic E-Business Platform folder contains one or more BEA product folders (see note) and two files: BEAHOME Location and View History.

Note: Because a BEA Home directory may be the home directory for a BEA Tuxedo installation, a BEA WebLogic Server installation, or other BEA product installations, a BEA WebLogic E-Business Platform folder may contain multiple BEA product folders.

For a given BEA Home directory and BEA WebLogic E-Business Platform folder, the BEAHOME file contains the pathname of the BEA Home directory, and the View History file contains a history of installation and uninstallation for the BEA Home directory. Double-clicking the text icon associated with either file displays its content. The BEAHOME and history files contain information extracted from the logs/log.txt file located in the BEA Home directory.

The Tuxedo 8.1 folder (Start —>Programs —>BEA WebLogic E-Business Platform  —>Tuxedo 8.1) contains the following shortcuts:


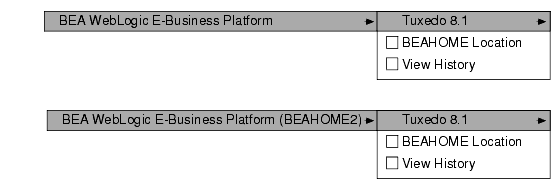
Understanding the BEA Administration Program on a Windows System

In addition to the BEA Tuxedo Administration Console, the BEA Tuxedo 8.1 software for Windows provides a BEA Administration program and two Windows services (Tlisten and BEA procMGR) for configuring the BEA Tuxedo system on a Windows 2000 system. Only if the installation included BEA Tuxedo server components will these additional administration tools be installed on the Windows 2000 system.

After you have installed or upgraded the BEA Tuxedo software on your Windows 2000 system, you can use the BEA Administration window to perform the following tasks:

For instructions on performing these tasks, see "Configuring BEA Tuxedo ATMI for Windows 2000" on page 2-1 in Using BEA Tuxedo ATMI on Windows.


Reviewing the Windows 2000 Registry Content

The Windows 2000 Registry is the repository for all hardware, software, and application configuration settings for the Windows 2000 system. During the BEA Tuxedo installation, the installer program writes general installation information as well as IPC Resource values to the Registry. The structure of the Registry relevant to BEA Tuxedo is as follows.

HKEY_LOCAL_MACHINE\Software\BEA Systems\Tuxedo\8.1\...

To view this structure, choose Start —> Run to launch the Run dialog box, enter regEdt32, and click OK to launch the Registry Editor window.

Developer Key

The Developer key stores product information, including the major and minor version numbers of the release, and user and company names.

Environment Key

The Environment key stores the locations referenced by the BEA Tuxedo environment variables set on your Windows 2000 system. It also stores other values such as IPC resource settings.

Security Key

The Security key holds the access permissions for BEA Tuxedo processes and services. The following permissions are mandatory:

BEA recommends that the Administrator have full control permissions.


What Do I Do Next?

To configure your BEA Tuxedo software and verify that your software is installed correctly, see Performing Post-Installation Tasks.


Back to Top Previous Next
Contact e-docsContact BEAwebmasterprivacy