


|

|
|
|
|
Catalog Administration Tasks
WebLogic Commerce Server provides administrators with command-line scripts, property files, and JSP-based administration tools accessed from a browser. The Administration Tools allow you to manage the behavior and content of your product catalog.
For catalog administration, the tasks include:
Note: In this topic, the environment variable WL_COMMERCE_HOME is used to represent the directory in which you installed the WebLogic Commerce Server software.
Starting the Server
The WebLogic Commerce Server Administration Tools run as a Web application in the WebLogic Server environment. The WebLogic Commerce server must be running before you can use the Administration Tools.
When you start the server for a WebLogic Commerce Server application, you are passing WebLogic Commerce Server-specific property values (and other required values, such as the location of the Java 2 SDK) to the WebLogic Server. This information gives the server instance the context it needs to provide services to the application.
For administrators, WebLogic Commerce Server provides a StartCommerce.bat (Windows) or StartCommerce.sh (UNIX) script. Detailed instructions can be found in the chapter "Starting the Server" in the Deployment Guide.
Starting the Administration Tools
With the WebLogic Commerce server running, as outlined in the previous section, you can access the main administration screen by opening the following URL in a browser:
http://localhost:7501/tools
The above URL assumes that you are running the server on your local machine and you want to perform administration tasks on the local machine. If the WebLogic Commerce Server application is running on a remote node, you can specify the remote node name to invoke its Administration Tools. For example, if the remote node is named blues, you can use the following URL:
http://blues:7501/tools
Another option on Windows systems is to start the main administration screen by using the following Start menu path:
Start --> BEA WebLogic E-Business Platform --> BEA WebLogic Commerce Server 3.5 --> Administration Tools
A third option is to click the Administration link that appears in the top banner of most JSP templates. Figure 4-1 shows the link in an extract of the main.jsp template.
Figure 4-1 Link to Administration Tools from JSP Template
Before the browser can open the page, you must log into the Administrator account, as shown in Figure 4-2. Figure 4-2 Administration Login Screen
WebLogic Commerce Server defines an Administrator account name for you. The default password is password (lowercase characters). See Changing the Administrator Password for a related discussion. Following valid login credentials, the main administration screen is displayed, as shown in Figure 4-3. Figure 4-3 Administration Tools Home Page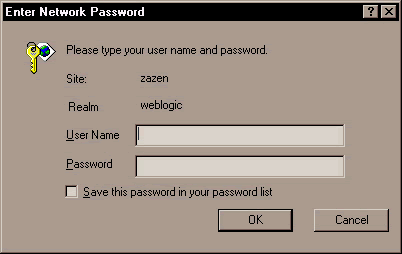
Most of the remaining sections in this chapter describe the Catalog Management tasks. Figure 4-4 identifies the two types of links on the Catalog Management graphic. Figure 4-4 Links on the Catalog Management Graphic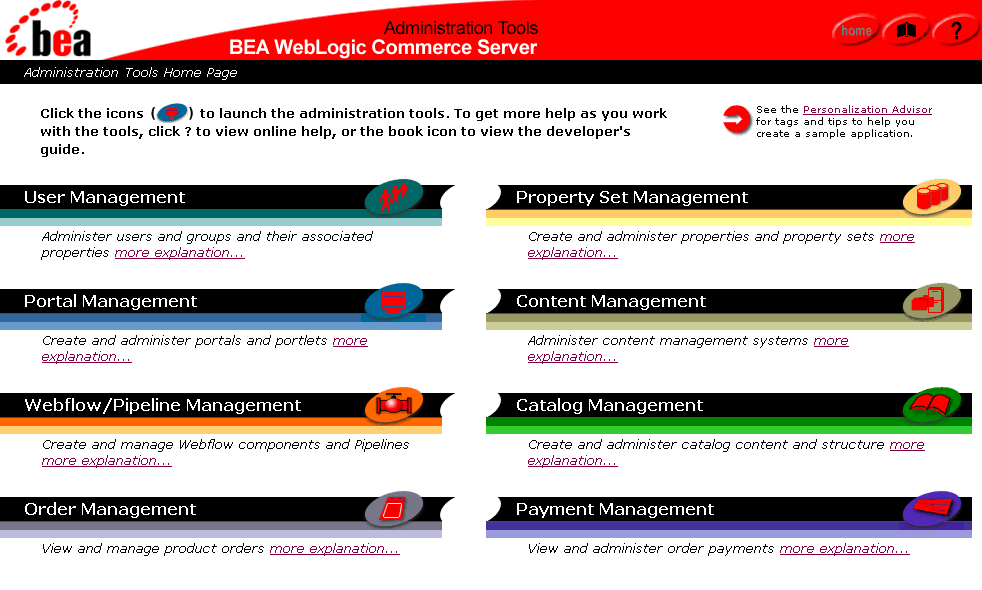
When you click the icon that looks like a catalog book, the main Catalog Administration screen is displayed, as shown in Figure 4-5. Figure 4-5 Main Catalog Management Screen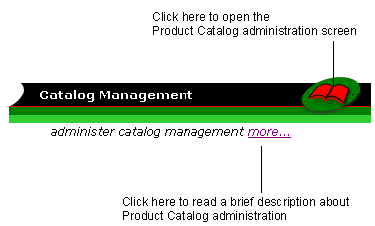
Table 4-1 summarizes the catalog management functional areas.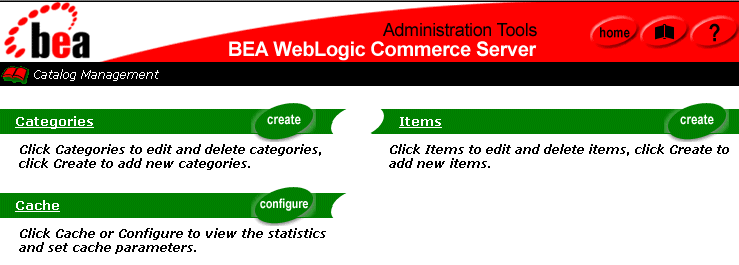
Changing the Administrator Password
The initial account information for the administrator account supplied with WebLogic Commerce Server is:
Username:  administrator
Password:  password
To change the password of the administrator account, follow these steps:
http://localhost:7501/tools
Figure 4-6 User Management Icon on Main Administration Screen
Figure 4-7 Users Link on the User Management Screen
Figure 4-8 Searching for the Administrator Account
After you enter administrator in the Username input box, click the Search button. Figure 4-9 Administrator Link in the User Account Search Results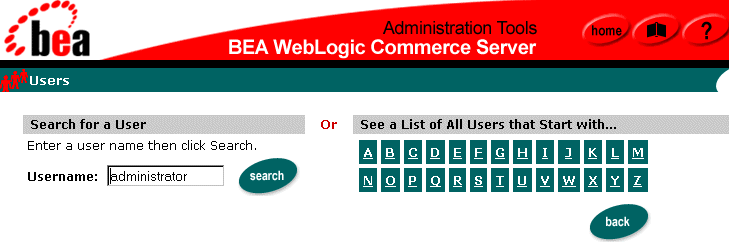
Warning: Do not click the red X to the right of the account name. Clicking the red X will delete the account. Figure 4-10 Edit Button on Users: administrator Screen
Figure 4-11 Entering the New Password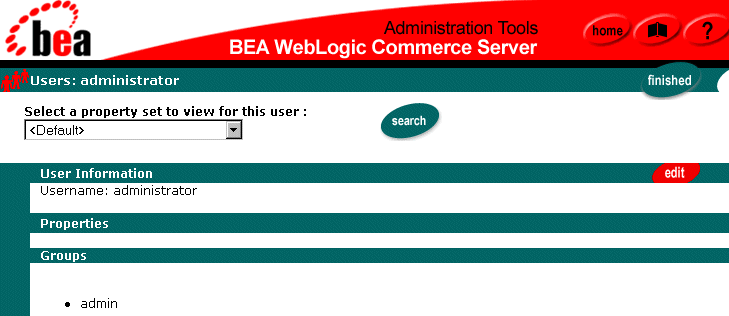
Warning: Make sure to remember the new password for the administrator account! That sounds obvious, but there is a potential "Catch-22" situation. To change the account password again, you must log into the Administration Tools, a step that requires the current administrator password. If you forget the account's password, you will have to recreate the Commerce database.
After entering the new password, click the Save button. Then click the Home button at the top of the screen to return to the main administration screen.
Loading Data into the Product Catalog
WebLogic Commerce Server provides a DBLoader program that can bulk load data into the product catalog database. While you could use the WebLogic Commerce Server Administration Tools to add new items or category data, one record at a time, this is impractical when you need to load hundreds or thousands of records. The DBLoader program is also useful when loading legacy data from an existing database into the WebLogic Commerce Server database.
You can also use a database vendor's specific loader program such as Oracle SQL Loader, or a data loader by a third-party company, to populate the product catalog database.
For details, see Using the Product Catalog Database Loader.
Adding Categories to the Catalog
You can add a new category by using either the DBLoader program, as described in Using the Product Catalog Database Loader, or by using the Administration Tools. This section explains how to use the Administration Tools.
The steps are as follows:
Figure 4-12 Create Button on Categories Graphic
On the Categories screen, you can either add a new category at the current level in the catalog hierarchy, or you can click an existing category name to create a subcategory. Figure 4-13 shows the Categories screen. Figure 4-13 Portion of Categories Screen When the Create Button Is Clicked
As you will recall from the section Catalog Hierarchy, the categories in the product catalog are organized as a hierarchy as shown in Figure 4-14. Figure 4-14 Product Catalog Hierarchy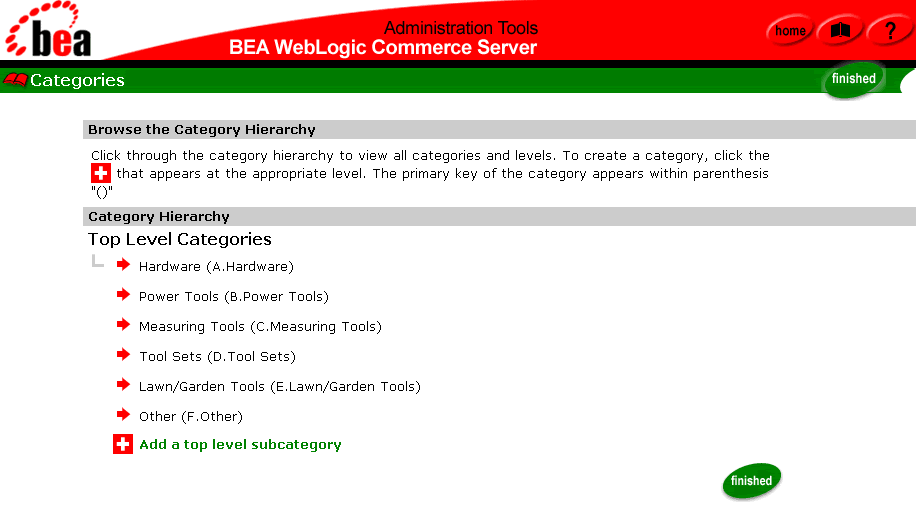
An individual item can reside in more than one category. However, categories cannot reside outside of their individual hierarchical paths. In other words, a category that resides in one path of the hierarchy cannot also reside in another path of the hierarchy. Figure 4-15 Top Portion of the Create New Subcategory Screen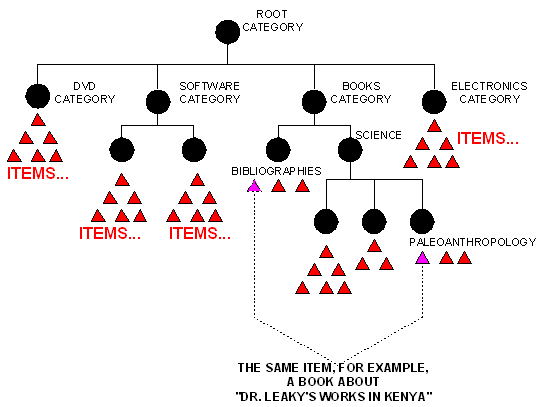
Figure 4-16 Bottom Portion of the Create New Subcategory Screen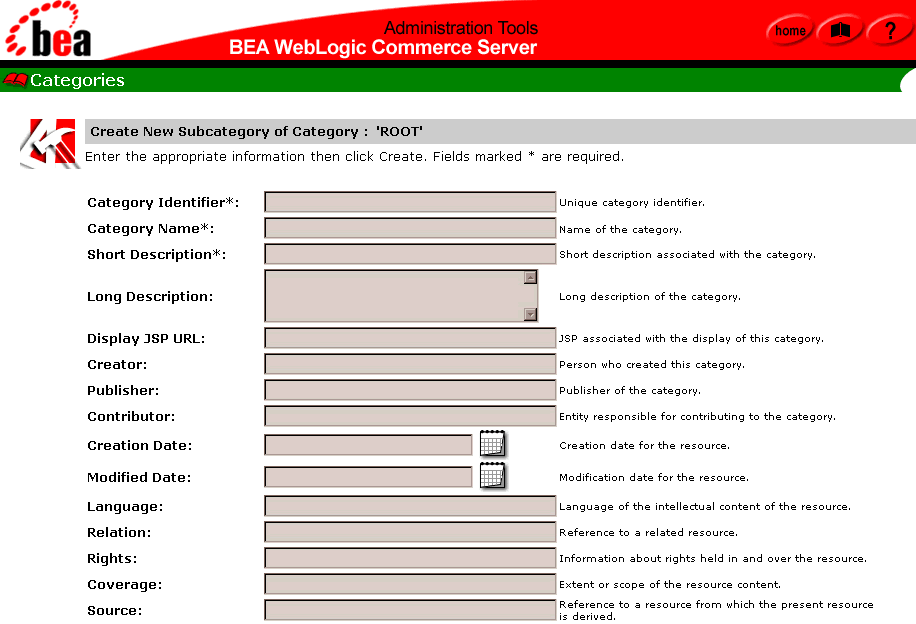

You have the option of leaving the other fields blank for now because they are not required fields or primary keys in the WLCS_CATEGORY table. For more information about the category fields, see the section The WLCS_CATEGORY Database Table.
Figure 4-17 Confirmation Screen After New Category Is Created
Figure 4-18 Newly Added Category Near Bottom of Category Screen
Figure 4-19 Updated Screen While Adding a Subcategory
The icon next to the Wood and Lumber category changes to a red, hollow, left-facing arrow. To proceed, click the plus-sign icon that appears indented below the category. In this example, click the plus-sign icon next to the text, Add a subcategory to Wood and Lumber. Figure 4-20 Creating a New Subcategory 
Click the Create button to create the new subcategory Hardwood under the Wood and Lumber category.
Repeat the previous steps to create additional categories and subcategories.
Adding Items to the Catalog
You can add one or more product items to an existing category by using either the DBLoader program, as described in Using the Product Catalog Database Loader, or by using the Administration Tools. This section explains how to use the Administration Tools.
After the catalog's categories and items are stored in the database, you will perform a separate set of steps to assign items to categories, as described in the section Assigning Items to Categories.
The steps are as follows:
Figure 4-21 Create Button on Items Graphic
Figure 4-22 Top Portion of the Create New Item Screen
Figure 4-23 Bottom Portion of Create New Item Screen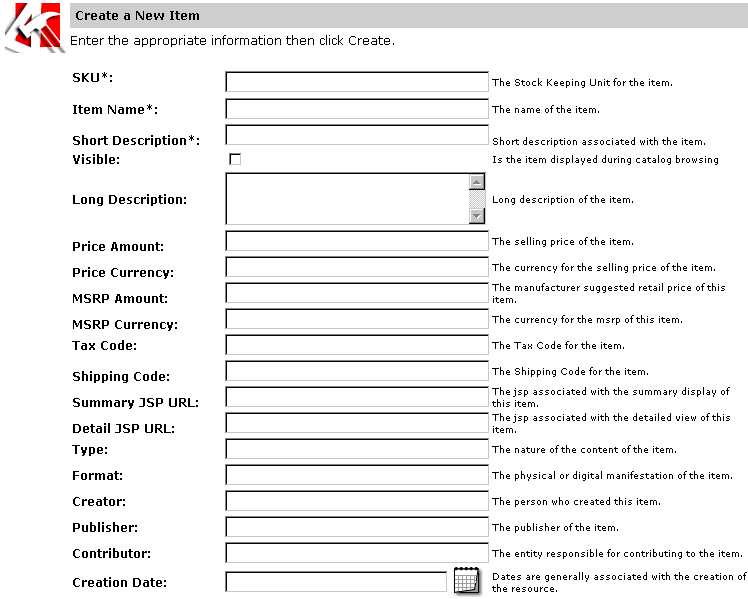
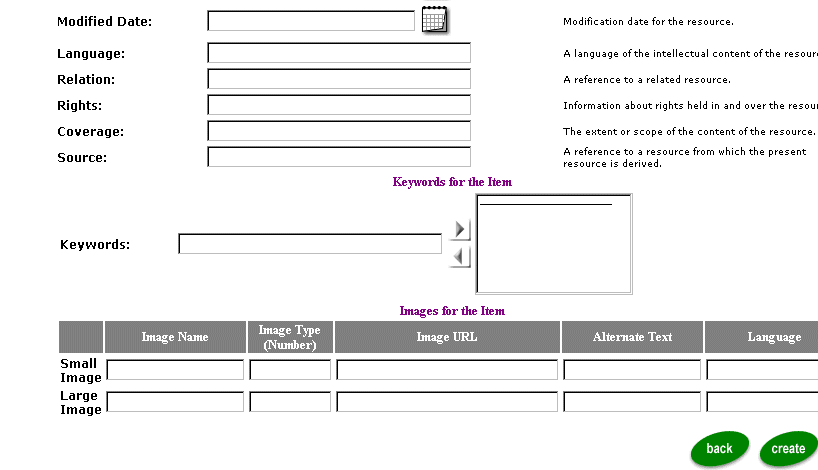
You have the option of leaving the other fields blank for now because they are not required fields or primary keys in the WLCS_PRODUCT table. For more information about the product item fields, see the section The WLCS_PRODUCT Database Table.
Note: See the section Controlling the Visibility of Items in the Catalog for important information about the Visible check box.
Figure 4-24 Adding a New Product Item
When you add an item, make sure you add a full set of keywords that describe the item. Doing so will make it easier for the Web site users to find items in the catalog via keyword-based searches. Adding lots of descriptive keywords will also make it easier for you to find items in the Administration Tools when you want to assign them to one or more categories. You can always remove keywords later if too many keywords are returning spurious results in keyword searches. Figure 4-25 shows the portion of the Create a New Item screen where you can enter keywords. Type the each keyword into the left-side text box, and click the right arrow to add it to the list. If necessary, highlight an unwanted keyword in the right-side list and then click the left arrow to remove it from the list. Figure 4-25 Entering Keywords on the Create a New Item Screen 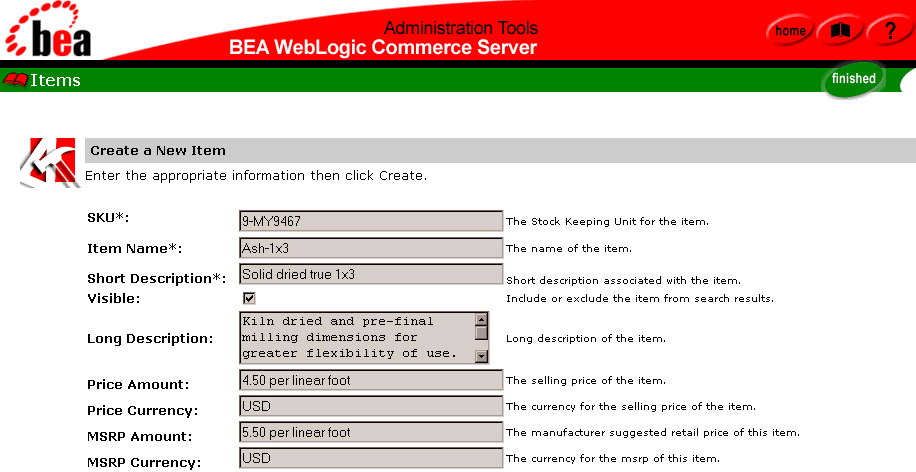
Note: By default, all keywords that are entered on this administration screen are converted to lowercase characters. Because the search engine is case sensitive, this consistent conversion means that your subsequent searches for items via keyword searches should use lowercase characters. You can enter keywords in mixed case or ALL CAPS, but the keywords are stored in lowercase, by default. This behavior is set in the wlcs-catalog.properties file. For more information, see the section Using the wlcs-catalog.properties File.
Controlling the Visibility of Items in the Catalog
The visibility attribute of items in the product catalog is currently only applied to the results of keyword searches and query-based searches. Thus if users of your deployed Web site are browsing for an item (by clicking through the catalog's hierarchy of categories and subcategories), by default they will see the item even if you left the Visible check box unchecked.
To make an item invisible to the results of keyword searches of the catalog, in the current release you must:
An uncategorized item, also known as an orphaned item, is one that has been removed from all categories, but still resides in the WLCS_PRODUCT table in the Commerce database.
For searches of the catalog, the default end-user CatalogRequest object has the showAll attribute set to false; thus invisible items are not displayed. In contrast the default administrator's CatalogRequest object has the showAll attribute set to true, ensuring that administrators can see invisible items when they perform search operations via the Administration Tools.
Assigning Items to Categories
Assuming that you have already entered categories and items in the Commerce database, either through a bulk loader program like DBLoader or through the Administration Tools, you can assign each item to one or more categories. This section shows how to use a WebLogic Commerce Server Administration Tools to make the assignments.
What if I Have a Large Amount of Data?
If you have a catalog with hundreds of categories and thousands or tens of thousands of items, making the assignments via the Administration Tools is obviously not practical. An alternative is to use the DBLoader. Create a text data input file to populate the WLCS_PRODUCT_CATEGORY table in the database. As illustrated in Figure 2-1, the WLCS_PRODUCT_CATEGORY table maps the CATEGORY_ID primary key from WLCS_CATEGORY table to the SKU primary key for the WLCS_PRODUCT table.
For related information, also see:
Using the Administration Tools to Assign Items to Categories
To assign items to categories in the Administration Tools, follow these steps:
Note: To expand a current category and reveal its subcategories (if any), make sure you click the red arrow to the left of a category name. If you instead click the current category's underlined name, you are taken to its Edit Category screen.
Figure 4-26 Sample Editing Category Screen with Modify Link
Figure 4-27 Modify Items Assigned to Category Screen
Warning: You must click the Save button to commit any changes to the category before performing a new search or leaving this page. Figure 4-28 Sample Keyword Search Results on Modify Items Assigned to Category Screen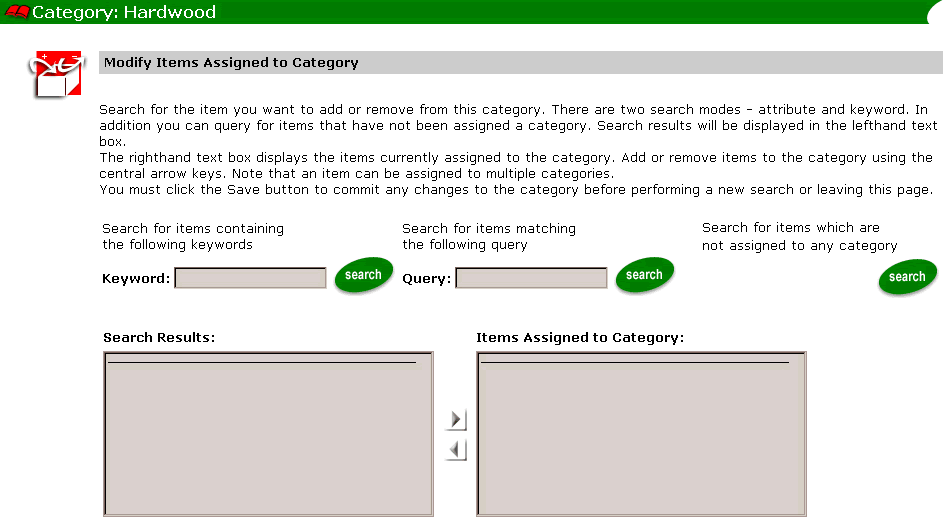
When the search results are displayed in the left-side text box, use the right-arrow button to move the appropriate items into the right-side Category Items text box. If you moved items, remember to click the Save button near the bottom of the page before you perform another search or leave this page. For details about the query-based search syntax, see the section Query-Based Search Syntax. 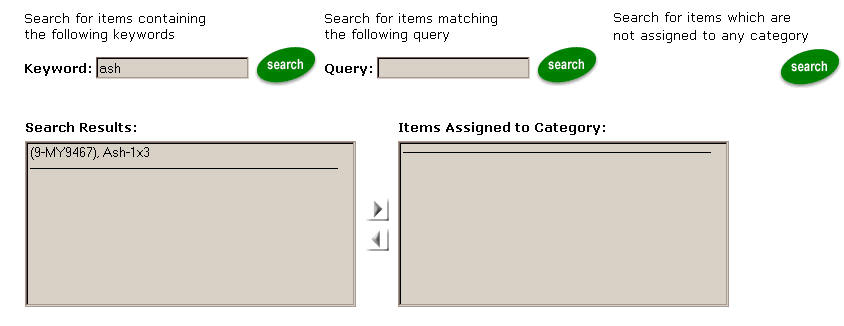
price > 100 && price <= 300
name like 'A*'
!(price > 100) || (msrpAmount >= 300)
modifiedDate < now
Editing the Attributes for Categories and Items
You can use the catalog Administration Tools to edit the attributes for existing categories and items.
Editing Category Attributes
To edit the attributes for a category, follow these steps:
Figure 4-29 Sample Category Search Result
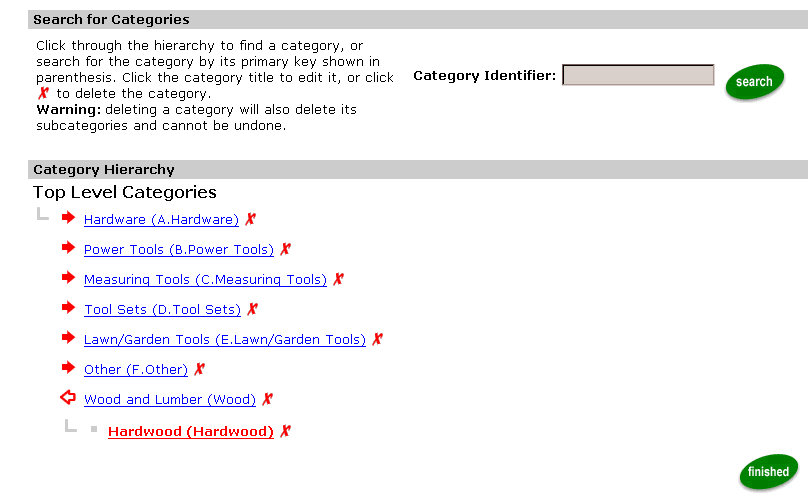
Figure 4-30 Editing Category: Chargers Sample Screen
Warning: By design, you cannot modify the category's unique identifier. If you had to change a category identifier, you would have to delete the category itself and then create a new category with a new, unique identifier. But be careful! As noted on the administration screen, removing a category removes it and all of its subcategories. In Oracle databases, this feature is known as a cascading delete operation. This feature is currently not supported in Cloudscape. 
Also, product items that are associated with removed categories may be orphaned (unless they belong to another category in the hierarchy). Orphaned items are allowed to remain in the catalog, and can be reassigned later to one or more categories. The caveat here is that by deleting a category, you may be inadvertently removing many subcategories from the catalog. Check the hierarchy carefully before clicking the red X next to a category name.
Editing Product Item Attributes
To edit the attributes for a product item, follow these steps:
Figure 4-31 Sample Keyword Search Results for Product Items
If more than 10 search results have been returned, you can click the underlined Next button or Previous button (if any) to read through the list. For details about the query-based search syntax, see the section Query-Based Search Syntax. Figure 4-32 shows the results of a search for price > 10 && price <= 50. Figure 4-32 Sample Query-Based Search to Find a Product Item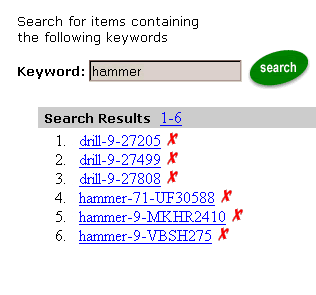
price > 10 && price <= 50
name like 'H*'
!(price > 20) || (msrpAmount >= 30)
modifiedDate < now
Figure 4-33 Sample Initial Edit Item Attributes Screen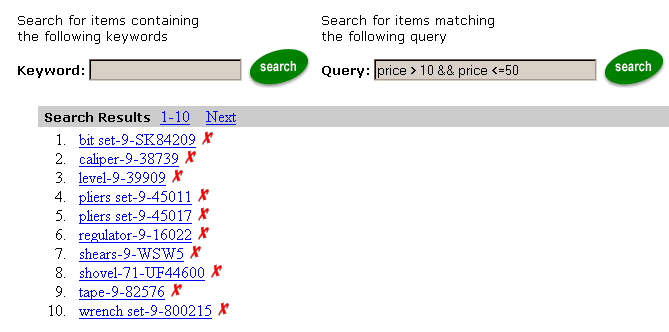
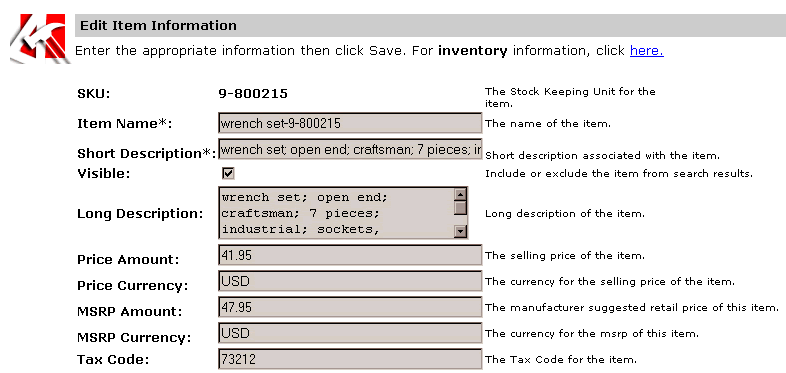
Figure 4-34 Sample Edit Item Information Screen
Editing the Availability of an Item
In the current release, WebLogic Commerce Server provides an inventory setting in its Administration Tools. The Edit Item Information screen includes a link to the inventory function. (Please see the previous section, Editing Product Item Attributes, for information about how to find an item and get to the Edit Item Information screen.)
Figure 4-34 in the previous section showed the top portion of an Edit Item Information screen, which included the link, "For inventory information, click here." Figure 4-35 shows the Item Inventory screen that is displayed when you click this link.
Figure 4-35 Sample Item Inventory Screen
On this screen, you can click the Yes or No option to indicate whether the specific product item is in stock. Enter a text string (which can be displayed to a user of your Web site on the item details screen) to indicate the shipping time. You can also enter additional comments about the item's inventory. Note: In the current release, WebLogic Commerce Server does not implement an automated inventory-count calculation. If you made any changes on the Item Inventory screen, click the Save button. Otherwise, click the Back button.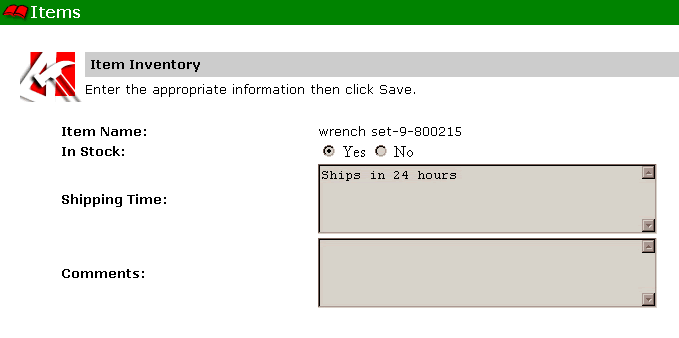
Determining How Categories and Items are Displayed to the Web Site User
You can control the format and content of category and item data that is displayed to the Web site's users by setting the Display URLs field for each category or item. The WebLogic Commerce Server catalog includes the URL of three JSPs for items and categories:
This approach allows, for example, the colors and layout of individual items to be controlled on as fine a grained level as necessary. Categories can be assigned different JSPs to define a "look and feel" for the category. Items can be given different layout logic that is appropriate to the item.
By simply editing the name of the display JSPs in the Catalog Management Administration Tools, you can introduce promotional text, seasonal greetings, or special offers in the catalog. The default values that appear in the Display JSP URL field on the create/edit category or item screen are read from the wlcs-catalog.properties file in WL_COMMERCE_HOME/classes. For example:
# Default JSP for Categories
catalog.category.jsp.default =/commerce/catalog/includes/category.jsp
# Default JSPs for Product Items
catalog.item.jsp.default.summary =/commerce/catalog/includes/itemsummary.jsp
catalog.item.jsp.default.details =/commerce/catalog/includes/itemdetails.jsp
The URL values defined in the wlcs-catalog.properties file are relative to the WLCS Web application directory. However, you can prepend any URL or URI string that you need. Although you could use fully qualified local URLs, that could introduce portability problems if you need to move the application to another server.
You can change these Display JSP defaults in wlcs-catalog.properties. You also can overwrite the defaults URLs on the Administration screen by providing a pointer to another JSP template of your own design. And you can modify the format and content of the default or customized included JSP files. The values for the Display JSP URLs are stored in the following fields in the Commerce database:
In the catalog's master JSP files (the JSPs that contain the <jsp:include...> tags), a related design decision is made by the Web designer or programmer about the type of summary or detail pages to be presented. For example, the details.jsp template is coded to return the summary JSP for items:
<%-- Get the summary JSP from the current product item --%>
<catalog:getProperty object="<%= item %>"
   propertyName="Jsp"
   getterArgument="<%= new Integer(ProductItem.DETAILED_DISPLAY_JSP_INDEX) %>"
   id="detailJsp"
   returnType="com.beasys.commerce.ebusiness.catalog.JspInfo"/>
<%-- Included the detail JSP --%>
<jsp:include page="<%= detailJsp.getUrl() %>" flush="true"/>
</catalog:iterateThroughView>
   .
   .
   .
Deleting Items or Removing Items from One or More Categories
As described earlier in this chapter, you can assign an item to one or more categories. If necessary, you could use the Administration Tools to:
Caching Considerations
Whenever possible, you should perform any Catalog Management operations during non-peak Web site usage. When you delete an item or remove an item from a category, WebLogic Commerce Server will automatically remove the item record from the ProductItemCache or CategoryCache. This step ensures that subsequent Web site users get a valid view of the available, categorized items.
However, if you use an SQL tool to directly delete an item from the database (WLCS_PRODUCT database table), or remove an association between an item and a category (WLCS_PRODUCT_CATEGORY mapping database table), you should flush the caches for items and categories. Flushing these in-memory caches is an administration function. For more information about caching, see the section Improving Catalog Performance by Optimizing the Catalog Cache.
Deleting an Item from the Catalog
To permanently delete an item from the catalog database via the Administration Tools, start by finding the item via one of the provided search options:
The steps to delete an item are as follows:
Figure 4-36 Sample Search for an Item Using Cabinet Keyword
In the Search Results list, when the item that you need to delete is displayed, click the red X icon to the right of the item name. Warning: When you click the red X icon, the delete operation is immediate and permanent; a confirmation screen is not displayed. Note: The query expression name like is case sensitive. For example, figure shows the results of a query search that used the expression: name like `cabinet*'. Had the search string been name like `Cabinet*' the search would have yielded no string matches given the sample data provided by the product. For more information about the query syntax, see the section Query-Based Search Syntax. Figure 4-37 Sample Query-Based Search Results Screen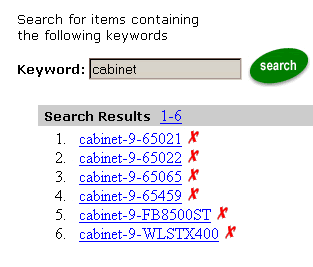
price > 100 && price <= 150
name like 'cabinet*'
modifiedDate < now
In the Search Results list, when the item that you need to delete is displayed, click the red X icon to the right of the item name. Warning: When you click the red X icon, the delete operation is immediate and permanent; a confirmation screen is not displayed. Figure 4-38 Sample Search Results for Uncategorized Items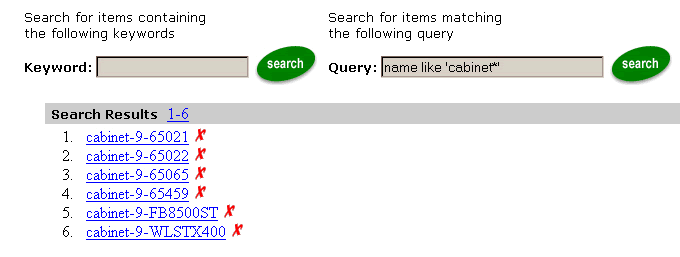
In the Search Results list, when the item that you need to delete is displayed, click the red X to the right of the item name. 
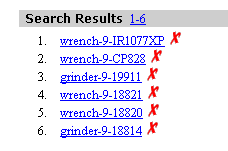
Warning: When you click the red X icon, the delete operation is immediate and permanent; a confirmation screen is not displayed.
Removing an Item from One or More Categories
The process to remove an item from one or more categories is similar to the process of assigning items to categories, which is explained in the section Using the Administration Tools to Assign Items to Categories.
For a given item, you can remove it (unassign it), one category at a time. If you remove the item from all categories, it remains in the Commerce database and is flagged as an uncategorized item, also known as an orphaned item.
Removing an item from one or more categories is different than deleting the item entirely from the database. If you need to delete an item entirely, see the section Deleting an Item from the Catalog.
The steps to remove an item from a category are covered in the following procedure. Due to their similarity, the sample screens that would duplicate the ones shown in the section Using the Administration Tools to Assign Items to Categories are not repeated here.
Note: To remove an item from a particular category, you must know in advance the name of the category to which the item is currently assigned. As the administrator, if you do not have this information, run the catalog's Web application and browse through the hierarchy of categories to find the item. If necessary, check with the development team to confirm that you are about to remove the item from the correct category (because the item can be associated with more than one category).
Note: To expand a current category and reveal its subcategories (if any), click the red arrow to the left of a category name. If you instead click the current category's underlined name, you are taken to its Edit Category screen.
Root --> Hardware --> Storage and Cabinets --> Cabinets
Figure 4-39 Removing an Item from a Category
On the screen, the second item in the Items Assigned to Category text box has been highlighted, and the cursor is hovering over the left arrow. 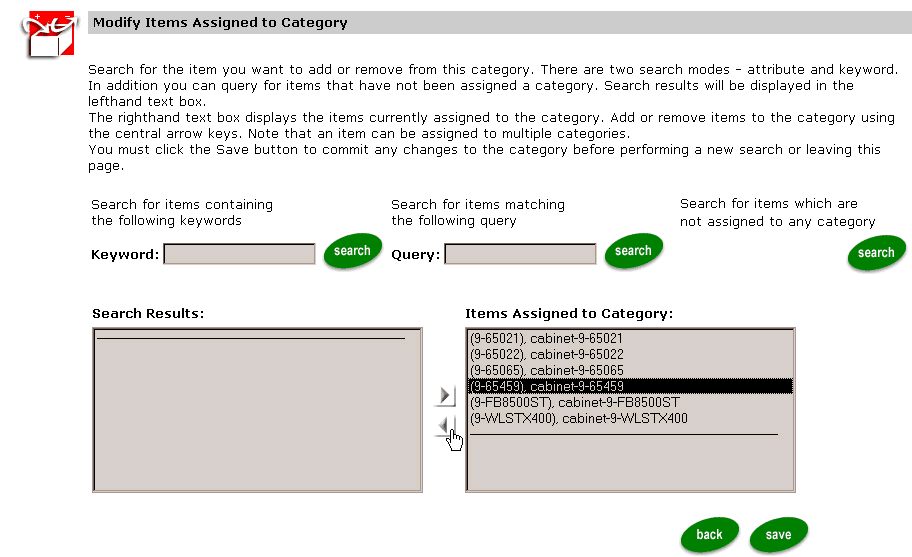
If you need to remove an item from more than one category, you must do so one category at a time. After removing the item from the first category, repeat steps 4 through 9 to remove the item from the next category.
Removing Categories
To remove a category, find the category or subcategory via the Administration Tools and click the red X icon to the right of the target category or subcategory name. When you click the red X icon, you are prompted for a confirmation before the deletion starts.
Warning: Removing a category removes it and all of its subcategories (if any). In Oracle databases, this feature is known as a cascading delete operation. Cascading deletes are not supported currently in Cloudscape.
Also, product items that are associated with removed categories may be orphaned (unless they belong to another category in the hierarchy). Orphaned items are allowed to remain in the catalog, and can be reassigned later to one or more categories. The caveat here is that by deleting a category, you may be inadvertently removing many subcategories from the catalog. Check the hierarchy carefully before clicking the red X next to a category name
To remove a category from the catalog's hierarchy, follow these steps:
Figure 4-40 shows a portion of the resulting Categories screen after searching for the category identifier hardwood. Notice how the found category name is shown in red type.
Figure 4-40 Sample Category Search Result
Moving Items from One Category to Another Category
To move an item from one category to another category:
Defining Custom Attributes for Items
You can define a property set that establishes custom attributes for an item. For a given item, a custom attribute that you define can be used in addition to the default attribute that was set by WebLogic Commerce Server in the Product Catalog database tables.
Warning: The default Product Catalog attributes that are provided by WebLogic Commerce Server (based on Dublin Core) are retrieved in a single SQL statement (from a single database table) and are cached. However, custom attributes typically require a single SQL statement (which involves multiple database tables) and are not cached. For optimal performance, BEA recommends that the use of custom attributes be minimized and that the catalog developer maps new custom attributes onto the default Dublin Core attributes. For related information about the category and item caches, see the section Improving Catalog Performance by Optimizing the Catalog Cache.
WebLogic Commerce Server uses the existing product architecture for defining property sets and assigning values to custom attributes. Both items and categories implement the ConfigurableEntity interface, allowing property sets to be used to define custom attributes for items and categories. At run time, these properties can be accessed or modified using the standard getProperty or setProperty interfaces of ConfigurableEntity.
The property set editor was introduced with an earlier release of WebLogic Personalization Server. Now the property set editor extends support to a new class of Property Set for the WebLogic Commerce Server catalog, and the product provides administrative tools that allow the custom attributes of categories and items to be edited. These tools are based on the familiar user interface for editing the custom attributes of groups and user (respectively).
You therefore have a number of options for customizing the WebLogic Commerce Server Product Catalog:
Defining Property Sets for custom attributes is a run-time operation that you can perform without having to restart the server. Domain-specific catalog attributes that cannot be mapped onto the metadata provided in the WebLogic Commerce Server schema (which is based on the Dublin Core standard) can be added to a Property Set for the catalog.
The functional areas of the WebLogic Commerce Server Product Catalog can be unplugged (either individually or as a whole) to customize the behavior or data sources of the catalog. The customizable services are:
These steps are described in Using the API to Extend the Product Catalog.
Custom attribute management has been delegated from the Custom Data Manager to the Entity Property Manager. A new implementation of the Entity Property Manager could be plugged for custom data management.
Improving Catalog Performance by Optimizing the Catalog Cache
WebLogic Commerce Server provides tools that allow you to tune the response-time efficiency of your product catalog by adjusting the size and behavior of in-memory cache settings. Two separate caches have been implemented:
There is only one instance of each cache per server. In a WebLogic Server clustered environment, the cache is specific to each server. Thus if you make adjustments to a CategoryCache or ProductItemCache on a particular server in the cluster, and you want that adjustment to take effect on other servers in the cluster, you must invoke the Administration Tools on each server machine and make the updates separately.
Values for each cache are defined in the weblogiccommerce.properties file and on a catalog administration screen. As the site administrator, your primary tasks related to the setup and maintenance of the caches are as follows:
By experimenting with the size and time-to-live (TTL) values for each cache, you can achieve optimal performance of the catalog. Most importantly, you can significantly improve the satisfaction level of customers who are shopping on your Web site. The goal of the cache is to avoid, as much as possible, excessive accesses to the Commerce database as the application software performs catalog data lookup requests.
Cache-Related Values in weblogiccommerce.properties
The WL_COMMERCE_HOME\weblogiccommerce.properties file includes the following values related to the category and item caches:
# Cache entries
ProductItemCache.ttl=21600000
ProductItemCache.capacity=10000
ProductItemCache.enabled=true
CategoryCache.ttl=86400000
CategoryCache.capacity=1000
CategoryCache.enabled=true
Table 4-2 describes the values defined for each cache property:
Use the caching statistics to understand whether the values that you select initially are too low or too high.
Note: Remember that in a WebLogic Server clustered environment, the cache is specific to each server. Thus if you make adjustments to a CategoryCache or ProductItemCache on a particular server in the cluster, and you want that adjustment to take effect on other servers in the cluster, you must perform the administration tasks on each server machine and make the updates separately.
Considering Hardware Costs Versus the Cost of Dissatisfied Web Site Users
BEA recommends that you provide sufficient hardware memory resources so that you can cache your entire product catalog. As you consider the options for implementing a caching strategy to support your e-commerce Web site's product catalog, ask the following question. In the long-term, what is more expensive:
BEA suggests that, almost certainly, losing customers due to poor site performance will be far more costly than purchasing the necessary RAM hardware to support your site.
What's in Each Cache Initially?
When the server starts, it reads the property values for the CategoryCache and ProductItemCache from the weblogiccommerce.properties file. But those values simply set the behavior and potential size of the separate caches. Each cache is initially empty.
As users start accessing the site's pages and requests for category or product item data are received, the WebLogic Commerce Server software first checks to see if the requested category or item record is in the cache. If the record resides in cache, it is returned to the requesting user and displayed. If the record does not reside in cache, the record is retrieved from the Commerce database, put in cache, returned to the requesting user and displayed.
If you are interested in the architectural view of how the catalog service managers use cache, see the section Catalog Architecture and Services.
The Catalog Cache Administration Screen
To start the catalog cache administration screen, follow these steps:
Note: As previously mentioned, in a WebLogic Server clustered environment the cache is specific to each server. Thus if you make adjustments to a CategoryCache or ProductItemCache on a particular server in the cluster, and you want that adjustment to take effect on other servers in the cluster, you must perform the administration tasks on each server and make the updates separately.
From your browser, you can administer another server in the cluster by specifying the other server's name in the URL (assuming that the WebLogic server software is already running on the remote machine). For example, if the machine Blues is a remote server in the cluster, you can use the following URL from a browser sessions on your local machine to invoke the main administration screen for the remote server:
http://blues:7501/tools
Figure 4-41 Configure Button on Cache Graphic
Figure 4-42 Initial Cache Statistics and Configuration Screen
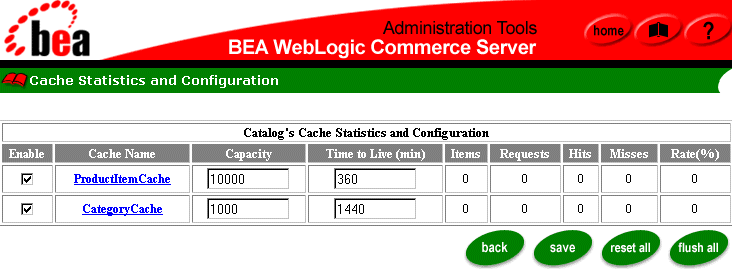
The number of product items or categories currently in the cache (Items column).
The number of requests for product items or categories (Requests column).
The number of times a requested product item or category was found in the cache (Hits).
The number of times a requested product item or category was not found in the cache (Misses).
The hit percentage; that is, the total requests divided by the number of hits (Rate% column).
Note: The Administration Tools always bypass the cache. Thus any access you perform to category and item data in the Administration Tools will not be seen in the statistics.
A basic approach to working with the statistics is as follows:
Repeat this process until the Hit Rate is high.
Using the wlcs-catalog.properties File
In the WebLogic Commerce Server's default Product Catalog configuration, the wlcs-catalog.properties file serves two purposes. The first part of the file defines values for internationalization string constants and constant configuration parameters, while the second part of the file defines the names of the tables, columns, and the SQL statements used by the JDBC catalog implementation to perform persistence activities.
Note: To learn more about string constants and constant configuration parameters, see Some Property Values You Might Modify. To learn how to modify the names of tables, columns, and so on, see Editing the Catalog Schema Definition.
In most cases, you will not have to modify the content of the wlcs-catalog.properties file. However, some of the properties are relevant to developers who need to extend the catalog to suit specific business requirements, or to internationalize the catalog for non-English readers.
Location
The default wlcs-catalog.properties file is located in WL_COMMERCE_HOME\classes, where WL_COMMERCE_HOME is the directory in which you installed the WebLogic Commerce Server software.
Some Property Values You Might Modify
The wlcs-catalog.properties file contains over 1000 lines of name/value properties. Table 4-3 lists a subset of the properties to introduce you to the type of information contained within the file. After reading this summary, you should be able to decide if your catalog's environment would benefit by adjusting the values in wlcs-catalog.properties.
Editing the Catalog Schema Definition
In addition to modifying some name/value pairs in the wlcs-catalog.properties file, you may also want to customize the names of the tables and/or columns used by the BEA WebLogic Commerce Server Product Catalog system.
The schema and persistence definition section of the wlcs-catalog.properties file are referenced by the Tier 2 JDBC catalog Service Providers.
Warning: The configuration parameters listed in this section are subject to change. Take extreme care when editing the persistence parameters.
The name of the persistence definition (or schema) file used by the Tier 2 Service Providers is loaded from the deployment environment of the stateless session beans. Therefore, it is possible to deploy multiple instances of the catalog services that are bound to different schema files. This allows multiple instances of the WebLogic Commerce Server Product Catalog to be deployed, bound to distinct tables or columns.
Note: For more information about multiple Product Catalog instances, see Method 3: Multiple Product Catalog Instances.
By editing the schema file you can modify the names of tables and columns. The SQL scripts should also be modified to reflect the new names. An example from the default schema file is presented in Listing 4-1.
Listing 4-1 Default Schema File
####################################################################
#  CATALOG TABLE NAMES
####################################################################
CATALOG_TABLE_CATEGORY=WLCS_CATEGORY
CATALOG_TABLE_PROD_ITEM=WLCS_PRODUCT
CATALOG_TABLE_PROD_KEYWORD=WLCS_PRODUCT_KEYWORD
By editing the right-hand side of the equal sign, you can modify the names of the tables used by the WebLogic Commerce Server Product Catalog Tier 2 persistence mechanism.
Notes: It is not currently possible to add or remove attributes by editing the schema file. New attributes (schema additions) are best handled by writing a new CustomDataManager stateless session bean that reads and writes the values of the new properties, or by using the provided CustomDataManager, which will store the values in the WLCS_CAT_ set of tables.
Please refer to the comments within the wlcs-catalog.properties file for additional details.

|

|

|
|
|
|
Copyright © 2001 BEA Systems, Inc. All rights reserved.
|