

|
|
|
|
|
|
Extending the Data Model
This chapter explains how to extend Managing Purchases and Processing Orders services. The following topics are discussed:
Data Model Extensions
Registering Customers and Managing Customer services and Managing Purchases and Processing Orders services are two core components of the WebLogic Commerce Server 3.5. These services implement use-cases that deal with customer self-registration, customer management, shopping cart experience, and order processing (including shipping, payment and taxation).
These services implement the most commonly required online commerce scenarios. However, this does not preclude any extensions that are specific to your commerce site. You can extend functionality of the WebLogic Commerce Server to provide more sophisticated and specialized commerce scenarios to meet your business needs. The WebLogic Commerce Server infrastructure supports use-case driven extensibility in the form of the Webflow and Pipelines. This infrastructure provides you with three forms of extensibility:
For more information on the WebFlow and Pipeline infrastructure, see the Guide to Managing Presentation and Business Logic: Using Webflow and Pipeline.
One of the common requirements for implementing such extensions is the ability to access and extend the WebLogic Commerce Server data model and schema. For example, you may want to customize the checkout process of your commerce site to collect a promotion code or gift coupon data, and then process the order and payment data accordingly. Similarly, you may want to capture additional shipping instructions from your customers. In this case, apart from extending the checkout WebFlow/Pipeline, you'll be required to capture, store, and process additional data.
This chapter presents some possible approaches and guidelines for extending the data model for the Guide to Managing Presentation and Business Logic: Using Webflow and Pipeline. of the WebLogic Commerce Server. While this chapter does not guarantee automatic compatibility of such extensions with future releases of the WebLogic Commerce Server, the approaches discussed in this chapter try to minimize potential problems, by leveraging the WebFlow/Pipeline infrastructure.
This chapter addresses the following:
Note: This chapter does not cover extensions to other WebLogic Commerce Server services (such as extensions for building a product catalog). You can periodically check the WebLogic Commerce Server documentation for future updates on how to extend other services.
Persistence Architecture
Before we go into the approaches for extending the WebLogic Commerce Server schema, consider the persistence architecture of WebLogic Commerce Server shown in Figure 8-1. This figure shows the persistence architecture for the Guide to Managing Presentation and Business Logic: Using Webflow and Pipeline. In this structure, the JSP, Input Processor, and Pipeline component layers are responsible for implementing the use-case flow. Specific information on the JSPs, input processors, and Pipeline components in these layers are discussed throughout this chapter.
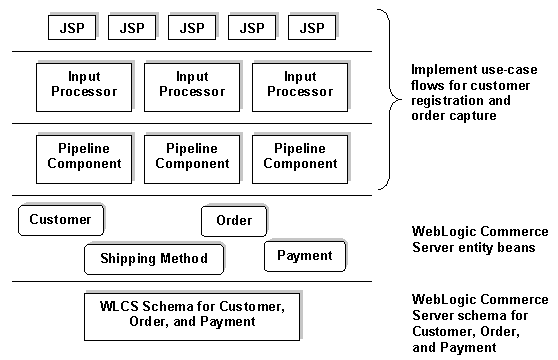
Figure 8-1 Persistence Architecture for Registering Customers and Managing Customer Services and Managing Purchases and Processing Orders Services
For persistence, these entities use the WebLogic Commerce Server tables discussed in the The Order Processing Database Schema.
The following table describes the mapping between these entities and the corresponding WebLogic Commerce Server tables.
The Pipeline components in the Customer Registration and Order Processing packages manipulate the above tables via the respective entities. The default deployment configuration of these beans is such that all business methods are always executed within a transaction. This is established by setting the <trans-attribute> to Required in the deployment descriptor. In the default configuration, the Pipelines that access these beans are transactional (with the isTransactional property set to true in pipeline.properties). Therefore, all database access occurs under transactions initiated by the Pipeline infrastructure and the methods on these entities merely participate in those transactions.
Adding Run-Time Attributes to Customer Data
The simplest possible extension is to add run-time attributes to the entities in the Customer Registration and the Order Processing packages. In the WebLogic Commerce Server, run-time attributes can be added on these entities without having to change the underlying database schema.
Although all the above entities in the WebLogic Commerce Server share the same basic structure, there are some differences in the way you can add run-time attributes to the customer entity, and the other entities.
The Customer entity of the WebLogic Commerce Server is a component that relies on the Unified User Profile (UUP) technology of the WebLogic Commerce Server. A UUP for customer data allows the abstraction of a customer to be seamlessly integrated into the WebLogic Personalization Server. Apart from personalization, this approach allows you to use the user management tools of the WebLogic Personalization Server to administer customer data, and maps the customer identity into a WebLogic Personalization Server-administered groups and the RDMBS security realm. For more information on unified user profiles, see "Creating and Managing Users" in the Guide to Building Personalized Applications.
In addition to the information in the previous paragraph, the notion of the unified user profile can be used to add run-time attributes to customer data without having to modify the underlying schema.
You can find examples of adding attributes for customer data in the Pipeline components under the com.beasys.commerce.ebusiness.customer.pipeline package. To add attributes to the customer data, the WebLogic Commerce Server Registration Package provides an abstract Pipeline component com.beasys.commerce.ebusiness.customer.pipeline.UpdateUserPC, as shown in Listing 8-1.
Listing 8-1 Adding Attributes to Customer Data
public void setCustomerProperty(String key, Object value,
                               Customer customer)
                          throws java.rmi.RemoteException
This method takes a property name (key), the value of the property (value), and a reference to the customer entity (customer). For instance, you may use the following Pipeline component to add a new attribute called preference for a given customer:
public class MyPC extends UpdateUserPC {
    public void updateCustomer(PipelineSession pSession,
                               Customer customer,
                                   CustomerValue customerValue)
                                    throws PipelineFatalException
    {
       try {
         setCustomerProperty("preference", "Loves music",
                               customer);
       }
    }
}
Given a customer, you can use the following snippet in your JSPs to read such run-time attributes:
<um:getProfile profileKey="<%=request.getRemoteUser()%>" profileType="WLCS_Customer" />

<!-- Get the "preference" -->

<um:getPropertyAsString propertyName="preference" />
In the above example, the request.getRemoteUser() method returns the login name of the customer accessing the page. The profileType is a UUP name, and WebLogic Commerce Server specifies the customer entity as a UUP of type "WLCS_Customer." The <um:getPropertyAsString> tag is one of the user management tags to extract user attributes in JSP pages. For more documentation on user management tags, see the "JSP Tag Reference Library" in the Guide to Building Personalized Applications.
Before you attempt to consider adding run-time attributes to the customer data, please bear in mind that this approach is meant only for quickly adding attributes without changing the schema. The WebLogic Commerce Server persists run-time attributes in tables that are internal to WebLogic Commerce Server. Consequently, you cannot execute SQL level operations on such data.
Adding Run-Time Attributes to Other Entities
For the entities in Managing Purchases and Processing Orders services such as com.beasys.commerce.ebusiness.shipping.Order, com.beasys.commerce.ebusiness.shipping.PaymentTransaction, and com.beasys.commerce.ebusiness.shipping.ShippingMethod, there exists a similar mechanism for adding run-time attributes. All the entities in the Managing Purchases and Processing Orders services extend the com.beasys.commerce.foundation.ConfigurableEntity interface, which provides the following methods for adding and manipulating run-time attributes.
public void setProperty(String key, Object value)
                       throws java.rmi.RemoteException
Using this method you can set a new property on an entity. You can use the following method to access the attribute later:
public Object getProperty(String key)
                       throws java.rmi.RemoteException
This method returns a previously added property.
For more information, including the API, see the JavaDoc.
Extending the Schema
The following are some of the common drivers for extending the WebLogic Commerce Server schema:
Both these drivers manifest in the following:
Note: Almost all the data in the Managing Purchases and Processing Orders services is meaningful across your business, so you may want to apply SQL level semantics for creating, updating, and querying. Depending on the nature and scale of your commerce site, the WebLogic Commerce Server and your back-end applications may depend on this data. Any extension to the schema of the Managing Purchases and Processing Orders services cannot be represented with run-time attributes, as run-time attributes cannot be accessed directly via standard SQL.
Here is an example scenario. Consider a new attribute called tracking number on your order. Typically this is an attribute generated after order fulfillment by your back-end order fulfillment application. You may want to display this tracking number on WebLogic Commerce Server order history pages for customers to view the tracking information. This is a domain-specific attribute that can best be persisted in the WLCS_ORDER table (or another table that you created for this purpose).
In this section, let's consider the following cases, and discuss approaches that meet the above needs:
Note: These two cases are discussed separately because the tables in case 2 participate in a one-to-many association with WLCS_ORDER and WLCS_CUSTOMER tables in case 1.
Overview of Approach to Extending the WebLogic Commerce Server Schema
The following figure presents an overview of the approach for extending the WebLogic Commerce Server schema and not for integrating the WebLogic Commerce Server schema with your existing schema or for mapping the WebLogic Commerce Server schema onto your existing schema.
Figure 8-2 Extending the Data Model
Figure 8-2 demonstrates how a given WebFlow/Pipeline processing can be modified to process additional data, without modifying existing input processors and Pipeline components. In Figure 8-2, the blocks with heavy borders are new input processors and Pipeline components inserted to process the additional data. While the WebLogic Commerce Server Pipeline components manage the WebLogic Commerce Server data via the WebLogic Commerce Server entities, the new Pipeline component in the Pipeline may directly access the data via plain JDBC, or indirectly via another layer of custom entity beans. Alternatively, the new Pipeline component may also delegate this data access to legacy data access mechanisms. As we shall discuss in a later section, depending on whether the additional data should be processed within the same transaction, within a new transaction, or no transaction at all, you can split the above Pipeline into more than one Pipeline where each will have its own transaction setting. Adding Attributes Against the WLCS_CUSTOMER, WLCS_ORDER, WLCS_TRANSACTION and WLCS_SHIPPING_METHOD Tables Let's now consider the case of the customer, order, payment, and shipping method tables. The general approach is as follows: Step 1: Design new tables. For each of the above tables, design new table(s) for the additional attributes with the same primary key. For instance, for extending order data, consider a new table with ORDER_ID as the primary key. Although it is tempting to extend the WebLogic Commerce Server tables for such attributes, we recommend against doing so, as it could lead to compatibility issues and potential name collision issues with future releases of WebLogic Commerce Server. Step 2: Modify corresponding JSP templates. If the new data is user-entered, modify the corresponding JSP templates to add new fields in the forms. Step 3: Implement new input processor. Implement a new input processor to read validate/preprocess the new data. Since input processors can be chained against a WebFlow event, adding a new input processor gives you more flexibility when compared to modifying an existing input processor for the same input processor chain. After validating the data, add the collected data to the Pipeline session for further processing in the Pipeline. Depending on whether such data is required beyond the scope of the current HTTP request or not, use the appropriate scope (session scope or request scope) while adding data to the Pipeline session. Step 4: Include the new input processor. Modify the webFlow.properties to include the new input processor. Step 5: Implement a new Pipeline component. Implement a new Pipeline component to extract the additional data from the Pipeline session, and write to the new tables. Obtain the primary key from the respective entity. For example, for storing additional attributes for the order entity, call the getIdentifier() method on the order entity. This method returns the primary key for the WLCS_ORDER table for the current order. Step 6: Obtain a database connection. To obtain a database connection, use the getConnection() method in the abstract base class com.beasys.commerce.foundation.pipeline.CommercePipelineComponent. You may recall that all Pipeline components extend this abstract class. This method returns a connection from the commercePool setup in the weblogic.properties file. However, if you want to use a different connection pool, modify the commerce.jdbc.pool.url property in the weblogiccommerce.properties file to point to a different data source wrapping the new connection pool. Step 7: Include the new Pipeline component. Modify the pipeline.properties to include the new Pipeline component. To query for such additional data, you may follow a similar procedure. Adding Attributes Against the WLCS_ORDER_LINE Table In the WebLogic Commerce Server, an order entity aggregates a collection of OrderLine objects, with each OrderLine object representing an order line in the database in the WLCS_ORDER_LINE table, with ORDER_LINE_ID as the primary key. These collections are internally based on the Java collections API, with primary keys generated while storing the order entity. The following procedure applies in case you want to extend the WLCS_ORDER_LINE table. Step 1: Design a new table. Design a new table for the additional attributes with the same primary key. For extending the ORDER_LINE table, consider a new table with ORDER_LINE_ID as the primary key. Step 2: Modify the corresponding JSP template. If the new data is user-entered, modify the corresponding JSP templates to add new fields in the forms. Step 3: Implement a new input processor. Implement a new input processor to read validate/preprocess the new data. The procedure is similar to that of step 3 of the previous section. Step 4: Include the new input processor. Modify the webflow.properties to include the new input processor. Step 5: Implement a new Pipeline component. Implement a new Pipeline component to extract the additional data from the Pipeline session, and write to the new tables. However, since the primary key for the WLCS_ORDER_LINE table is internal to the WebLogic Commerce Server, examine the code snippet shown in Listing 8-2 in your new Pipeline component for obtaining the ORDER_LINE_ID for a given order line. Listing 8-2 Implementing a New Pipeline Component Step 6: Update the deployment descriptor. Before you deploy the new Pipeline component, another step has to be perfomed, which is to update the deployment descriptor of the order entity as follows: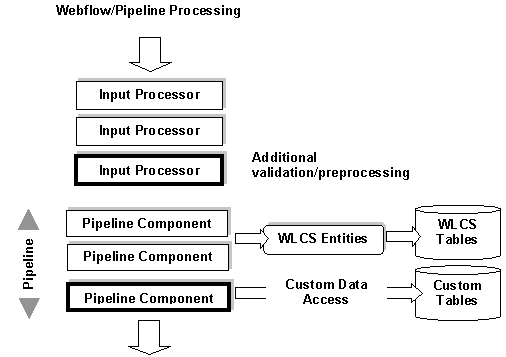
String orderId = null;
order.getIdentifier();
String sku =  ...; // Get the sku from the corresponding line
                   // in the shopping cart.
try {
   Connection c = getConnection();
   String statement = "SELECT ORDER_LINE_ID FROM \
       WLCS_ORDER_LINE WHERE ORDER_ID = ? AND PRODUCT_ID = ?";
   PreparedStatement preparedStatement = null;
   preparedStatement = c.prepareStatement(statement);
   preparedStatement.setObject(1, ordereId);
   preparedStatement.setObject(2, sku);
   ResultSet rs = preparedStatement.executeQuery();
   // The result set should now have a row containing
   // the ORDER_LINE_ID. Add your custom JDBC here to
   // persist the additional data for the order line.
Listing 8-3 Updating the Deployment Descriptor
<weblogic-enterprise-bean>
    <ejb-name>
        com.beasys.commerce.ebusiness.order.Order
    </ejb-name>
    <persistence-descriptor>
        <is-modified-method-name>
           isModified
        </is-modified-method-name>
        <delay-updates-until-end-of-tx>
            false
        </delay-updates-until-end-of-tx>
        </persistence-descriptor>
            <reference-descriptor>
                ...
    </reference-descriptor>
        <enable-call-by-reference>true</enable-call-by-
            reference>
        <jndi-name>
            com.beasys.commerce.ebusiness.order.Order
        </jndi-name>
    </weblogic-enterprise-bean>
Step 6 ensures that the order and order-line data is available for executing queries in the new Pipeline component.
Step 7: Include the new Pipeline component.
Modify the pipeline.properties to include the new Pipeline component.
Adding Attributes Against the WLCS_CREDIT_CARD and WLCS_SHIPPING_ADDRESS Tables
The following procedure applies in case you want to extend the WLCS_ORDER_LINE table.
Step 1: Design new tables.
For each of the above tables, design new table(s) for the additional attributes with the same primary key. For extending the WLCS_CREDIT_CARD table, consider a new table with CREDIT_CARD_ID as the primary key. Similarly for the WLCS_SHIPPING_ADDRESS table, consider a new table with SHIPPING_ADDRESS_ID as the primary key.
Step 2: Modify corresponding JSP templates.
If the new data is user-entered, modify the corresponding JSP templates to add the new fields in the forms.
Step 3: Add mapKey attribute to the Pipeline Session.
Modify the com.beasys.commerce.ebusiness.customer.webflow.UpdatePaymentInfoIP to add the mapKey attribute to the PipelineSession. Similarly, in the case of shipping address, add the ShippingAddressMapKey attribute to the PipelineSession in the com.beasys.commerce.ebusiness.customer.webflow.UpdateShippingInfoIP.
Step 4: Implement new input processor.
Implement a new input processor to read validate/preprocess the new data. Reconfigure webflow.properties to include the new input processor.
Step 5: Implement new Pipeline component.
To extract the additional data from the PipelineSession and write to the new tables, you need to implement a new Pipeline component. However, since the primary keys for the WLCS_CREDIT_CARD and WLCS_SHIPPING_ADDRESS tables are internal to the WebLogic Commerce Server, consider using the code snippet shown in Listing 8-4 in your new Pipeline component for obtaining the primary keys. Although this snippet describes the steps for credit card data, the same procedure applies to shipping address data.
Listing 8-4 Implementing a New Pipeline Component
// Get the customer ID
String customerId = null;
customer.getIdentifier();

// Get the map key for the credit card from the
// pipeline session. Refer to Step 3.
String mapKey = pipelineSession.getAttribute("mapKey");
try {
  Connection c = getConnection();
  String statement = "SELECT CREDIT_CARD_ID FROM \
     WLCS_CREDIT_CARD WHERE CUSTOMER_ID = ? AND MAP_KEY = ?";
  PreparedStatement preparedStatement = null;
  preparedStatement = c.prepareStatement(statement);
  preparedStatement.setObject(1, customerId);
  preparedStatement.setObject(2, mapKey);

  ResultSet rs = preparedStatement.executeQuery();
  // The result set should now have a row containing
  // the CREDIT_CARD_CARD_ID.
  // Add your custom JDBC for your tables here.
Step 6: Modify the deployment descriptor.
Similar to the case of order-line attributes, modify the deployment descriptor for the Customer entity.
Listing 8-5 Modifying the Deployment Descriptor
<weblogic-enterprise-bean>
    <ejb-name>
        com.beasys.commerce.ebusiness.customer.Customer
    </ejb-name>
    <persistence-descriptor>
        <is-modified-method-name>
            isModified
        </is-modified-method-name>
        <delay-updates-until-end-of-tx>
            false
        </delay-updates-until-end-of-tx>
    </persistence-descriptor>
        <reference-descriptor>
            ...
        </reference-descriptor>
            <enable-call-by-reference>true</enable-call-by-
                reference>
        <jndi-name>
            com.beasys.commerce.ebusiness.customer.Customer
        </jndi-name>
    </weblogic-enterprise-bean>
Step 7: Include new Pipeline component.
Modify the pipeline.properties to include the new Pipeline component.
Transaction Management
In the WebFlow/Pipeline infrastructure, you can declaratively demarcate Pipelines within transactions. Although the default Pipeline configuration has certain default settings on the Pipelines, you should reconsider your options while deploying your extensions on the WebLogic Commerce Server.
Depending on how you're customizing a use-case flow, consider if the new Pipeline component should participate in a pre-existing Pipeline. The answer depends on whether the database access in the new Pipeline component is part of another unit of work or not.
In cases such as capturing additional order/order line information, add the new Pipeline component to CommitOrder Pipeline. This is a transactional Pipeline, and therefore the updates made in the new Pipeline component would happen in the same transaction as that of the CommitOrder Pipeline.
If the database accessing the new Pipeline component is independent of any existing Pipelines, define a new Pipeline with the new Pipeline component. Note that you can chain multiple Pipelines. For instance, consider four Pipeline components A, B, C, and D. If A, B, and C are required to execute within a single transaction, while D is not, define two different Pipelines (one consisting of A, B, and C), and the other consisting of D. Set the first Pipeline to be transactional, and depending on whether D should execute in its own transaction or no transaction at all, specify the second Pipeline to be transactional or not.

|

|

|
|
|
|
Copyright © 2001 BEA Systems, Inc. All rights reserved.
|