

|
|
|
|
|
|
Creating and Managing Property Sets
Property sets are the schemas for personalization attributes. Using the Property Set Management tool, you can create property sets and define the properties that make up these property sets.
This chapter includes the following topics:
Overview of Property Sets
In the most general sense, a property can be considered a name/value pair. Property sets serve as namespaces for properties so that properties can be conveniently grouped and so that multiple properties with the same name can be defined.
For instance, Web site developers might want users to be able to specify different background colors for each of their portals by requiring the property "backgroundColor" for a user. By creating "portalA" and "portalB" property sets, the property "backgroundColor" can exist for both portalA and portalB. While the two "backgroundColor" properties have the same name, they could have the same or different definitions. Figure 1-5 shows two property sets with redundant property names, corresponding to unique definitions.
Figure 1-5 Property Sets Serving as Namespaces
A property definition includes the following information:
For Personalization Server purposes, property sets are applied to six major areas.
The User/Group property set type is used for defining the property sets and properties that apply to user and group profiles. For example, a property set of this type might be created called portalA. Subsequent property retrieval for a particular user or group can then be scoped with this property set name to retrieve the user's background color for the portal. See Creating and Managing Users, for an in-depth discussion of how property retrieval works for users and groups.
The Session property set type is used for defining the property sets and properties that apply to HTTP sessions. Like the User/Group property set type, a "Session" property set type might be called "portalA." Properties available through this property set can then be accessed via the Advisor.
The Request property set type is used for defining the property sets and properties that apply to HTTP requests. Again, like the "User/Group" property set type, a "Request" property set type might be called "portalA." Properties available through this property set can then be accessed via the Advisor.
The Content Management property set type is used for defining the configuration and run-time use of the content management system. Content Management property sets cannot be created or manipulated with the Personalization Server Administration Tools. For more complete information on this subject, see Creating and Managing Content, in this guide.
The Application Init property set type uses default values to define application initialization parameters. These are the property sets used by the Flow Manager in support of portal (DEFAULT_PORTAL_INIT) and non-portal (DEFAULT_APP_INIT) based personalized applications. For more information about the Flow Manager, see Foundation Classes and Utilities, in this guide.
You can define a property set that establishes custom attributes for a product item in the WebLogic Commerce Server catalog. For a given product item, a custom attribute that you define can be used in addition to the default attributes provided by WebLogic Commerce Server in the catalog database tables. For more information, see "Catalog Administration Tasks" in the Guide to Building a Product Catalog.
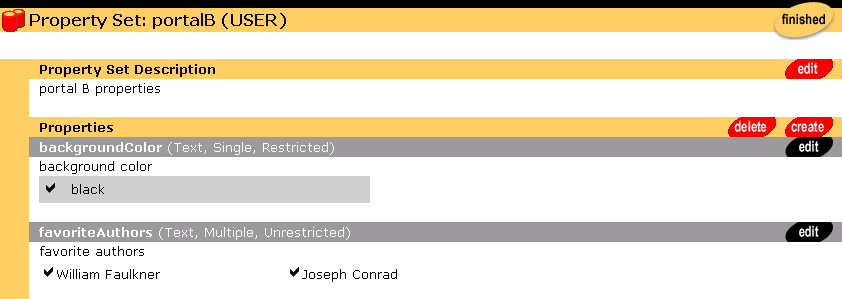
Creating a property set is a simple task via the Property Set Management tools. A name for the set must be provided as well as description. Properties can be copied from an existing property set if a pre-existing property set defines similar properties. Expanding the previous example, if portalA's properties have been defined and portalB is going to have the same (or similar) properties, then you can copy the properties from portalA's property set when creating portalB's property set. Finally, the type of property set ("User/Group", "Session", or "Request") must be chosen.
When defining a property, specify the following:
The following table lists the property definition attribute and value.
Once created, User/Group property values can be edited for a particular user or group via the User Management user and group tools. For "Session" and "Request" properties, the only editable values are the default values set in the property definitions -run-time values are determined by values in the HTTP session or HTTP request, respectively.
Property Value Retrieval via ConfigurableEntity
Property Sets created with the administration tools are stored as com.beasys.commerce.foundation.property.Schema components. The component that acts as an "owner" of properties associated with Property Sets is the com.beasys.commerce.foundation.ConfigurableEntity. During inspection of the Javadoc for Schema and ConfigurableEntity, the reader may see the words "schema" and "scope" used interchangeably with "Property Set." Figure 1-6 shows a simplified representation of property value retrieval through a ConfigurableEntity. For the ConfigurableEntity, the value of backgroundColor for portalB has been overridden. The value of backgroundColor for portalA has not. Therefore, when backgroundColor is requested for the portalB property set, the overridden value, red, will be returned. When backgroundColor is requested for the portalA property set, the property set default value, white, will be returned.
Figure 1-6 backgroundColor Property Retrieval
Figure 1-7 shows another simple example of backgroundColor property retrieval to demonstrate the notion of an explicit successor. A second ConfigurableEntity can be specified in the ConfigurableEntity getProperty() API that acts as a "backup" place to look for a particular property value. This second ConfigurableEntity is considered an explicit property successor. In this example, a particular group is used as an explicit successor, and the value for portalA's background color, green, is "inherited" from this successor. Figure 1-7 Explicit Successor backgroundColor Property Retrieval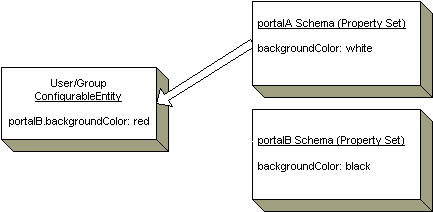
Figure 1-8 provides an example of an implicit successor. An implicit successor is a successor tied to a particular Property Set. In this case, the user does not have a value for portalA.backgroundColor, and no explicit successor is provided in the getProperty() call. However, the group has already been associated with the user as its successor for the portalA Property Set. Again, the user "inherits" the property value, green, from the group. Figure 1-8 Property Inheritance Through Property Set-related Successor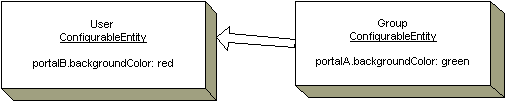
There also exists the notion of a default successor, which can be searched after an explicit successor and a Property Set-related successor have failed to return a value for the property. Figure 1-9 shows such a case. In this example, the Property Set-related successor cannot produce the necessary property value for backgroundColor in portalA, so the value must be retrieved from the default successor. Figure 1-9 Property Inheritance Through a Default Successor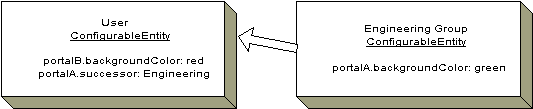
Keep in mind that these examples have been considerably simplified for brevity and to easily explain relevant concepts. More details of ConfigurableEntity property inheritance are available in the topic Users and Groups in the chapter Creating and Managing Users.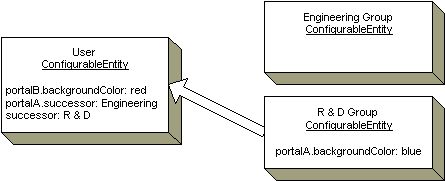
Using the Property Set Management Tool
The Property Set Management tools allow you to create and manage sets of typed properties. Property Sets may be defined to describe user and group, session, request, and content properties.
Creating Property Sets
To create a property set:
To enter a new property set:
To copy properties from an existing property set into the new one:
Note: At any time, you can click Back to return to the Property Set Management Home page without saving the property set.
Creating Properties Within a Property Set
To create properties within a property set:
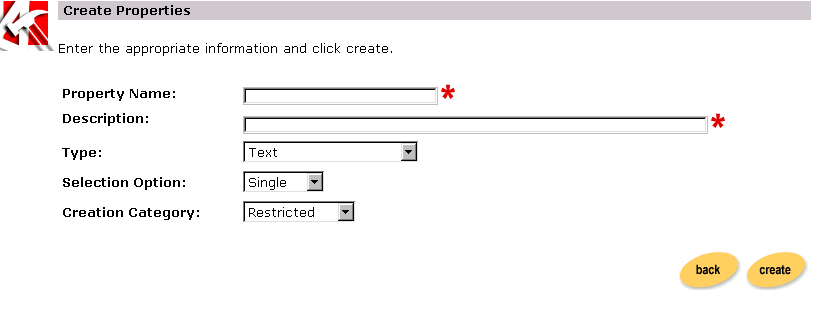
Note: The single option refers to those properties having only one option (for example, Property: Color, Attribute: red). The multiple option refers to those properties having multiple options (for example, Property: Colors, Attributes: red, green, blue, and so on).
Note: Restricted categories refer to values that are selected via a list, radio buttons, check boxes, and so on. Unrestricted categories refer to instances in which users populate a form field.
Setting Up the Property Default Value
Notes: Different steps are required for setting up default values, given your option/category selection.
To set up the property default value for single/restricted categories:
To set up the property default value for single/unrestricted categories:
To set up the property default value for multiple/restricted categories:
To set up the property default value for multiple/unrestricted categories:
Editing Property Sets
To edit a property set:
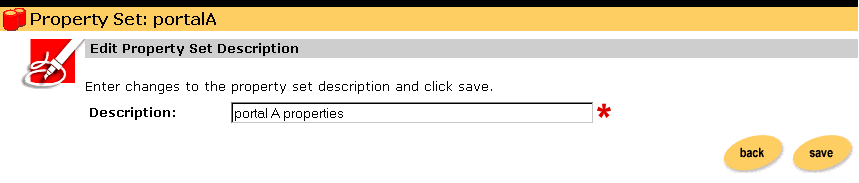
To edit the Property Set Description:
Editing Properties Within a Property Set
To edit properties within a property set:
Deleting Property Sets
To delete a property set:
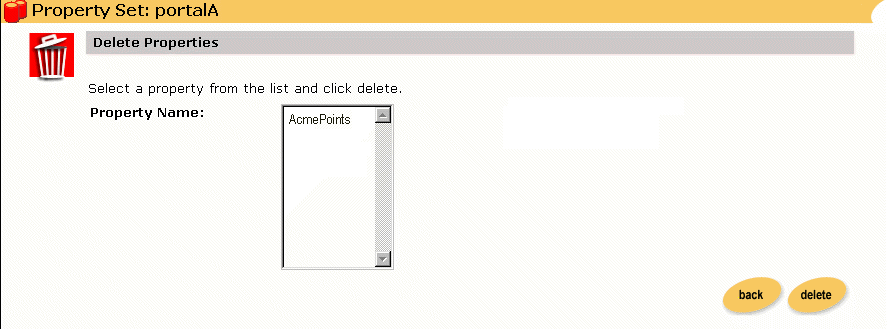
Deleting Properties
To delete properties:

|

|

|
|
|
|
Copyright © 2001 BEA Systems, Inc. All rights reserved.
|