| Download Docs | Site Map | Glossary | |
|
|
|||
| bea.com | products | dev2dev | support | askBEA |
|
|
|
||||||||
| e-docs > WebLogic Platform > WebLogic Integration > B2B Topics > Administering B2B > Importing and Exporting B2B Integration Components |
|
Administering B2B
|
Importing and Exporting B2B Integration Components
Before trading partners can participate in conversations hosted by a WebLogic Integration B2B application, they must set up their environments to meet the requirements of the application. Specifically, they must populate their systems with various components on which a B2B application depends, such as trading partner definitions, conversation definitions, collaboration agreements, and workflows. You can facilitate this aspect of environment setup by creating the necessary B2B components and delivering them to your trading partners.
This section explains how to export and import the components necessary to implement B2B applications. It includes the following topics:
B2B Integration Components
The components of a WebLogic Integration B2B application include:
A collaborative workflow includes the template definition and any associated:
It is common for multiple trading partners to use the same component. For example, all parties who are assigned the same role in a collaboration agreement for a given conversation definition require the same conversation definition and public workflow template. To participate in a peer-to-peer exchange, each trading partner must have a trading partner definition for itself and the other party.
To facilitate trading partner setup, one partner can define the required components, and then export them so they become available for import by other trading partners. Trading partner definitions, collaboration agreements, and conversation definitions can be exported and imported through the WebLogic Integration B2B Console. Collaborative workflows can be exported and imported through the WebLogic Integration Studio.
Although many components of a business collaboration are identical when used by different trading partners, some require minor modification after import. For example, if a trading partner definition for a remote trading partner is exported by a local trading partner and then imported by the remote trading partner, the remote trading partner must change the value of the trading partner type property from remote to local before the imported definition can be used.
Workflow templates and conversations typically require modification of the specified organization because different trading partners have different organizational structures in the Studio.
Export and Import Overview
To export the components required by a participant in a B2B exchange:
To import and modify the exported components for use:
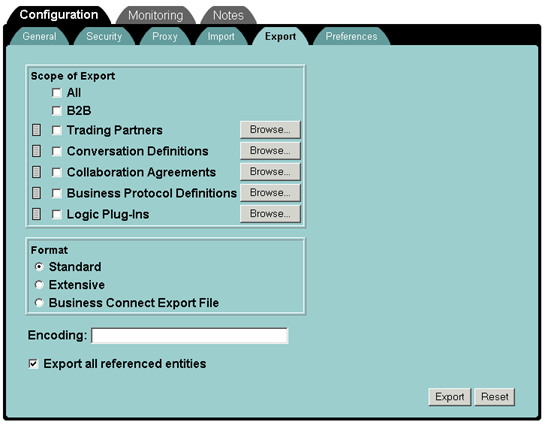
Exporting from the B2B Console
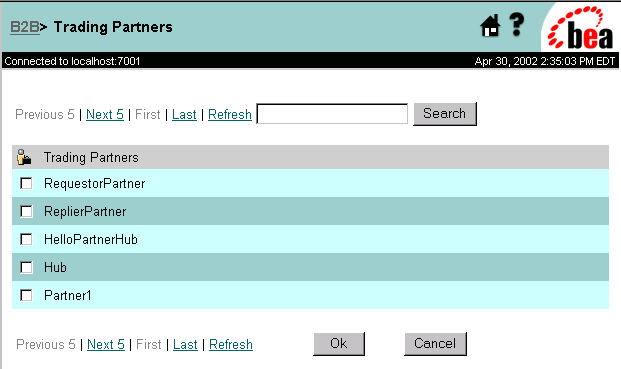
To export entities from the B2B Console:
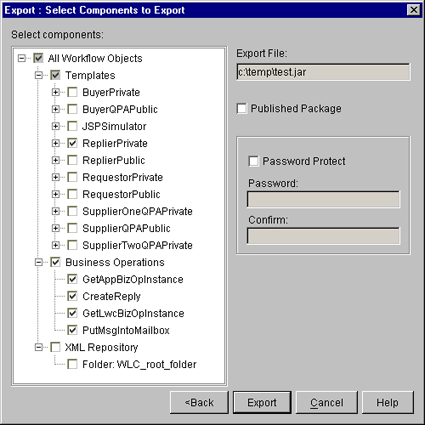
Figure 4-2 Entity Selection Page
You can export only one trading partner at a time in the Business Connect Export File format. You can select this option only if you selected only one trading partner to export in the previous step.
WebLogic Integration - Business Connect is a lightweight trading partner client. Trading partners that deploy WebLogic Integration can use the ebXML business protocol to interoperate with trading partners that deploy WebLogic Integration - Business Connect. (For details, see "Configuring Your Environment for ebXML Messaging" in Administering ebXML in Implementing ebXML for B2B Integration.)
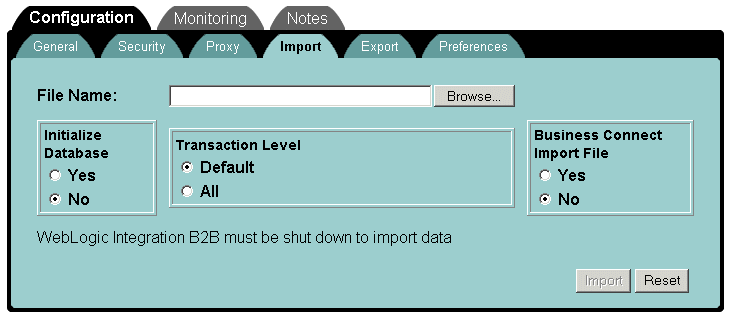
Importing to the B2B Console
To import to the B2B Console:
Note: Shutting down the B2B engine any other way may not result in a successful data import after the B2B engine has subsequently been restarted.
Note: If you are importing trading partners, shutting down and restarting the B2B engine is not always necessary. See Note About Adding or Importing Trading Partners for more details.
Warning: If the Initialize Database option is selected, then when you subsequently import repository data, existing data is destroyed. Be careful about selecting the Initialize Database option.
Trading partners that deploy WebLogic Integration can use the ebXML business protocol to interoperate with trading partners that deploy WebLogic Integration - Business Connect. A WebLogic Integration - Business Connect trading partner can export its trading partner configuration data in an XML file to be consumed by WebLogic Integration. When you import such a file into the WebLogic Integration repository, you must select Yes for this Business Connect Import File option.
For information about the ebXML business protocol and WebLogic Integration - Business Connect, see the following:
Exporting a Workflow Package
The WebLogic Integration Studio allows you to select and export template definitions and related workflow components. The components you select are packaged in a Java Archive (JAR) file known as a workflow package.
When you export a workflow package, you can:
The Studio supports the export of template definitions, business operations, business calendars, plug-ins, event key tables, and XML repository items. The only elements that cannot be exported are the organizations, users, and roles defined in the Studio. When you export a template definition, it is disassociated from the current organization. When a template definition is imported into a target system, a new organization must be selected for the template.
To export a workflow package from the Studio:
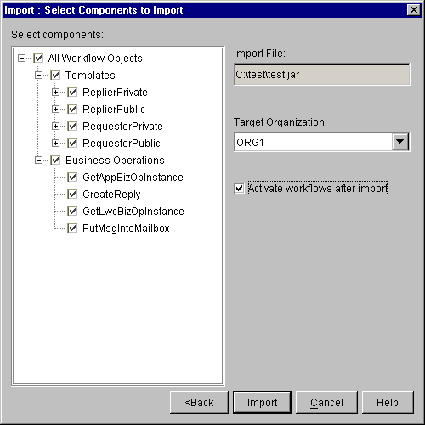
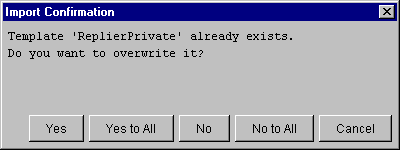
Importing a Workflow Package
To import a workflow package from the Studio:
Figure 4-7 Import: Review Import Summary Dialog Box
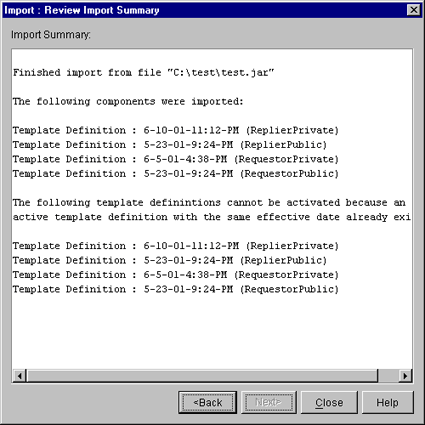
Figure 4-8 Import: Review Import Summary

|

|

|