bea.com | products | dev2dev | support | askBEA
 Download Docs   Site Map   Glossary 
Search

B2B Samples

 Previous Next Contents View as PDF  

Messaging API Sample (Deprecated)

The Messaging API sample shows how the WebLogic Integration Messaging API can be used. Specifically, it demonstrates the use of two message-delivery mechanisms available with the Messaging API and the logic plug-in feature of WebLogic Integration B2B.

This section includes the following topics:

Note: The Messaging API sample is based on the WebLogic Integration Messaging API, which is deprecated as of this release of WebLogic Integration. For information about the features that are replacing the WebLogic Integration Messaging API, see BEA WebLogic Integration Release Notes.


Overview of the Messaging API Sample

WebLogic Integration supports two methods of sending business messages:

  1. Using application workflows created in the WebLogic Integration Studio. The application workflows contain actions that send business messages. The RosettaNet 2.0 Security and Channel Master samples are examples of workflow applications that send business messages.

  2. Using a Java application that invokes the WebLogic Integration Messaging API to send business messages.

This sample uses the second method.

The WebLogic Integration Messaging API supports two message-delivery mechanisms:

The sample demonstrates the use of both the synchronous and deferred synchronous message delivery mechanisms.

The Messaging API sample contains three trading partners (Partner1, Partner2, and Partner3) that send business messages. The Messaging API sample contains four Java source code files: MdmTp1Servlet.java, MdmTp2Servlet.java, MdmTp3Servlet.java, and WaiterPlugin.java.

This file. . .

Contains the source code for the . . .

MdmTp1Servlet.java

Partner1 trading partner

MdmTp2Servlet.java

Partner2 trading partner

MdmTp3Servlet.java

Partner3 trading partner

WaiterPlugIn.java

Hub filter logic plug-In


For more information about the WaiterPlugIn.java code, see Tracing the Execution Flow.

Before Running the Messaging API Sample

Before running the Messaging API sample, complete the following steps:

  1. Follow the instructions in Preparing to Run the Samples.

  2. Make sure the proxy settings on your browser do not prevent you from connecting to the sample WebLogic Server. For more information, see "Web Browser Configuration Requirements" in WebLogic Integration Administration and Design Tools in Starting, Stopping, and Customizing BEA WebLogic Integration.


Running the Messaging API Sample

To run the Messaging API sample, complete the following steps:

  1. Go to WLI_HOME (the directory in which you installed WebLogic Integration):
    cd WLI_HOME

  2. To set the top-level WebLogic Integration environment variables, run the setenv script appropriate for your platform:

  3. Start the RunSamples script by completing the procedure appropriate for your platform:

    Warning: For UNIX systems, the directory in which the netscape executable resides must be included in your PATH environment variable. If it is not included, the samples launcher page is not displayed when the RunSamples script is run. You can start the samples launcher page by starting the Netscape browser on the same machine on which the RunSamples script is currently running, and entering the following URL:
    http://localhost:7001/index.html

  4. If the RunSamples script detects that the configuration section of the RunSamples script has been run before, the following prompt is displayed:
    The WebLogic Integration repository has already been
    created and populated, possibly from a previous run
    of this RunSamples script. Do you want to destroy all the
    current data in the repository and create and populate the
    WebLogic Integration repository, again? Y for Yes, N for No

    If you answer N to this question, the RunSamples script skips the steps for creating and populating the repository and runs only the step for booting the sample instance of the WebLogic Server.

    If you answer Y to this question, the RunSamples script recreates and repopulates the repository, and then it boots the sample instance of the WebLogic Server. When you answer Y the RunSamples script destroys all the data currently in the repository and loads an unaltered version of the sample data into the repository. Answer Y only when the current sample data has been altered or removed and you want a fresh or unaltered version of the sample data in the repository.

    Now the RunSamples script starts an instance of WebLogic Server as a background process and the samples launcher page is displayed.


  5. Click the link for the Messaging API, under Sample Applications, in the left pane of the samples launcher page. A menu of options for the Messaging API sample is displayed in the right pane.


If necessary, resize your browser to display all three options.

  1. Click the first option (Join Partner3 spoke). Wait until you see a message about it before proceeding to the next step.

  2. Click the second option (Join Partner2 spoke). Wait until you see a message about it before proceeding to the next step.

  3. Click the third option (Join Partner1 spoke and send request).

    If the Messaging API sample is executed successfully, the following output is displayed at the bottom of the right pane:

Partner1 process flow: 
Starting XOCPAppplication... done.
Creating conversation : verifierConversation:1.0:
requestor_Partner1_1001029696695_341001029696695...done.
send string for Message 1 = FIRST MESSAGE
Sending message 1 using synchronous deferred delivery method to Partner 2
Sending a second message before checking for acknowledgment on the first
send string for Message 2 = SECOND MESSAGE
Sending message 2 using synchronous delivery method to Partner 3
success status for message 2
Waiting for Message 2 response... done.
Processing reply for Message 2:
Received string for Message 2 = partner3 -- second message
Verification for Message 2 SUCCESS
Doing something else... done
Waiting acknowledgment for Message 1... Acknowledgment received
Success status for message 1
Waiting for Message 1 response... done
Processing reply:
Received string for Message 1 = partner2 -- first message
Verification for Message 1 SUCCESS
Terminating conversation:verifierConversation:1.0:
requestor_Partner1_1001029696695_341001029696695
success
Shutting down session... done.

  1. If you want to run more B2B samples at this time, keep the samples launcher page open and keep the sample instance of WebLogic Server running.

    If you do not plan on running more B2B samples at this time, shut down the current instance of WebLogic Server by completing the procedure appropriate for your platform:

Tracing the Execution Flow

The following steps trace the execution flow of the Messaging API sample:

  1. The RunSamples script is started, with the following results:

    1. The sample instance of WebLogic Server is started.

    2. A browser opens and displays the samples launcher page.

    3. On the samples launcher page, the Messaging API link is clicked: the Messaging API sample page is displayed. This page in turn, displays three options: Join Partner3 spoke, Join Partner2 spoke, and Join Partner1 spoke and send request.

  2. The Join Partner3 spoke option is selected, with the following results:

    1. An HTTP request is posted to the MdmTp3 servlet.

    2. MdmTp3, in turn, invokes the doPost method from MdmTp3Servlet.java.

    3. doPost method starts trading partner Partner3's XOCPApplication.

  3. The Join Partner2 spoke option is selected, with the following results:

    1. An HTTP request is posted to the MdmTp2 servlet.

    2. MdmTp2 in turn, invokes the doPost method from MdmTp2Servlet.java.

    3. The doPost method starts trading partner Partner2's XOCPApplication.

  4. The Join Partner1 spoke and send request option is selected, with the following results:

    1. An HTTP request is posted to the MdmTp1 servlet.

    2. MdmTp1, in turn, invokes the doPost method from MdmTp1Servlet.java.

    3. The doPost method starts trading partner Partner1's XOCPApplication.

    4. The doPost sends the first message, triggering a series of messages among the three trading partners (Partner1, Partner2, and Partner3). All three trading partners in this sample register with the WebLogic Integration repository to use the VerifierHubChannel delivery channel and to participate in the verifierConversation conversation. Partner1 is registered with the repository in the role of requester. Partner2 and Partner3 are registered in the role of replier.

    The following figure shows the sequence in which these business messages are most likely to be sent and received. (The exact sequence is timing related and depends on the thread scheduling of the Java virtual machine.)

    Figure 5-1 Interactive Diagram of the Flow of Messages Among Trading Partners


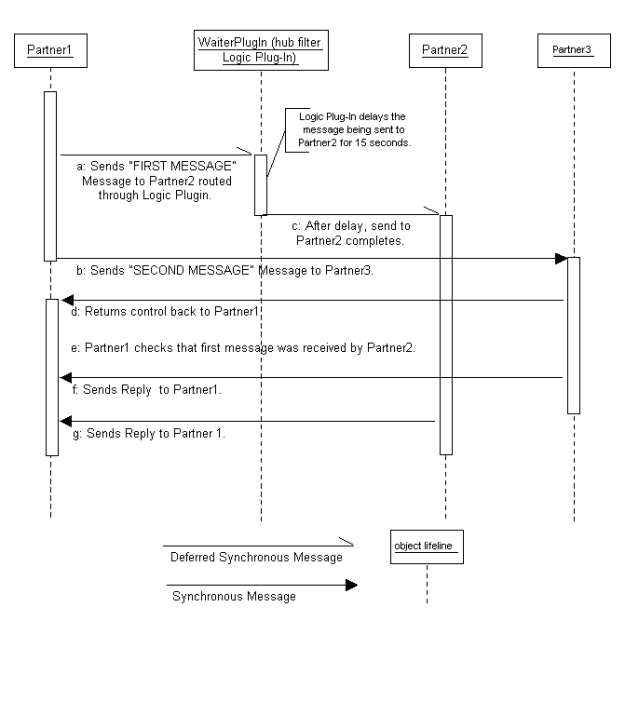
    The following sequence provides details about each of the steps indicated by a corresponding letter in Figure  5-1:

    1. Partner1 sends a message with the text FIRST MESSAGE to Partner2. This message is sent in deferred synchronously mode. Consequently, Partner1 does not wait or block for a return from Partner2. Instead, it continues executing tasks.

      The nonblocking aspect of the message is represented in the Interaction diagram (Figure  5-1) by Partner1's Object lifeline. When Partner1 initially becomes active, the representation of it's lifeline changes from a dashed line (indicating an inactive state) to a narrow rectangle (indicating an active state). The lifeline remains active after Partner1 sends the first message. By remaining active, Partner1 can do other tasks, such as sending another message, as shown in the next step.

      All the messages sent in this sample are routed through the hub. A logic plug-in called WaiterPlugIn has been added to the filter chain of the hub. When messages are routed though the hub, the process method of the WaiterPlugIn class is executed. The process method checks the target recipient of the outgoing message. If the target recipient is Partner2, process sleeps for 15 seconds. Otherwise, it sends the message immediately. In the example shown in Figure  5-1, the first message, which was sent by Partner1 to Partner2, is delayed by 15 seconds.

    2. While the first message is still being processed, Partner1 sends the second message, with the text SECOND MESSAGE, to Partner3. This message is sent synchronously. Consequently, Partner1 must block or wait until Partner3 returns before Partner1 can process other tasks.

    3. Notice how this blocking of Partner1 is represented in Figure  5-1. Because the second message is synchronous, the representation of Partner1's lifeline changes from a narrow rectangle (indicating an active state) to a dashed line (indicating an inactive state) after Partner1 sends the second message. The change to an inactive state means that Partner1 must block or wait until the message is sent and acknowledged by Partner3 before it can become active and start doing other tasks again.

      The second message and all the reply messages of this sample are routed through the hub, where the process method of WaiterPlugIn is executed on them. Each of these messages passes through the hub without delay because the recipient of the message is not Partner2. Routing of these messages through the hub filter logic plug-in is not shown in Figure  5-1.

    4. After the first message is delayed in the hub for 15 seconds, the hub routes it to Partner2.

    5. Control is returned to Partner1 after the synchronous send to Partner3 is completed. At this point Partner1 becomes active again, as shown by the change in its lifeline, in Figure  5-1, from a dashed line (representing an inactive state) to a narrow rectangle (representing an active state).

    6. Partner1verifies that the first message was received by Partner2.

    7. Partner3 takes the text of the second message, converts it to lowercase, and adds the prefix partner 3-- to it. It then sends the modified message back to Partner1.

    8. Partner2 takes the text of the first message, converts it to lowercase, and adds the prefix partner 2-- to it. It then sends the modified message back to Partner1.

  5. The results are displayed by Partner1 on an HTML page. This step is not represented in Figure  5-1.


Back to Top Previous Next