| Download Docs | Site Map | Glossary | |
|
|
|||
| bea.com | products | dev2dev | support | askBEA |
|
|
|
||||||||
| e-docs > WebLogic Platform > WebLogic Integration > AI Topics > Developing Adapters > Learning to Develop Adapters Using the DBMS Sample Adapter |
|
Developing Adapters
|
Learning to Develop Adapters Using the DBMS Sample Adapter
This section contains information about the following subjects:
Introduction to the DBMS Sample Adapter
The DBMS sample adapter is a J2EE-compliant adapter that includes a JSP-based GUI. It provides a concrete example of how an adapter can be constructed by using the WebLogic Integration ADK. A relational database is used as the adapter's EIS to allow adapter providers to focus on details of the adapter and the ADK, instead of investing time to learn about a particular proprietary EIS.
The DBMS Sample Adapter is intended to help you understand the tasks required to design and develop your own adapter. It is not intended for use in a production environment, nor is it supported in such an environment. Because the adapter is intended as an example, rather than a production-ready adapter, it does not include a full set of features and has the following limitations: the adapter is unable to execute complex queries or stored procedures.
Whether you are a developer or a business analyst, the DBMS sample adapter can help you understand the possibilities at your disposal when you use the ADK to build adapters. If you are a business analyst, you might find it useful to run through the interface to get a better understanding of an application view, service, and event, as described in How the DBMS Sample Adapter Works.
If you are an adapter developer, we suggest you start by learning how you can extend and use the ADK classes to build a J2EE-compliant adapter. To do so, review the following:
The DBMS sample adapter satisfies the following requirements:
How the DBMS Sample Adapter Works
This section shows how the DBMS sample adapter works. If you are a business analyst, you might enjoy running through the interface to get a feel for how the adapter works. The example in this section shows how to create a service that inserts a customer in the underlying database, and how an event is generated to notify others that this action has taken place.
This section contains information about the following subjects:
Before You Begin
Before you try to access the DBMS sample adapter, make sure you complete the following tasks:
Accessing the DBMS Sample Adapter
To access the DBMS sample adapter:
http://HOSTNAME:7001/wlai
Tour of the DBMS Sample Adapter
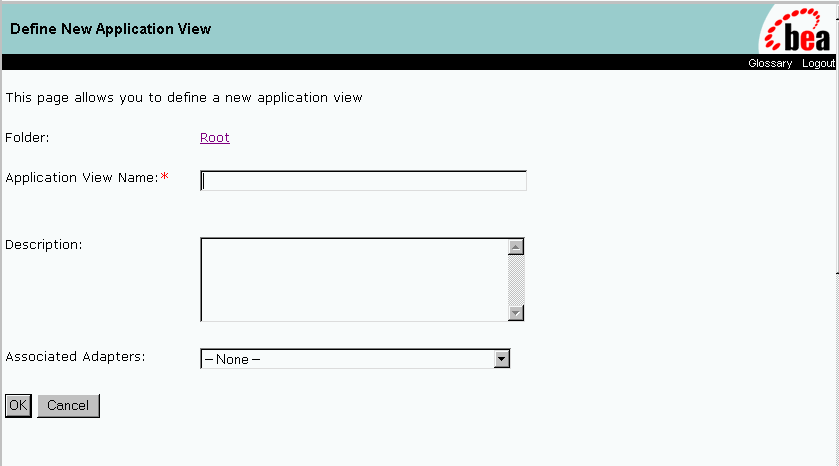
This section provides a short tour through the DBMS sample adapter. To begin, open the Application View Console Logon page for the DBMS sample adapter in your browser. For instructions, see Accessing the DBMS Sample Adapter.
Figure E-1 Application View Console - Logon

Figure E-2 Application View Management Console
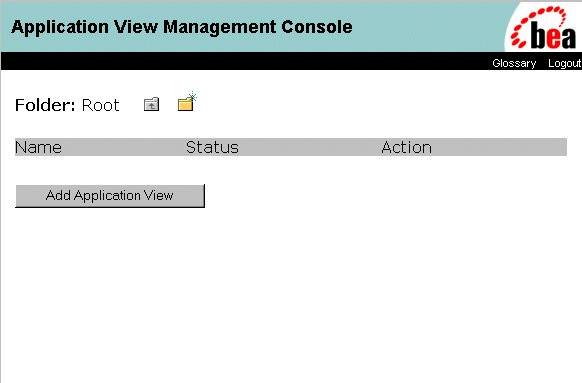
Figure E-4 Select Existing Connection Page
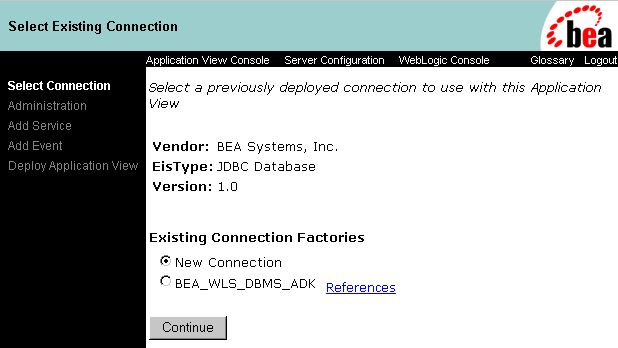
Figure E-5 Connection Factory Reference Page
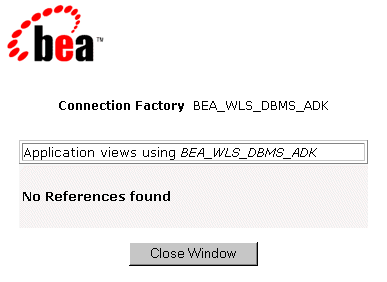
Figure E-6 Configure Connection Parameters Page
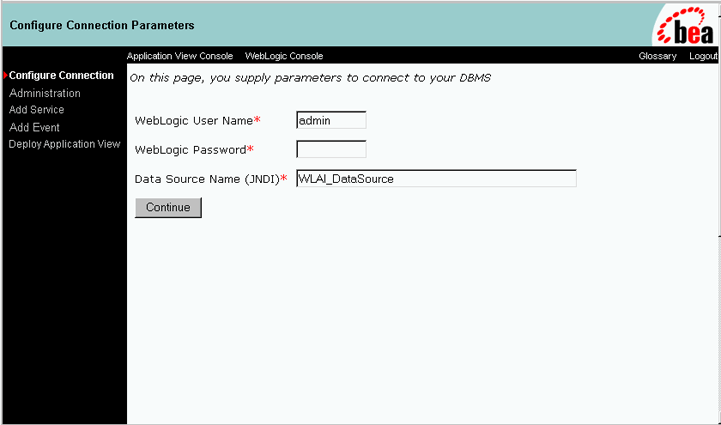
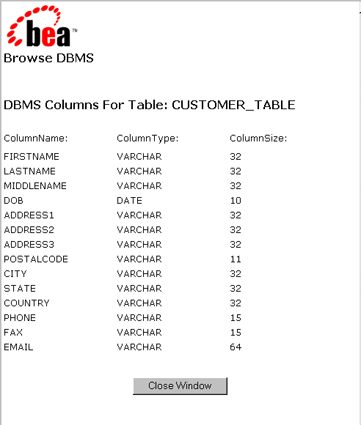
Use the browse link to browse the DBMS sample adapter database schemas and tables and to specify the database table CUSTOMER_TABLE.
To add a service:
Figure E-8 Add Service Page
Figure E-9 Browse DBMS Page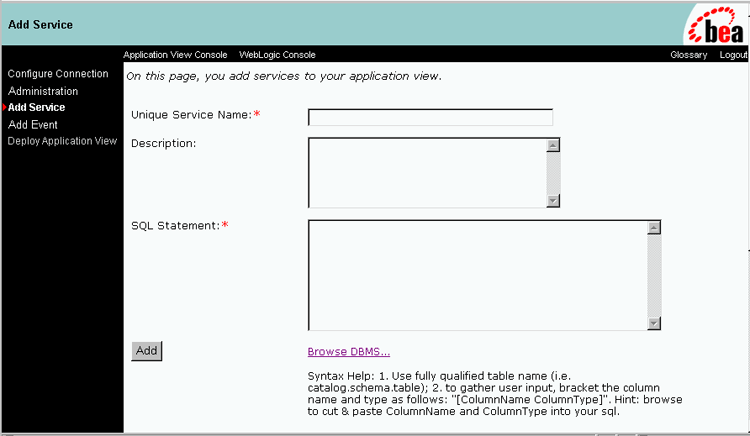
Figure E-10 Browse DBMS Table Types Page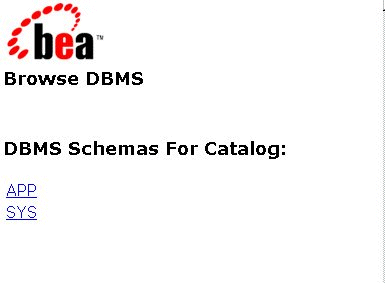
Figure E-11 DBMS Browse Tables Page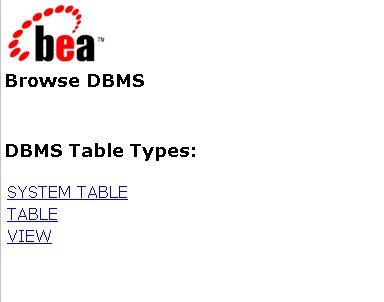
Figure E-12 Browse DBMS for Table Page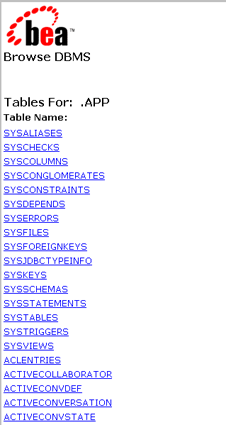
You can use the Browse DBMS link to browse the DBMS database schemas and tables and to specify the database table. Then you can have the field populated automatically with the specified table name.
To add an event:
Figure E-13 Add Event Page
Figure E-14 Browse DBMS Tables Page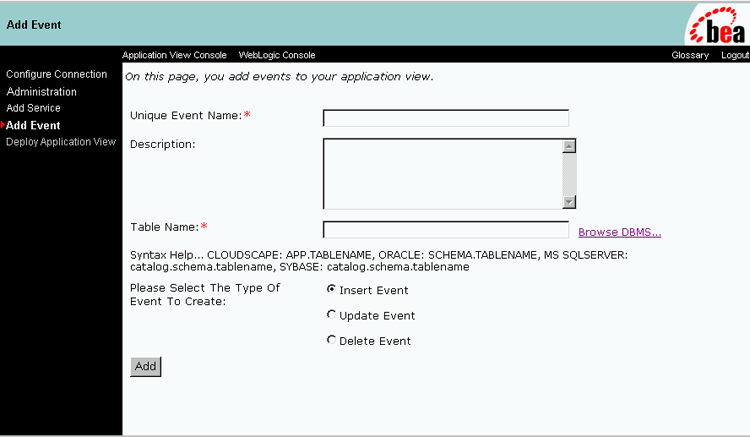
Figure E-15 Add Event Page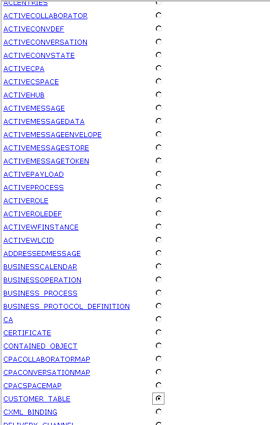
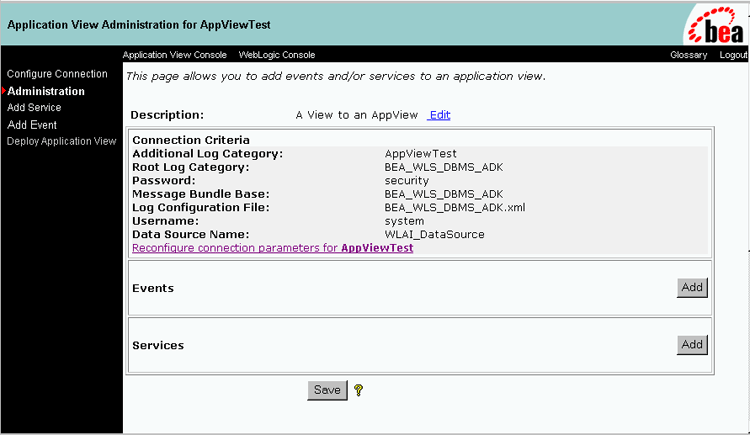
Figure E-16 Application View Administration Page for AppViewTest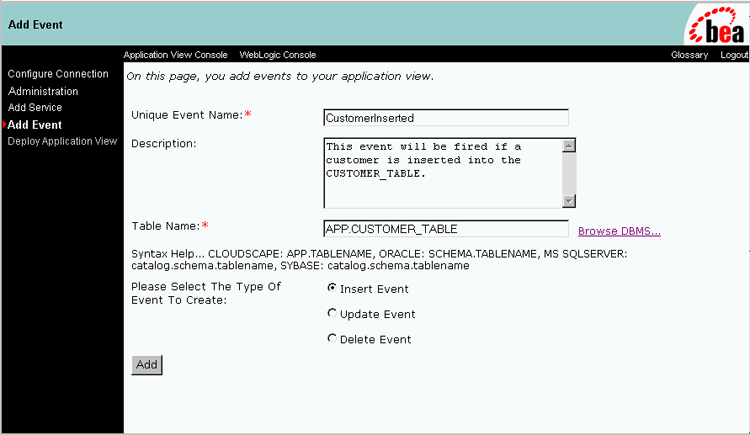
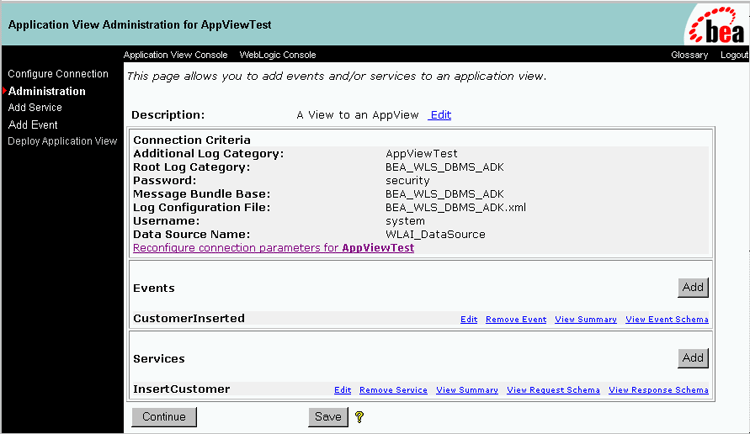
Figure E-17 Display Application View to Server Page
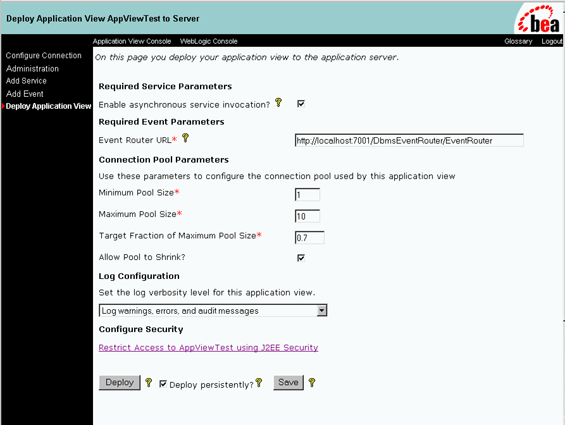
http://localhost:7001/DbmsEventRouter/EventRouter
Minimum Pool Size - 1
Maximum Pool Size - 10
Target Fraction of Maximum Pool Size - 0.7
Allow Pool to Shrink (selected)
Figure E-18 Application View Security Page
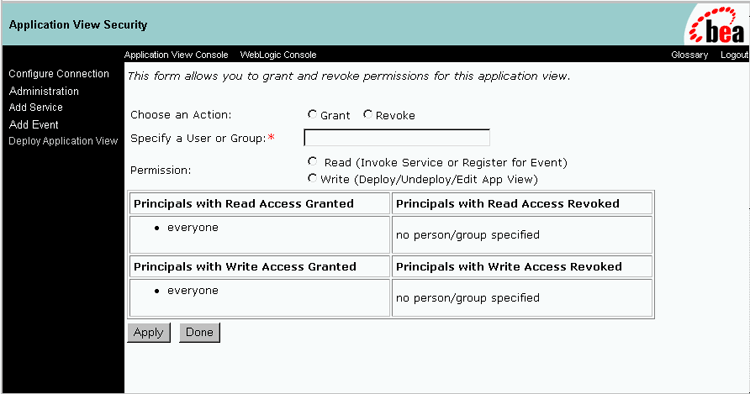
Figure E-19 Summary for Application View Page
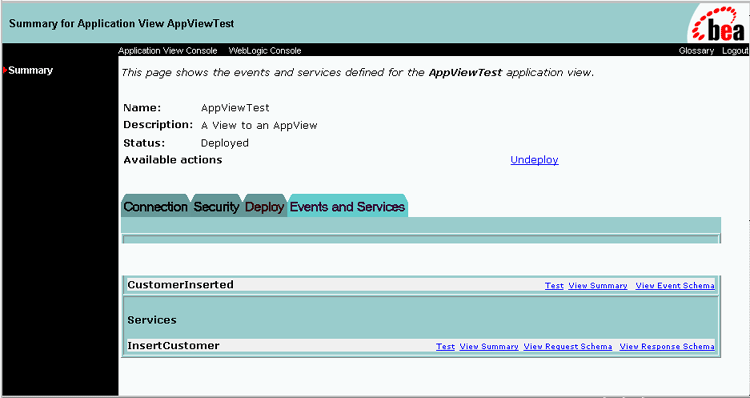
Figure E-20 Test Event Page
Figure E-21 Test Service Page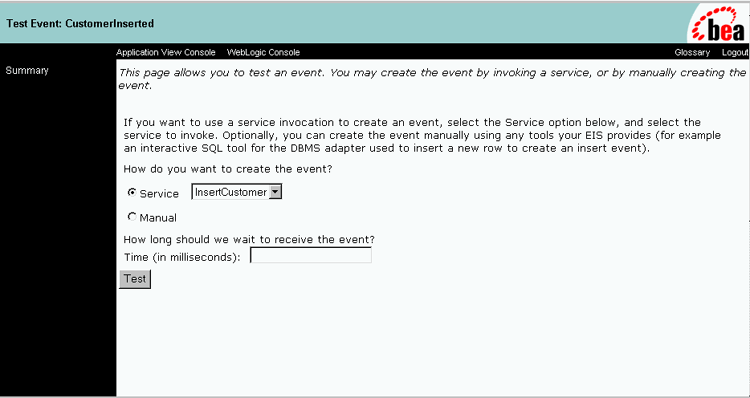
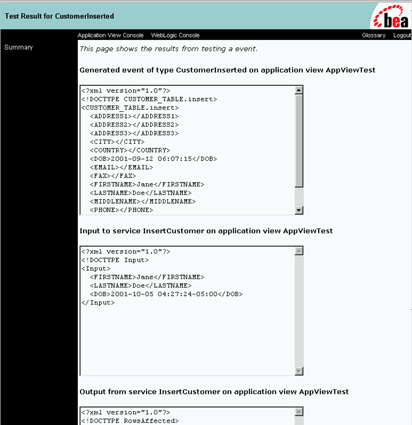
Figure E-22 Test Result Page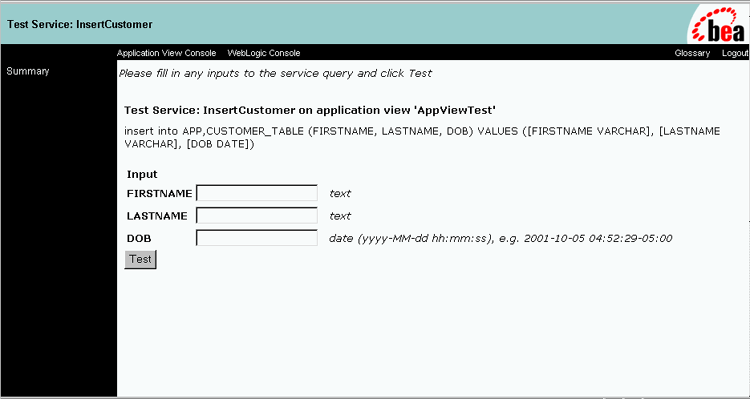
How the DBMS Sample Adapter Was Developed
This section describes each interface used to develop the DBMS sample adapter. The ADK provides many of the necessary implementations required by a Java Connector Architecture-compliant adapter, but some interfaces cannot be implemented fully until the EIS and its environment are defined. For this reason the DBMS sample adapter was created as a concrete implementation of the abstract classes provided by the ADK.
The procedure for creating the DBMS sample adapter includes the following steps:
Step 1: Learn About the DBMS Sample Adapter
To learn how the implementations provided by the ADK are leveraged in the DBMS sample adapter, we recommend that you review the Javadoc and code for the methods defined in this section.
WLI_HOME/adapters/dbms/docs/api/index.html
WLI_HOME/adapters/dbms/src/com/bea/adapter/dbms/spi
Note: WLI_HOME is the drive or directory in which WebLogic Integration is installed.
Step 2: Define Your Environment
The Adapter Setup Worksheet (see Adapter Setup Worksheet,) is available to help adapter developers identify and collect critical information about an adapter they are developing before they begin coding. For the DBMS sample adapter, the worksheet questions are answered as follows:
Note: Questions preceded by an asterisk (*) are required to use the GenerateAdapterTemplate utility.
Step 3: Implement the Server Provider Interface Package
To implement the DBMS sample adapter Server Provider Interface (SPI) and meet the J2EE-compliant SPI requirements, the classes in the ADK were extended to create the following concrete classes:
These classes provide connectivity to an EIS and establish a framework for event listening and request transmission, establish transaction demarcation, and allow management of a selected EIS. ManagedConnectionFactoryImpl The first step in implementing an SPI for the DBMS sample adapter was to implement the ManagedConnectionFactory interface. A ManagedConnectionFactory supports connection pooling by providing methods for matching and creating a ManagedConnection instance. Basic Implementation The ADK provides com.bea.adapter.spi.AbstractManagedConnection Factory, an implementation of the Java Connector Architecture interface javax.resource.spi.ManagedConnectionFactory. The DBMS sample adapter extends this class in com.bea.adapter.dbms.spi.ManagedConnectionFactoryImpl. Listing E-1 shows the derivation tree for ManagedConnectionFactoryImpl. Listing E-1 com.bea.adapter.dbms.spi.ManagedConnectionFactoryImpl javax.resource.spi.ManagedConnectionFactory Developers' Comments The ManagedConnectionFactory is the central class of the Java Connector Architecture SPI package. The ADK's AbstractManagedConnectionFactory provides much of the required implementation for the methods declared in Sun MicroSystems' interface. To extend the ADK's AbstractManagedConnectionFactory for the DBMS sample adapter, the key createConnectionFactory() and createManagedConnection() methods were implemented. Overrides for equals(), hashcode(), checkState() were also written to provide specific behaviors for the databases supported by the DBMS sample adapter. There are private attributes about which the superclass has no knowledge. When creating your adapters, you must provide setter/getter methods for these attributes. The abstract createConnectionFactory() method is implemented to provide an EIS-specific ConnectionFactory using the input parameters. Additionally, createManagedConnection() is the main factory method of the class. It checks to see if the adapter is configured properly before doing anything else. It then implements methods of the superclass to get a connection and a password credential object. It then attempts to open a physical database connection; if this succeeds, it instantiates and returns a ManagedConnectionImpl (the DBMS sample adapter implementation of ManagedConnection), which is given the physical connection. Other methods are getter/setter methods for member attributes. ManagedConnectionImpl A ManagedConnection instance represents a physical connection to the underlying EIS in a managed environment. ManagedConnection objects are pooled by the application server. For more information, read about how the ADK implements the AbstractManagedConnection instance in ManagedConnection. Basic Implementation The ADK provides com.bea.adapter.spi.AbstractManagedConnection, an implementation of the J2EE interface javax.resource.spi.ManagedConnection. The DBMS sample adapter extends this class in com.bea.adapter.dbms. spi.ManagedConnectionImpl. Listing E-2 shows the derivation tree for ManagedConnectionImpl. Listing E-2 com.bea.adapter.dbms.spi.ManagedConnectionImpl javax.resource.spi.ManagedConnection Developers' Comments This class is thoroughly documented in the Javadoc comments because the ManagedConnection is a crucial part of the Java Connector Architecture SPI specification. You should focus on our implementation of the following methods:
|
|-->com.bea.adapter.spi.AbstractManagedConnectionFactory
|
|-->com.bea.adapter.dbms.spi.ManagedConnectionFactoryImpl
|
|-->com.bea.adapter.spi.AbstractManagedConnection
|
|-->com.bea.adapter.dbms.spi.ManagedConnectionImpl
The ping() method is used to check whether a physical database connection (not our cci.Connection) is still valid. If an exception occurs, ping() is specific about checking the type so that a connection is not needlessly destroyed.
Other methods are EIS-specific or are simply required setters or getters.
ConnectionMetaDataImpl
The ManagedConnectionMetaData interface provides information about the underlying EIS instance associated with a ManagedConnection instance. An application server uses this information to get run-time information about a connected EIS instance. For more information, read about how the ADK implements the AbstractConnectionMetaData instance in ManagedConnection.
Basic Implementation
The ADK provides com.bea.adapter.spi.AbstractConnectionMetaData, an implementation of the J2EE interface javax.resource.spi.ManagedConnection MetaData. The DBMS sample adapter extends this class in com.bea. adapter.dbms.spi.ConnectionMetaDataImpl. Listing E-3 shows the derivation tree for ConnectionMetaDataImpl.
Listing E-3 com.bea.adapter.dbms.spi.ConnectionMetaDataImpl
javax.resource.spi.ManagedConnectionMetaData
|
|-->com.bea.adapter.spi.AbstractConnectionMetaData
|
|-->com.bea.adapter.dbms.spi.ConnectionMetaDataImpl
Developers' Comments
The ADK's AbstractConnectionMetaData class implements the following:
This implementation of the ConnectionMetaData class uses a DatabaseMetaData object. Because the ADK's abstract implementation was used, you must provide EIS-specific knowledge when implementing the abstract methods in this class.
LocalTransactionImpl
The LocalTransaction interface provides support for transactions that are managed within an EIS resource manager (that is, transactions that do not require an external transaction manager). For more information, read about how the ADK implements the AbstractLocalTransaction instance in LocalTransaction.
Basic Implementation
The ADK provides com.bea.adapter.spi.AbstractLocalTransaction, an implementation of the J2EE interface javax.resource.spi.LocalTransaction. The DBMS sample adapter extends this class in com.bea.adapter.dbms. spi.LocalTransactionImpl. Listing E-4 shows the derivation tree for LocalTransactionImpl.
Listing E-4 com.bea.adapter.dbms.spi.LocalTransactionImpl
javax.resource.spi.LocalTransaction
|
|-->com.bea.adapter.spi.AbstractLocalTransaction
|
|-->com.bea.adapter.dbms.spi.LocalTransactionImpl
Developers' Comments
This class utilizes the ADK's abstract superclass which provides logging and event notification. The superclass implements both the CCI and SPI LocalTransaction interfaces provided by Sun. The DBMS sample adapter's concrete class implements the three abstract methods of the superclass:
Step 4: Implement the Common Client Interface Package
To implement the DBMS sample adapter Common Client Interface (CCI) and meet the J2EE-compliant CCI requirements, several classes in the ADK were extended to create the following concrete classes.
These classes provide access back-end systems. The client interface specifies the format of both the request and response records for a given interaction with the EIS. Note: Although implementation of the CCI is optional in the Java Connector Architecture 1.0 specification, it is likely to be required in the future. For your reference, the DBMS sample adapter provides a complete implementation. ConnectionImpl A Connection represents an application-level handle that is used by a client to access an underlying physical connection. The actual physical connection associated with a Connection instance is represented by a ManagedConnection instance. For more information, read about how the ADK implements the AbstractConnection instance in Connection. Basic Implementation The ADK provides com.bea.adapter.cci.AbstractConnection, an implementation of the J2EE interface javax.resource.cci.Connection. The DBMS sample adapter extends this class in com.bea.adapter.dbms.cci.ConnectionImpl. Listing E-5 shows the derivation tree for ConnectionImpl. Listing E-5 com.bea.adapter.dbms.cci.ConnectionImpl javax.resource.cci.Connection Developers' Comments The ConnectionImpl class is the DBMS sample adapter's concrete implementation of the javax.resource.cci.Connection interface. It extends the ADK's AbstractConnection class. The actual physical connection associated with a connection instance is represented by a ManagedConnection instance. A client gets a connection instance by using the getConnection() method on a ConnectionFactory instance. A connection can be associated with zero or more interaction instances. The simplicity of this concrete class is a testament to the power of extending the ADK's base classes. InteractionImpl The Interaction instance enables a component to execute EIS functions. An interaction instance is created from a connection and is required to maintain its association with the Connection instance. For more information, read about how the ADK implements the AbstractInteraction instance in Interaction. Basic Implementation The ADK provides com.bea.adapter.cci.AbstractInteraction, an implementation of the J2EE interface javax.resource.cci.Interaction. The DBMS sample adapter extends this class in com.bea.adapter.dbms.cci. InteractionImpl. Listing E-6 shows the derivation tree for InteractionImpl. Listing E-6 com.bea.adapter.dbms.cci.InteractionImpl javax.resource.cci.Interaction Developers' Comments The InteractionImpl class is the concrete implementation of the ADK's Interaction object. The methods are EIS-specific implementations of methods required by the Java Connector Architecture and the ADK. Both versions of the Java Connector Architecture's javax.resource.cci.InteractionExecute()method (the central method of this class) were implemented for the DBMS sample adapter. The main logic for the execute() method includes the following signature: Because this method returns the actual output record from the interaction, it is called more often than other methods. The second implementation is provided as a convenience method. This form of execute() includes the following signature: public boolean execute(InteractionSpec ispec, Record input, Record output). The second implementation's logic returns a boolean, which indicates only the success or failure of the interaction. InteractionSpecImpl An InteractionSpecImpl holds properties for driving an interaction with an EIS instance. An InteractionSpec is used by an interaction to execute the specified function on an underlying EIS. The CCI specification defines a set of standard properties for an InteractionSpec, but an InteractionSpec implementation is not required to support a standard property if that property does not apply to its underlying EIS. The InteractionSpec implementation class must provide getter and setter methods for each of its supported properties. The convention followed in the getter and setter methods should be based on the Java Beans design pattern. For more information, read about how the ADK implements the InteractionSpecImpl instance in InteractionSpec. Basic Implementation The ADK provides com.bea.adapter.cci.InteractionSpecImpl, an implementation of the J2EE interface javax.resource.cci.InteractionSpec. The DBMS sample adapter extends this class in com.bea.adapter.dbms. cci.InteractionSpecImpl. Listing E-7 shows the derivation tree for InteractionSpecImpl. Listing E-7 com.bea.adapter.dbms.cci.InteractionSpecImpl javax.resource.cci.InteractionSpec Developers' Comments An implementation class for the InteractionSpec interface is required to implement the java.io.Serializable interface. InteractionSpec extends the ADK InteractionSpec in order to add setter and getter methods for the String attribute m_sql. The getter and setter methods should be based on the Java Beans design pattern, as specified in the Java Connector Architecture 1.0 specification. Step 5: Implement the Event Package This package contains only one class: the DBMS sample adapter EventGeneratorWorker. It does the work for the event generator for the DBMS sample adapter. EventGenerator The EventGenerator class implements the following interfaces:
|
|-->com.bea.adapter.cci.AbstractConnection
|
|-->com.bea.adapter.dbms.cci.ConnectionImpl
|
|-->com.bea.adapter.cci.AbstractInteraction
|
|-->com.bea.adapter.dbms.cci.InteractionImplpublic Record execute(InteractionSpec ispec, Record input)
|
|-->com.bea.adapter.cci.InteractionSpecImpl
|
|-->com.bea.adapter.dbms.cci.InteractionSpecImpl
Basic Implementation
The DBMS sample adapter event generator extends the ADK's AbstractPullEventGenerator because a database cannot push information to the event generator; you therefore need to pull or poll the database for changes about which you want to be notified. Listing E-8 shows the derivation tree for EventGenerator.
Listing E-8 EventGenerator
com.bea.adapter.event.AbstractEventGenerator
|
|-->com.bea.adapter.event.AbstractPullEventGenerator
|
|-->com.bea.adapter.dbms.event.DbmsEventGeneratorWorker
Developers' Comments
This concrete implementation of the ADK's AbstractPullEventGenerator implements the following abstract methods:
It also overrides the following methods:
These methods are EIS-specific: they are used to identify an event within the context of the EIS while interacting with the database to create and remove event definitions and events. Additionally, these methods can be used to create and remove triggers on the database that are activated when an event occurs.
The key method of the class is postEvents(). It creates the IEvent objects of the data taken from rows in the EVENT table of the database. This method takes an IEventRouter as an argument. After creating an IEvent using the IEventDefinition object's createDefaultEvent() method, the postEvents() method populates the event data propagates the event to the router by calling router.postEvent(event). Once the event is sent to the router, the method deletes the relevant rows of event data from the database.
The method setupNewTypes()creates new event definitions, making sure that the appropriate triggers are created for the database. For each event definition, the method creates a trigger information object that describes the catalog, schema, table, triggerType, and trigger key represented by the event definition. A map of trigger keys is maintained so that triggers are not redundantly added to the database. If the map does not contain the new key, trigger text for the database is generated.
The method removeDeadTypes() also creates a trigger information object, but this object also searches for one or more matching event types. All event definitions that match this trigger are removed from the map, and then the trigger itself is removed from the database.
Step 6: Deploy the DBMS Sample Adapter
After implementing the SPI, CCI, and event interfaces, deploy the adapter by completing the following steps:
Step 6a: Set Up Your Environment
Before deploying the adapter in a WebLogic Integration environment, determine the location of the adapter on your computer. The adapter resides in WLI_HOME/adapters/dbms. You must replace WLI_HOME with the pathname for the directory in which WebLogic Integration is installed. We refer to this location as ADAPTER_ROOT.
Step 6b: Update the ra.xml File
The DBMS sample adapter provides the ra.xml file in the adapter's RAR file (META-INF/ra.xml). Because the DBMS sample adapter extends the AbstactManagedConnectionFactory class, the following properties are provided in the ra.xml file:
The DBMS sample adapter also requires the declarations listed in the following table.
You can view the complete ra.xml file for the DBMS sample adapter in: WLI_HOME/adapters/dbms/src/rar/META-INF/ Step 6c: Create the RAR File Class files, logging configuration information, and message bundle(s) should be collected in a JAR file, which should then be bundled, along with META-INF/ra.xml, into a RAR file. The Ant build.xml file demonstrates how to construct this RAR file properly. Step 6d: Build the JAR and EAR Files To build the JAR and EAR files, complete the following procedure:
Step 6e: Create and Deploy the EAR File
The DBMS sample adapter is displayed by creating and deploying an EAR file. To do so, complete the following procedure:
Listing E-9 Declaring the DBMS Sample Adapter's EAR File
<!-- This deploys the EAR file -->
<Application Deployed="true" Name="BEA_WLS_DBMS_ADK" Path="WLI_HOME/adapters/dbms/lib/BEA_WLS_DBMS_ADK.ear">
     <ConnectorComponent Name="BEA_WLS_DBMS_ADK" Targets="myserver"
       URI="BEA_WLS_DBMS_ADK.rar"/>
    <WebAppComponent Name="DbmsEventRouter" Targets="myserver"
       URI="BEA_WLS_DBMS_ADK_EventRouter.war"/>
    <WebAppComponent Name="BEA_WLS_DBMS_ADK_Web" Targets="myserver"
      URI="BEA_WLS_DBMS_ADK_Web.war"/>
</Application>
Note: Replace WLI_HOME with the pathname of the WebLogic Integration installation directory for your environment.
How the DBMS Sample Adapter Design-Time GUI Was Developed
The design-time GUI is an interface that allows a user to create application views, add services and events, and deploy an adapter that is hosted in a WebLogic Integration environment. This section explains how the design-time GUI for the DBMS sample adapter was developed:
Step 1: Identify Requirements
Before development of the design-time GUI for the DBMS was begun, values for the following parameters needed to be determined:
Step 2: Identify Required Java Server Pages
The DBMS sample adapter uses the Java Server Pages (JSPs) delivered with the ADK for a design-time GUI. Additional JSPs have been added, however, to provide adapter-specific functionality. The additional JSPs are described in the following table.
Step 3: Create the Message Bundle To support the internationalization of all text labels, messages, and exceptions, the DBMS sample adapter uses a message bundle based on a text property file. The property file includes both name-value pairs copied from the BEA_WLS_SAMPLE_ADK property file, and new entries, added for properties specific to the DBMS sample adapter. The message bundle for the DBMS sample adapter resides in the WLI_HOME/adapters/dbms/src directory, which was installed with the ADK. For details, see the BEA_WLS_DBMS_ADK.properties file in the same directory. For additional instructions on creating a message bundle, see the JavaSoft tutorial on internationalization at: Step 4: Implement the Design-Time GUI To implement the design-time GUI, you need to create a DesignTimeRequestHandler class. This class accepts user input from a form and provides methods to perform a design-time action. For more information about the DesignTimeRequestHandler, see Step 4: Implement the Design-Time GUI. The DBMS sample adapter public class DesignTimeRequestHandler extends AbstractDesignTimeRequestHandler, and it provides the methods shown in the following table.
Step 5: Write Java Server Pages Consider incorporating the following practices into your development process:
Use Custom JSP Tags
Because the Java Server Pages (JSPs) are displayed on the display.jsp page, display.jsp is the first .jsp file that needs to be written. The ADK provides a library of custom JSP tags, which are used extensively throughout the Java server pages of the ADK and DBMS sample adapter. These tags support numerous features, such as the ability to add validation and to save a value entered in a field when the user clicks a button.
Save an Object's State
While writing the JSPs, with the ADK, for your adapter, you may need to save an object's state. You can do so in any of a number of ways. The AbstractDesignTimeRequestHandler maintains an ApplicationViewDescriptor of the application view being edited. This [file?] is often the best place in which to save state; calls to the handler from this file are fast and efficient.
As an alternative, you can request a Manager Bean from the AbstractDesignTimeRequestHandler, using its convenience methods (getApplicationViewManager(), getSchemaManager(), and getNamespaceManager()) to retrieve information from the repository about an application view. This method is more time-consuming but, occasionally, it may be necessary. Because it is a JSP, you can also use the session object, although everything put in the session must explicitly implement the java.io.serializable interface.
Write the WEB-INF/web.xml Deployment Descriptor
Write the WEB-INF/web.xml deployment descriptor. In most cases, you should use the adapter's web.xml file as a starting point and modify components as necessary. To see the web.xml file for this adapter, go to:
WLI_HOME/adapters/dbms/src/war/WEB-INF/web.xml
For detailed information, see the BEA WebLogic Server product documentation at:
http://www.oracle.com/technology/documentation/index.html

|

|

|