bea.com | products | dev2dev | support | askBEA
 Download Docs   Site Map   Glossary 
Search

File Plug-In

 Previous Next Contents Index View as PDF  

An Example of Using the File Plug-In

This section provides an example of how to use the File Plug-In to transfer a file to a remote server via FTP. The first part of the example tells you how to set up a workflow in the WebLogic Integration Studio to FTP a file when the workflow is executed. The second part of the example tells you how to use the JSP Worklist to start the workflow, resulting in the transfer of a text file.

Note: This example uses the WebLogic Integration Samples Domain. For more information, see "Configuring and Starting the Samples Domain" in Starting, Stopping, and Customizing BEA WebLogic Integration.


Setting Up the Workflow

To set up a workflow in Studio to FTP a file, complete the following steps:

Note: For more information about using WebLogic Integration Studio, see Learning to Use BEA WebLogic Integration at http://download.oracle.com/docs/cd/E13214_01/wli/docs70/bpmtutor/index.htm.

  1. Start the WebLogic Integration server.

  2. After the server is running, open the WebLogic Integration Studio:

  3. Log on to the WebLogic Integration Studio with the following parameters: (See Figure  2-1.)

  4. After WebLogic Integration Studio opens, select CDExpress from the Organization drop-down list.

  5. Right-click the Templates node and select Create Template. The Template Properties window opens, as shown in Figure  2-2.

    Figure 2-2 Template Properties Window


  6. On the General tab, in the Name field, enter "FTP Example" and then click OK.

  7. In the Organization tree, right-click the FTP Example Template node, and then select Create Template Definition.

  8. In the Template Definition FTP Example window, click OK.The Workflow Design window opens in the right pane, as shown in Figure  2-3.

    Figure 2-3 Workflow Design - FTP Example


  9. Right-click Task 1 and select Properties. The Task Properties window opens, as shown in Figure  2-4.

    Figure 2-4 Task Properties Window


  10. Make sure the Activated tab is selected. (This is the run-time state.)

  11. Click Add. The Add Action window opens, as shown in Figure  2-5.

    Figure 2-5 Add Action Window


  12. Open the FilePlugin Actions folder, select Read a File Content to a Variable, and then click OK. The Read a File window opens, as shown in Figure  2-6.

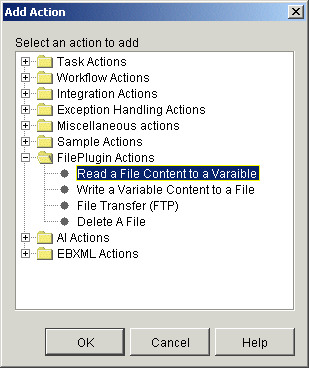
    Figure 2-6 Read a File Window


  13. Set the Read a File actions as follows:

    Note: Use two backslashes for Window systems.

  14. In the Task Properties window, select the Executed tab, and then click Add. The Add Action dialog box opens.

  15. Open the FilePlugin Actions folder, select the File Transfer (FTP) node, and then click OK. The File Transfer window opens, as shown in Figure  2-7.

    Figure 2-7 File Transfer Window


  16. Set the File Transfer actions as follows:

  17. In the Task Properties window, select File Transfer (FTP), click the Up arrow, and then click OK. See Figure  2-8.

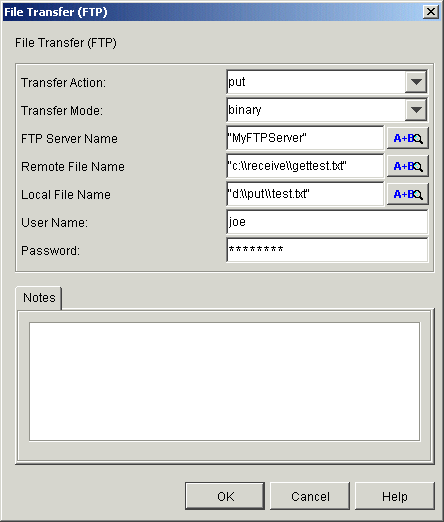
    Figure 2-8 Task Properties - Move File Transfer Task


  18. In the Organization tree, right-click the Variables Node, and then select Create Variable. The Variable Properties window opens, as shown in Figure  2-9.

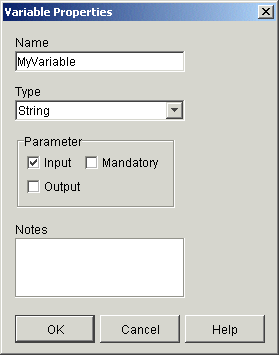
    Figure 2-9 Variable Properties


  19. Set the variable properties as follows:

  20. Right-click the Template Definition Folder and select Properties.

  21. Select the Active check box and click OK.

  22. Right-click the Template folder and select Save.

    Note: An asterisk by the folder indicates that the changes have not been saved.

  23. In your file system, create a text file corresponding to the Local File Name you created in the File Transfer window.


Activating the Workflow

In this part of the example, the JSP Worklist executes the workflow, resulting in the transfer of the text file to the remote file system.

For more information about the JSP Worklist, see Using the WebLogic Integration JSP Worklist.

  1. To start the JSP Worklist, do one of the following:

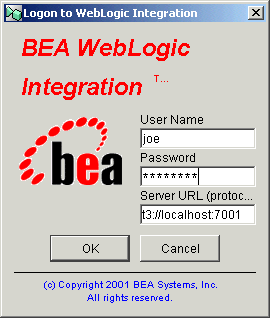
The Login page displays, as shown in Figure  2-10.

Figure 2-10 Login to WebLogic Integration JSP Worklist


  1. Enter joe in the User Name field.

  2. Enter password in the Password field.

  3. Click the OK button. The JSP Worklist displays, as shown in Figure  2-10.

    Figure 2-11 JSP Worklist Main Page


  4. Select CDExpress from the Organization drop-list.

  5. Click Start Workflow. The Start Workflow page opens, as shown in Figure  2-12.

    Figure 2-12 Start Workflow Page


  6. In Select Workflow to Start list, select FTP Example, and then click OK. The Worklist opens showing the task, as shown in Figure  2-13.

    Figure 2-13 Worklist with New Task


  7. Click Execute. The file is transferred to its target directory and the task disappears from the worklist.

  8. Check your target directory to see the transferred file.


Back to Top Previous Next