| Download Docs | Site Map | Glossary | |
|
|
|||
| bea.com | products | dev2dev | support | askBEA |
|
|
|
||||||||
| e-docs > WebLogic Platform > WebLogic Integration > Migration Guide > Migrating WebLogic Integration 2.1 to WebLogic Integration 7.0 |
|
Migration Guide
|
Migrating WebLogic Integration 2.1 to WebLogic Integration 7.0
This section provides the procedure for migrating from BEA WebLogic Integration 2.1 or BEA WebLogic Integration 2.1 Service Pack 1 (SP1) to BEA WebLogic Integration 7.0.
It includes the following steps:
Step 1. Retrieve Your WebLogic Integration 2.1 Database Connection Information
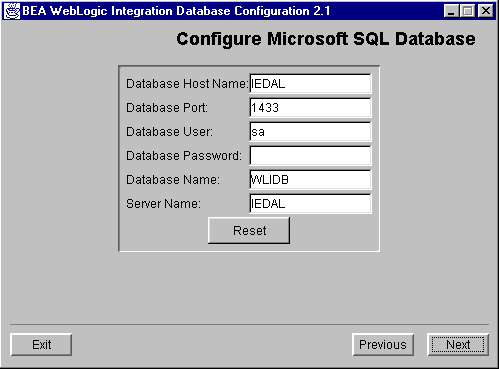
Later in this procedure (Step 5. Create a New Domain and Configure Database Information) you need to use information about the database configuration of your WebLogic Integration 2.1 or WebLogic Integration 2.1 SP1 installation. Retrieve that information now and note it for later.
To retrieve this information, complete the following procedure:
Step 2. Stop Your WebLogic Integration 2.1 Application
Before you migrate to WebLogic Integration 7.0, stop your WebLogic Integration 2.1 or WebLogic Integration 2.1 SP1 application. Make sure that:
Step 3. Back Up Your Application
Before you attempt to migrate to WebLogic Integration 7.0, we strongly recommend that you back up the following:
We also recommend that you export all your WebLogic Integration repository information and workflows:
Step 4. Install WebLogic Integration 7.0
Install WebLogic Integration 7.0 in one of two modes:
For instructions, see Installing BEA WebLogic Platform in the BEA WebLogic Platform document set, available at the following URL:
http://download.oracle.com/docs/cd/E13196_01/platform/docs70/install/index.html
Warning: Do not create a new WebLogic Integration repository or database after the installation is complete. Do not run the RunSamples script.
Step 5. Create a New Domain and Configure Database Information
The directory structure for WebLogic Server domains was changed between Releases 6.x and 7.0. This change affects many scripts and settings of environment variables. For example, changes in the directory structure affect the settings of the classpath and path environment variables and the script that starts WebLogic Integration (startWebLogic). For this reason, this procedure provides steps for creating a new WebLogic Integration 7.0 domain and then moving your WebLogic Integration application-specific components to it, as described in Step 7. Migrate Components of Your WebLogic Integration Application.
The following procedure allows you to create a new domain for a single-server (standalone) configuration. For instructions on creating a multiple-server configuration, see "Step 2. Create a WebLogic Integration Domain" in Configuring a Clustered Deployment in Deploying BEA WebLogic Integration Solutions.
To create and customize a new domain for a single server:
Choose Start
cd c:\bea\weblogic700\integration
setenv.cmd
cd c:\bea\weblogic700\common\bin
dmwiz
cd c:\bea\weblogic700\integration
setenv.cmd
cd c:\bea\weblogic700\common\bin
dmwiz console
cd /home/joe/bea/weblogic700/integration
. setenv.sh
cd /home/joe/bea/weblogic700/common/bin
dmwiz.sh
cd /home/joe/bea/weblogic700/integration
. setenv.sh
cd /home/joe/bea/weblogic700/common/bin
dmwiz.sh console
The Choose Domain Type and Name window is displayed.
For more information, see Using the Configuration Wizard in the BEA WebLogic Platform document set, available at the following URL:
http://download.oracle.com/docs/cd/E13196_01/platform/docs70/confgwiz/index.html
For more information about these templates, see "WebLogic Integration Configuration Templates" in Getting Started in Starting, Stopping, and Customizing BEA WebLogic Integration and Configuration Wizard Template Reference in the BEA WebLogic Platform document set, available at the following URL:
http://download.oracle.com/docs/cd/E13196_01/platform/docs70/template/index.html
Warning: Make sure you select a WebLogic Integration template for creating the new domain; do not use a WebLogic Server or a WebLogic Portal template. Specifying a WebLogic Integration template ensures that the domain created in this step is based on the WebLogic Server 6.x security realm in compatibility mode. The new WebLogic Server 7.0 realm, based on LDAP, is not supported with this release of WebLogic Integration. If you create a new domain by selecting a WebLogic Server template, the new domain uses the new WebLogic Server 7.0 security realm, which is based on LDAP.
Note: It is recommended that you choose the same domain type used with your WebLogic Integration 2.1 application. For example, if you used the preconfigured EAI Domain for your WebLogic Integration 2.1 application, choose the EAI Domain template in this step.
Figure 2-1 Choose Configuration Option
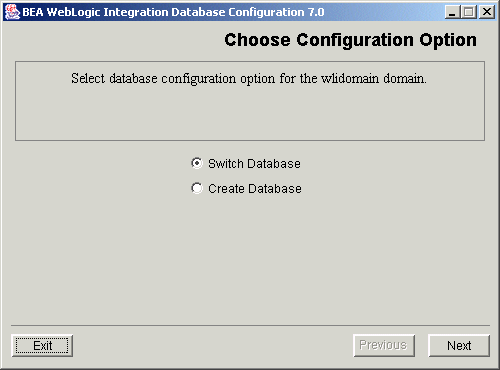
For information about running the Database Wizard, see "Using the Database Wizard" in Customizing WebLogic Integration in Starting, Stopping, and Customizing BEA WebLogic Integration.
Warning: Do not start the instance of WebLogic Server for this domain and do not create the database.
WebLogic Integration System Identities
In WebLogic Integration 2.1 and WebLogic Integration 2.1 SP1, two system user identities are used: wlpisystem and wlcsystem. In WebLogic Integration 7.0, these two system user identities are replaced by a single system user identity: wlisystem. When you create a new domain in WebLogic Integration (as described in "Customizing WebLogic Integration" in Creating a New Domain in Starting, Stopping, and Customizing BEA WebLogic Integration), wlisystem is the only the system user identity that is created.
Step 6. Migrate Your Database
This section provides a procedure for converting the database schema for either WebLogic Integration 2.1 or WebLogic Integration 2.1 Service Pack 1 (SP1) to the WebLogic Integration 7.0 format. This upgrade procedure is represented by the gray arrows labeled Migrate database in Figure 2-2.
Figure 2-2 WebLogic Integration 7.0 Database Migration
Caution: This migration procedure updates a single repository. The migration of repository data from an existing database instance to a new instance is not supported. To update the existing repository data to the WebLogic Integration 7.0 format, complete the following procedure: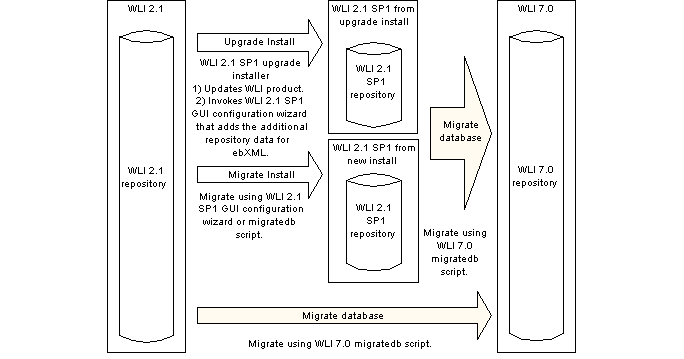
Listing 2-1 SystemRepData.xml
<?xml version="1.0"?>
<!DOCTYPE wlc SYSTEM "WLC.dtd">
<wlc
	system-password="wlisystem"
	ignore-wlc="true"
>
switchdb oracle
migratedb
Step 7. Migrate Components of Your WebLogic Integration Application
In Step 5. Create a New Domain and Configure Database Information, you created a new WebLogic Integration domain. In this step, you migrate your WebLogic Server application-specific components from your WebLogic Integration 2.1 or WebLogic Integration 2.1 SP1 application to the new domain.
Note: As used here, the term WebLogic Integration application refers to an application that you have developed, based on WebLogic Integration. It should not be confused with the WebLogic Application application element in the config.xml file.
Examples of WebLogic Server application-specific components include the following:
Warning: Migrate only those application-specific components that you developed for your application; do not migrate the components used by WebLogic Integration itself. For example, you should not migrate the JMS queues used by WebLogic Integration, but you do need to migrate the custom JMS queues that you developed for your WebLogic Integration 2.1 or WebLogic Integration 2.1 SP1 application. The JMS queues used by WebLogic Integration are automatically included in the config.xml file that is generated when you create the new domain in Step 5. Create a New Domain and Configure Database Information.
Warning: Do not copy files (for example, config.xml) from your WebLogic Integration 2.1 or WebLogic Integration 2.1 SP1 domain directory to your WebLogic Integration 7.0 domain directory. Due to changes in the directory structure of WebLogic Server 7.0 domains, WebLogic Server 6.x files are not compatible with WebLogic Server 7.0.
For instructions on migrating these WebLogic Server components and more information about migrating from WebLogic Server 6.x to WebLogic Server 7.0, see "Upgrading WebLogic Server 6.x to Version 7.0" in BEA WebLogic Server Upgrade Guide. This document is available, in the BEA WebLogic Server documentation set, at the following URL:
http://download.oracle.com/docs/cd/E13222_01/wls/docs70/upgrade/index.html
Note: As used in this document, the terms upgrade and migrate are synonymous. The term migrate refers to the process of changing your software from an older release to a newer one. Do not confuse this upgrade process with that of moving clusterable services from one WebLogic Server to another.
Because WebLogic Integration 7.0 is built on top of WebLogic Server 7.0, the changes to your application that are required for migrating from WebLogic Server 6.x to WebLogic Server 7.0 also affect any migration to WebLogic Integration 7.0.
Warning: WebLogic Server 7.0 supports a new security realm based on LDAP. WebLogic Integration 7.0, however, does not support the new security realm based on the LDAP. WebLogic Integration 7.0 supports the Compatibility realm which, in turn, supports both the File and RDBMS realms.
Application Integration
If your application invokes the application integration functionality provided by WebLogic Integration, you must configure your application integration adapter EAR file(s). For instructions, see Configuring Application Integration Adapter EAR Files.
Application-Specific JAR Files
If you create application-specific JAR files for your WebLogic Integration 2.1 or WebLogic Integration 2.1 SP1 application, you must copy those JAR files into the WLI_HOME/lib directory (where WLI_HOME represents the location of the WebLogic Integration 7.0 home directory).
Warning: Do not copy application integration JAR files from your WebLogic Integration 2.1 or 2.1 SP1 application to your WebLogic Integration 7.0 application. For more information, see Application Integration CLASSPATH and Adapter Packaging Changes.
Also, you must add an entry for your application-specific JAR to the config.xml and application.xml files for the WebLogic Integration 7.0 domain created in Step 5. Create a New Domain and Configure Database Information.
The WebLogic Integration J2EE components are now deployed using the exploded form. To deploy J2EE components in the exploded form, you must use a new syntax when you specify a JAR file in the config.xml file. Do not cut and paste the application-specific JAR entries directly from your WebLogic Integration 2.1 or WebLogic Integration 2.1 config.xml file to your WebLogic Integration 7.0 config.xml file. Instead, follow the instructions in "Adding an EJB to the WLI Application Element" in Customizing WebLogic Integration in Starting, Stopping, and Customizing BEA WebLogic Integration.
startWebLogic Script
If custom changes have been made to the startWebLogic script that you run with your WebLogic Integration 2.1 or WebLogic Integration 2.1 SP1 application, you must make the same changes to the startWebLogic script for the WebLogic Integration 7.0 domain created in Step 5. Create a New Domain and Configure Database Information. For example, if you add an application-specific JAR file, containing business operations, to the CLASSPATH of the startWebLogic script, you must also add the same JAR file to the CLASSPATH of the WebLogic Integration 7.0 startWebLogic script (startWebLogic.cmd for Windows systems and startWebLogic.sh for UNIX systems).
For more information, see "Adding Java Classes to the CLASSPATH" in Customizing WebLogic Integration in Starting, Stopping, and Customizing BEA WebLogic Integration.
setenv Script
If the setenv script for your WebLogic Integration 2.1 or WebLogic Integration 2.1 SP1 application is customized, you must customize, in the same way, the setenv script for the WebLogic Integration 7.0 domain created in Step 5. Create a New Domain and Configure Database Information. For example, if you add an application-specific JAR file containing business operations to the CLASSPATH of the setenv script, you must add the same JAR file to the CLASSPATH of the WebLogic Integration 7.0 setenv script. The name of this script is setenv.cmd on Windows systems and setenv.sh on UNIX systems.
For more information, see "Adding Java Classes to the CLASSPATH" in Customizing WebLogic Integration in Starting, Stopping, and Customizing BEA WebLogic Integration.
Application Integration CLASSPATH and Adapter Packaging Changes
In WebLogic Integration 2.1 or WebLogic Integration 2.1 SP1 applications, you must include adapter Java classes in the system CLASSPATH for your instance of WebLogic Server. In WebLogic Integration 7.0 applications, however, adapter Java classes must be packaged in a single, self-contained application enterprise archive (EAR) file. Do not move any adapter Java classes or JAR files to your WebLogic Integration 7.0 installation, and do not add the adapter classes to the WebLogic Integration CLASSPATH. For instructions on configuring adapter EAR files, see Configuring Application Integration Adapter EAR Files.
B2B Transport Servlet
If your WebLogic Integration 7.0 application uses the business-to-business integration (B2B) functionality provided by WebLogic Integration, you must add an entry for the TransportServletFilter to the deployment descriptor for the default Web application. If, when you created a domain (see Step 5. Create a New Domain and Configure Database Information), you used a template that included B2B functionality, then your domain already has an entry for the TransportServletFilter.
For example, if you created a domain with the WLI domain template, an entry for TransportServletFilter is added to the DOMAIN_HOME\applications\DefaultWebApp_myserver\WEB-INF\web.xml file, where DOMAIN_HOME represents the pathname of the domain you created, as shown in the following listing.
Listing 2-2 Entry for TransportServerFilter in web.xml
<!-- WLI-B2Bi filter-begin.  DO NOT EDIT -->
<filter>
	<filter-name>TransportServletFilter</filter-name>
	<filter-class>com.bea.b2b.transport.http.TransportServletFilter</filter-class>
</filter>
<filter-mapping>
	<filter-name>TransportServletFilter</filter-name>
	<url-pattern>/*</url-pattern>
</filter-mapping>
<!-- WLI-B2Bi filter-end. -->
Step 8. Migrate Your Security Realm Data
If you add any data, such as entries for your own users or groups, to your WebLogic Integration 2.1 or 2.1 SP1 security realm, you must also add the same data to the new domain created in Step 5. Create a New Domain and Configure Database Information.
Warning: Do not copy the fileRealm.properties and SerializedSystemIni.dat file from your WebLogic Integration 2.1 or WebLogic Integration 2.1 SP1 domain directory to your new WebLogic Integration 7.0 domain because the default system user identities and groups have changed. For more information, see WebLogic Integration System Identities.
Migrating from the RDBMS Realm
If you migrate from a WebLogic Integration 2.1 or WebLogic Integration 2.1 SP1 application in which the RDBMSRealm is used, you must change the realm specified, for the domain, in the config.xml file (created in Step 5. Create a New Domain and Configure Database Information) from FileRealm to RDBMSRealm. Specifically, you must replace the Realm element in the config.xml file (shown in Listing 2-3) with the RDBMSRealm, CachingRealm, and Realm elements from your existing WebLogic Integration 2.1 or WebLogic Integration 2.1 SP1 config.xml file.
If you have not booted your instance of WebLogic Server, the generated config.xml file will contain the RDBMSRealm elements in a comment section of the file. You can remove the comment delimiters for this section, if you want to add the RDBMSRealm elements to your config.xml file. The default database, PointBase is already configured. You must update the database configuration information from your existing WebLogic Integration 2.1 or WebLogic Integration 2.1 SP1config.xml file.
Listing 2-3 Realm Element to Be Replaced
<Realm CachingRealm="" FileRealm="myFileRealm" Name="myRealm"/>
Database attributes for your application should be configured already in your existing WebLogic Integration 2.1 or WebLogic Integration 2.1 SP1config.xml file. Listing 2-4 shows an example listing for an Oracle database.
Listing 2-4 RDBMS Elements to Be Added
<RDBMSRealm DatabaseDriver="oracle.jdbc.driver.OracleDriver" DatabaseURL="jdbc:oracle:thin:@(description=(address=(host=
MY_ORACLE_SERVER)(protocol=tcp)(port=1521))(connect_data=
(sid=MY_ORACLE_SID)))" DatabaseUserName="scott"
DatabasePassword="tiger" Name="wlpiRDBMSRealm"
RealmClassName="com.bea.wlpi.rdbmsrealm.RDBMSRealm"
SchemaProperties="getGroupNewStatement=true;
removeUserFromGroup=DELETE FROM USERMEMBER WHERE USERID
= ? AND GROUPID = ?;getAcls=SELECT NAME, PRINCIPAL,
PERMISSION FROM ACLENTRIES ORDER BY NAME, PRINCIPAL;addUserToGroup=INSERT INTO USERMEMBER
(USERID, GROUPID) VALUES ( ?, ? );getGroupMembersUsers
=SELECT USERMEMBER.USERID, PASSWORD FROM USERMEMBER,
WLSUSER WHERE GROUPID = ? AND USERMEMBER.USERID = WLSUSER.USERID;newGroup=INSERT INTO WLSGROUP (GROUPID)
VALUES ( ? );addGroupToGroup=INSERT INTO GROUPMEMBER (GROUPMEMBERID, GROUPID) VALUES ( ?, ? );newUser=INSERT
INTO WLSUSER (USERID, PASSWORD) VALUES ( ? , ? );removeGroupFromGroup=DELETE FROM GROUPMEMBER WHERE
GROUPMEMBERID = ? AND GROUPID = ?;deleteGroup4=DELETE FROM
WLSGROUP WHERE GROUPID = ?;deleteUser3=DELETE FROM WLSUSER
WHERE USERID = ?;deleteGroup3=DELETE FROM USERMEMBER WHERE
GROUPID = ?;getPermissions=SELECT DISTINCT PERMISSION
FROM ACLENTRIES;deleteUser2=DELETE FROM USERMEMBER WHERE
USERID = ?;getPermission=SELECT DISTINCT PERMISSION FROM
ACLENTRIES WHERE PERMISSION = ?;getUser=SELECT USERID,
PASSWORD FROM WLSUSER WHERE USERID = ?;deleteGroup2=DELETE
FROM ACLENTRIES WHERE PRINCIPAL = ?;deleteGroup1=DELETE FROM GROUPMEMBER WHERE GROUPID = ?;deleteUser1=DELETE FROM
ACLENTRIES WHERE PRINCIPAL = ?;getAclEntries=SELECT
NAME, PRINCIPAL, PERMISSION FROM ACLENTRIES WHERE NAME = ?
ORDER BY PRINCIPAL;getGroupMembersGroups=SELECT GROUPMEMBERID, GROUPID FROM GROUPMEMBER WHERE GROUPID = ?;getGroups=
SELECT GROUPID FROM WLSGROUP ORDER BY GROUPID;
getGroup=SELECT GROUPID FROM WLSGROUP WHERE GROUPID
= ?;getUsers=SELECT USERID, PASSWORD FROM WLSUSER
ORDER BY USERID"/>

<CachingRealm BasicRealm="wlpiRDBMSRealm"
CacheCaseSensitive="true" Name="wlpiCachingRealm"/>

<Realm CachingRealm="wlpiCachingRealm" FileRealm=
"myFileRealm" Name="myRealm"/>
Note: The RDBMSRealm element in Listing 2-4 must be one continuous line in your config.xml file. In Listing 2-4 the element is divided into many lines for readability.
Migration from the RDBMSRealm is supported only for the Microsoft SQL Server and Oracle databases.
Note: A new security model for trusted relationships is used in WebLogic Server 7.0. For more information, see Trusted Relationships.
Step 9. Migrate to the Keystore for Security
In WebLogic Integration 2.1 and WebLogic Integration 2.1 SP1 applications, private keys and the certificates associated with them are stored on the file system. WebLogic Platform 7.0 provides a keystore in which those keys and certificates can be stored. If your WebLogic Integration application is configured to communicate using the SSL protocol, or if it contains trading partners with delivery channel(s) that are configured to use the SSL protocol, message encyption, or digital signatures, we recommend that you convert your application to use the new keystore.
Use of the SSL protocol for communication between trading partners is supported for all WebLogic Integration B2B collaboration protocols (ebXML, XOCP, and RosettaNet). Message encryption and digital signatures, however, are supported only for RosettaNet 2.0.
Note: For WebLogic Integration 7.0, the only supported keystore provider is Java Keystore (JKS) from Sun Microsystems.
For more information about using a keystore with WebLogic Integration, see Configuring the Keystore in Implementing Security with B2B Integration.
Convert your WebLogic Integration application to use the new keystore by importing all existing certificates and private keys from the file system into the keystore. To perform this conversion, complete the following steps:
cd DOMAIN_HOME
%JAVA_HOME%\bin\java ... weblogic.Server
%JAVA_HOME%\bin\java ... -Dwli.keystore.automigrate=true
weblogic.Server
On a Windows platform, enter the string shown in bold in the following listing:
%JAVA_HOME%\bin\java ... -Dwli.keystore.automigrate=true
-Dwli.keystore.password=%KEYSTORE_PASS% weblogic.Server
On a UNIX platform, enter the string shown in bold in the following listing:
$JAVA_HOME/bin/java ... -Dwli.keystore.automigrate=true
-Dwli.keystore.password=$KEYSTORE_PASS weblogic.Server
In both listings, KEYSTORE_PASS represents the environment variable that contains the password of the keystore. We strongly recommend that you specify a password using an environment variable, as shown in the listings in this step, rather than including the passwords in the scripts. Passwords should not be stored in clear text in files.
The password specified in the KEYSTORE_PASS environment variable must match the password for the keystore that you specify in step 8.
On a Windows platform, enter the string shown in bold in the following listing:
%JAVA_HOME%\bin\java ... -Dwli.keystore.automigrate=true
-Dwli.keystore.password=%KEYSTORE_PASS%
-Dwli.cakeystore.password=%CAKEYSTORE_PASS% weblogic.Server
On a UNIX platform, enter the string shown in bold in the following listing:
$JAVA_HOME/bin/java ... -Dwli.keystore.automigrate=true
-Dwli.keystore.password=$KEYSTORE_PASS
-Dwli.cakeystore.password=$CAKEYSTORE_PASS weblogic.Server
In both listings, CAKEYSTORE_PASS represents the environment variable that contains the password of the root Certificate Authority (CA) keystore.
The password specified in the CAKEYSTORE_PASS environment variable must match the password for the root Certificate Authority (CA) that you specify in step 8.
Windows:
-D Key.certificateName.password=%KEY_PASS1%
UNIX:
-D Key.certificateName.password=$KEY_PASS1
In both property settings, certificateName represents the Certificate Name and KEY_PASS1 represents the environment variable that contains the password for the private key of the certificate. The settings for these properties should match the settings for these certificates in your WebLogic Integration 2.1 or WebLogic Integration 2.1 SP1 application.
Add this system property for all the security certificates used by your application. For example, if you specify two certificates, cert1 and cert2, with the environment variables passcert1 and passcert2, respectively (to define the private key passwords), the java command line in the startWebLogic.cmd script (for Windows) appears as shown in the following listing:
%JAVA_HOME%\bin\java ... -Dwli.keystore.automigrate=true
-Dwli.keystore.password=$KEYSTORE_PASS
-DKey.cert1.password=%passcert1%
-DKey.cert2.password=%passcert2% weblogic.Server
<Application Deployed="false" Name="WebLogic Integration"
Path="c:/bea/weblogic700/integration/lib>" TwoPhase="true">
Choose Start
startWeblogic.cmd
startWebLogic
http://host:port/console
<Application Deployed="true" Name="WebLogic Integration"
Path="c:/bea/weblogic700/integration/lib>" TwoPhase="true">
Choose Start
startWeblogic.cmd
startWebLogic
When the instance of WebLogic Server boots, the B2B engine retrieves, from the repository, the locations of the certificates and the private keys associated with them. It then populates the keystore with those certificates and keys.
Listing 2-5 Example startWebLogic.cmd Java Command for Windows
%JAVA_HOME%\bin\java ... -Dwli.keystore.password=%KEYSTORE_PASS%
-Dwli.cakeystore.password=%CAKEYSTORE_PASS% -DKey.cert1.password=%passcert1%
-DKey.cert2.password=%passcert2% weblogic.Server
Caution: This procedure should be done only once, to initially populate the keystore.
This procedure does not include steps for migrating the server certificate and the private key associated with it. For instructions on adding this server certificate and associated key to the keystore, see "Adding the Server Certificate Required by SSL" in Configuring the Keystore in Implementing Security with B2B Integration.
Step 10. Migrate Your RosettaNet Workflows
If your WebLogic Integration application includes workflows that implement the RosettaNet protocol, you must make changes to those workflows before running your application with WebLogic Integration 7.0.
Note: If your WebLogic Integration application uses RosettaNet workflows, see RosettaNet Schema Changes.
To make your RosettaNet workflows compatible with WebLogic Integration 7.0, complete the following procedure:
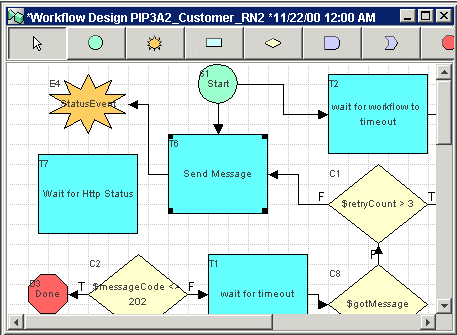
Detailed instructions for adding these nodes are provided in steps 6-a to 6-v. The following figure shows how your workflow is changed when you substitute these nodes for all instances of a task node with a Send Business Message action.
Figure 2-3 Differences Between RosettaNet Workflows for WebLogic Integration 2.1 and WebLogic Integration 7.0
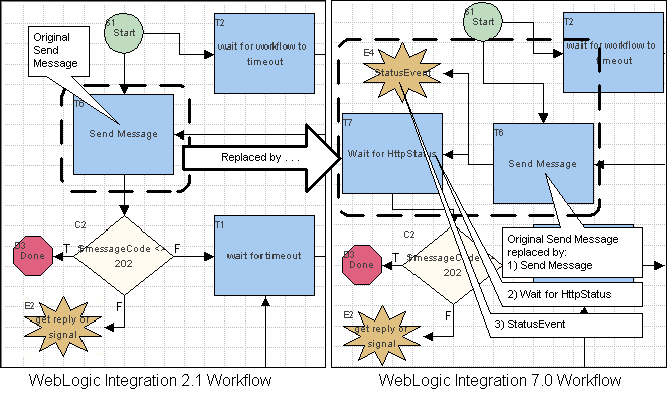
In RosettaNet workflows for WebLogic Integration 2.1 or WebLogic Integration 2.1 SP1, the Send Business Message task sends the message, receives the HTTP status code, and then proceeds to the next node. In RosettaNet workflows for WebLogic Integration 7.0, however, the Send Business Message task sends the message, and an event node (RosettaNet Status Event) waits for the HTTP status. When it receives the status, the event node marks another task node (Wait for HTTP Status) as done, and the workflow proceeds from the Wait for HTTP Status task node.
In RosettaNet workflows for WebLogic Integration 2.1 or WebLogic Integration 2.1 SP1, the Send Business Message task is synchronous: it waits for an HTTP status reply before proceeding to the next node in the workflow. In RosettaNet workflows for WebLogic Integration 7.0, the Send Business Message task is asynchronous: it does not wait for the HTTP status reply before proceeding to the next node in the workflow.
Note: The PIP3A2_Customer workflow shown in Figure 2-3 is taken from the B2B RosettaNet Security sample. The B2B RosettaNet Security sample has been converted to run on WebLogic Integration 7.0. The workflows for it are located in the following file:
SAMPLES_HOME/integration/samples/RN2Security/workflow/RN2Workflows.jar
In this pathname, SAMPLES_HOME represents the WebLogic Platform samples directory. The workflows available there provide examples of the Send Message changes described in this section. If you have not altered the original PIP3A2 workflows supplied with earlier releases of WebLogic Integration, you can replace the PIP3A2 workflows in your application with the new workflows supplied with the B2B RosettaNet Security sample.
Figure 2-4 Create an Event Node
Figure 2-5 New Task Node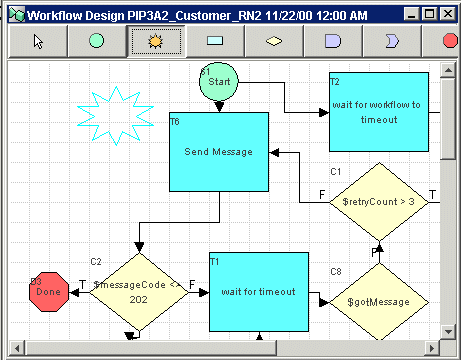
Figure 2-6 Task Properties Window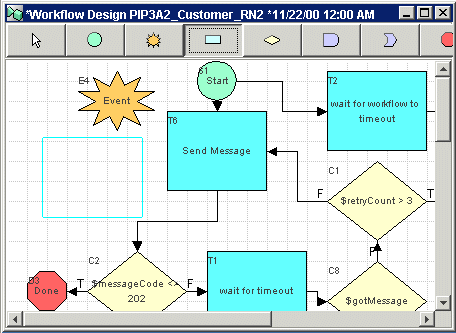
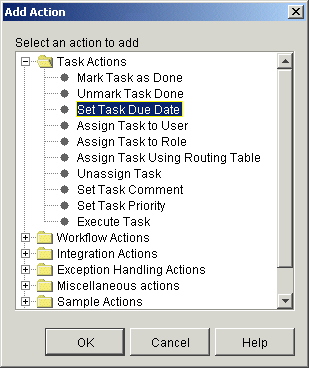
Figure 2-7 Add Action Window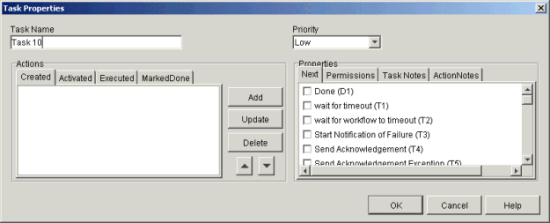
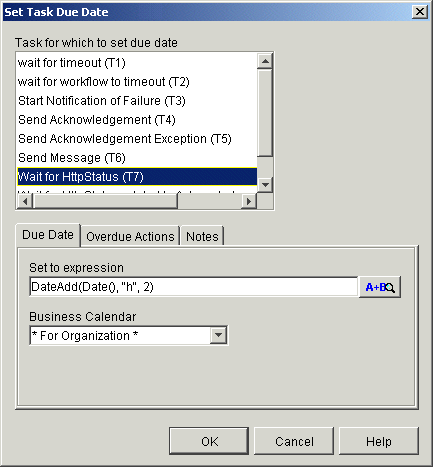
In the Set to expression field, enter a formula that expresses the amount of time you want to designate as the timeout interval for receiving the reply. For example, to set the timeout to two hours, enter the expression shown in Figure 2-8.
Notice the second argument in the DateAdd() method "h": it specifies the unit of time (hours). The third argument specifies the amount of time. Thus, in the example shown in Figure 2-8, the timeout interval specified is two hours.
Figure 2-9 Event Properties Window with RosettaNet Status Event
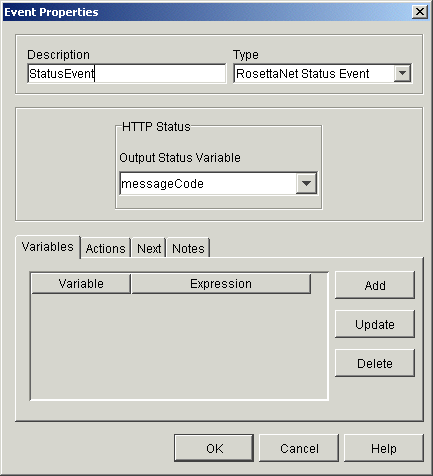
The Send Business Message sends a message. The RosettaNet Status Event waits until it receives the HTTP status reply, and then it stores that HTTP Status in the HTTP Status Output Status Variable. In the PIP3A2_Customer_RN2 example shown in Figure 2-5, the HTTP status reply is stored in the messageCode variable by the StatusEvent. Then the decision node tests the variable messageCode to determine whether the HTTP status is equal to 202. An HTTP status of 202 means the request has been accepted for processing, but the processing is not complete.
In the toolbar, click Draw Connection. Move the cursor into the middle of the existing Send Message task.
Click the Send Message task, drag to the event created in the step 6-b, and release the mouse button. (If you are continuing to work with the example introduced in step 6-e, the name of the event is StatusEvent.)
An arrow (pointing from the task that sends the business message to the new event) is added to the workflow design, as shown in the following figure.
Figure 2-10 Linking the Task that Sends the Business Message to the Status Event
In the toolbar, click Draw Connection. Move the cursor into the middle of the existing Send Message task.
Click the Send Message task, drag to the task created in the step 6-c, and release the mouse button. (If you are continuing to work with the example introduced in step 6-e, the name of the task is Wait for Http Status.)
An arrow (pointing from the Send Message task to the new task) is added to the workflow design, as shown in the following figure.
Figure 2-11 Linking the Event Node to the New Task Node
In the toolbar, click Draw Connection. Move the cursor into the middle of the new task node.
Click the new task node, drag to the decision node, and release the mouse button. (In this example, the decision node is labeled $messageCode <> 202. )
An arrow, pointing from the new task to the exiting decision node, is added to the workflow design, as shown in the following figure.
Figure 2-12 Linking the New Task with the Existing Decision Node
You have now finished converting an instance of the Send Business Message task in a RosettaNet workflow to be compatible with WebLogic Integration 7.0.
Note: For more detailed instructions on exporting workflows, see Importing and Exporting Workflow Packages in Using the WebLogic Integration Studio.
You have now finished converting your RosettaNet workflows.
Step 11. Deploy Your Application Views
If your application uses the application integration feature of WebLogic Integration, you must deploy your application views by following the auto-deploy procedure or by using the WebLogic Integration Application View Console. If your application does not use application integration, however, you can skip this step.
The procedure presented in this section is based on the assumption that the application views for your application are stored in the database that was converted to WebLogic Integration 7.0 in Step 6. Migrate Your Database. The procedures does not create new application views; it simply verifies that your application view settings are correct for the new environment and then deploys existing application views.
Warning: Before deploying your application views, you must configure your application integration adapter EAR file for you new domain (which you created in Step 5. Create a New Domain and Configure Database Information). For instructions, see Configuring Application Integration Adapter EAR Files.
To deploy your application view, complete one of the following procedures:
Deploy Using the Application View Console
To deploy your application views using the Application View Console:
Choose Start
cd DOMAIN_HOME
startWeblogic.cmd
cd DOMAIN_HOME
startWebLogic
In the cd command line, DOMAIN_HOME is the pathname of the new domain that you created in Step 5. Create a New Domain and Configure Database Information.
http://host:port/wlai
Note: For more detailed instructions, see "Step 1: Log On to the Application View Console" in Defining an Application View
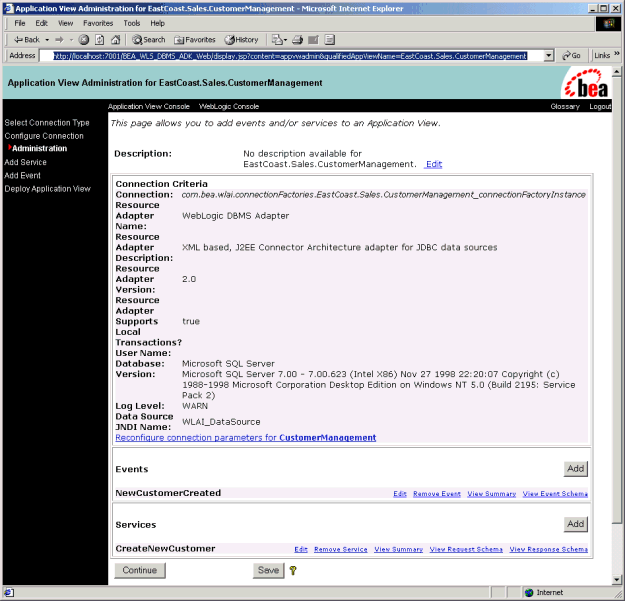
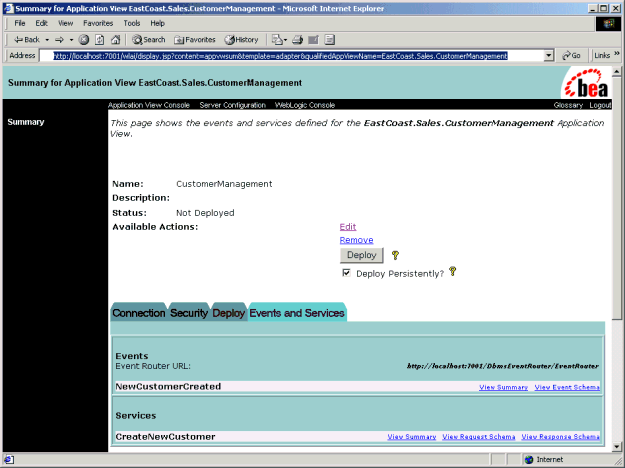
in Using Application Integration.The Summary page for the selected application view is displayed. The following figure shows the Summary page for the EastCoast.Sales.CustomerManagement application view, which is based on the example described in Configuring Application Integration Adapter EAR Files.
Figure 2-13 EastCoast.Sales.CustomerManagement Application View
Auto-Deploy Application Views
This procedure automatically deploys application views that where stored in the database that was converted to the WebLogic Integration 7.0 in Step 6. Migrate Your Database.
To deploy your application views:
wlai.appView.deploy=EastCoast.Sales.CustomerManagement, WestCoast.Sales.CustomerManagement
Choose Start
startWeblogic.cmd
When the instance of WebLogic Server is booted, the listed application views will automatically be deployed.
Step 12. Start and Test Your WebLogic Integration Application
Start, run, and test your application using WebLogic Integration 7.0.
If you get an exception similar to the following, when starting the WebLogic Integration 7.0 server, you must regenerate your SerializedSystemIni.dat file.
weblogic.security.internal.FileUtilsException: Couldn't rename
DOMAIN_HOME\SerializedSystemIni.dat to
DOMAIN_HOME\SerializedSystemIni.dat42698.old
In this messages DOMAIN_HOME represents the pathname of the new domain that you created in Step 5. Create a New Domain and Configure Database Information."
For the procedure for generating a new SerializedSystemIni.dat file, see Generating a New SerializedSystemIni.dat File.
Importing WebLogic Integration 2.1 Repository Data Files
In Step 6. Migrate Your Database, the WebLogic Integration 2.1 repository data stored in your database was converted to the WebLogic Integration 7.0 format. This section is required only if you want to import additional repository information stored in repository files for WebLogic Integration 2.1 or WebLogic Integration 2.1 SP1.
As part of the database migration in Step 6. Migrate Your Database, a new system identity, wlisystem, was created with a password of wlisystem. The new identity was stored in both the WebLogic Integration repository and the security realm. The wlisystem system identity replaces the wlcsystem and wlpisystem system identities for WebLogic Integration 2.1 and WebLogic Integration 2.1 SP1.
Before importing a WebLogic Integration 2.1 or WebLogic Integration 2.1 SP1 repository data file into the WebLogic Integration 7.0 repository, you must change the system-password attribute of the LC element in the repository data file to reflect the current password for wlisystem. (In WebLogic Integration 2.1 and WebLogic Integration 2.1 SP1, the value specified by the system-password attribute of the LC element is the password for the wlcsystem system identity.)
Set the system-password attribute of the WLC element in the repository data file to reflect the password of the wlisystem system identity, as shown in the following listing. (The password for the wlisystem system identity is wlisystem, unless you changed the wlisystem password using the B2B Console.)
Listing 2-6 Set system-password
<?xml version="1.0"?>
<!DOCTYPE wlc SYSTEM "WLC.dtd">
<wlc
	large-msg-support-on="OFF"
	large-msg-min-size="0"
	large-msg-location="c:\temp"
	system-password="wlisystem"
	>
The same password must be specified for wlisystem in both the WebLogic Integration repository and the security realm. Failure to keep the two copies synchronized can cause problems when you boot the WebLogic Integration instance for WebLogic Integration. To make sure that the two copies remain synchronized, use the B2B Console whenever you need to change the password. When you make a change, the B2B Console automatically saves the password in both the security realm and the WebLogic Integration repository.
When you import a repository data file, the value of the system-password attribute overrides the password for the wlisystem system identity in the repository; the password for the wlisystem system identity in the security realm is not updated. If you change the wlisystem password using the WebLogic Integration Administration Console, the password for wlisystem is changed only in the security realm.

|

|

|