|
|
To run and test the business process that you have created, complete the following steps:
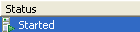
 Show View Other Server Servers, and click OK. A Server view is displayed in which the Server and its state are shown.
BEA_HOME\weblogic92\samples\domains\integration, where BEA_HOME represents the directory in which you installed WebLogic Platform. Click Finish.The samples domain integration server is started, and the RequestQuote application is deployed on it. When WebLogic Server is running, the following indicator is visible in the Servers view:
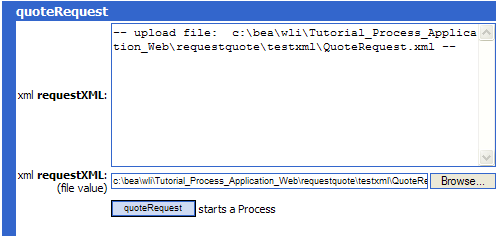
The QuoteRequest.xml file is available at the following location in your file system: Tutorial_Process_Application_WEB\src\testxml\QuoteRequest.xml
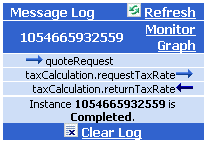
The Test Form page refreshes to display a summary of your request parameters and the responses from the Web service in the Message Log.
Instance instanceID is Completed.
where instanceID represents the ID generated when the quoteRequest method in your business process was called.
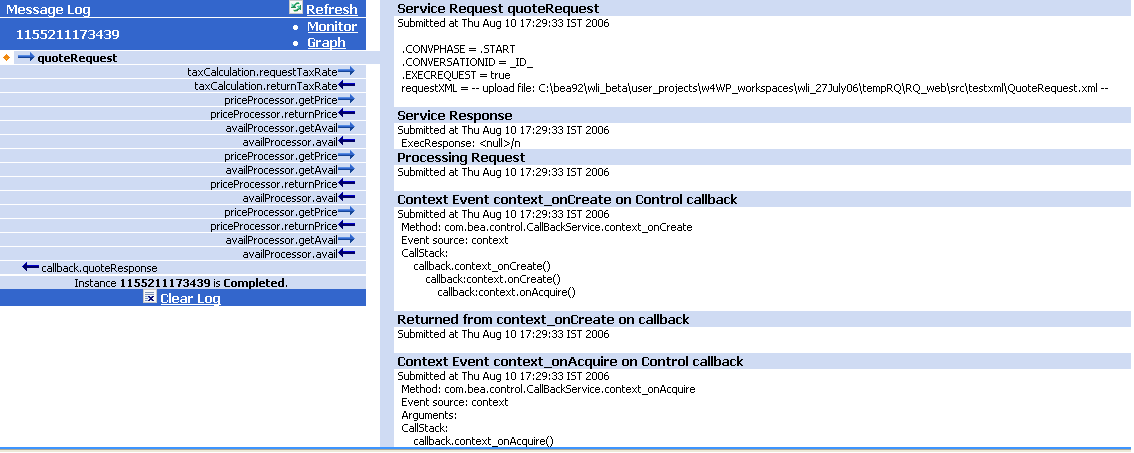
You can click any of the methods in the Message Log to view the details of the call. For example, if you click quoteRequest, the Service Request panel displays the XML message sent by the client (you) when the method was called.
If you click taxCalculation.returnTaxRate, you can view the response from the taxCalculation service—in this case, the tax rate was calculated, based on the input value (NJ) for the state element in the test XML.
In the sample XML message you used, state="NJ". That is, the state to which the order is shipped is NJ. This XML message is designed to cause the flow of execution through the Yes branch on your Sales Tax Calculation Needed? node. The preceding figure shows the rate of sales tax returned for this test XML message.
<returnTaxRate xmlns="http://www.openuri.org/">
<taxRate>0.08</taxRate>
</returnTaxRate>
By following these steps you ran and tested a simple business process, which contains a Start node and a Decision node, and includes an asynchronous call to a Web service, via a control.
Subsequent steps in this tutorial build on the business process you have created so far.
The following additional links are available from the Test Form page in the Test Browser:
http://www.adobe.com/svg/viewer/install/main.html.
http://download.oracle.com/docs/cd/E13214_01/wli/docs92/adminhelp/processmonitoring.html in WebLogic Integration Admin Console Online Help. For detailed information about the operating systems and browsers WebLogic Platform supports, see
WebLogic Platform Supported Configurations at http://download.oracle.com/docs/cd/E13196_01/platform/suppconfigs/index.html.
As previously mentioned, the Process Graph is a graphical representation of your business process and its execution path. The Process Graph highlights the node currently being executed. When the instance of the business process completes, the path of execution followed in your test is highlighted. In this scenario, the Yes path is executed—the No path is gray on the Process Graph to indicate that this path was not taken during the execution of this instance of the business process.
Note: Press Alt and drag the mouse pointer over the Process Graph to move and position it on the Test Browser page. To zoom in, press Ctrl+click; to zoom out, press Ctrl+Shift+click. Alternately, right-click on the Process Graph and select the Zoom In or Zoom Out command from the drop-down menu.
You will review your running business process in the Process Graph in a later step in the tutorial.
Note: Use the back and forward arrows  to navigate between the pages in the BEA Workshop Test Browser.
weblogic and password = weblogic. The BEA Products Administration Console opens to the Process Instance Details page. The WebLogic Integration Administration Console allows you to administer and manage your BEA Products applications. For example, if you click View Statistics on the Process Instances navigation pane, you access a Process Instance Statistics page. This page displays a summary of business process instances grouped by the process type. To view the instances of a process type that ran or are running on your server, click the process name. Processes instances are identified by their instanceID. Note that the instanceID displayed for your RequestQuote business process matches the instanceID displayed on the Message Log pane (see the preceding figures in this topic).
weblogic and password = weblogic. When you use this link to open the Administration Console, it opens on the Process Instance Summary page, which displays a summary of all the instances of business processes that ran or are running.
Managing WebLogic Integration Solutions


|