Tutorial: Building a Worklist Application

     Previous  Next    Open TOC in new window    View as PDF - New Window  Get Adobe Reader - New Window
Content starts here

Step 2: Modeling and Deploying the Loan Processing Task Plan

A task plan defines the business-specific life cycle to complete a task. A loan processing task plan depicts the multiple human interaction steps involved in processing a loan. For example, when a prospective customer submits a loan application, a loan officer needs to be assigned the task of checking the customer details and then approve the loan or forward it to the loan manager for further scrutiny. This step is a part of the task plan, which ensures that whenever a new loan application is submitted, a loan officer claims the task and processes the loan application.

In WebLogic Integration Worklist 9.2, a task plan can be modeled using the Workshop for WebLogic design-time environment and then be deployed to run on the server. Once the task plan is deployed, the task instances can be created by authorized systems or human entities. Task Instances or tasks are based on the task plan.

In this step, you will model and deploy the loan processing task plan using Workshop for WebLogic Platform design-time environment.

Model and Deploy the Loan Processing Task Plan

The loan processing task plan will be modeled using Workshop for WebLogic. To model the task plan, you need to perform the following tasks:

Create a New Task Plan

To create the loan processing task plan:
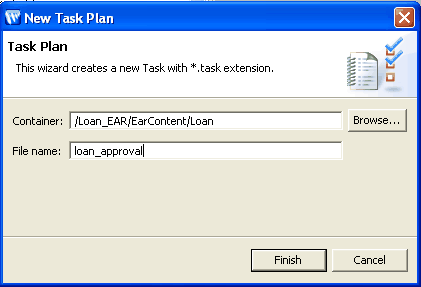
  1. In the Package Explorer pane, right-click the Loan_EAR\EarContent folder, and select NewArrow symbolFolder.
  2. In the New Folder dialog box, specify the folder name as Loan and click Finish to continue.
  3. Select the Loan folder, right-click and select NewArrow symbolTask Plan.
  4. The New Task Plan dialog box appears.

  5. In the New Task Plan dialog box enter loan_approval in the File name (see Figure 3-1).
  6. Figure 3-1 New Task Plan


    New Task Plan

  7. Click Finish to proceed.

Define the Steps for the Loan Processing Task Plan

A task plan is a collection of steps that define the action a human needs to perform when working through a task. For Acme Financial loan processing system, the steps involved are listed in Table 3-1.

Table 3-1 Steps in the Loan Processing Task Plan
Step Name
Default Assignee
Note
Officer Review Pending
Loan Officer
 
Manager Review Pending
Loan Manager
 
Loan Approved
 
Step Completed
Loan Rejected
 
Step Aborted

To add these steps to the loan_approval task plan:

  1. From the Palette box, click Step and then click anywhere in the *loan_approval.task tab to add a step. The default name for a new step is 
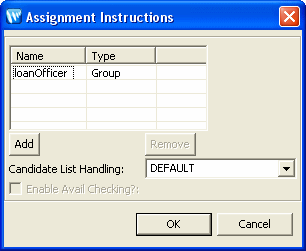
Step#, where # is an incremental numeric value that changes depending on the number of existing steps in the task plan.
  2. Click the step again and change the name to OfficerReviewPending.
  3. With the OfficerReviewPending step selected, click Assignment Instructions in the Properties tab.
  4. In the Value column, click New Task Plan. This displays the Assignment Instructions dialog box, as shown in Figure 3-2.
  5. Click Add and click the Name column to enter loanOfficer.
  6. In the Type column, click the list box and select Group.
  7. Select DEFAULT from the Candidate List Handling list box.
  8. Click OK. The OfficerReviewPending step is now assigned to the loanOfficer group ( see Figure 3-2).
  9. Figure 3-2 Assignment Instructions


    Assignment Instructions

  10. Add another step to the loan_approval.task file and call it ManagerReviewPending.
  11. With the ManagerReviewPending step selected, click Assignment Instructions in the Properties tab.
  12. In the Value column, click Assignment Instructions. This displays the Assignment Instructions dialog box.
  13. Click Add and click the Name column to enter loanManager.
  14. In the Type column, click the list box and select Group.
  15. Select DEFAULT from the Candidate List Handling list box.
  16. Click OK. The OfficerReviewPending step is now assigned to the loanManager group.
  17. From the Palette tab, click Complete Step and drop it in the loan_approval.task tab.
  18. Change the name of the step to LoanApproved.
  19. From the Palette tab, click Abort Step and drop it in the loan_approval.task tab.
  20. Change the name of the step to LoanRejected.

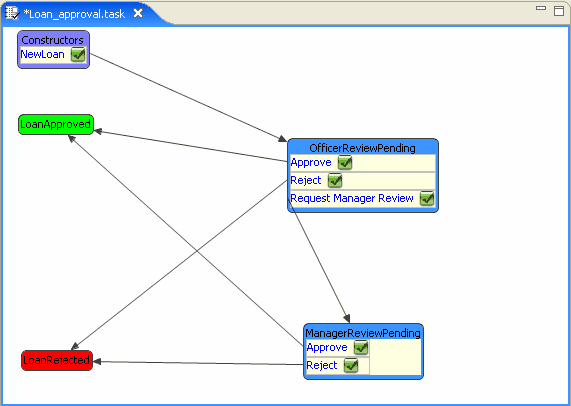
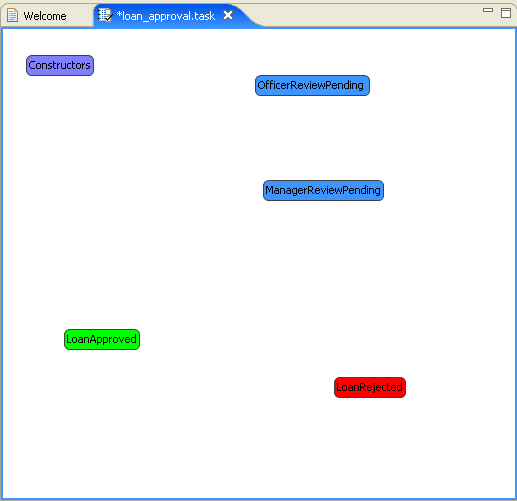
After you add all the steps, the loan_approval.task tab will be displayed (Figure 3-3).

Figure 3-3 Steps in loan_approve.task

Steps in loan_approve.task

Define the User Properties of the Task Plan

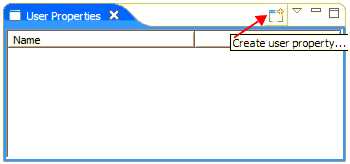
User properties are business-specific data elements of a task plan. For the loan processing scenario, you need to define the user properties mentioned in Table 3-2.

Table 3-2 User Properties for Loan Processing Task Plan
User Property Name
Data Type
LoanAmt
Integer
Name
String
SSN
String
Collateral Assets
String
Notes
String

Note: User properties are global and apply to all the steps throughout the life cycle of the task plan.

To create user properties:

  1. From the User Properties tab, click the Create user property icon (see Figure 3-4).
  2. Figure 3-4 User Properties Tab


    User Properties Tab

  3. In the Create User Property dialog box, enter the name of the user property as 
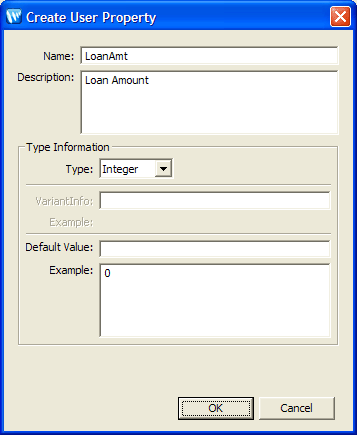
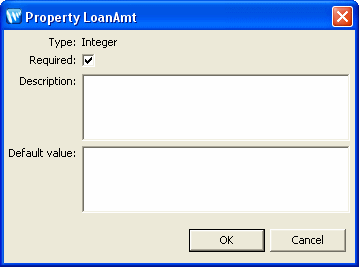
LoanAmt, and provide a brief description in the Description field.
  4. Click the Type drop-down list and select Integer (see Figure 3-5).
  5. Figure 3-5 Create User Property Dialog Box


    Create User Property Dialog Box

  6. Click OK to implement the new property.
  7. Repeat step 1 to step 4 for the other properties listed in Table 3-2.

Define Actions in the Task Plan

Every step (other than terminal steps including Completed Step and Aborted Step) of the loan processing task plan can include actions, which allow the transition of the task instance from one step to another. The actions can be taken by authorized employees or system actors.

For the loan processing task plan, create the actions listed in Table 3-3.

Table 3-3 Actions for the Loan Processing Task Plan
Step/Constructor
Action
User Properties Required
Resulting Step
Officer Review Pending
Approve
Notes
Approved
Officer Review Pending
Reject
Notes
Rejected
Officer Review Pending
Request Manager Review
Notes
Manager Review Pending
Approve
Notes, Collateral Assets
Approved
Manager Review Pending
Reject
Notes
Rejected

To create the actions listed in Table 3-3:

  1. Click Action in the Palette tab and drop it on the OfficerReviewPending step.
  2. Change the action name to Approve.
  3. In the Properties tab, click the Required User PropertiesÆNotes property.
  4. In the Value column, click Create User Property Dialog Box to open the Property Notes dialog box.
  5. Select the Required check box and click OK.
  6. Click Connections in the Palette tab.
  7. To create a connection between the Approve action, and the LoanApproved step, which appears in green color, click the Approve action box.
  8. Move the mouse over the LoanApproved step and click again. This creates the connection between the Approve action and the LoanApproved step.
  9. Repeat step 1 to step 8 for the other steps listed in Table 3-3.

After you create the connections for each action, the Outline tab will look similar to Figure 3-6.

Figure 3-6 Outline Tab with Action, Steps and Connections

Outline Tab with Action, Steps and Connections

Define Constructors for the Task Plan

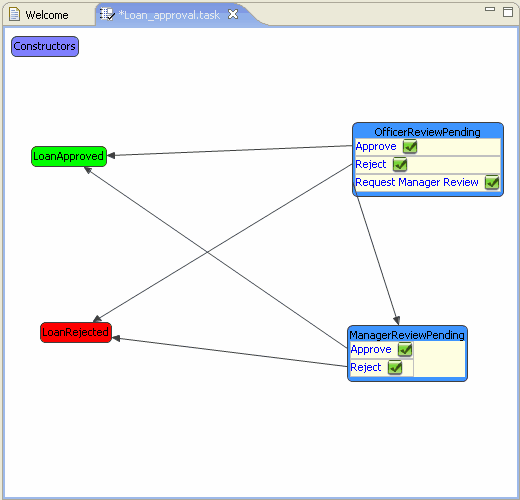
In a task plan, there is at least one constructor that defines how a task instance comes into existence. A constructor for a task plan lists the initial data to be provided for the creation of a task instance as well as the resulting step of the task instance. Each constructor needs to have a step associated with it. There may be more than one constructor for a task plan.

For the loan processing task plan, define the NewLoan constructor. This constructor will be used to create a loan task when a loan request comes in without a credit score and pre-approval.

Note: Constructors can be invoked by authorized employees or system actors, so that the loan task instances can be created either by human data entry or system execution.

To configure the constructor:

  1. Click Constructor on the Palette tab and drop it in the Constructor container of the *loan_approval.task tab.
  2. Name the constructor NewLoan.
  3. In the Properties tab, set the value for the LoanAmt, Name, and SSN properties to Required, by performing the following steps:
    1. In the Properties tab, click the LoanAmt property (see Figure 3-7).
    2. Click Outline Tab with Action, Steps and Connections in the Value column to open the Property LoanAmt dialog box.
    3. Select the Required check box and click OK.
    4. Figure 3-7 Property LoanAmt Dialog Box


      Property LoanAmt Dialog Box

    5. Repeat step a to step c for the Name and SSN properties.
    6. For a new loan application, you need to create a connection between the NewLoan constructor and the OfficerReviewPending step.

  4. Click Connection in the Palette tab to connect NewLoan to OfficerReviewPending.
  5. Click the NewLoan constructor box and move the mouse over to the OfficerReviewPending step and click again.
  6. After you map the NewLoan constructor to OfficerReviewPending step, the Outline tab will appear similar to Figure 3-8.

    Figure 3-8 Outline Tab After Connecting the NewLoan to OfficerReviewPending


    Outline Tab After Connecting the NewLoan to OfficerReviewPending

  7. Select FileÆSave All menu option to save the application before you proceed.

Validate the Task Plan

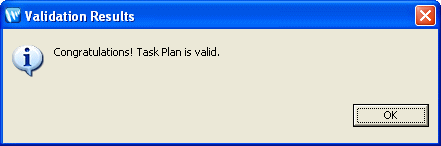
The final stage in designing and deploying the task plan is to validate if the task plan is working according to the required enterprise model specification.

To validate the loan processing task plan:

  1. Click WorklistArrow symbolValidate Task Plan for Runtime.
  2. If the task plan is valid, then the Validation Results dialog box appears (see Figure 3-9).
  3. Figure 3-9 Validation Results Dialog Box


    Validation Results Dialog Box

  4. Click OK to confirm.
  5. Select FileArrow symbolSave All menu option to save the application before you proceed.

Deploy the Loan Processing Task Plan

Once the loan processing task plan is modeled completely, you can deploy it on WebLogic Integration Server.

To deploy the loan processing task plan:

  1. In the Package Explorer pane, right-click the Loan_Web project that you created previously and select Run AsArrow symbol
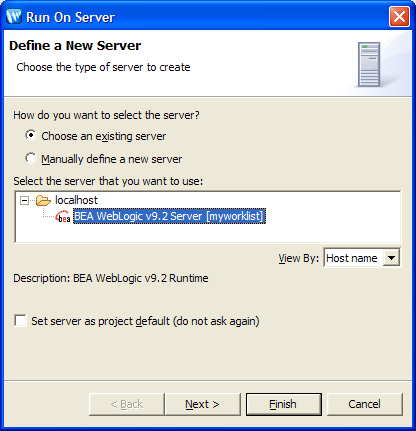
Run on Server. The Run on Server dialog box is displayed (see Figure 3-10).
  2. Figure 3-10 Run on Server Dialog Box


    Run on Server Dialog Box

  3. Select Choose an existing server and from the Select the server that you want to use: list, select the myworklist server and click Next.
  4. This will display the Add and Remove Projects dialog box.

  5. Ensure that 
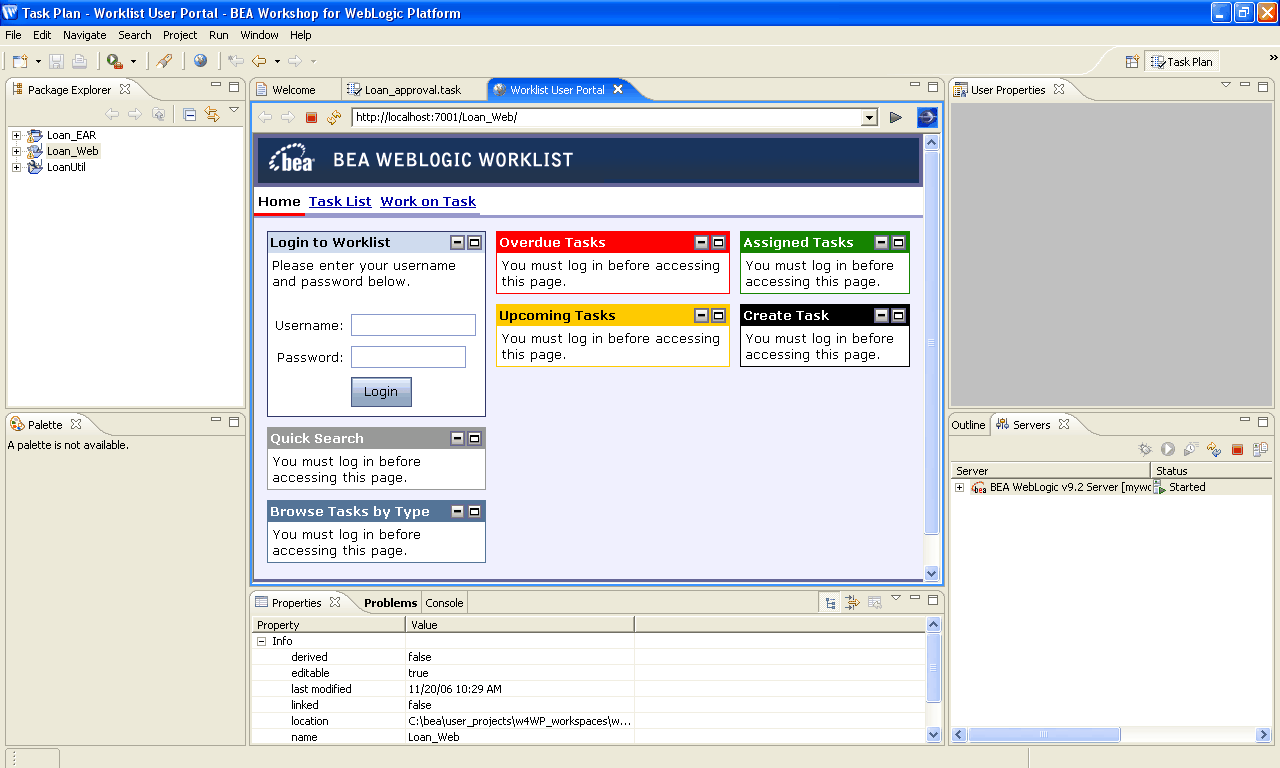
Loan_EAR is listed in the Configured projects list. If it is not then select Loan_EAR from the Available projects list, and click Add.
  6. Click Finish to start deploying the project on the server.

It will take some time to deploy the project on the server. After the task plan is deployed successfully, it opens up on the Worklist User Portal within the BEA Workshop for WebLogic Platform (see Figure 3-11).

Figure 3-11 Worklist User Portal

Worklist User Portal


  Back to Top       Previous  Next