

|

|
|
|
|
Getting Started with the Administration Console
The following sections explain how to log on to the WebLogic Collaborate Administration Console and get started using it.
This topic includes the following sections:
Starting the Administration Console
To start the WebLogic Collaborate Administration Console:
When you log on, the home page for the WebLogic Collaborate Administration Console is displayed.
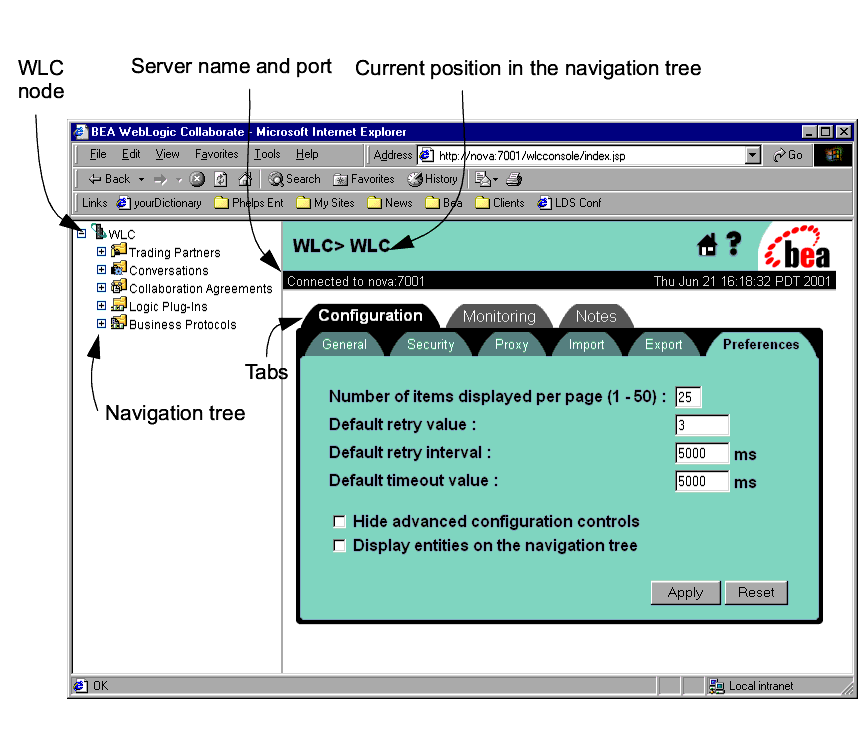
The WebLogic Collaborate Administration Console is a graphical, Web-based interface to the administrative functions required to maintain and run WebLogic Collaborate. The home page for the WebLogic Collaborate Administration Console is similar to the home page for the WebLogic Server Administration Console: a window containing two vertical panes.
The left pane contains a navigation tree: a hierarchically arranged set of nodes that represent the entities (such as trading partners) that make up a WebLogic Collaborate installation. The right pane contains interactive pages through which you manage and use the entities represented by the nodes in the navigation tree. These pages, which are depicted in the Console as file folders with tabs, are also known as tabs.
Using the Navigation Tree
Note: Displaying a long list of entities in the navigation tree like individual Trading Partners can affect WebLogic Collaborate performance. Displaying entities on the navigation tree is by default disabled.
To display a list of entities in the navigation tree:
To access the parameters controlling a particular entity, click the node for that entity in the navigation tree (in the left pane). The configuration page for the selected entity is displayed in the right pane, as shown in the following figure.
Figure 1-1 WebLogic Collaborate Navigation Tree and Tabs
Note: For instructions on expanding and collapsing the navigation tree (so that items listed below nodes are displayed and hidden, respectively), see Displaying Items in the Navigation Tree. Using the Pop-Up Context Menus Right-click a node in the navigation tree. The WebLogic Collaborate Administration Console displays a context-sensitive pop-up menu that includes the following commands. Selecting and Ordering List Boxes Some dialog boxes enable you to transfer entities by moving them from one field to another, either left and right or up and down. Use the right and left arrow buttons to move entities between lists. Use the up and down arrow buttons to order entities. Applying Changes and Removing Entities When you modify the properties of an entity, click Set to modify properties for an attribute. When you finish modifying all fields and attributes, click Add/Apply to commit the changes. To remove an entity from any list, select the entity and click Remove. In some circumstance you can also disable an entity. Instructions for modifying entity properties and for removing and disabling an entity are provided in appropriate sections of this document.
Searching for Entities
You can search for the following entities by name in the WebLogic Collaborate Administration Console.
Query capability should allow the following pattern match on the name of the above objects:
For example, you can search for the name ABCD by using any one of the following:
ABCD,
AB*
AB?D
A???
*
*CD
??CD
To search for an entity:
Using the Notes Tab
The WebLogic Collaborate Administration Console provides a Notes tab for each entity type. You can use these text-entry dialog boxes to record information that helps to describe the related function. Each Notes tab is independent and records information relative to its location. This information persists from one logon session to another.

|

|

|
|
|
|
Copyright © 2001 BEA Systems, Inc. All rights reserved.
|