


|

|
|
|
|
Working with Business Messages
The following sections explain how to use the B2B integration plug-in to construct and manipulate the contents of business messages that are exchanged among business partners:
About Working with Business Messages
A business message is the basic unit of communication exchanged by trading partners in a conversation. A business message consists of the following:
The B2B integration plug-in provides two methods to either create or extract the contents from business messages:
Defining Workflow Variables for Business Messages
At run time, a business message is stored in a workflow variable (of type Java Object) when it is ready to be sent or when it has been received. When a business message is ready to be sent, the application code associated with the action that composes the business message constructs the business message and returns it in this variable to the workflow instance. When a business message has been received, the workflow node associated with any of three actions (Compose Business Message, Extract Business Message Parts, or Manipulate Business Message) obtains this variable from the workflow instance and uses it to process the incoming business message.
Note: In WebLogic Integration, XOCP business messages are not stored in workflow variables of type XML Document.
In the Studio, you must define the Java Object variables used to store business messages before you define any actions that refer to them, as described in About Using Workflow Variables.
For each workflow template definition, you can define a separate variable for each business message that the workflow sends or receives, or you can define a single object variable to contain all your message exchanges.
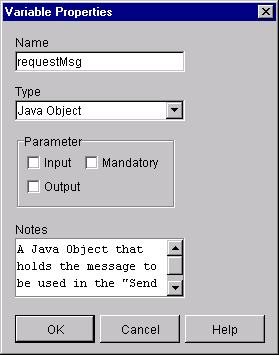
To define a variable for a business document in the Studio:
Figure 4-1 Variable Properties Dialog Box
Simple Message Manipulation
The B2B integration plug-in provides two actions that you can use for simple message manipulation:
The primary ease-of-use feature provided by these two actions is that they provide a means to manipulate business messages entirely nonprogrammatically. The sections that follow explain how to use these two workflow actions.
Creating Business Messages
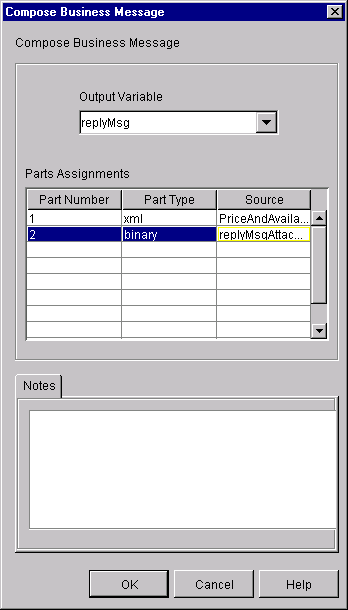
You can define the Compose Business Message action on any node in a collaborative workflow—start, task, decision, event, or done. You must explicitly add the Compose Business Message action to the workflow template definition. At run time, this action adds one or more XML documents and one or more attachments to a business message envelope, specified as variables in the Compose Business Message dialog box, which gives you an easy means to create a message that you can subsequently send via the Send Business Message action.
For overview information about the composition of a business message, refer to either of the following:
Defining the Compose Business Message Action
To define the Compose Business Message action for a workflow in the Studio:
Figure 4-2 Add Action Dialog Box
Figure 4-3 Add Action Dialog Box with Integration Actions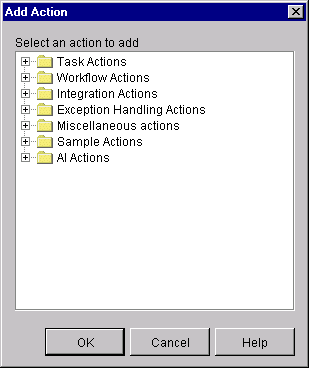
Figure 4-4 Compose Business Message Dialog Box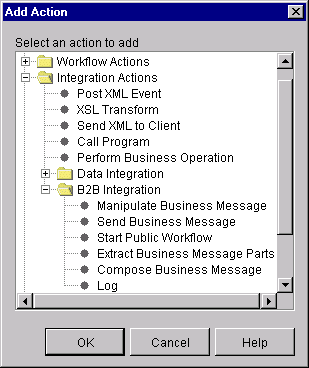
Table 4-1 Fields in the Compose Business Message Dialog Box
Extracting Information from Business Messages
You can define the Extract Business Message Parts action on any node in a collaborative workflow—start, task, decision, event, or done. You must explicitly add the Extract Business Message Parts action to the workflow template definition. At run time, this action extracts the XML document(s) and attachment(s) to a business message envelope, specified as variables in the Extract Business Message Parts dialog box, which gives you an easy means to obtain the contents of a business message that has been received.
For overview information about the composition of a business message, refer to either of the following:
Defining the Extract Business Message Parts Action
To define the Extract Business Message Parts action for a workflow in the Studio:
Figure 4-5 Add Action Dialog Box
Figure 4-6 Add Action Dialog Box with Integration Actions
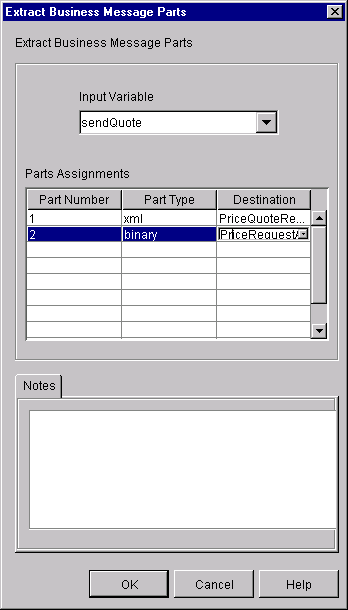
Figure 4-7 Extract Business Message Parts Dialog Box
Table 4-2 Fields in the Extract Business Message Parts Dialog Box
Complex Message Manipulation
You must perform the following tasks before you can create or extract the content of business messages via a Java application that implements the MessageManipulator interface:
The sections that follow explain how to define the Manipulate Business Message action and to write the Java application.
Defining the Manipulate Business Message Action
At run time, the Manipulate Business Message action is invoked to manipulate a business message. If the workflow is sending a business message (such as a request), the Manipulate Business Message action runs the associated application code to create the business message and save it in an output variable that is sent subsequently in a Send Business Message action. If the workflow is receiving a business message (such as a reply), the Manipulate Business Message action captures the incoming business message in an input variable and passes it on to the associated application code for processing.
The Manipulate Business Message action can be associated with any of the following nodes: task, decision, event, and start. You must explicitly add the Manipulate Business Message action to the workflow template definition.
Adding a Manipulate Business Message Action
To define the Manipulate Business Message action for a workflow in the Studio:
Figure 4-8 Add Action Dialog Box
Figure 4-9 Add Action Dialog Box with Integration Actions
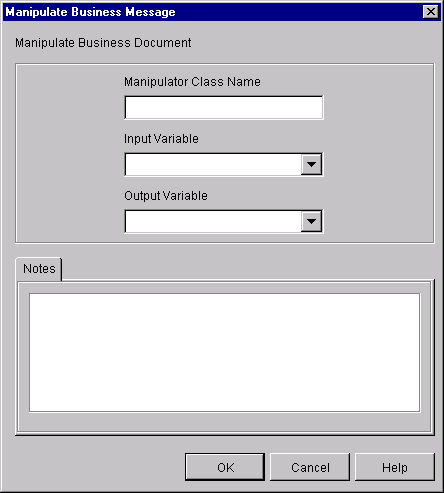
Figure 4-10 Manipulate Business Message Dialog Box
Table 4-3 Fields in the Manipulate Business Message Dialog Box
When specifying variables for the input or output fields, follow these guidelines:
Example of a Manipulate Business Message Action
For example, suppose you specify the following settings in the Manipulate Business Message dialog box.
Table 4-4 Sample Settings in the Manipulate Business Message Dialog Box
|
Field |
Description |
|---|---|
|
Manipulator Class Name |
examples.wlpiverifier.ProcessRequest |
|
Input Variable |
requestMsg |
|
Output Variable |
replyMsg |
At run time, when the WebLogic Integration process engine executes the action with the specified settings, the following events occur:
Writing the Application to Manipulate Business Messages
You write a Java application that uses workflow variables and Java code to manipulate business messages that are exchanged between trading partners. The Manipulate Business Message action invokes this application to create a business message to either send or process a business message that has been received. This Java application implements the com.bea.b2b.wlpi.MessageManipulator interface. Such an application is referred to generically as a message manipulator.
For more information about defining the message manipulator class and input and output variables for the Manipulate Business Message action, see Defining the Manipulate Business Message Action. For more information about the com.bea.b2b.wlpi.MessageManipulator interface, see the BEA WebLogic Integration Javadoc
.Message Manipulator Features
Message manipulators can implement the following operations for processing business messages:
MessageManipulator Interface
To process business messages that are exchanged between roles in a conversation, workflow applications use Java classes that implement the com.bea.b2b.wlpi.MessageManipulator interface. This interface contains a single operation, manipulate, with the following signature:
XOCPMessage manipulate(WorkflowInstance instance, XOCPMessage in) throws WLPIException;
When calling the manipulate operation, a workflow specifies the following parameters.
Table 4-5 Parameters in the Manipulate Operation
The manipulate operation returns an XOCP message generated by the message manipulator. At run time, this XOCP message is stored in the output variable specified in the associated Manipulate Business Message action. If this output variable is not specified, then the return value is ignored.
Public Default Constructor
Classes that implement the message manipulator interface must have a public default constructor (a constructor without arguments). The process engine uses Java reflection to create objects of that class and therefore invokes the default constructor.
Steps for Writing the Application that Implements the MessageManipulator Interface to Create a Business Message
The ChannelMasterMessageFactoryII class shown in this section is an example of a message manipulator that constructs a business message. It is called by the Manipulate Business Message action that occurs in the workflow. It returns a reply message (xocpmsg variable) that is passed back to the workflow as the business message to send.
Step 1: Import the Necessary Packages
The following listing shows the packages that the ChannelMasterMessageFactoryII class imports, including the XOCP messaging objects that are used to create the XOCP message.
Listing 4-1 Importing the Necessary Packages
package wlcsamples.channelmaster;

import java.io.*;

import org.apache.xerces.dom.*;
import org.w3c.dom.*;

import com.bea.eci.logging.*;
import com.bea.b2b.wlpi.MessageManipulator;
import com.bea.b2b.wlpi.WorkflowInstance;
import com.bea.b2b.wlpi.WLPIException;

import com.bea.b2b.protocol.conversation.ConversationType;
import com.bea.b2b.enabler.*;
import com.bea.b2b.enabler.xocp.*;
import com.bea.b2b.protocol.messaging.*;
import com.bea.b2b.protocol.xocp.conversation.local.*;
import com.bea.b2b.protocol.xocp.messaging.*;
Step 2: Implement the MessageManipulator Interface
The following listing shows the ChannelMasterMessageFactoryII class declaration that implements the MessageManipulator interface.
Listing 4-2 Implementing the MessageManipulator Interface
public class ChannelMasterMessageFactoryII implements MessageManipulator
Step 3: Include a Default Constructor
The following listing shows the default constructor used for the ChannelMasterMessageFactoryII class.
Listing 4-3 Implementing a Default Constructor
public ChannelMasterMessageFactoryII(){}; Step 4: Include an Invocation to the Manipulate Method
The code in the following listing invokes the manipulate method, which retrieves the current workflow instance object, as well as the incoming business message.
Listing 4-4 Invoking the manipulate Method
public XOCPMessage manipulate(WorkflowInstance instance,
                                        XOCPMessage in)
    throws WLPIException{
Step 5: Get Input Variables from the Workflow Instance
The code in the following listing uses the getVariable method to obtain values from the current workflow instance to be used for creating the business message.
Listing 4-5 Getting the Input Variables
String content = (String) instance.getVariable(MESSAGE_CONTENT_VAR);
Step 6: Create the Business Message
The code in the following listing does the following:
Listing 4-6 Creating the XML Document
DOMImplementationImpl domi = new DOMImplementationImpl();
DocumentType dType =
  domi.createDocumentType( "temp-xml-transporter",
    "temp-xml-transporter", "temp-xml-transporter.dtd" );

org.w3c.dom.Document rq = new DocumentImpl(dType);
Element root = rq.createElement("temp-xml-transporter");
rq.appendChild(root);

Element elementContent = rq.createElement("content");
Text t1 = rq.createTextNode(content);
elementContent.appendChild(t1);
root.appendChild(elementContent);

XOCPMessage xocpmsg = new XOCPMessage("");
xocpmsg.addPayloadPart(new BusinessDocument(rq));
Step 7: Return the Request Message
The code in the following listing returns the request message in the variable xocpmsg (of type XOCPMessage). The return value is then assigned to an output variable (of type Java Object) in the workflow in preparation for sending the business message.
Listing 4-7 Returning the Request Message
return xocpmsg;
Steps for Writing the Application that Implements the MessageManipulator Interface to Process the Contents of a Received Business Message
The ChannelMasterMessageExtractorII class described in this section is an example of a message manipulator that receives and processes a business message. It is called by the Manipulate Business Message action associated with the Start event (defined as a Business Message start event) that is triggered when the initial business message is received from the conversation initiator workflow. It returns a reply message (replyMsg variable) that is passed back to the workflow as the business message to send.
Step 1: Import the Necessary Packages
The code in the following listing shows the packages that the ChannelMasterMessageExtractorII class imports, including the XOCP messaging objects that are used to create the XOCP business message.
Listing 4-8 Importing the Necessary Packages
package wlcsamples.channelmaster;

import java.io.*;

import org.apache.xerces.dom.*;
import org.w3c.dom.*;

import com.bea.eci.logging.*;
import com.bea.b2b.wlpi.MessageManipulator;
import com.bea.b2b.wlpi.WorkflowInstance;
import com.bea.b2b.wlpi.WLPIException;

import com.bea.b2b.protocol.conversation.ConversationType;
import com.bea.b2b.enabler.*;
import com.bea.b2b.enabler.xocp.*;
import com.bea.b2b.protocol.messaging.*;
import com.bea.b2b.protocol.xocp.conversation.local.*;
import com.bea.b2b.protocol.xocp.messaging.*;
Step 2: Implement the MessageManipulator Interface
The following listing shows the ChannelMasterMessageExtractorII class declaration that implements the MessageManipulator interface.
Listing 4-9 Implementing the MessageManipulator Interface
public class ChannelMasterMessageExtractorII implements MessageManipulator
Step 3: Include a Default Constructor
The following listing shows the default constructor used for the ChannelMasterMessageExtractorII class.
Listing 4-10 Implementing a Default Constructor
public ChannelMasterMessageExtractorII(){};Step 4: Invoke the Manipulate Method
The code in the following listing invokes the manipulate method, which retrieves the current workflow instance object, as well as the incoming business message (request).
Listing 4-11 Invoking the manipulate Method
public XOCPMessage manipulate(WorkflowInstance instance,
                                        XOCPMessage in)
    throws WLPIException{
Step 5: Process the Request Message
The code in the following listing does the following:
Listing 4-12 Processing the Request Message
PayloadPart[] payload = in.getPayloadParts();
Document rq = null;

if (payload != null && payload.length > 0){		//
  BusinessDocument bd = (BusinessDocument)payload[0];
  rq = bd.getDocument();
  if (rq == null)
    throw new WLPIException("Did not get a reply document");
}
Element root = rq.getDocumentElement();
debug(root.toString());

String name = root.getNodeName();
if (!name.equals("temp-xml-transporter")) {
  throw new WLPIException(
    debug("Did not get temp-xml-transporter, found " + name));
}
if (!root.hasChildNodes()){
  throw new WLPIException(
    debug("No child nodes in temp-xml-transporter"));
}
Node childContent = root.getFirstChild();
if (childContent == null){
  throw new WLPIException(
    debug("No child nodes inside temp-xml-transporter"));
}
String content = ((Text)childContent.getFirstChild()).getData(); debug("Content is " + content);

|

|

|
|
|
|
Copyright © 2001 BEA Systems, Inc. All rights reserved.
|