

|

|
|
|
|
Defining Conversation Properties for Workflow Templates
The following sections describe how to define templates and template definitions for workflows that implement roles in conversation definitions:
About Using the B2B Integration Plug-In to Define Templates
To create workflows for conversation roles in WebLogic Integration, you use the B2B integration plug-in. The first step in creating these workflows is defining workflow templates and template definitions for those workflows. In addition to the standard properties for templates and template definitions described in Defining Workflow Templates in Using the WebLogic Integration Studio, you must define additional properties not described in that document that allow the workflows based on those template definitions to be used in conversations.
For example, suppose you link a workflow template definition to a particular role in a conversation definition and version that is bound to a collaboration agreement in the WebLogic Integration repository. You must also define some additional attributes, such as the protocol to which the conversation role implemented by the workflow is bound, and additional configuration data that might be required by the protocol.
For general information about defining workflow templates, see Defining Workflow Templates in Using the WebLogic Integration Studio.
About Templates and Template Definitions
The topic Defining Workflow Templates in Using the WebLogic Integration Studio contains a comprehensive discussion about templates and template definitions, specifically about the differences between the types of information you provide in the template and the template definition.
The only data required in a template definition that you cannot define in a template is the expiration date and whether the template definition is active. However, it is good practice to set all conversation properties in the template, such as the following:
Then, when you create a template definition, you have the flexibility of overriding any conversation properties defined in the template, as appropriate. However, the primary advantage to assigning these properties in the template instead of the template definition is that you can specify properties for all template definitions contained in a given template.
Notes: Due to a limitation in WebLogic Integration, template properties are not exported when you export a template definition. That is, the properties that a template definition inherits from a template are not exported. You should consider your export requirements when you determine the properties to define in a template versus a template definition.
Template definition properties are exportable, but are specific to only one template definition.
The sections that follow show how to define conversation properties in the template; however, it is possible to define all these properties in the template definition, instead.
Creating a Workflow Template
To create a workflow template in the Studio using the B2B integration plug-in, complete the following steps:
Figure 2-1 Template Properties Dialog Box

Linking Templates to Conversations
Before you use a collaborative workflow to exchange business messages in WebLogic Integration, you must first link the workflow template to a particular conversation definition (a conversation name, version, role, and protocol) in the repository.
To link a workflow template to a conversation definition:
Figure 2-2 B2B Integration Page
Table 2-1 Fields on the Conversation Page

Linking Templates to Collaboration Protocols
In general, linking a template to a specific protocol affects what you see in many of the B2B integration plug-in dialog boxes and tabs throughout the Studio. As this document explains how to use various components of the B2B integration plug-in to perform various tasks, such as defining workflow start properties, sending and receiving business messages, and terminating conversations, you will see how the appearance of each plug-in component varies, depending on the protocol chosen for the workflow template.
For example, Table 2-1 explains that if you choose the XOCP protocol while configuring a workflow template, an additional tab is displayed in which you can specify Quality of Service (QoS) settings for business messages exchanged in workflows based on that template.
With respect to linking a template to a protocol, do the following:
Defining the Quality of Service for XOCP Message Delivery in the Workflow Template
The Quality of Service (QoS) is a set of attributes that are defined for reliable business message publishing. You can set QoS attributes only for business messages sent via the XOCP protocol.
In the Studio, you can define the QoS in the following:
To specify the Quality of Service in the workflow template:
Figure 2-3 Quality of Service Properties Page
Table 2-2 Quality of Service Properties

Logging Messages
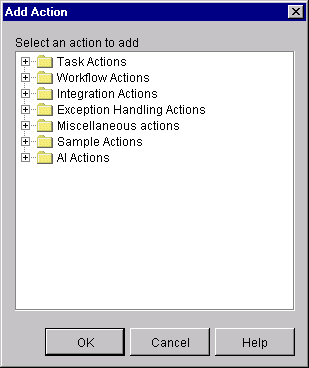
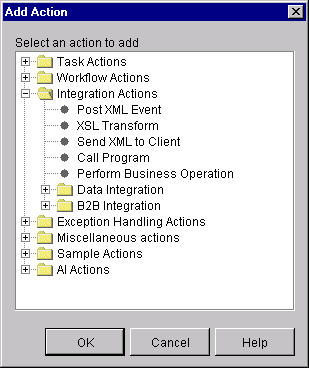
The B2B integration plug-in provides a means to send messages— for example, debug messages, run-time information, or application messages—to the B2B log at any point during the execution of a collaborative workflow. This functionality is provided via the Log action, which you can add to any node in the workflow. This action can provide a useful debugging tool during the workflow design process.
To add a Log action to a node in the workflow, complete the following steps:
Figure 2-4 Add Action Dialog Box
Figure 2-5 Add Action Dialog Box with Workflow Actions
Figure 2-6 Log Action Dialog Box

About Using Workflow Variables
A workflow variable is typically used to store application-specific information required by the workflow at run time. Variables are created and assigned values largely to control the logical path through a workflow instance. The same workflow template definition is instantiated multiple times and can be traversed in different ways if the flow contains decision nodes.
The guidelines for working with variables that apply to noncollaborative workflows also apply to collaborative workflows. (They are fully explained in Using the WebLogic Integration Studio.) When creating workflows, keep the following guidelines in mind:
Note: Applications that start workflows programmatically must use the Message Manipulator API (package com.bea.b2b.wlpi). For more information, see Developing Applications that Start Conversation Initiator Workflows.
Associations Between Workflow Variables and Java Data Types
If you want to access a workflow variable within a business operation, you need to know how workflow variable types correspond to Java data types. The following table shows how they are related.
Table 2-3 Workflow Variables and Java Data Types
Rules for Defining Workflow Variables
The rules for defining Workflow variables for collaborative workflows are the same as those for noncollaborative workflows:
Note that the variables that specify binary attachments to a business message must contain a source file or destination file, as appropriate.
Defining Variables
For complete details about defining workflow variables in the Studio, see Using Workflow Expressions in Using the WebLogic Integration Studio.

|

|

|
|
|
|
Copyright © 2001 BEA Systems, Inc. All rights reserved.
|