

|
|
|
|
|
|
Setting Up and Running the Sample
This section provides instructions for setting up your environment and running the WebLogic Integration sample application. The instructions are provided in the following sections:
For a description of the architecture behind this sample, see Solution Architecture. For a summary of the process illustrated by the sample application, see Figure1-1, Process Flow of the Sample Application.
Preparing to Run the Sample
Before running the sample, complete the following steps:
The WebLogic Integration sample is installed in the /samples/wlis directory in your WebLogic Integration installation.
Note: The sample uses the database you specified when you installed WebLogic Integration. If you want to change the database, you can do so by running the WebLogic Integration Database Configuration wizard. See Using the Database Configuration Wizard in Starting, Stopping, and Customizing BEA WebLogic Integration for instructions on running the Configuration wizard.
Running the Sample
Note: This sample can be run by only one user at a time per instance of WebLogic Integration.
To run the WebLogic Integration sample, complete the following eight-step procedure:
Step 1. Configure and Invoke the Launcher Web Page
The \samples\bin directory in your WebLogic Integration installation contains scripts used to configure and run all the samples for the WebLogic Integration product.
About the Scripts
The RunSamples script is a driver script that invokes other scripts in the appropriate order until the launcher Web page is displayed. The launcher Web page contains links to start several WebLogic Integration samples and administration consoles. See "Configuring and Starting the Samples Domain" in Getting Started in Starting, Stopping, and Customizing BEA WebLogic Integration for details about the RunSamples script.
This Step (Configure and Invoke the Launcher Web Page) describes two substeps. These substeps describe alternative procedures to configure and invoke the launcher Web page:
You must execute the RunSamples script, described in Step 1A, the first time you run a sample in the samples domain. The RunSamples script both configures the samples database, and starts WebLogic Integration in the samples domain.
If you have executed the RunSamples script once, and the database is properly configured, the next time you start the samples domain, you can choose to start a sample by executing the RunSamples script again, as described in Step 1A.
Note: When you execute the RunSamples command after the samples database has already been properly configured, you will be prompted with the following message:
The WebLogic Integration repository has already been created and populated, possibly from a previous run of this RunSamples script. Do you want to destroy all the current data in the repository and create and populate the WebLogic Integration repository again?
Y for Yes, N for No
When you enter N, the command bypasses the database configuration tasks. The command starts WebLogic Integration in the samples domain, launches your default Web browser, and displays the Samples Launcher page.
Alternatively, you can use the Start Server and Launcher scripts, described in Step 1B.
Step 1A: Invoke the RunSamples Script
Note: You must complete the tasks described in this step if you have not invoked the RunSamples script before, or if you have changed the database with which you want to run the sample.
The following sections provide instructions for running the RunSamples script on a Windows and UNIX system.
Invoking the RunSamples Script on Windows
To run the RunSamples script on a Windows system, do one of the following:
Choose Start
cd \bea\wlintegration2.1\samples\bin
RunSamples
After the RunSamples script finishes running, a Web browser, which displays the launcher Web page provided with the samples, is displayed.
Invoking the RunSamples Script on UNIX
To run the RunSamples script on a UNIX system:
cd BEA_Home/wlintegration2.1/samples/bin
. ./RunSamples
After the RunSamples script finishes running, a Web browser, which displays the launcher Web page provided with the samples, is displayed.
Step 1B: Invoke the Start Server and Launcher Scripts
If you have previously run the RunSamples script, as described in Step 1A, the database has been created and populated with the sample data. In this case, when you want to run a sample, you can complete the tasks in this step (as an alternative to Step 1A). The procedures in Step 1B start WebLogic Server and invoke the launcher Web page on Windows and UNIX systems.
Invoking the Start Server and Launcher Scripts on Windows
To run the scripts on a Windows system, do one of the following:
When the following message is displayed, the Start Server script has completed successfully:
StartServer execution successful
A Web browser, which displays the launcher Web page provided with the samples, is displayed.
cd \bea\wlintegration2.1\samples\bin
startServer
When the following message is displayed, the startServer script has completed successfully:
StartServer execution successful
launchBrowser
A Web browser, which displays the launcher Web page provided with the samples, is displayed.
Invoking the Start Server and Launcher Scripts on UNIX
To run the scripts on a UNIX system:
cd BEA_Home/wlintegration2.1/samples/bin
. ./startServer
When the following message is displayed, the startServer script has completed successfully:
StartServer execution successful
http://localhost:7001/index.html
The launcher Web page provided with the samples, is displayed.
Step 2: Choose the WebLogic Integration Sample
You can start several sample applications and administration consoles from the launcher Web page. Click the WLI Sample link under Sample Applications on this Web page to invoke the sample application that addresses the supply chain problem described in Introduction.
As shown in the following figure, the sample overview page is displayed in your browser.
Figure 2-1 WebLogic Integration Sample Overview Window
The overview window contains a brief description of the business problem and the solution offered by the WebLogic Integration sample. Step 3. Start the Sample Start the sample by doing either of the following: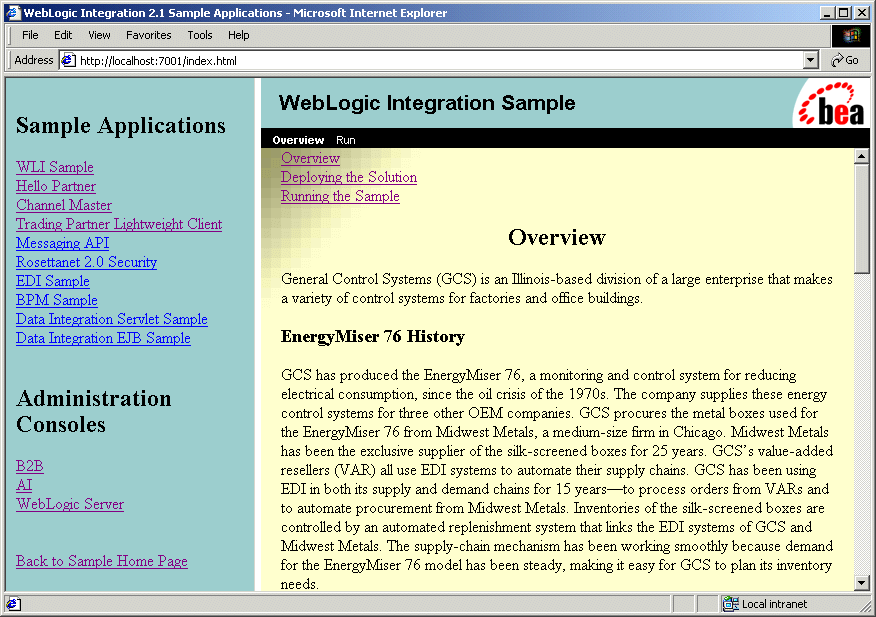
The Send QPA Request window, shown in the following figure, is displayed.
Figure 2-2 Send QPA Request Window
Note the following details about this window: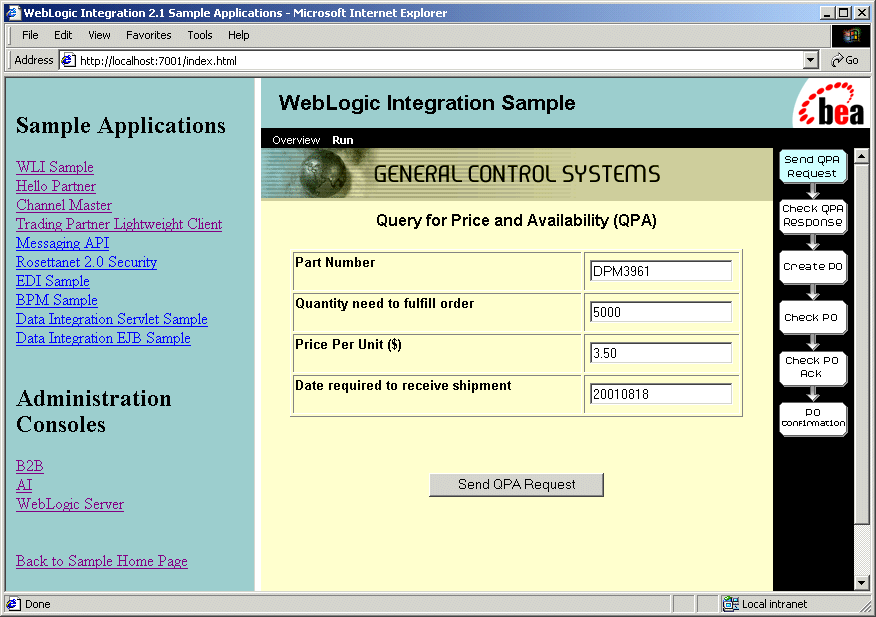
You cannot modify data in the fields in this form.
Step 4. Send the QPA Request
Click Send QPA Request to trigger the QPA process. The Check QPA Response window, shown in the following figure, is displayed.
Figure 2-3 Check QPA Response Window
This window indicates that the QPA request has been sent to suppliers and that the buyer is waiting for responses. Click Check QPA Response in the Check QPA Response window to go to the next window. Step 5. Check for QPA Responses Which window is displayed next depends on whether or not the buyer has received QPA responses from the suppliers:
Figure 2-4 QPA Response Dialog Box

Figure 2-5 Create PO Window

This window displays a form summarizing each supplier's response to the price and availability query.
Step 6. Create the Purchase Order
Complete the following procedure to create the purchase order for the silk-screened metal boxes:
The Check PO window is displayed. It displays a message indicating that the purchase order request has been submitted, as shown in the following figure.
Figure 2-6 Check PO Window
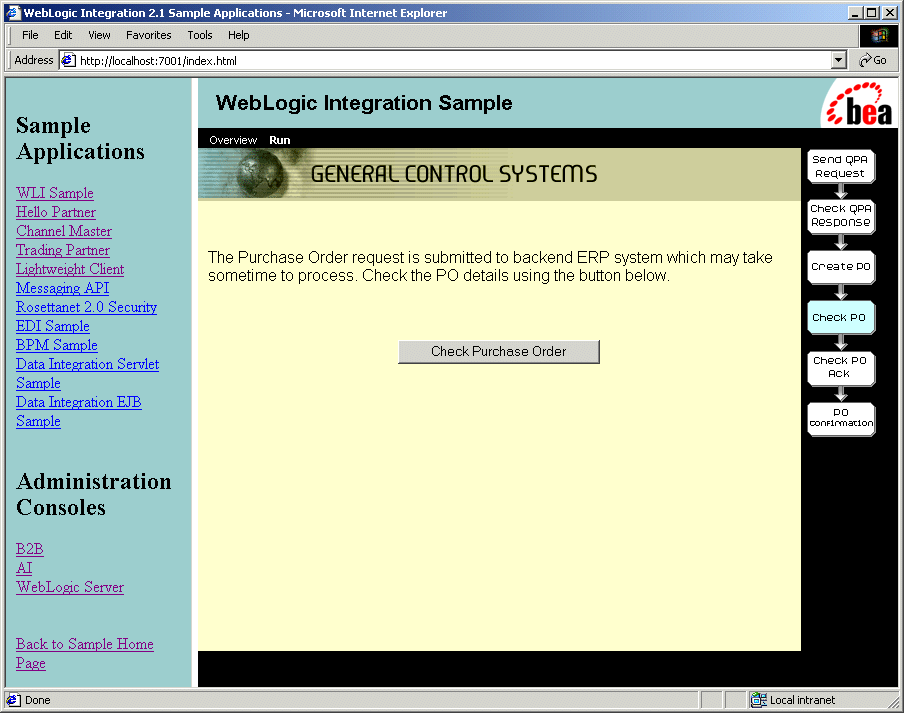
To check the status of the purchase order you have submitted, click Check Purchase Order.
Step 7. Check the Purchase Order
When the purchase order has been submitted to the selected supplier, the system displays its contents, as shown in the following figure.
Figure 2-7 Check PO Ack Window
The preceding figure displays the PO information that you, as the buyer, submitted to the selected supplier. On receipt of the purchase order, the supplier returns an acknowledgment message.To view this message, click Check PO Acknowledgement. Step 8. Check for Purchase Order Acknowledgment When the supplier acknowledges receipt of the purchase order, a PO Confirmation page, as shown in the following figure, is displayed to the buyer. Figure 2-8 PO Confirmation Window
The preceding figure shows the purchase order confirmation sent from the supplier to the buyer (GCS). Note that the supplier has added shipping information to the original purchase order sent by the buyer and confirmed by the supplier, as shown in the PO Master Information sections of Figure2-7 and Figure2-8, respectively. You have now completed running the WebLogic Integration sample application. See Understanding the Sample, to find out how this application works.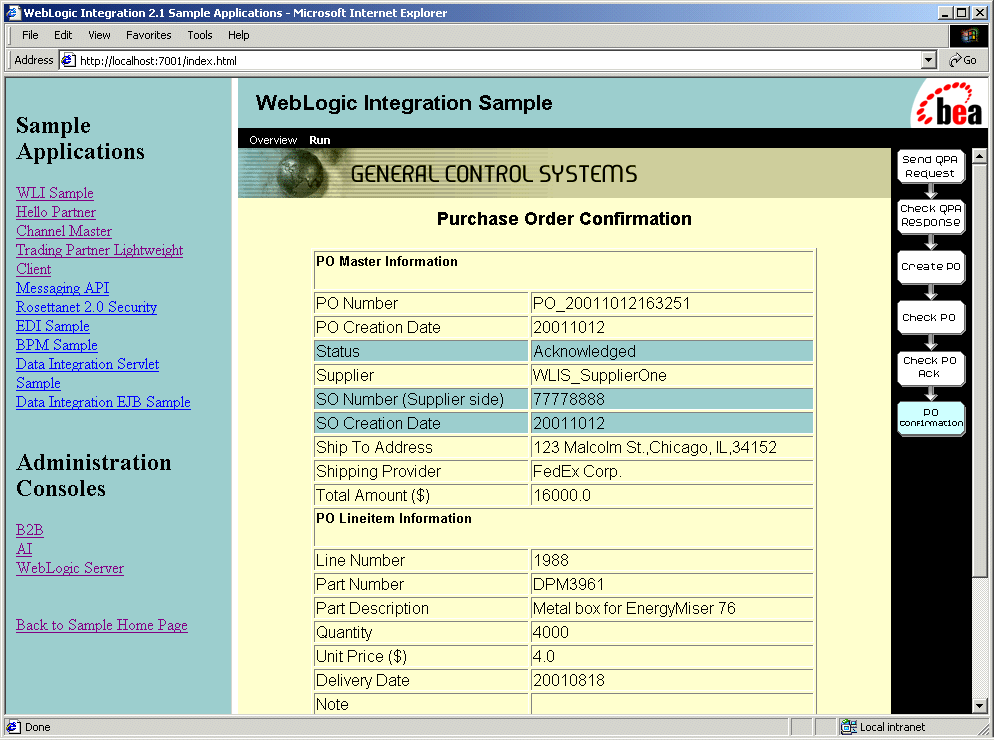

|

|

|
|
|
|
Copyright © 2001 BEA Systems, Inc. All rights reserved.
|