BEA Logo BEA WLI Release 2.1

  BEA Home  |  Events  |  Solutions  |  Partners  |  Products  |  Services  |  Download  |  Developer Center  |  WebSUPPORT


   WLI Doc Home   |   Learning to Use WebLogic Integration   |   Previous Topic   |   Next Topic   |   Contents   |   View as PDF

Understanding the Sample


Note: We strongly recommend that you run the sample before reading this section. For instructions, see Setting Up and Running the Sample. The sample code described in this section is available in the \samples\wlis directory of your WebLogic Integration installation.

The sample application automates a number of business processes, integrates back-end enterprise information systems (EIS), and deploys a supply-chain hub that connects business partners. This section describes how this sample integrated solution addresses the supply-chain challenge experienced by our hypothetical enterprise, General Control Systems (GCS). Specifically, it includes the following topics:


Overview

In our sample scenario, General Control Systems (GCS) decides to implement a WebLogic Integration solution to its supply-chain challenge. What is the first step?

GCS begins by analyzing how it will use WebLogic Integration to perform the following tasks:

The remainder of this section explains how WebLogic Integration enables GCS to perform these tasks.

Model Business Processes

WebLogic Integration provides the tools required to manage business processes:

Manage B2B Integration

WebLogic Integration supports communication with external trading partners over the Internet. Specifically, it supports the XOCP, RosettaNet (1.1 and 2.0), and Ariba cXML business protocols for sending and receiving XML messages.

A B2B integration BPM plug-in extends the WebLogic Integration Studio so the Studio can be used to define collaborative workflows, that is, workflows that exchange messages with external trading partners.

Integrate New and Existing Systems

WebLogic Integration supports the integration of new Web-based front-end systems with existing enterprise information system (EIS) applications through the use of adapters. Application integration adapters can be broadly categorized as follows:

Application integration adapters are configured using a Web browser interface. Business events that flow through application integration adapters are defined as XML Schema Definitions (XSDs) in the WebLogic Integration repository.

An application integration BPM plug-in extends the WebLogic Integration Studio so the Studio can be used to define processes that:

Handle Heterogeneous Data Formats

XML is the message format used in WebLogic Integration systems. The WebLogic Integration framework, however, makes it easy to integrate WebLogic Integration applications with environments in which a binary message format is used.

WebLogic Integration supports the following types of data integration:

The following sections describe how the components of WebLogic Integration work together to build and deploy this sample application.


B2B Integration

The definition and management of the relationships between the trading partners that participate in the e-business transactions (in the roles of the buyer and suppliers for this scenario) is fundamental to the development of this integrated solution. The data to define and administer trading partners is stored in the WebLogic Integration repository, and WebLogic Integration provides tools and processes for the effective management of dynamic and diverse trading partner relationships.

An exhaustive discussion of how to configure your B2B integration environment is beyond the scope of this document. However, this section briefly describes the WebLogic Integration repository data that is used in the sample application, how it is loaded for the sample, and how you can view the data and monitor the progress of the sample's business conversations.

For information about B2B integration and instructions for configuring the WebLogic Integration environment to support it, see Introducing B2B Integration and Administering B2B Integration, respectively.

This section includes the following topics:

Loading the Repository Data

The data required by the sample for integrating the trading partners is bulk loaded into the WebLogic Integration repository when you run the RunSamples script during the sample setup (see Running the Sample).

The RunSamples script loads the repository with the B2B configuration data contained in the following XML files:

For details about each of these data elements, see the next section, Understanding the Repository Data.

Understanding the Repository Data

This section highlights important information about the following data elements that are bulk loaded to the WebLogic Integration repository for the sample application:

Note: As described in Loading the Repository Data, data from two XML files is imported into the WebLogic Integration repository to support the sample application. You can bulk load configuration data or enter it through the WebLogic Integration B2B Console. You can also access and configure bulk-loaded data using the B2B Console. For more information, see Using the WebLogic Integration B2B Console.

Business Protocol Definitions

The SystemRepData.xml file contains system data, including definitions for all the business protocols supported by WebLogic Integration: XOCP, RosettaNet, and cXML. The WebLogic Integration sample application uses only XOCP. The following excerpt from the SystemRepData.xml file shows the XOCP business protocol definitions.

Listing 3-1 XOCP Business Protocol Definitions in the SystemRepData.xml File

<!-- XOCP BUSINESS PROTOCOL DEFINITIONS -->
<business-protocol-definition
name="XOCP-SPOKE"
business-protocol-name="XOCP"
protocol-version="1.1"
endpoint-type="SPOKE">
<java-class>com.bea.b2b.protocol.xocp.XOCPSpokeProtocol</java-class>
<decoder>XOCP-Decoder</decoder>
<encoder>XOCP-Encoder</encoder>
</business-protocol-definition>
<business-protocol-definition
name="XOCP-Hub"
business-protocol-name="XOCP"
protocol-version="1.1"
endpoint-type="HUB">
<java-class>com.bea.b2b.protocol.xocp.XOCPHubProtocol</java-class>
<decoder>XOCP-Decoder</decoder>
<system-router>XOCP-System-Router</system-router>
:
:
<system-router>XOCP-Router-Enqueue</system-router>
<system-filter>XOCP-System-Filter</system-filter>
:
<encoder>XOCP-Encoder</encoder>
:
:
</business-protocol-definition>

In the preceding listing, note the following:

For details about configuring business protocol definitions, see Configuration Requirements in Administering B2B Integration and Configuring Trading Partners in Online Help for the WebLogic Integration B2B Console.

Logic Plug-Ins

Logic plug-ins are Java classes that can intercept and process business messages at run time. Each business protocol is associated with standard router and filter logic plug-ins.

The SystemRepData.xml file contains system data, including the WebLogic Integration logic plug-ins for XOCP, RosettaNet, and cXML business protocols. This sample uses the XOCP logic plug-ins only.

Table 3-1 XOCP-Specific Logic Plug-Ins

Logic Plug-In

Description

XOCP-Router

This router logic plug-in processes incoming business messages and generates the message-context document that is used in the processing. By default, this is the first logic plug-in in the router chain. The XOCP router logic plug-in for a hub delivery channel can modify the list of trading partner recipients, based on XPath router expressions. For more information, see Routing and Filtering Business Messages in Programming Logic Plug-Ins for B2B Integration.

XOCP-Router-Enqueue

This router enqueue logic plug-in adds business messages to the router message queue. By default, this logic plug-in is the last one in the router chain.

XOCP-Filter

This filter logic plug-in processes outgoing business messages and generates the message-context document that is used in processing outgoing messages. By default, this is the only logic plug-in in the filter chain. The XOCP filter logic plug-in for a hub delivery channel can use any XPath filter expressions defined to determine whether or not to send a message. For more information, see Routing and Filtering Business Messages in Programming Logic Plug-Ins for B2B Integration.

XOCP-Encoder

The encoder forwards the message to the B2B transport service.

XOCP-Decoder

The decoder processes the XOCP headers, identifies the sending trading partner, enlists the sending trading partner in a conversation, prepares a reply to return to the sender, and forwards the message to the B2B scheduling service.


For details about developing logic plug-ins and processing messages through the WebLogic Integration B2B engine, see Programming Logic Plug-Ins for B2B Integration.

Trading Partners

The WebLogic Integration sample scenario involves three business partners: a buyer (General Control Systems) and two suppliers. For each business partner, a trading partner is configured in the BulkLoaderData.xml file. The following trading partners are defined for the sample: WLIS_Buyer, WLIS_SupplierOne, and WLIS_SupplierTwo.

Because these trading partners communicate using the XOCP business protocol, General Control Systems must define its WebLogic Integration system as hub-and-spoke configuration. (See Getting Started with B2B integration in Introducing B2B Integration for details about configuring B2B integration.) To that end, the BulkLoaderData.xml file defines a fourth trading partner: WLIS_Hub.

The WLIS_Hub trading partner acts as an intermediary. It is responsible for mediating messages between the spoke trading partners: WLIS_Buyer, WLIS_SupplierOne, and WLIS_SupplierTwo. The WLIS_Hub trading partner is not the sender or receiver of a business message, but it acts as the proxy buyer and proxy supplier, at different times during the transaction.

Each of the three trading partners—WLIS_Buyer, WLIS_SupplierOne, and WLIS_SupplierTwo—has a collaboration agreement with the WLIS_Hub trading partner. The WLIS_Hub trading partner is responsible for linking collaboration agreements. Such linking is essential, for example, when a message arrives as part of one collaboration agreement and must be routed to another trading partner as part of another collaboration agreement. Collaboration agreements that use the same delivery channel—the channel defined for the WLIS_Hub trading partner—are linked. For details about the collaboration agreements in this scenario, see Collaboration Agreements.

Each trading partner element is characterized by various attributes and subelements, some of which contain simple identification information, such as name, email, phone, and fax. Other trading partner configuration information is described in the following table.

Table 3-2 Trading Partner Configuration

Element

Description

Type

Note that Type="LOCAL" for all trading partners in the sample scenario because all run on the same instance of WebLogic Server.

Party Identifier

A unique party ID, which is used along with the trading partner name to identify the party in a collaboration agreement.The party ID has a unique name, a business ID, and a business ID type.

Business ID

Descriptive name for the business ID associated with a party ID. In this sample scenario the same business ID (business-id="999999999") is used for both the WLIS_Hub and WLIS_Buyer trading partners because both are owned by GCS.

Each supplier trading partner has a unique business ID.

Delivery Channel

References a transport and a document exchange for each trading partner. Note that the delivery channel for the WLIS_Hub trading partner is configured with routing-proxy="true", and the delivery channels for the other trading partners (each of which is configured as a spoke in this scenario) are configured with routing-proxy="false".

Document Exchange

Defines the business protocol (XOCP for this scenario) and run-time parameters.

Transport

Defines the transport protocol (HTTP) and end-point URI.


Note: See the BulkLoaderData.xml file for the sample's trading partner configuration.

Conversation Definitions

The BulkLoaderData.xml file contains two XOCP conversation definitions, one each for the Query Price and Availability (QPA) and the Purchase Order (PO) conversations. There are two roles—buyer and supplier—for each conversation. Each role references the following:

Note: The BPM component of WebLogic Integration was formerly known as WebLogic Process Integrator (WLPI). You may still see references to WebLogic Process Integrator or WLPI, as in the names of the template and organization shown here.

The workflow template, in turn, references the conversation definition to which it applies. (For example, see the reference to a conversation in Figure3-12, which shows properties for one of the public workflows used in this sample).

For details about the workflows used to implement this sample, see Business Process and Workflow Modeling.

Organizations represent different business entities, geographical locations, or any other classifications that are relevant to the particular business of the company. For details about BPM organizations, see Configuring the Security Realms in Programming BPM Client Applications.

The following listing is an excerpt from the BulkloaderData.xml file. It defines the WLIS_QPAConversation.

Listing 3-2 Conversation Definition in the BulkLoaderData.xml File

...
<conversation-definition
name="WLIS_QPAConversation"
version="1.1"
business-protocol-name="XOCP"
protocol-version="1.1">
<role
name="Buyer"
wlpi-template="WLIS_BuyerQPAPublic">
<process-implementation wlpi-org="ORG1" />
</role>
<role
name="Supplier"
wlpi-template="WLIS_SupplierQPAPublic">
<process-implementation wlpi-org="ORG1" />
</role>
</conversation-definition>
...

Collaboration Agreements

Six collaboration agreements are used in this sample: three in the QPA conversation and three in the PO conversation. For each conversation, collaboration agreements are defined between the following pairs of business entities:

The following figure illustrates the collaboration agreements among trading partners who participate in the QPA conversation (WLIS_QPAConversation).

Figure 3-1 Collaboration Agreements Among Trading Partners in the QPA Conversation


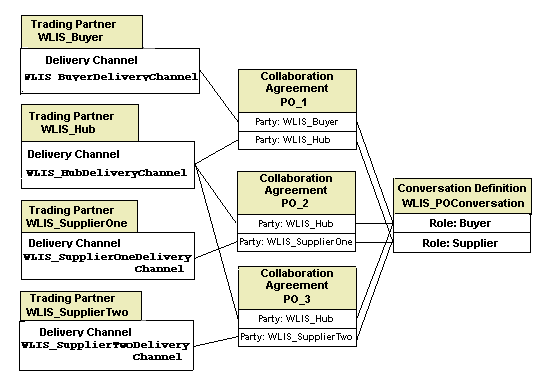
The following figure illustrates the collaboration agreements among trading partners who participate in the PO conversation (WLIS_POConversation).

Figure 3-2 Collaboration Agreements Among Trading Partners in the PO Conversation


Notice the following details in the preceding figures:
Using the WebLogic Integration B2B Console

WebLogic Integration allows you to bulk load configuration data or enter it through the WebLogic Integration B2B Console. You do not need to run the B2B Console when you run the WebLogic Integration sample, but you can use it to view the repository data that is bulk loaded for the sample (see Loading the Repository Data). You can also use the B2B Console to monitor the ongoing conversations while you are running the sample.

Start the WebLogic Integration B2B Console by completing the procedure appropriate for your platform:

Note: If you have not already done so, run the WebLogic Integration sample as described in Setting Up and Running the Sample.

The following figure shows the WebLogic Integration B2B Console with the WebLogic Integration sample data loaded.

Figure 3-3 WebLogic Integration B2B Console Displaying Sample Data


See Online Help for the WebLogic Integration B2B Console and Administering B2B Integration for details about using the WebLogic Integration B2B Console to configure B2B integration. See Working with the Bulk Loader in Administering B2B Integration for details about the Bulk Loader.


Business Process and Workflow Modeling

This section provides a brief introduction to the business process management (BPM) functionality provided by WebLogic Integration, followed by instructions for starting and using the Studio, and descriptions of the two business processes implemented by the WebLogic Integration sample: Query Price and Availability (QPA) and Purchase Order (PO). It includes the following topics:

Introduction to BPM

Workflows that implement the roles assigned to trading partners in a conversation definition (see Conversation Definitions) are referred to as collaborative workflows.

A workflow template represents a workflow, and combines various workflow template definitions (versions) of its implementation. Workflow templates are designed and edited in the WebLogic Integration Studio. Several BPM plug-ins extend the functionality of the Studio:

In this sample scenario, trading partners implement both private and collaborative workflows. Private workflows work in conjunction with the collaborative workflows, and implement local processes for the trading partners. Local and private processes are not necessarily dictated by the conversation definition. For example, when a trading partner starts a conversation, that trading partner's private workflow can start the collaborative workflow to initiate the conversation.

The following sections describe the implementation of the business processes on the buyer-side and supplier-side of the sample business transaction. Key workflow design elements, tasks, and events are highlighted.

Using the WebLogic Integration Studio

The WebLogic Integration Studio allows you to design new workflows and monitor running workflows using a familiar flowchart paradigm. You are not required to run the Studio when you run the WebLogic Integration sample, but you may find it useful for viewing the details of any workflow or workflow node, and for learning how nodes are defined and configured for this sample. You can also use the Studio to monitor the workflows as you run the sample.

This section provides procedures for starting and using the Studio, and a list of components used by the sample to manage business processes.

Launching the Studio

Launch the Studio by completing the procedure appropriate for your platform:

Viewing Workflow Templates in the Studio

To view a workflow template and its properties in the Studio, complete the following procedure:

  1. In the left pane of the Studio, make sure ORG1 is selected in the Organization field.

  2. In the left pane, double-click the Templates folder to display a list of workflow templates.

  3. Expand the Templates folder to display the list of workflow template definitions. The template definitions of interest for this sample application are listed in Table 3-3, Components Imported to the WebLogic Integration Repository. They are imported, via the workflow.jar file, when you configure the sample, as described in Step 1. Configure and Invoke the Launcher Web Page.

  4. Right-click a template definition, and select Open to open the workflow template in the Studio.

    Note: You can also expand a particular workflow template definition to display folders containing the Tasks, Decisions, Events, Joins, Starts, Dones, and Variables for that workflow template definition.

  5. Double-click any node in the Studio to display the Properties dialog box for that node.

See Using the WebLogic Integration Studio for complete details about the Studio tools and functionality.

BPM Components Used in the Sample

Workflow templates and other data required by the Studio and process engine for this sample application are loaded into the WebLogic Integration repository, via the workflow.jar file, when you configure the sample. Imported components include those listed in the following table.

Table 3-3 Components Imported to the WebLogic Integration Repository

Component

Name

Business Operations

binary to file

file to binary

xmlToFile

create POAck from PO

Template Definitions

WLIS_BuyerPOPrivate

WLIS_BuyerPOPublic

WLIS_BuyerQPAPrivate

WLIS_BuyerQPAPublic

WLIS_SupplierOnePOPrivate

WLIS_SupplierOneQPAPrivate

WLIS_SupplierPOPublic

WLIS_SupplierQPAPublic

WLIS_SupplierTwoPOPrivate

WLIS_SupplierTwoQPAPrivate

XML Repository Folders

com.bea.wlxt.MFL

wlis

XML Repository Entities

PO.mfl

PO.dtd

POAck.mfl

POAck.dtd

Event Keys

PORequest

AggregatedQPAResponse

PurchaseOrderAcknowledgement


QPA Business Process

Due to the supply shortage of metal boxes, GCS (the buyer trading partner) sends a QPA message for such boxes to selected suppliers. The following diagram illustrates the flow of events for the QPA business process.

Figure 3-4 Process Flow in the QPA Business Process


The following sequence summarizes the events illustrated in the preceding figure:

  1. The buyer trading partner creates a QPA.

  2. The QPA is sent to suppliers.

  3. The suppliers process the QPA and generate responses.

  4. The buyer trading partner collects and aggregates responses from the suppliers.

Note: The preceding figure shows a high-level view of the QPA business process. Each side of the process is implemented by a public (collaborative) and a private workflow. The following sections describe these workflows:

Overview of the QPA Implementation

In this scenario, each trading partner implements a private and a public workflow for the QPA process. The following five workflow templates are used in this sample's QPA process.

Table 3-4 Workflows for the Sample QPA Process

Role

Public/Private

Workflow Name

Buyer

Private

WLIS_BuyerQPAPrivate

Buyer

Public

WLIS_BuyerQPAPublic

Supplier

Public

WLIS_SupplierQPAPublic

Note: Both suppliers in the scenario use the same public workflow.

Supplier

Private

WLIS_SupplierOneQPAPrivate

Supplier

Private

WLIS_SupplierTwoQPAPrivate


WebLogic Integration manages the business conversations and collaboration agreements between business partners, and it automates the business message exchange between the buyer and suppliers. The workflows are referenced in the collaboration agreements and conversations, as described in Understanding the Repository Data.

This sample uses JSPs and JSP tag libraries to initiate the QPA process and display QPA request and response data. The following figure illustrates the data flow among the trading partners involved in the QPA business transaction.

Figure 3-5 Data Flow in the QPA Business Process


The buyer-side and supplier-side implementations are discussed in more detail in Buyer-Side Implementation and Supplier-Side Implementation.

The following sequence of events summarizes the data flow among trading partners and workflows:
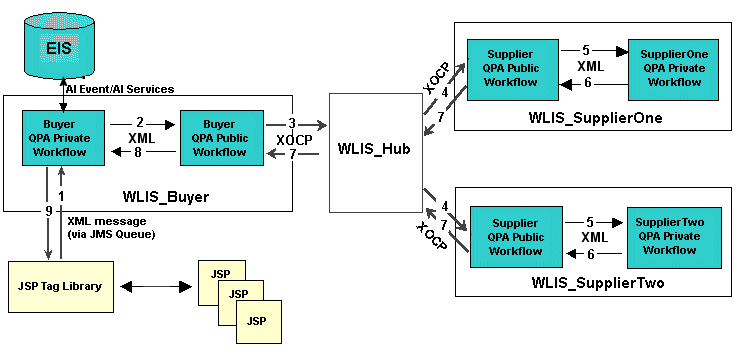
  1. The JSP containing the QPA form (see Figure2-2) sends the QPA request to a JMS queue and triggers the WLIS_BuyerQPAPrivate workflow.

  2. The WLIS_BuyerQPAPrivate workflow invokes the WLIS_BuyerQPAPublic workflow, passing it the QPA request XML document. It then initiates the QPA conversation.

  3. Based on the collaboration agreement between the WLIS_Buyer and the WLIS_Hub trading partners, the WLIS_BuyerQPAPublic workflow packs the QPA request XML into an XOCP message and sends it to the WLIS_Hub trading partner.

    Note: When the WLIS_Hub trading partner receives a message, it is acting as the proxy supplier in the collaboration agreement.

  4. The WLIS_Hub trading partner routes the message to the destination trading partners, WLIS_SupplierOne and WLIS_SupplierTwo, based on registered collaboration agreements between itself and each supplier.

    Note: In this step, the WLIS_Hub trading partner changes roles and becomes the proxy buyer in the collaboration agreements between itself and the suppliers.

    Each supplier's public workflow is triggered by receiving the XOCP message. In this scenario, WLIS_SupplierOne and WLIS_SupplierTwo share the public workflow (WLIS_SupplierQPAPublic). The public workflow extracts the QPA request XML document from the message.

  5. The WLIS_SupplierQPAPublic workflow invokes a private workflow for each supplier and passes the QPA request XML document to the private workflows.

  6. Each supplier's private workflow creates its own QPA response (an XML document), and attaches it to the return variable of the public workflow.

  7. The WLIS_SupplierQPAPublic workflow extracts the QPA response XML document, packs it into an XOCP message, and sends it to the buyer.

    Note that the WLIS_Hub trading partner acts as a routing proxy for WLIS_Buyer. When the supplier trading partners send response messages to WLIS_Hub (based on collaboration agreements between WLIS_Hub and each supplier trading partner), WLIS_Hub acts as the proxy buyer.

    WLIS_Hub then changes roles to that of proxy supplier, and routes the response messages to the buyer (WLIS_Buyer), based on the collaboration agreement between WLIS_Hub and WLIS_Buyer.

  8. The buyer's public workflow (WLIS_BuyerQPAPublic):

    1. Extracts the QPA response XML document from the XOCP message it receives.

    2. Aggregates both supplier response documents into a single XML document and posts it, via a JMS queue, to the buyer's private workflow (WLIS_BuyerQPAPrivate).

    3. Terminates the QPA conversation and notifies the supplier public workflow (WLIS_SupplierQPAPublic).

  9. The buyer's private workflow (WLIS_BuyerQPAPrivate) receives the aggregated QPA response XML document and writes it to an XML file. A JSP parses the XML and displays the aggregated QPA response in the Web browser.

    This step marks the end of the QPA business process.

Buyer-Side Implementation

To implement this solution, the buyer (GCS) implements a custom client (Web user interface) to drive the sample, process messages, and exchange XML messages with the WebLogic Integration process engine, using JMS queues. GCS also implements a private workflow, to manage the buyer's back-end processes, and a public workflow that choreographs the exchange of messages in the QPA conversation. This section discusses these components:

Buyer-Side Web User Interface

Java Server Pages (JSPs) and JSP tag libraries are used to initiate the QPA process and display request and response data in your Web browser. The source files related to the QPA process can be found in the directories listed in the following table.

Table 3-5 Source Files for the QPA Process

Directory in Your WebLogic Integration Installation

Source File

\samples\wlis\src\examples\wlis\tags

\samples\wlis\web

\samples\wlis\lib\xsl

ProcessQPAResponse.xsl


The Web user interface interacts with the buyer's private workflow (WLIS_BuyerQPAPrivate), as illustrated in the following figure.

Figure 3-6 Interaction Between the Web User Interface and the Buyer's Private Workflow


The following sequence of events describes the interaction illustrated in the preceding figure:
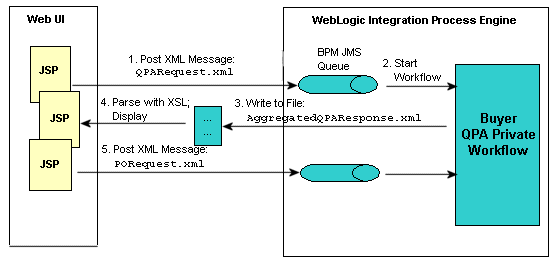
  1. The QPA request is created as XML, based on the input from the HTML Web form (see Step 4. Send the QPA Request). The XML is sent, via a JSP (SendQPARequest.jsp), to a JMS queue.

    The following listing is code from the SendQPARequestTag.java file that defines the name of the JMS queue and the queue connection factory to which the XML message is posted:

    Listing 3-4 SendQPARequestTag.java

    //Defines the JMS connection factory.
    final String JMS_FACTORY = "com.bea.wlpi.QueueConnectionFactory";
    //Defines the JMS queue.
    final String QUEUE = "com.bea.wlpi.EventQueue";
    ...

  2. The buyer's private workflow (WLIS_BuyerQPAPrivate) is started.

  3. The WLIS_BuyerQPAPrivate workflow receives responses from both suppliers, aggregates them, and writes the QPA responses to a local file, AggregatedQPAResponse.xml.

  4. A JSP (CheckQPAResponse.jsp) reads the file using a JSP tag, parses the XML data using XSL (see \samples\wlis\lib\xsl\processQPAResponse.xsl), and displays the results in the Web browser as shown in Figure2-5, Create PO Window.

  5. When running the sample, you, as the buyer, select the supplier. (See Step 6. Create the Purchase Order). The JSP posts an XML message that contains the QPA response data for the selected supplier to the JMS topic. The buyer's private workflow (WLIS_BuyerQPAPrivate) receives and processes the message.

Buyer QPA Private Workflow

The WLIS_BuyerQPAPrivate workflow is initiated by the JMS message, which contains the QPA request data, sent from a JSP. The interaction of the workflow with the Web user interface is described in Buyer-Side Web User Interface.

The WLIS_BuyerQPAPrivate workflow template is shown in the following figure.

Figure 3-7 WLIS_BuyerQPAPrivate Workflow Template


The following sections define the key tasks and events at the nodes in the WLIS_BuyerQPAPrivate workflow template, shown in the preceding figure:
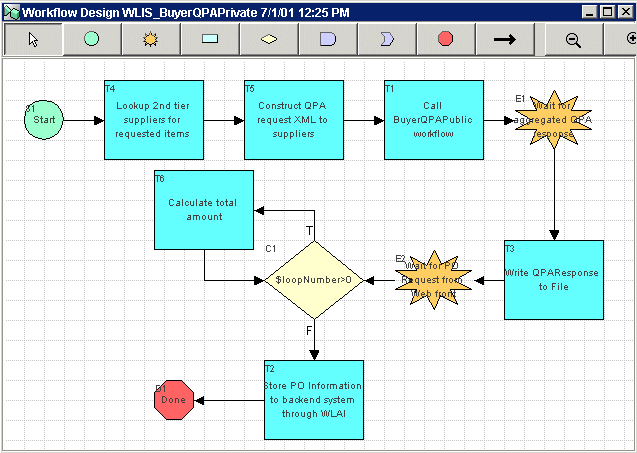
Start

An XML event received from the SendQPARequest.jsp JSP triggers the workflow.

The XML is defined by the QPARequest.dtd file. DTD files for the sample are available in DTDs. Note that the first element in the QPARequest.dtd:

QPARequestId: (<!ELEMENT QPARequestId (#PCDATA)>)

For this sample scenario, a unique value for the QPARequestId element is created by the JSP every time a QPA request is generated from the buyer's Send QPA Request Web page (see Step 3. Start the Sample). You can see the value that is generated for QPARequestId every time you run the sample by looking at the form containing the QPA response that is returned to the buyer (see Step 5. Check for QPA Responses).

The Start node extracts the XML message using an XPath expression, and stores the message in a workflow variable (qpaRequestXML). The Start node also extracts the value of the QPARequestId element, and assigns it to a workflow variable, QPARequestId. The latter variable is used in other workflows in this sample as the key value expression for an event key.

What Is an Event Key?

The WebLogic Integration process engine does not start a workflow or trigger an Event node unless the DOCTYPE or root element in the Start or Event Properties dialog box matches that in the incoming XML message. In addition to using the DOCTYPE or root element, you can further qualify the start of a workflow or the triggering of an Event node by using an event key. An event key allows you to specify the contents of incoming XML messages that will trigger a Start or Event node.

An event key consists of two parts: a key value expression and an event key expression. A key value expression is a workflow expression that specifies the exact data that an incoming document must contain for the node to be triggered. An event key expression is an expression that specifies the exact element in the XML message in which the target data is found.

To configure event key expressions, or to see the configurations in this sample, choose Configuration—>Events from the Studio task menu.

The following event key expressions are configured for this sample scenario:

Event Key Expressions

PORequest.QPARequestId

AggregatedQPAResponse.QPARequestId

PurchaseOrderAcknowledgement.PONumber

After you configure event key expressions, they are available for all workflows in all organizations. The event key expression must correspond to the value specified by the key value expression defined in the Start or Event properties dialog box, so that the process engine can compare the two values at run time and determine whether there is a match.

You may notice the QPARequestId key value expression used by workflow nodes in other sections of this document. See Configuring Workflow Resources in Using the WebLogic Integration Studio for details about defining and using event keys in the Studio tool.

Lookup 2nd Tier suppliers for requested items

A set of suppliers, which we refer to as tier 2 (or category 2) suppliers for this sample scenario, are defined in the buyer's enterprise information system (EIS). The EIS for the sample is an RDBMS. The data for these suppliers is loaded in the WebLogic Integration repository when you run the RunSamples script to set up the database for the sample (see Running the Sample). These suppliers are accessed when the primary supplier of an item cannot meet the demand, as is the case in our sample scenario.

An application view, namely WLISAppView.sav, is also deployed for this sample. See Application Integration for details about the application view. An application integration plug-in extends the functionality of the Studio so that application view services and events can be readily integrated with workflow templates. From the Studio, you can select a service to invoke, and specify service request and response variables (the variables must be in XML format).

This task node completes the following actions:

1. Composes a workflow variable (supplierLookupInputXML).

2. Calls the getSupplier service on the WLISAppView.sav application view to retrieve information from the EIS about the tier 2 suppliers.

You can select a service to be invoked from a workflow as follows:

1. Double-click the task node to invoke the Task Properties dialog box.

2. Click Add to open the Add Actions dialog box.

3. Choose AI Actions—>Call Application View Service to invoke the Call Service dialog box, which displays a list of the services for the WLISAppView.sav application view, as shown in the following figure.

Figure 3-8 Application Integration Call Service Dialog Box


Note that the value in the Request Document Variable field in the preceding figure is the XML variable that was created at this node (supplierLookupInputXML).

The application view service is called synchronously at this node. Therefore the workflow waits for the service to return a response document to this node before it continues.

The value in the Response Document Variable field is supplierLookupOutputXML. This variable receives the response from the application view service. The supplierLookupOutputXML variable is used by the workflow at the next node to construct the request XML messages.

Note: You can examine the XML schema of the input or the response document, by clicking View Request Definition or View Response Definition, respectively. The View Definition dialog box is displayed. Click Close when finished.

See Using Application Integration for information about using the application integration plug-in provided by WebLogic Integration.

Construct QPA Request XML to Suppliers

This task node creates workflow variables (qpaRequestXMLOne and qpaRequestXMLTwo) to hold the QPA Request XML message for the suppliers. These XML messages are sent from the buyer's public workflow (WLIS_BuyerQPAPublic) to the suppliers' public workflow (WLIS_SupplierQPAPublic) as part of an XOCP business message.

Because the supplier trading partners are collocated on a single instance of WebLogic Integration, and the suppliers share the same public workflow for this sample, the correct recipient for the incoming XOCP message must be identified.

To that end, a unique attribute value (SupplierName) is added to the root element of the QPA Request XML. The value for SupplierName is composed from the variable returned as a result of the CallApplicationViewService:sav.getSupplier event at the previous node in the workflow: supplierLookupOutputXML. For example, the value for the SupplierName attribute in the qpaRequestXMLOne workflow variable is generated from the following XPath expression:

ToString(XPath("//Row[1]/supplierName/text()", $supplierLookupOuputXML))

To see the attributes and elements for qpaRequestXMLOne and qpaRequestXMLTwo:

1. Double-click this node to display the Task Properties dialog box.

2. Choose Actions—>Activated.

3. Double-click one of the following actions:

Set workflow variable qpaRequestXMLOne structure

Set workflow variable qpaRequestXMLOne structure

The XML structure dialog box shown in the following figure is displayed.

Figure 3-9 Set Workflow Variable Dialog Box


Call BuyerQPAPublic workflow

This task node starts the WLIS_BuyerQPAPublic workflow and passes workflow variables containing the QPA Request XML documents to the public workflow. Because the WLIS_BuyerQPAPrivate workflow is the initiator of a WebLogic Integration B2B conversation (WLIS_QPAConversation), this task node uses the special Start Public Workflow action (provided by the B2B integration plug-in), instead of the default Start Workflow action.

The key difference between the Start Public Workflow and the Start Workflow actions is that the workflow template binding is dynamic when you use the former. The WLIS_BuyerQPAPrivate workflow determines which workflow template to invoke at run time, based on conversation properties defined in the Start Public Workflow action.

Also, based on the conversation information passed as part of the Start Public Workflow call, the B2B engine uses the collaboration agreement information (stored in the WebLogic Integration repository) to associate the called workflow with other public workflows in the same collaboration agreement.

You can define a Start Public Workflow action in the WebLogic Integration Studio as follows:

1. Double-click the task node to invoke the Task Properties dialog box.

2. Choose Actions—>Add—>Integration Actions—>B2B Integration—>Start Public Workflow to display the Start Public Workflow dialog box.

To view the Start Public Workflow properties already specified for this node:

1. Double-click the task node to invoke the Task Properties dialog box.

2. Choose Actions—>Activated.

3. Double-click Start Public Workflow to display the Start Public Workflow dialog box shown in the following figure.

Figure 3-10 Start Public Workflow Dialog Box


Note the following properties for the WebLogic Integration sample in the preceding figure:

Note also that the subworkflow (WLIS_BuyerQPAPublic) is invoked asynchronously at this node. If you open the Task Properties dialog box and choose Actions—>Activated, the following actions are specified in the order shown:

  1. Start Public Workflow

  2. Mark task "CallBuyerPublic workflow" done

See Creating Workflows for B2B Integration for more details about workflows in B2B conversations.

Wait for aggregated QPA Response

The workflow waits, at this event node, for a specific XML event from the WLIS_BuyerQPAPublic workflow. When it receives the XML event, it extracts the XML using an XPath expression, and stores it in a workflow variable. The XML is defined by the AggregatedQPAResponse.dtd file. DTDs for the sample application are available in DTDs.

This node uses a key value expression defined for it: QPARequestId. This expression is used to specify the exact data that the incoming document must contain for the node to be triggered.

If there are a number of instances of the private workflow (WLIS_BuyerQPAPrivate), the appropriate Wait for aggregated QPA Response node, in the appropriate workflow template instance, needs to be triggered at this point in the QPA process. The workflow instance that contains the node to be triggered is specified by the value of QPARequestId. (See the discussion about event keys in Start.)

Write QPAResponse to File

This action node uses the xmlToFile business operation to write the QPA response from both suppliers to the following local file in your WebLogic Integration installation: \config\samples\data\AggregatedQPAResponse.xml.

The local file is consumed by a JSP.

To see the business operations defined for this sample, choose Configuration—>Business Operations from the Studio task menu. The Business Operations dialog box containing a list of business operations is displayed. Double-click any business operation to see more information about it. You can find the Java class relevant to the xmlToFile business operation in the following location in your WebLogic Integration installation:
\samples\wlis\src\examples\wlis\common\util\Utils.java.

Wait for PO Request from Web Front

An event node that causes the workflow to wait until it receives the PO Request from the PO Request Web page. The PO Request XML message is assigned to the poRequestXML variable at this node. Note also that three other variables are assigned at this node. They are loopNumber, counter, and totalAmount, and are used in the next node in the workflow.

Decision

This node specifies a condition that must be evaluated. The result of the evaluation determines the path the workflow follows. When the condition evaluates to true, that is the value of loopNumber is greater than zero, the workflow proceeds to the Calculate total amount node. When the condition evaluates to false, the workflow proceeds to the following task node: Store PO information to the back-end system through WLAI.

Calculate total amount

This task node assigns values to three workflow variables, based on the results of expressions defined in the Set Workflow Variable dialog box. Values are first calculated for the quantity and the unit price of the requested items. The total amount for the order is the product of the quantity and unit price values.

Store PO Information to backend system through WLAI

This task node inputs the PO information into the Enterprise Information System (in this case, an RDBMS) using the application integration functionality of WebLogic Integration. From the Studio, you can select a service to invoke on the WLISAppView.sav application view that is also deployed for this sample, and specify the service request and response variables, which must be in XML format.

The application view services called from this node, insertPOData and insertLine, are called synchronously. Therefore the workflow waits for the service to return a response document to this node before it proceeds to the Done node.

See Buyer PO Private Workflow for more details.

Buyer QPA Public Workflow

The buyer's public workflow (WLIS_BuyerQPAPublic) is initiated by the buyer's private workflow (WLIS_BuyerQPAPrivate) for the QPA business process.

The following figure shows the WLIS_BuyerQPAPublic workflow template.

Figure 3-11 WLIS_BuyerQPAPublic Workflow Template


The following sections define the key tasks and events at the nodes in the WLIS_BuyerQPAPublic workflow template, shown in the preceding figure:
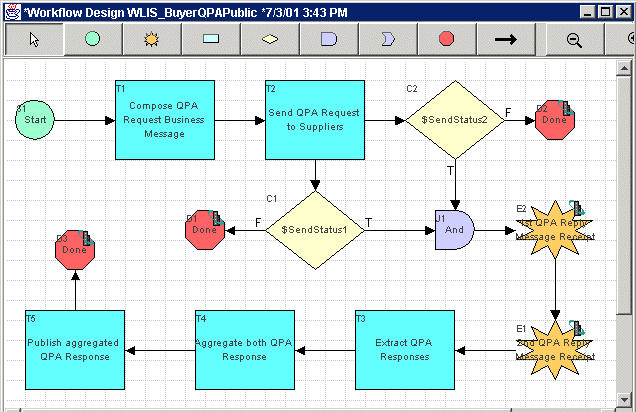
Note: You must define conversation properties for workflows involved in B2B conversations, that is, for the public workflows, which are also called collaborative workflows in the WebLogic Integration environment. The WLIS_BuyerQPAPublic workflow is an example of a collaborative workflow.

To see the conversation properties for the WLIS_BuyerQPAPublic workflow template, right click the template name in the left pane of the Studio, and select Properties from the drop-down menu. The template definition dialog box shown in the following figure is displayed.

Figure 3-12 Template Definition for the WLIS_BuyerQPAPublic Workflow


The name, version, role, and business protocol binding for the conversation are defined on the B2B Integration tab. Note also that the WLIS_BuyerQPAPublic workflow is specified as the Conversation Initiator on this tab.

Start

Starts the QPA conversation. Note that the WLIS_BuyerQPAPublic workflow is specified as the Conversation Initiator in the Template Definition dialog box shown in the previous figure. This workflow is started by the buyer's private workflow (WLIS_BuyerQPAPrivate), and is therefore defined as a called workflow.

The workflow variables assigned at this node include those that identify the suppliers to which the QPA business message is to be sent: FirstSupplierName and SecondSupplierName. (See the Send QPA Request to Suppliers node in this workflow.)

Values are assigned to these variables using an XPath expression that gets information from the XML messages passed to this workflow: QPARequestXMLOne and QPARequestXMLTwo. For example, the following XPath expression assigns a value to QPARequestXMLOne:

XPath("/QPARequest/@SupplierName/text()", $QPARequestXMLOne)

Compose QPA Request Business Message

This task node composes XOCP business messages by packing XML documents into the XOCP message payload. The XML is created by the buyer's private workflow (WLIS_BuyerQPAPrivate) and passed to this workflow in the following variables: QPARequestXMLOne and QPARequestXMLTwo.

To compose such a business message in the Studio, you must choose the Compose Business Message action, a B2B action provided by the B2B integration plug-in. Access the Compose Business Message dialog box as follows:

1. Double-click this node to display the Task Properties dialog box.

2. Choose Actions—>Activated.

3. Choose Add—>Integration Actions—>B2B Integration—>Compose Business Message to display the Compose Business Message dialog box.

Two business messages are composed at this node: QPARequestMessageOne and QPARequestMessageTwo. They are stored in variables of type Java Object.

Send QPA Request to Suppliers

Actions defined at this task node send an XOCP message to each of two suppliers through the WLIS_Hub trading partner.

The sample application uses a router expression on this task node. The WLIS_Hub routes the QPA Request XOCP message to a supplier, based on the Router Expression Type (in this case, Trading Partner Name).

To see the Router Expression defined for this node, invoke the Send Business Message dialog box as follows:

1. Double-click this node to display the Task Properties dialog box.

2. Choose Actions—>Activated, and double-click Send Business Message.

The dialog box shown in the following figure is displayed.

Figure 3-13 Send Business Message Dialog Box
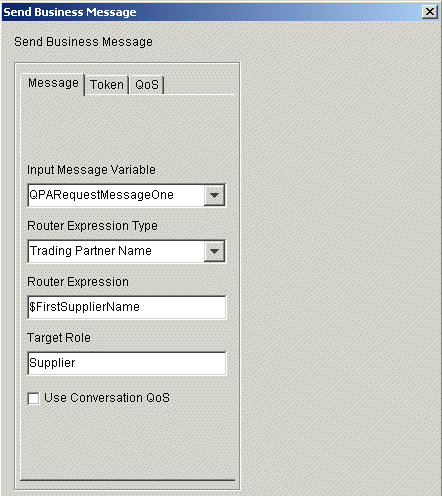


In the preceding figure, note that the value selected for Router Expression Type is Trading Partner Name, and that the value for the Router Expression is contained in the FirstSupplierName variable. The FirstSupplierName and SecondSupplierName variables are assigned at the Start node for this workflow.

1st/2nd QPA Reply Message Receipt

These are event nodes, at which the workflow waits for replies from the suppliers. Because there are two suppliers, two event nodes are defined. The order of receipt of reply messages is not defined; that is, an incoming business message is assigned to a target variable. The supplier's name is subsequently derived from the business message XML.

Note that both of these event nodes are of type Conversation Event. Double-click one of these nodes to see the Event Properties dialog box displayed in the following figure.

Figure 3-14 B2B Conversation: Event Node Properties


To distinguish between event nodes that wait for business messages from other trading partners in a B2B conversation and other event nodes (for example, those waiting for an internal XML event), specify the former event nodes as Conversation Event type. The Event Properties dialog box in the preceding figure defines the properties for a node that waits to receive the first QPA Reply Message.

Extract QPA Responses

After receiving replies from both suppliers, this task node unpacks the XOCP messages (in the FirstQPAResponseMessage and FirstQPAResponseMessage variables). It then extracts the QPA response XML documents into the following variables: FirstQPAResponseXML and SecondQPAResponseXML.

Aggregate both QPA Responses

This task node defines a Set Workflow Variable action by composing an XML Structure. The action aggregates the XML response documents into a single QPA response XML document. The XML document is stored in the AggregatedQPAReply variable.

To view the XML workflow variable created for this sample in the Set Workflow Variable dialog box:

1. Double-click the node.

2. Choose Actions—>Activated.

3. Double-click the Set Workflow Variable action defined for this node (Set workflow variable "AggregatedQPAReply" XML structure) to invoke the Set Workflow Variable dialog box shown in the following figure.

Figure 3-15 Set Workflow Variable Dialog Box


In the preceding figure, note that the AggregatedQPAResponse XML is composed of the following elements: QPARequestId, Creation Date, and the QPA Response from each supplier.

Publish Aggregated QPA Response

This task node defines a Post XML Event action. (You can define such an event for a node by double-clicking the node to display the Task Properties dialog box, then choosing Add—>Integration Actions—>Post XML Event.) This action posts the aggregated QPA response (the AggregatedQPAReply variable defined at the previous node) as an internal XML event.

An internal XML event is an event internal to BPM: it triggers an event in the current workflow or another one, or it starts another workflow for which the Start node is triggered by an event. Because the destination is internal, the XML message is sent to an internal JMS queue maintained by BPM. The JNDI name of the internal JMS queue is com.bea.wlpi.EventQueue.

This aggregated QPA response message is called an Addressed Message, indicating that the message should persist for a particular workflow instance. In this case, the addressing is achieved through the instance ID, QPAPrivateFlowId. This instance ID specifies the instance of the private workflow that calls this public workflow. In this case, the QPAPrivateFlowId instance ID is first specified by the private workflow that calls this public workflow (WLIS_BuyerQPAPrivate), as described in Call BuyerQPAPublic workflow. In this way, various instances of caller and called workflows are synchronized.

Done

Terminates the QPA conversation successfully. Other Done nodes in the workflow terminate the conversation unsuccessfully if the business messages are not sent to both suppliers from the Send QPA Request to Suppliers node.

Supplier-Side Implementation

To implement this solution, the suppliers implement private workflows to manage the back-end processes, and a public workflow that choreographs the exchange of messages in the QPA conversation. This section describes the following workflows:

Supplier QPA Public Workflow

The suppliers' QPA public workflow (WLIS_SupplierQPAPublic) is initiated by the incoming message from the WLIS_Hub trading partner.

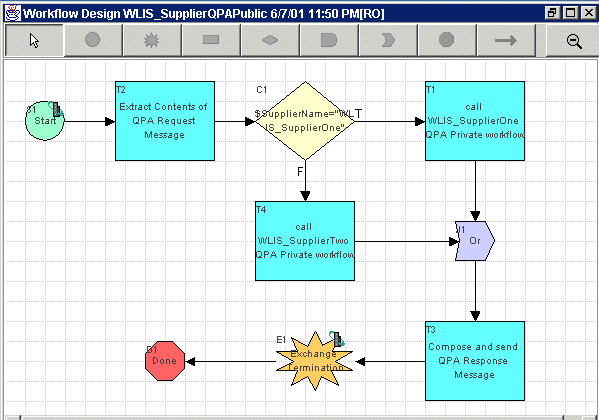
The following figure shows the WLIS_SupplierQPAPublic workflow template.

Figure 3-16 WLIS_SupplierQPAPublic Workflow Template


The following sections define the key tasks and events at the nodes in the WLIS_SupplierQPAPublic workflow template, shown in the preceding figure:
Start

The WLIS_SupplierQPAPublic workflow is started by an event, that is, the receipt of the QPA Request business message.

Extract Contents of QPA Request Message

The first Extract Business Message Parts action extracts the XML message from the incoming business message (from the QPARequestMessage variable) and assigns the XML to the QPARequestXML variable.

Another action defined at this node sets a workflow variable that, in turn, defines the supplier's name for the QPA request message. The suppliers in this sample are collocated on the same instance of WebLogic Integration, they have identical roles in the QPA conversation, and they share the same public workflow template. The WLIS_Buyer trading partner sends two XOCP messages (one for each supplier) via the WLIS_Hub trading partner. This action sets a variable (SupplierName) by extracting the unique attribute value in the incoming QPA request XML document, using the following XPath expression:

ToString(XPath("/QPARequest/@SupplierName", $QPARequestXML))

Call WLIS_SupplierOneQPA Private Workflow

Based on the value of the SupplierName variable, which was set at the previous node in this workflow, the instance of this public workflow starts the appropriate supplier private workflow (in this case, WLIS_SupplierOneQPAPrivate). Note that this action starts a private workflow; it is different from the Start Public Workflow action described (in Call BuyerQPAPublic workflow) as part of the WLIS_BuyerQPAPrivate workflow.

You can define the Start Workflow action as follows:

1. Double-click the task node to display the Task Properties dialog box.

2. Choose Actions—>Activated—>Add—>Workflow Actions—>Start Workflow to display the Start Workflow dialog box.

3. Select the name of the workflow to call and define other parameters.

To view the Start Workflow action defined for this node in this workflow:

1. Double-click the node.

2. Choose Actions—>Activated.

3. Double-click the Start Workflow action defined for this node (Start workflow "WLIS_SupplierOneQPAPrivate") to invoke the Set Workflow Variable dialog box.

For this node, the Start Workflow dialog box allows you to define the WLIS_SupplierOneQPAPrivate workflow in the Workflow to Start field. The Start Workflow dialog box also contains a Results tab, which, in turn, contains a Variable field and a Result field. In this case, QPAResponseXML is specified in the Variable field; QPAReplyXML, in the Result field. The Results tab displays variables that are defined as output parameters in the called workflow. An output parameter is used by a calling workflow to receive values from a called workflow.

In this case, the Results tab assigns the QPAResponseXML variable to the QPAReplyXML Result. The Result value is assigned to the QPAReplyXML output parameter at the Create QPA Reply XML node in the WLIS_SupplierOneQPAPrivate workflow (see Supplier QPA Private Workflow).

After this assignment is made, the caller workflow, WLIS_SupplierQPAPublic in this case, proceeds to the next task. In short, the call from this node to the private workflow is a synchronous call.

Or

A join node. The called workflows (WLIS_SupplierOneQPAPrivate and WLIS_SupplierTwoQPAPrivate) are invoked synchronously. As a result, the caller workflow (WLIS_SupplierQPAPublic) does not proceed until it gets results from one of the private workflows.

Call WLIS_SupplierTwoQPA Private Workflow

Based on the value of the SupplierName variable, which is set in the Extract Contents of QPA Request Message node in this workflow, this instance of this public workflow starts the appropriate supplier private workflow (in this case, WLIS_SupplierTwoQPAPrivate).

The tasks performed at this node are the same as those performed at the Call WLIS_SupplierOneQPA Private Workflow (described earlier), except that the WLIS_SupplierTwoQPAPrivate workflow is called at this node.

Compose and Send QPA Response Message

The first action at this node composes the response message from the supplier. It takes the QPAResponseXML variable from the private workflow and builds the response message into the QPAReplyMessage output variable.

The Send Business Message action sends the business message, which is assigned to the QPAReplyMessage variable, to the WLIS_Buyer trading partner via the WLIS_Hub. WLIS_Hub routes this QPA Response XOCP message to the WLIS_Buyer trading partner, based on the Router Expression Type (in this case, Trading Partner Name). To see the router expression as defined for this node, you can invoke the Send Business Message dialog box as follows:

1. Double-click this node to display the Task Properties dialog box.

2. Choose Actions—>Activated, and double-click Send Business Message to display the Send Business Message dialog box.

The dialog box contains three tabs: Message, Token, and QoS. Note the following parameters on the Message tab.


Exchange Termination

An event node of type Conversation Event. This node terminates the QPA conversation.

Supplier QPA Private Workflow

There are two workflow templates in this category, one for each supplier:

The templates differ only slightly from each other. We leave it as an exercise for readers to determine the difference.

The suppliers' QPA private workflows are invoked from the suppliers' QPA public workflow (WLIS_SupplierQPAPublic).

The following figure shows the WLIS_SupplierOneQPAPrivate workflow template.

Figure 3-17 WLIS_SupplierOneQPAPrivate Workflow Template


The following sections define the key tasks and events at the nodes in the WLIS_SupplierOneQPAPrivate workflow template shown in the preceding figure:

Start

The workflow is a called workflow, that is, it is started from the suppliers' public workflow (WLIS_SupplierQPAPublic). A variable called selfName is set at this node. In this case, the value of selfName is WLIS_SupplierOne.

Extract Variables from QPA Request

Several Set Workflow Variable actions are defined at this node. These actions use XPath expressions to extract the quantity, unit price, and required date of delivery from the incoming QPA Request XML document, and to assign the data to workflow variables.

For example, the unit price is extracted from the incoming XML document, and assigned to the RequestPrice variable, using the following XPath expression:

ToString(XPath("//Availability/UnitPrice/text()",
$QPARequestXML))

Decision Nodes

The workflow contains two decision nodes, which evaluate quantity and price conditions:

RequestQuantity

The content of the RequestQuantity variable is evaluated and a return variable (ReplyQuantity) is set, depending on the result of the evaluation.

RequestPrice

The content of the RequestPrice variable is evaluated and a return variable (ReplyPrice) is set, depending on the result of the evaluation.

Examine Figure2-2, Send QPA Request Window, and Figure2-5, Create PO Window, to compare the quantity and price per unit that were requested by the buyer in this sample scenario, with the quotes the buyer subsequently received from the suppliers.

Create QPA Reply XML

This task node creates the QPA Response XML document using the XML editor. The document is assigned to the return workflow variable (QPAReplyXML) of the public workflow (WLIS_SupplierQPAPublic) that invoked this private workflow.

The QPA Response XML document is defined by the QPAResponse.dtd DTD. See DTDs, for the QPA Response DTD.

After the QPAReplyXML variable is set by this workflow, the public workflow that called it can proceed to its next task. This sequence of WLIS_SupplierQPAPublic public workflow tasks is described in Call WLIS_SupplierOneQPA Private Workflow.

PO Business Process

Assume that you are the buyer in this sample scenario. After reviewing the QPA responses from the suppliers, select one of the suppliers and start the PO business process, as described in Step 6. Create the Purchase Order. The following diagram illustrates the flow of events for the PO business process.

Figure 3-18 Process Flow in the PO Business Process


The following sequence summarizes the events illustrated in the preceding figure:
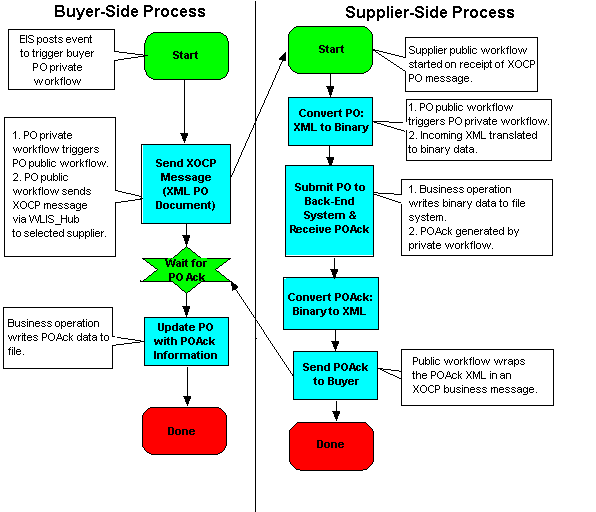
  1. The buyer composes a purchase order (PO) document.

  2. The buyer sends the PO document to the selected supplier.

  3. The supplier receives the PO and converts the XML-based PO document into a binary data file. (In this sample we assume the supplier's order management system expects to receive a binary file to process the order).

  4. The supplier generates an XML-based PO acknowledgment document, based on another binary data file.

  5. The supplier sends the PO acknowledgment document to the buyer.

  6. The buyer updates the PO information, based on the PO acknowledgment.

Note: The preceding figure shows a high-level view of the PO business process. Each side of the process is implemented by a public and a private workflow. The following sections describe these workflows:

Overview of the PO Implementation

In this scenario, each trading partner implements a private workflow and a public workflow for the PO process. The following workflow templates are used in the sample.

Table 3-6 Workflows for the Sample PO Process

Role

Public/Private

Workflow Name

Buyer

Private

WLIS_BuyerQPAPrivate

Buyer

Private

WLIS_BuyerPOPrivate

Buyer

Public

WLIS_BuyerPOPublic

Supplier

Public

WLIS_SupplierPOPublic

Note: Both suppliers in the scenario use the same public workflow.

Supplier

Private

WLIS_SupplierOnePOPrivate

Supplier

Private

WLIS_SupplierTwoPOPrivate


The PO implementation for this sample requires WebLogic Integration support for application integration, data integration, and management of business processes. This section describes the PO workflows, including their integration with back-end applications and heterogeneous data formats. See Application and Data Integration for more information about application integration and data integration functionality as it applies to the PO business process in this scenario.

The following figure illustrates the data flow among the trading partners involved in the PO business process.

Figure 3-19 Data Flow in the PO Business Process


For details about the buyer-side and supplier-side implementations, see Buyer-Side Implementation and Supplier-Side Implementation.

The following sequence of events summarizes the data flow among trading partners, workflows, and back-end systems:
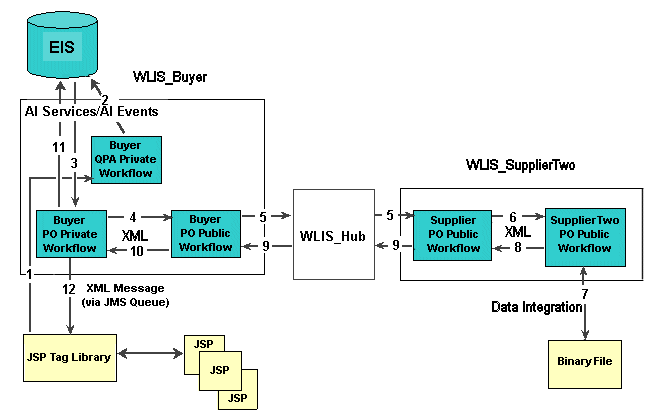
  1. The PO business process is started when you, as the buyer in this scenario, select a supplier and create a purchase order, as described in Step 6. Create the Purchase Order.

    A JSP extracts the PO request information, including the party ID, unit price, quantity, and delivery date, and puts it in an XML message. The XML message is posted to the BPM JMS queue.

  2. The buyer's private workflow (WLIS_BuyerQPAPrivate) that subscribes to the XML event is invoked by the event posting.

    The WLIS_BuyerQPAPrivate workflow invokes the insertPO service on the WLISAppView.sav application view to insert the PO information into the Enterprise Information System (EIS). The EIS is simulated by an RDBMS in this sample. (The WLISAppView.sav application view, together with its services and events, is configured and deployed in WebLogic Integration when you set up the sample.)

  3. The EIS sends an event containing the PO information to the WebLogic Integration process engine.

    The application view event triggers the start of the buyer's private workflow for the PO process (WLIS_BuyerPOPrivate).

  4. The WLIS_BuyerPOPrivate workflow starts the buyer's public workflow (WLIS_BuyerPOPublic).

  5. WLIS_BuyerPOPublic sends an XOCP message to the suppliers' public workflow (WLIS_SupplierPOPublic). This step initiates the PO conversation.

    The WLIS_Hub trading partner routes the message to the destination trading partner, WLIS_Buyer, based on a registered collaboration agreement between itself and WLIS_Buyer.

    Note: In this step, the WLIS_Hub trading partner changes roles and becomes the proxy supplier in the collaboration agreement between itself and the buyer.

  6. On the supplier side, an instance of the suppliers' public workflow (WLIS_SupplierPOPublic) is started when the supplier receives the XOCP message.

    The WLIS_SupplierPOPublic workflow starts the selected supplier's private workflow (WLIS_SupplierOnePOPrivate or WLIS_SupplierTwoPOPrivate).

  7. The selected supplier's private workflow:

    1. Translates the XML PO data it receives to binary data, using the data integration functionality of WebLogic Integration.

    2. Generates a PO acknowledgment in binary format.

    3. Translates the PO acknowledgment from binary format to XML.

  8. The supplier's private workflow returns the PO acknowledgment XML data to the WLIS_SupplierPOPublic workflow.

  9. The WLIS_SupplierPOPublic workflow wraps the PO acknowledgment information in an XOCP message and sends it to the buyer's public workflow (WLIS_BuyerPOPublic).

  10. The WLIS_BuyerPOPublic workflow receives the XOCP message, extracts the XML content, and sends an XML event to the buyer's private workflow (WLIS_BuyerPOPrivate).

    This step marks the end of the PO conversation.

  11. The WLIS_BuyerPOPrivate workflow uses the application integration framework provided by WebLogic Integration to update the PO information in the EIS, based on the data provided in the PO acknowledgment. The workflow also writes PO acknowledgment information to the POAcknowledgement.xml file.

  12. A JSP reads the POAcknowledgement.xml file and displays the contents in the PO Confirmation window described in Step 8. Check for Purchase Order Acknowledgment.

    This step marks the end of the PO business process.

Buyer-Side Implementation

The buyer (GCS) in our sample scenario implements a Web user interface to drive the business transaction, a private workflow to manage the buyer's back-end processes, and a public workflow that choreographs the message exchange in the PO conversation. The WLIS_Buyer trading partner stores its PO information in an RDBMS.

Through the use of the application integration framework provided by WebLogic Integration, the workflows in the PO business process can integrate with the RDBMS. To support application integration, an application view (WLISAppView.sav) is deployed for this sample when you set up and configure the samples domain. (The sample domain setup is described in Step 1A: Invoke the RunSamples Script.)

This section discusses the following components of the buyer-side PO business process:

Buyer-Side Web User Interface

The interaction between the Web browser and the buyer-side workflows for the buyer-side implementation is similar to that for the QPA business process—Java Server Pages (JSPs) and JSP tag libraries are used to initiate the PO process and display request and response data in your Web browser. The source files related to the PO business process can be found in the directories listed in the following table.

Table 3-7 Source Files for the PO Process

Directory in your WebLogic Integration Installation

Source Files

\samples\wlis\src\examples\wlis\tags

\samples\wlis\web

\samples\wlis\lib\xsl


Buyer PO Private Workflow

The WLIS_BuyerPOPrivate workflow performs the following key tasks:

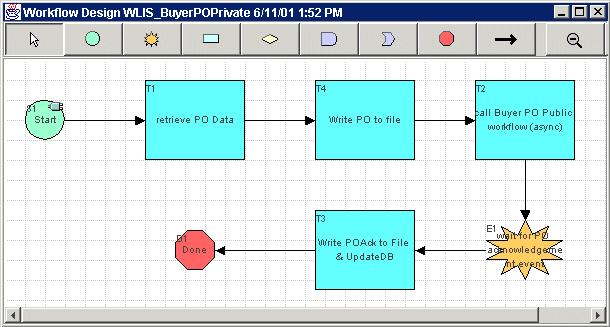
The following figure shows the WLIS_BuyerPOPrivate workflow template.

Figure 3-20 WLIS_BuyerPOPrivate Workflow Template


The following sections define the key tasks and events at the nodes in the WLIS_BuyerPOPrivate workflow template, shown in the preceding figure:
Start

The final task in the buyer's QPA private workflow (WLIS_BuyerQPAPrivate), described in Buyer QPA Private Workflow, is to input PO information into the EIS system, using the insertPO service defined for the WLISAppView.sav application view, which is deployed for this sample application. (See Application Integration for details about the application view.)

The EIS subsequently uses an application view event to post an event to the WebLogic Integration process engine. The event (WLISAppView.sav.insertPOEvent) triggers the start of the WLIS_BuyerPOPrivate workflow at this Start node.

The Start Properties dialog box for this node specifies that this workflow is started by an application integration event, namely the insertPO event defined for the WLISAppView.sav application view.

Double-click this Start node to view the Start Properties dialog box shown in the following figure.

Figure 3-21 Start Properties Dialog Box


In the preceding figure, note that the Event Document Variable field in the Start Properties dialog box is populated with the aiEventXML variable. The data format for the event is XML and the XML Schema language defines the event schema. When the start node receives data from the application view event, the data is stored in the aiEventXML variable.

Note: You can examine the XML schema of the event document by clicking View Definition in the Start Properties dialog box.

A workflow variable (PONumber) is set at this node, using the following XPath expression to get the PO number from the incoming PO data:

XPath("/PURCHASEORDER.insert/PONUMBER/text()",$aiEventXML)

Retrieve PO Data

This task node completes the following actions:

1. Composes workflow variables.

2. Calls application view services to retrieve PO information from the EIS.

This task node is set up to call application view services through the same procedure provided for the node called Lookup 2nd Tier suppliers for requested items, which is described in Buyer QPA Private Workflow.

See Using Application Integration for more information about using the application integration plug-in provided by WebLogic Integration.

Write PO to file

This action node uses the xmlToFile business operation to write the PO to a local file (BEA_HOME/config/samples/data/PO.xml). The local file is consumed by a JSP.

To see business operations defined for this sample, choose Configuration—>Business Operations from the Studio task menu. The Business Operations dialog box is displayed. Double-click any business operation to see more information about it. You can find the Java class relevant to the xmlToFile business operation in the following location in your WebLogic Integration installation:
\samples\wlis\src\examples\wlis\common\util\Utils.java.

Call Buyer PO Public workflow

This task node starts the buyer's public workflow (WLIS_BuyerPOPublic) asynchronously, and passes workflow variables containing the QPA Request XML documents to the public workflow. Because the WLIS_BuyerPOPrivate workflow is the initiator of a WebLogic Integration B2B conversation (WLIS_POConversation), this task node uses the special Start Public Workflow action (provided by the B2B integration plug-in), instead of the default Start Workflow action.

The key difference between the Start Public Workflow and the Start Workflow actions is that the workflow template binding is dynamic when you use the former. The WLIS_BuyerPOPrivate workflow determines which workflow template to invoke at run time, based on conversation properties defined in the Start Public Workflow action.

Also, based on the conversation information passed as part of the Start Public Workflow call, the B2B engine uses collaboration agreement information (stored in the WebLogic Integration repository) to associate the called workflow with other public workflows in the same collaboration agreement.

You can define a Start Public Workflow action in the WebLogic Integration Studio as follows:

1. Double-click the task node to invoke the Task Properties dialog box.

2. Choose Actions—>Add—>Integration Actions—>B2B Integration—>Start Public Workflow to display the Start Public Workflow dialog box.

To view the Start Public Workflow properties already specified for this node:

1. Double-click the task node to invoke the Task Properties dialog box.

2. Choose Actions—>Activated.

3. Double-click Start Public Workflow to display the Start Public Workflow dialog box shown in the following figure.

Figure 3-22 Start Public Workflow Dialog Box


Note the following parameters for the Start Public Workflow action shown in the preceding figure:

Wait for PO acknowledgement

The workflow waits, at this event node, for a specific XML event from the WLIS_BuyerPOPublic workflow. This node uses a key value expression to specify the exact data that the incoming document must contain for the node to be triggered. The key value expression defined for this node is PONumber. The PONumber key value is set in the Start node for this WLIS_BuyerPOPrivate workflow. See Start.

If a number of instances of the buyer's private workflow (WLIS_BuyerPOPrivate) are active, the appropriate Wait for PO Acknowledgement node, in the appropriate workflow template instance, needs to be triggered at this point in the PO process. The workflow instance that contains the node to be triggered is specified by the value of PONumber. (See the discussion about event keys in Start.)

Write POAcktoFile & UpdateDB

The actions performed at this task node include the following:

Perform business operation "xmlToFile"

This business operation writes the PO acknowledgment XML data to the following location in your WebLogic Integration installation:

/config/samples/data/POAcknowledgement.xml

Set Workflow variable "updatePOXML" XML structure

Composes an XML document and stores the content in an XML-type updatePOXML variable.

Call Application View Service

Calls the updatePOData service on the WLISAppView.sav application view to update the RDBMS with the PO data.

Buyer PO Public Workflow

The primary task of the WLIS_BuyerPOPublic workflow is to send and receive the XOCP business messages in the purchase order conversation (WLIS_POConversation).

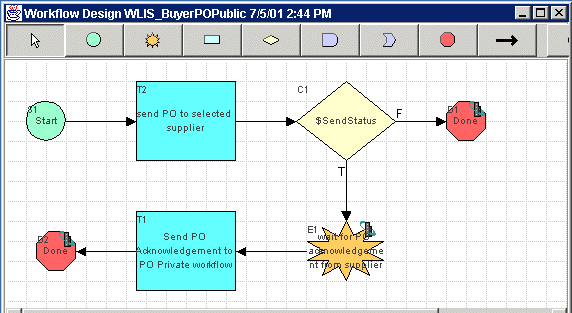
The following figure shows the WLIS_BuyerPOPublic workflow template.

Figure 3-23 WLIS_BuyerPOPublic Workflow Template


The following sections define the key tasks and events at the nodes in the WLIS_BuyerPOPublic workflow template, shown in the preceding figure:
Start

This workflow is started by the buyer's private workflow, WLIS_BuyerPOPrivate, as described in Call Buyer PO Public workflow. The POxml variable, specified in the Workflow tab of the Call Buyer PO Public workflow node, is an input variable for this workflow. A workflow variable (SupplierName) that contains the supplier's name is set at this node, using the following XPath expression:

ToString(XPath("//SupplierName/text()", $POxml))

Send PO to Selected Supplier

The first action defined at this node is Compose Business Message. This action composes the PO message to be sent from the buyer to the selected supplier. It takes the POxml variable from the private workflow and builds the response message into the POXOCPMessage output variable.

A Send Business Message action is also defined at this node. The PO message (POXOCPMessage) is routed through the WLIS_Hub trading partner. The WLIS_Hub trading partner routes the message based on the Router Expression Type (in this case, Trading Partner Name) defined at this node. To see the router expression defined for this node, you can invoke the Send Business Message dialog box as follows:

1. Double-click this node to display the Task Properties dialog box.

2. Choose Actions—>Activated, and double-click Send Business Message to display the Send Business Message dialog box.

The dialog box contains three tabs: Message, Token, and QoS. Note the following parameters on the Message tab.


Wait for PO Acknowledgement from Supplier

This node is a conversation event node at which the public workflow waits for the returned PO acknowledgment XOCP message from the supplier. The acknowledgment message is assigned to a Java object variable called POXOCPMsg.

Send PO Acknowledgement to PO Private Workflow

The first action defined at this node (Extract Business Message Part) extracts the business message parts from the incoming PO Reply XOCP message from the selected supplier. It then assigns the XML content to the POReplyXML variable.

Another action at this node defines a Post XML Event action to post the PO Acknowledgment (the POReplyXML variable) to the PO private workflow as an internal XML event. In the sample scenario, this internal XML event triggers an event in another workflow. Because the destination is internal to BPM, the XML message is sent to an internal JMS queue maintained by BPM.

You can post an XML event action for a workflow node as follows:

1. Double-click the node to display the Task Properties dialog box.

2. Choose Add—>Integration Actions—>Post XML Event to display the Post XML Event dialog box.

To view the parameters already defined in the Post XML Event dialog box for this node:

1. Double-click the node to display the Task Properties dialog box.

2. Choose Actions—>Activated, and double-click Post Internal XML Event to display the Post XML Event dialog box.

In this case, the XML message is contained in the POReplyXML variable. This PO acknowledgment message is referred to as an Addressed Message, indicating that the message should persist for a particular workflow instance. In the sample scenario, addressing is achieved through the instance ID, POPrivateFlowId. This instance ID specifies the instance of the private workflow that called this public workflow. The POPrivateFlowId instance ID is specified by the WLIS_BuyerPOPrivate workflow, that is, by the private workflow that called this public workflow (see Call Buyer PO Public workflow). In this way, various instances of caller and called workflows are synchronized.

Done

Terminates the PO conversation successfully. Another Done node in the workflow terminates the conversation unsuccessfully if the workflow fails to send the purchase order to any supplier.

Supplier-Side Implementation

In this scenario, each supplier implements a private workflow to integrate its back-end processes, and a public workflow to choreograph the exchange of messages in the PO conversation. This section describes the following workflows:

Supplier PO Public Workflow

The PO public workflow (WLIS_SupplierPOPublic) is started on receipt of an XOCP business message from the buyer's PO public workflow (WLIS_BuyerPOPrivate).

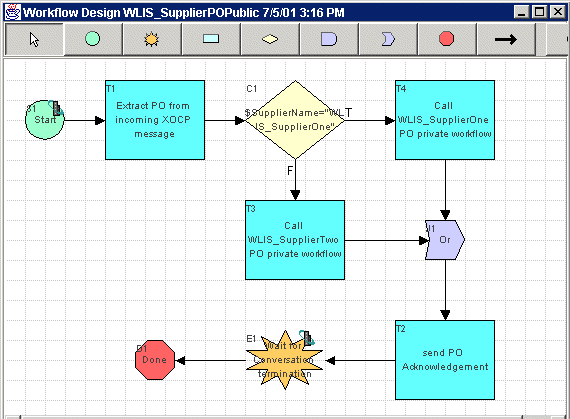
The following figure shows the WLIS_SupplierPOPublic workflow template.

Figure 3-24 WLIS_SupplierPOPublic Workflow Template


The following sections define the key tasks and events at the nodes in the WLIS_SupplierPOPublic workflow template, as shown in the preceding figure:
Start

This workflow is started when the supplier receives an XOCP business message from the buyer's PO public workflow (WLIS_BuyerPOPublic). This message is one of several messages exchanged during the PO conversation (WLIS_POConversation).

Extract PO from incoming XOCP message

In the first action at this node, message parts are extracted from the XOCP message received from the WLIS_BuyerPOPublic workflow. The XML is assigned to the PODataXML variable.

Next, a workflow variable expression for SupplierName is set. The name of the supplier is derived from the incoming PO XML and is assigned to SupplierName, using the following XPath expression:

ToString(XPath("/PurchaseOrder/SupplierInformation/SupplierName/text()", $PODataXML))

Call WLIS_SupplierOne PO private workflow

Based on the unique attribute value (SupplierName) extracted from the incoming PO XML document, which specifies the supplier's name, the workflow proceeds to the appropriate task node and starts the PO private workflow for either WLIS_SupplierOne or WLIS_SupplierTwo.

Note that the action in the Task Properties dialog box for both nodes is the Start Workflow action. (From the Task Properties dialog box, choose Add—>Workflow Actions—>Start Workflow.) When you add a Start Workflow action, you select the name of the workflow to call.

At this node, for example, the WLIS_SupplierOnePOPrivate workflow is selected in the Start Workflow dialog box. Additional information in the Start Workflow dialog box for this action includes variables specified on the Results tab—this tab displays variables that are defined as output parameters in the called workflow. An output parameter is used by a calling workflow to receive values from a called workflow.

In this case, a result is assigned to the POAck_XML output parameter at the penultimate node in the WLIS_SupplierOnePOPrivate workflow (described in Get PO Ack and transform into XML). Once this assignment is made, the caller workflow proceeds to the next task. This call from the WLIS_SupplierPOPublic workflow to the private workflow (WLIS_SupplierOnePOPrivate or WLIS_SupplierTwoPOPrivate) is therefore a synchronous call.

Send PO Acknowledgement

This node gets the return PO acknowledgment from the supplier's private workflow, wraps it in an XOCP message, and sends a PO acknowledgment business message to the WLIS_Buyer trading partner. The business message is routed through the WLIS_Hub, based on the value of the router expression input (in this case, the name of the trading partner) defined at this node. To see the router expression defined for the Send PO Acknowledgement node, invoke the Send Business Message dialog box as follows:

1. Double-click this node to display the Task Properties dialog box.

2. Choose Actions—>Activated, and double-click Send Business Message to display the Send Business Message dialog box.

The dialog box contains three tabs: Message, Token, and QoS. Note the following parameters on the Message tab.


Wait for Conversation Termination

The system waits for the conversation to end. The workflow that initiates the PO conversation (WLIS_BuyerPOPublic) also terminates it. See Buyer PO Public Workflow.

Done

At this node, the workflow finishes and exits the conversation.

Supplier PO Private Workflow

The sample application defines the following private workflow templates for the suppliers in the PO process: WLIS_SupplierOnePOPrivate and WLIS_SupplierTwoPOPrivate. The templates are similar.

The following figure shows the WLIS_SupplierOnePOPrivate workflow template.

Figure 3-25 WLIS_SupplierOnePOPrivate Workflow Template


The following sections define the key tasks and events at the nodes in the WLIS_SupplierOnePOPrivate workflow template, shown in the preceding figure:

Start

This private workflow is started at this node when it is called from the suppliers' PO public workflow (WLIS_SupplierPOPublic).

Transform and persist PO

WLIS_SupplierOne maintains its purchase order information as binary data, but the PO is sent from the buyer in XML format. At this node the workflow uses the data integration functionality provided by WebLogic Integration to translate the incoming XML data to binary data, which can be understood by the supplier's systems. This translation is accomplished through an action in the Studio which, in turn, is provided by the data integration plug-in.

You can define a data integration action in the Studio as follows:

1. Double-click the task node to display the Task Properties dialog box.

2. Choose Actions—>Add—>Integration Actions—>Data integration.

3. Select one of the following options: Translate Binary to XML or Translate XML to Binary.

In this case, the data integration action is Translate XML to Binary.

A business operation (binary to file) is also defined at this node to write the translated binary data to the file system, simulating a back-end ERP system for this scenario. The Java class for the business operation is examples.wlis.common.util.Utils.

Create POAck from PO

A business operation (create POAck from PO) is defined at this node to create a PO acknowledgment message in binary format, based on the binary PO data. The Java class for the business operation is examples.wlis.common.util.Utils.

Get PO Ack and transform into XML

The first action at this node is Perform business operation. A business operation (file to binary) reads the PO acknowledgment binary data from the file system. The resulting binary data is assigned to the POAckbinary variable.

Subsequently, this node uses the data integration functionality provided by WebLogic Integration to translate the PO acknowledgment binary data to XML. This translation is accomplished through the Translate Binary to XML action, which is provided by the data integration plug-in.

The translation action takes the POAckbinary variable as input, and assigns the result of the translation to the POAck_XML variable. After the POAck_XML variable is set in this way, the public workflow (WLIS_SupplierPOPublic) that calls this private workflow can proceed to its next task, as described in Call WLIS_SupplierOne PO private workflow.

For more information about data integration actions that can be executed through the Studio, see Data Integration.


Application and Data Integration

This section contains the following topics:

Introduction

The workflows for the PO business process and the WLIS_BuyerQPAPrivate workflow integrate the BPM functionality of WebLogic Integration with the application integration and data integration functionality that are also provided by WebLogic Integration.

A buyer-side process uses the application integration framework to update the PO information in the enterprise information system (EIS), based on the PO acknowledgment. It then writes PO acknowledgment information to the POAcknowledgement.xml file.

A supplier-side process uses the data integration framework to translate XML data to binary data, and vice versa.

Application Integration

The WLIS_BuyerQPAPrivate and WLIS_BuyerPOPrivate workflows highlight the application integration functionality provided by WebLogic Integration, and the interaction between workflows and application integration services. (See Buyer QPA Private Workflow and Buyer PO Private Workflow.)

Businesses need enterprise application integration (EAI) solutions that make it possible for applications to share data and business processes without first making changes to their original application code or data structures. WebLogic Integration provides an application integration framework that supports inter-enterprise integration through the use of adapters.

Adapters provide an interface that applications can use to access enterprise data programmatically. For example, an adapter can use a Java class to represent enterprise data, and it can provide methods that applications can invoke to access the data. When an application invokes an access method, the adapter executes the method to retrieve the enterprise data. The application integration functionality provided by WebLogic Integration is based on J2EE Connector Architecture (JCA). In addition to complete compliance with the J2EE standard, the application integration tools available with WebLogic Integration offer other important functionality:

See Introducing Application Integration for details about application integration in the WebLogic Integration environment.

When you define an application view, you create an XML-based interface between WebLogic Integration and an EIS application. In this sample, the EIS system is an RDBMS. The application integration adapter used in the sample is the DBMS adapter that is packaged with the WebLogic Integration product. Based on the DBMS adapter, an application view (WLISAppView.sav) is defined and deployed in WebLogic Integration for this sample. See \samples\wlis\src\examples\wlis\wlai\WLISAppViewDeployer.java in your WebLogic Integration installation.

You can define, test, and deploy an application view using the WebLogic Integration Application View Console, a Web-based user interface. For details about defining application views, see Using Application Integration.

You can also use the Application View Console to view the details of the application view created by the WLISAppviewDeployer.java Java program for this sample, as follows:

  1. If you have not already done so, start the WebLogic Integration sample as described in Setting Up and Running the Sample.

  2. Do one of the following:

    The Application View Console is displayed. It displays the Root folder, which contains a list of folders that organize the application views for your enterprise. One of the folders in this window is WLISAppView, the folder that contains the application view for this sample.

  3. Click WLISAppView to open a window displaying a list of application views. The list includes an application view defined for the sample application: sav. Note that its status is Deployed.

  4. Double-click sav to display details about the WLISAppView.sav application view, as shown in the following figure.

    Figure 3-26 WebLogic Integration Application View Console


The WLISAppView.sav application view includes the following services and events.

Services

getContact
updatePOData
insertPOData
getPOData
getAddress
getSupplier
insertLine
getLineData

Events

insertPOEvent


Click on the following links in the Application View Console to view more information about any service or event:

Data Integration

The WLIS_SupplierOnePOPrivate and WLIS_SupplierTwoPOPrivate workflows highlight the data integration functionality provided by WebLogic Integration. This feature is used to translate data from XML to binary format, and vice versa. For this sample application, the following translations are performed:

Both translations are described in Supplier PO Private Workflow.

The following data integration plug-in actions are available in the Studio to support data integration:

To perform a data translation at a task node in the Studio:

  1. Double-click the node to invoke the Task Properties dialog box.

  2. In the Actions pane, click Add to display the Add Action dialog box.

  3. Choose Integrated Actions—>Data Integration.

  4. Select one of the following actions:

  5. In the Binary to XML (or XML to Binary) dialog box, browse the WebLogic Integration repository and select an available map.

    The following figure shows the Binary to XML dialog box for the final task node (Get PO Ack and transform into XML) in the WLIS_SupplierTwoPOPrivate workflow template, described in Supplier PO Private Workflow.

    Figure 3-27 Binary to XML Dialog Box


In the preceding figure note the following:

For this sample application, two translation maps, PO.mfl and POAck.mfl, were built in the Format Builder design tool and saved in the WebLogic Integration repository. The maps, stored in the workflow.jar package, are imported during the setup and configuration of the sample.

You can view the translation maps for this sample by invoking the Format Builder tool, as described in the following section.

Invoke Format Builder

To invoke Format Builder, complete the procedure appropriate for your platform:

View the Sample Translation Maps

You can view the translation maps for this sample as follows:

See Translating Data with WebLogic Integration for information about using the Format Builder design tool to build and test your translation maps. The following figure shows the PO.mfl translation map being defined in the Format Builder.

Figure 3-28 PO Map in Format Builder


back to top previous page next page