bea.com | products | dev2dev | support | askBEA
 Download Docs 
Search

Using WebLogic Integration - Business Connect

 Previous Next Contents Index View as PDF  

Partner Profiles

The following topics are provided for using the Partner Profile information viewer for setting up and maintaining partner profiles.

Concepts

Procedures

Windows


Importing a Profile from a Partner Who Uses WebLogic Integration

Use this procedure to import a company profile file that was sent to you by a trading partner who uses WebLogic Integration. When imported, the profile, which contains your partner's identity and transport information, becomes a partner profile on your system.

Importing a profile from a partner who uses WebLogic Integration is a simple direct method of adding a new partner profile to your system. You must manually create partner profiles for your partners who use a trading engine other than WebLogic Integration. See Adding or Changing a Partner Profile.

Steps

  1. Have your trading partner send you by secure means the XML company profile file your partner created in WebLogic Integration.

  2. Click Partner Profiles on the Administrator bar to open the Partner Profiles information viewer. The window displays any partner profiles added earlier.

    Figure 8-1 Partner Profiles Information Viewer


  3. Select File—>Import to open the Import Partner Profile dialog box.

    Figure 8-2 Import Partner Profile Dialog Box


  4. Find and select the partner profile file you want to import and click Open. The file is located on your floppy disk drive or wherever your e-mail attachments are stored.

    Partner profiles files are relatively small in size. The files are in the format ProfileName.pfl or ProfileName.xml.

    Note: Partner profile generated in WebLogic Integration are XML files.

    If you are importing a profile for a partner already on your system, you are asked to confirm that you want the imported data to overwrite the existing data.

    If the profile includes more than one configured protocol-transport combination, the system reminds you to choose an active protocol-transport for the partner. Click OK to open the Partner Profile window Outbound Protocols tab. Select a configured protocol-transport as active. See Partner Profile Outbound Protocols Tab.

    You can import a profile that has incomplete information for one or more outbound protocol-transport combinations. If you import a profile with a single outbound protocol-transport and the configuration information is incomplete, the system displays a message informing you of the missing information. If you import a profile with two or more outbound protocol-transports, however, the system does not display a message if one or more is incompletely configured. Instead, the system reminds you to complete the configuration. Incompletely configured protocol-transports appear in red in the configured protocols area of the tab. Contact your partner to obtain the missing information or have your partner resend the profile.

  5. Select the Security tab and review the settings. To successfully exchange documents, you must coordinate with your trading partner to confirm that both of you have made identical security selections. That is, the settings for your partner's profile on your system must be the same as the settings for your profile on your partner's system. For more information see Partner Profile Security Tab.

  6. If you intend to exchange binary documents with this partner, select the Binary Directories tab.

    Select your company profile from the Companies drop-down list and click Add. The application sets up default paths names for the binary-in and binary-out directories. You can change these paths by clicking on the directories and typing your changes.

    These are the directories WebLogic Integration - Business Connect polls for binary (non-EDI) documents. You create unique binary-in and binary-out directories for each partner so the system knows the addressee for the outbound documents and can store inbound documents in partner-specific directories. For more information see Partner Profile Binary Directories Tab.

  7. Click OK to save and close the profile.

  8. If you are exchanging signed and encrypted data, open the Certificates information viewer and ensure that an active certificate exists for this partner profile. For more information see Certificate Window.


Adding or Changing a Partner Profile

Use this procedure to add a new partner profile when you cannot import a partner's profile file. You also can change an existing profile.

Before you create a partner profile, consult with your partner on the ID to use and other details involving the outbound transport and firewall and security issues.

Steps

  1. Click Partner Profiles on the Administrator bar to open the Partner Profiles information viewer. The window displays any partner profiles added earlier.

  2. To add a new partner profile, click New to open the New Partner Profile dialog box.

    Figure 8-3 New Partner Profile Dialog Box


  3. Complete the following fields.

  4. Click OK to open the Partner Profile window Identity tab.

  5. Add information on the Partner Profile window tabs. You can complete a new profile by choosing the tabs in any order you want.

    See the following topics for information about adding or changing information on the tabs:


  6. Click OK to save the new partner profile or Cancel to close without adding the profile.

    Note: Click OK only after you have made all the changes or additions you want on all tabs.

  7. If you exchange encrypted or signed documents, you must import this partner's certificate in your Certificates information viewer. You should also confirm with your partner that the fingerprints in both certificates are identical.


Partner Profile Identity Tab

Use the Partner Profile window Identity tab to review or change partner name and location data and secondary IDs. The tab has two parts:

Identity, Primary Tab

Use the Partner Profile window Identity, Primary tab to view or change the name, location and contact information about your partner. You also can view the profile ID, but you cannot change it.

Figure 8-4 Partner Profile Identity, Primary Tab


Field Descriptions

The following describes the fields on the Partner Profile window Identity, Primary tab. For procedure see Adding or Changing a Partner Profile or Importing a Profile from a Partner Who Uses WebLogic Integration.
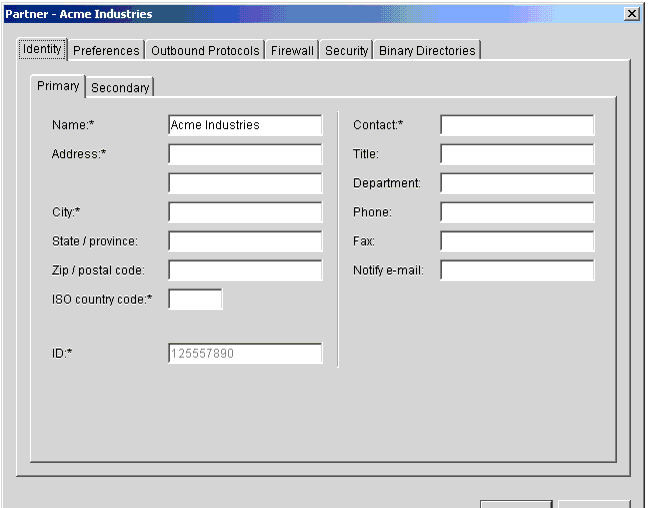
Name

This field contains the company name of the trading partner. You can edit this name after you have added and saved a profile. You can use any alphanumeric characters and the following characters: back slash (\), forward slash (/), colon (:), underscore (_), comma (,), period (.). You can use spaces in your name; the system translates them to underscores. The system removes any other characters.

Address

If you imported this profile, this field contains the trading partner's street address. If you are manually adding this profile, type the trading partner's street address. The first line of the address is required. The second line is optional.

City

If you imported this profile, this field contains the city where the trading partner is located. If you are manually adding this profile, type your trading partner's city. This field is required.

State/province

If you imported this profile, this field contains the name of the state or province where the trading partner is located. If you are manually adding this profile, type the state or province where the trading partner is located.

Zip/postal code

If you imported this profile, this field contains the trading partner's zip or postal code. If you are manually adding this profile, type the trading partner's zip or postal code.

ISO country code

If you imported this profile, this field contains the partner's two-letter ISO country code. If you are manually adding this profile, type the partner's country code; us is United States. The following are the ISO codes for selected countries. See ISO Country Codes, for a complete list of the codes.


ID

The ID for this trading partner. You cannot edit this field.

Contact

If you imported this profile, this field contains the name of the trading partner's contact person. If you are manually adding this profile, type the name of the trading partner's contact person.

Title

If you imported this profile, this field contains the job title of the trading partner's contact person. If you are manually adding this profile, type the title of the trading partner's contact person.

Department

If you imported this profile, this field contains the department where the trading partner's contact person works. If you are manually adding this profile, type the name of the department where the trading partner's contact person works.

Phone

If you imported this profile, this field contains the phone number for the trading partner's contact person. If you are manually adding this profile, type the phone number of the trading partner's contact person.

Fax

If you imported this profile, this field contains the fax number for the trading partner's contact person. If you are manually adding this profile, type the fax number of the trading partner's contact person.

Notify e-mail

If you imported this profile, this field contains the e-mail address where your partner receives notifications from you. When an error occurs that concerns traffic with this partner, you and your partner receive the notification message. If you are adding this profile manually, type the e-mail address of the trading partner's contact person. This address cannot be the same as the one you enter in the e-mail address field on the outbound transport SMTP Transport Options window or POP Transport Options window.

Identity, Secondary Tab

Use the Partner Profile window Identity, Secondary tab to add or change secondary IDs for partners.

You can use secondary IDs to designate partners other than the current partner as the ultimate intended recipients of documents. Your current partner receives your document and routes it to the partner designated by the secondary ID. Using a secondary ID is useful when trading in a service provider environment. You can send EDI, XML and binary documents to a partner by routing them through a service provider.

Figure 8-5 Partner Profile Identity, Secondary Tab


Field Descriptions

The following describes the fields on the Partner Profile window Identity, Secondary tab. For procedure see Adding or Changing a Partner Profile or Importing a Profile from a Partner Who Uses WebLogic Integration.
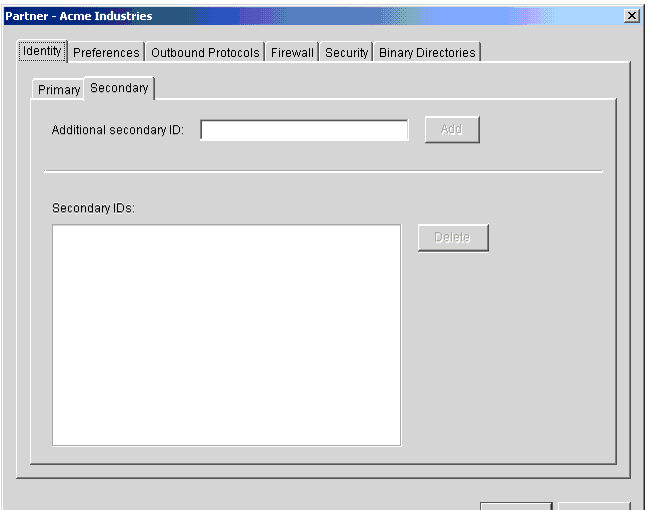
Additional secondary ID

Type the secondary partner's ID. Do not enter the ID of a partner that already exists on your system or an ID that is already a secondary ID in another partner profile on your system. Secondary IDs are case sensitive; type IDs precisely.

Note: WebLogic Integration - Business Connect rejects outbound documents without valid IDs. However, you can force the application to send such documents by using the wildcard character * (asterisk) as a secondary ID for the intermediary partner to whom you want such documents directed. This works for EDI and XML documents, but not binary documents. The wildcard secondary ID forces WebLogic Integration - Business Connect to process outbound documents it otherwise would reject.

Click Add. Repeat this step to add another secondary ID or click OK to save and close the profile.

Secondary IDs

This window displays the secondary IDs associated with the partner profile.

To delete a secondary ID, select the ID you want to delete and click Delete. Repeat this step to delete another secondary ID or click OK to save and close the profile.


Partner Profile Preferences Tab

Use the Partner Profile window Preferences tab to add or change partner preferences for document handling and processing for a partner profile.

Figure 8-6 Partner Profile Preferences Tab


Field Descriptions

The following describes the fields on the Partner Profile window Preferences tab. For procedure see Adding or Changing a Partner Profile or Importing a Profile from a Partner Who Uses WebLogic Integration.
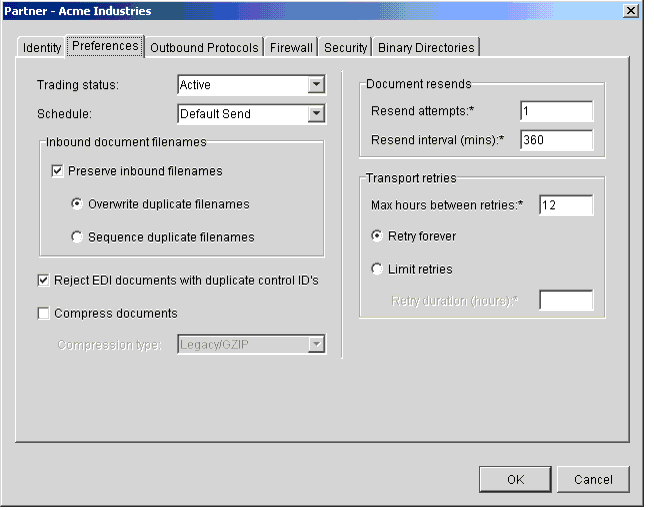
Trading status

Select Active from the drop-down list to indicate that the system is to process transactions to and from this trading partner. This is the default.

Select Inactive to indicate that the system is not to process transactions to and from this trading partner. Any attempt to exchange documents with this partner generates an alert.

Note: You can quickly change the trading status by right-clicking the partner profile in the Partner Profiles information viewer and then left-clicking Change Status in the pop-up menu that appears.

Schedule

Select from the drop-down list the document send schedule you want to use with this partner profile.

Default Send is the default schedule for sending documents to partners. The default send interval is 15 seconds.

Immediate Send sends documents right away after WebLogic Integration - Business Connect has packaged them.

Inbound document filenames

The following fields control file names of inbound documents from this partner.

Preserve inbound file names

Select this check box to have the system write inbound documents to the binary-in, EDI-in or XML-in directory using the documents' original file names assigned by the remote partner. This is the default.

Clear this check box to have WebLogic Integration - Business Connect write inbound documents to the binary-in, EDI-in or XML-in directory using unique names.

If you clear this option, WebLogic Integration - Business Connect, upon receiving a binary document, assigns it a unique file name that does not provide any clues as to the content. It is recommended, therefore, that you accept the default option to have WebLogic Integration - Business Connect preserve inbound file names. This allows you to identify the documents more easily. It also allows your business application to process inbound binary documents based on their file names.

Overwrite duplicate filenames

If you select preserve inbound file names, select this radio button to have WebLogic Integration - Business Connect overwrite the first file if it later receives a document with the same name. This is the default.

Sequence duplicate filenames

If you select preserve inbound file names, select this radio button to have WebLogic Integration - Business Connect sequence the names of files it later receives that have the same name rather than overwriting the files.

Reject EDI documents with duplicate control IDs

Select this check box to have WebLogic Integration - Business Connect place inbound EDI documents with duplicate transaction control numbers in the rejected directory. This is the default.

Clear the check box to indicate that WebLogic Integration - Business Connect is to place all inbound EDI documents in the EDI-in directory without checking for possible duplicate transaction control numbers. You might choose this option if your translator performs the duplicate-checking function.

Compress documents

This check box specifies whether or not WebLogic Integration - Business Connect compresses the documents you send. No compression (clear check box) is the default.

Note: This option has no effect when ebXML is the outbound protocol. Do not select the Compress document check box with ebXML.

Document resends

The following fields control how the system will attempt to resend documents following failed attempts.

Resend attempts

Type the number of times you want WebLogic Integration - Business Connect to resend a document for which it does not receive an expected acknowledgment. After the specified number of retries have failed, WebLogic Integration - Business Connect sends you an alert. The default is 1 time. Increasing this number increases the risk of swamping your trading partner with re-sent documents.

This option applies only if you also select the request acknowledgment of documents check box in the Partner Profile window Security tab.

Resend interval (mins)

Type the number of minutes WebLogic Integration - Business Connect is to wait before it tries to re-send a document. The range is from 1 to 9999 minutes. The default is 360 minutes.

You can shorten or lengthen this period for each partner based on such factors as distance, time of day, known partner system down times and historical patterns. Shortening this interval increases the risk of swamping your trading partner with re-sent documents.

Transport retries

The following fields control the system's persistence in trying again to send documents in the event of a transport failure.

Max hours between retries

Type a number for the longest interval in hours between attempts to re-send a packaged document that did not send because of a transport failure. The default is 12 hours, which also is the highest allowed value. This is the maximum hours between re-send attempts, which is an interval the system can reach only after many retries. Attempts to re-send outbound documents is based on a fall-off algorithm. This is how it works:

When a document fails to send the first time, the document enters a wait state of 10 seconds, after which the system tries again to send the document. If it fails again, the wait state doubles to 20 seconds, then doubles again 40 seconds, then doubles again to 80 seconds, and so on until it doubles to the number of hours in this field. When the longest retry interval is reached, the system keeps trying each time the interval elapses, limited only by whether you have selected retry forever or limit retries.

The wait state resets to zero when the partner profile is updated. This is because the update might resolve the connection problem. However, the fall-off algorithm restarts if the transport failure persists.

This field does not apply to transport failures for inbound documents. That also is based on a fall-off algorithm, but uses a doubling factor in conjunction with the inbound polling rate that plateaus at 12 hours. For details see Inbound Fall-Off Algorithm.

Retry forever

Select this radio button for the system to keep re-trying without limit to resend documents to a partner. This is the default setting. It is strongly recommended that you use this setting unless you have a special situation or on the advice of technical support.

Limit retries

Select this radio button to limit retries for the maximum hours you type in the retry duration field.

Retry duration (hours)

If you select limit retries, type the number of hours after which the system will stop re-trying to send documents. You can use numbers between 0 and 60.


Partner Profile Outbound Protocols Tab

Use the Partner Profile window Outbound Protocols tab to select, add or change the protocol and transport for sending documents to a partner. A profile must have at least one fully configured protocol and transport.

If you import a partner profile, your partner might have configured two or more transport methods for a single protocol. However, you can choose only one active transport type in the partner profile. It is recommended that you consult with your partners about preferred transports.

Figure 8-7 Outbound Protocols Tab


If you imported a profile from a user of WebLogic Integration - Business Connect, it should contain information about the protocol and transport methods your partner wants you to use for sending documents. If not, you must complete the fields yourself for the protocol and transport, based on information your partner provides.

For a list of supported protocols and transports, see Supported Protocols and Transports.

The Outbound Protocols tab allows you to change a partner profile in the following ways:
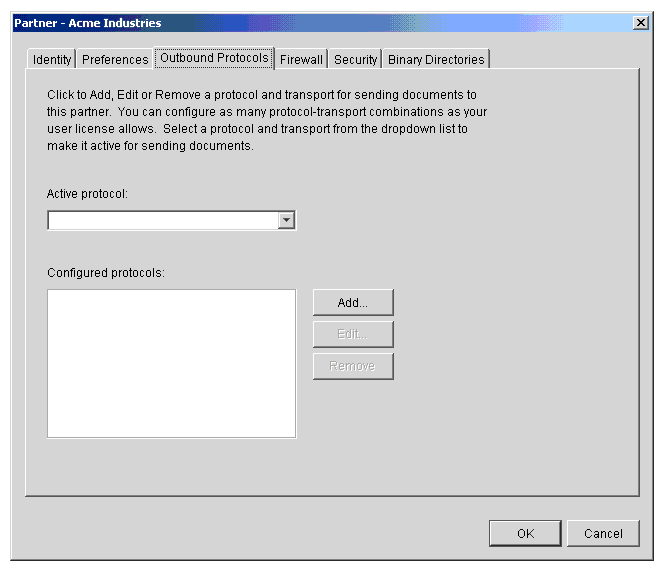
The following topics explain each of these functions in detail:

Selecting an Active Outbound Protocol

Select an active outbound protocol and transport combination from the active protocol drop-down list. If no protocol-transport combinations are available to select, you must first add one.

A partner profile can have more than one configured protocol and transport combination, but only one can be active at a time for sending documents to the partner.

Click OK on the Outbound Protocols tab to save your changes and close the profile. Or, click Cancel to close the profile without saving your changes.

The following are related topics:

Adding an Outbound Protocol

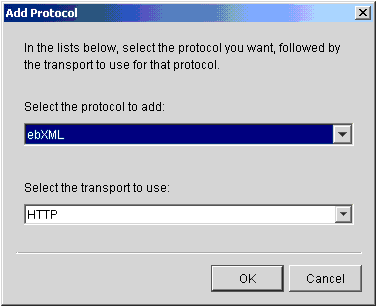
To add a configured protocol to a partner profile, click Add on the Partner Profile window Outbound Protocols tab. This opens the Add Protocol window.

Figure 8-8 Add Protocol Window


The single protocol authorized under your user license already is selected, and no other can be selected. Select a transport from the transports drop-down list. A protocol has at least one transport from which to choose. If more than one transport is available, you must configure at least one, but you can later select another transport and configure it, too. See Transport Selection Considerations for guidelines about selecting transports.

After you select a protocol and transport, click OK. A configuration window opens for the transport method you selected. See one of the following topics for information about configuring the transport:
On the configuration window for the selected transport, complete the applicable fields and then click OK to save the transport information and close the window. Or, click Cancel to close the configuration window without saving your changes.

After you click OK, the transport method you added appears on the list of configured protocols on the Outbound Protocols tab. The information appears in the following format: protocol transport.

If more than one transport is available for the protocol, you can click Add and repeat the process to configure another transport. If you are done, click OK on the Outbound Protocols tab to save your changes and close the profile. Or, click Cancel to close the profile without saving your changes.

The following are related topics:

Editing an Outbound Protocol

To edit an outbound transport for a protocol that was configured earlier for a partner profile, select the protocol and transport combination you want from the configured protocol list on the Partner Profile window Outbound Protocols tab and then click Edit. This opens the configuration window for the transport. See one of the following topics for information about configuring the transport:

On the configuration window for the selected transport, edit the applicable fields and then click OK to save the transport information and close the window. Or, click Cancel to close the configuration window without saving your changes. Then click OK on the Outbound Protocols tab to save your changes and close the profile. Or, click Cancel to close the profile without saving your changes.

The following are related topics:

Removing an Outbound Protocol

To remove an outbound protocol-transport combination that was configured earlier for a partner profile, select the protocol-transport combination you want from the configured protocol list on the Partner Profile window Outbound Protocols tab and then click Remove. This removes the protocol-transport combination from the configured protocol list. Then click OK on the Outbound Protocols tab to save your changes and close the profile. Or, click Cancel to close the profile without saving your changes.

When you remove a protocol and transport combination, it no longer is available for sending documents. However, removing a protocol-transport only removes it from the list of configured protocols. It does not delete the configuration information for the protocol-transport. That information persists in your system. If you add a protocol-transport, later remove it and still later add it back, the earlier configuration information is saved and you do not have to re-enter it.

The following are related topics:


SMTP Outbound Transport

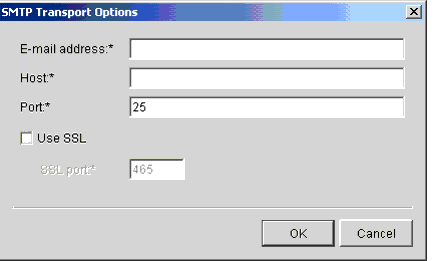
The SMTP transport enables you to send documents from the SMTP server in your WebLogic Integration - Business Connect system to the SMTP server in your partner's WebLogic Integration - Business Connect system. You configure this transport on the SMTP Transport Options window accessed from the Partner Profile window Outbound Protocols tab.

If you imported this profile, configuration information about this transport should be present if your partner wants you to send documents by this method.

Figure 8-9 SMTP Transport Options Window


Field Descriptions

The following describes the fields on the SMTP Transport Options window. For procedure see the following topics: Adding an Outbound Protocol, Editing an Outbound Protocol, and Removing an Outbound Protocol.
E-mail address

The e-mail address where you send documents to your partner. If you are adding this profile manually, type this value.

The e-mail address must be in the standard format of mailbox@server.domain (for example, john@worldwide.com). This can can be any address, as long as it is identical on your and your partner's system.

The system uses the same e-mail address on the SMTP Transport Options window and the POP Transport Options window. The address you enter on one window also is used on the other, regardless whether you use the transport.

Host

The fully qualified domain name or IP address of the partner's system.

If you imported the profile and there is a value in this field, it should be a FQDN. You can use this FQDN or obtain another FQDN or an IP address from your partner and enter that value.

Port

The host port. For sending from WebLogic Integration - Business Connect to a partner's WebLogic Integration - Business Connect, the port by default is 4025. If you are creating the profile, the default port is 25.

Use SSL

Select this radio button to have WebLogic Integration - Business Connect send documents over Secure Sockets Layer (SSL) protocol.

SSL port

The host SSL port. For sending from WebLogic Integration - Business Connect to a partner's WebLogic Integration - Business Connect, the port by default is 4026. If you are creating the profile, the default port is 465.


Bundled HTTP Outbound Transport

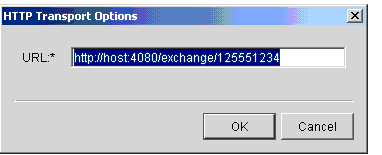
The bundled HTTP transport enables you to send documents to the HTTP server in your partner's WebLogic Integration - Business Connect system. You configure this transport on the HTTP Transport Options window accessed from the Partner Profile window Outbound Protocols tab.

If you imported this profile, configuration information about this transport should be present if your partner wants you to send documents by this method.

Note: This bundled transport is named simply HTTP on the user interface.

Figure 8-10 HTTP Transport Options Window


Field Description

URL is the single field on the HTTP Transport Options window. If you imported this profile and your partner wants you to use this transport, this field contains the URL for sending documents to your partner's HTTP server, which is bundled in the partner's WebLogic Integration - Business Connect system. For your partner's security, the URL is an alias in the following format:

http://partner_host_name:4080/exchange/partner_ID

The word exchange in the URL is an alias for the directory on your partner's server where you send documents. The number 4080 is the default port where your partner's WebLogic Integration - Business Connect HTTP server is listening for inbound documents from you.

If you want to request synchronous acknowledgments (MDNs) from your partner, see Field Descriptions on the Security Tab.

For procedure see the following topics: Adding an Outbound Protocol, Editing an Outbound Protocol, and Removing an Outbound Protocol.


Bundled HTTPS Outbound Transport

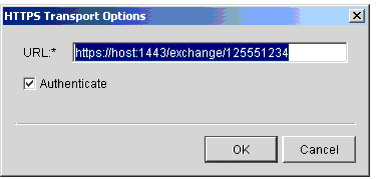
The bundled HTTPS transport enables you to send documents to the HTTPS server in your partner's WebLogic Integration - Business Connect system. You configure this transport on the HTTPS Transport Options window accessed from the Partner Profile window Outbound Protocols tab.

If you imported this profile, configuration information about this transport should be present if your partner wants you to send documents by this method.

If you use bundled HTTPS to send documents, we recommend that you make sure the sign documents check box is selected and the encrypt documents check box is not selected on the Partner Profile window Security tab.

Large-key certificates result in slower HTTPS processing.

Note: This bundled transport is named simply HTTPS on the user interface.

Figure 8-11 HTTPS Transport Options Window


Field Descriptions

The following describes the fields on the HTTPS Transport Options window. If you want to request synchronous acknowledgments (MDNs) from your partner, see Field Descriptions on the Security Tab.

For procedure see the following topics: Adding an Outbound Protocol, Editing an Outbound Protocol, and Removing an Outbound Protocol.
URL

If you imported this profile and your partner wants you to use this transport, this field contains the URL for sending documents to your partner's HTTPS server, which is bundled in the partner's WebLogic Integration - Business Connect system. For your partner's security, the URL is an alias in the following format:

https://partner_host_name:1443/exchange/partner_ID

The word exchange in the URL is an alias for the directory on your partner's server where you send documents. The number 1443 is the default port where your partner's WebLogic Integration - Business Connect HTTPS server is listening for inbound documents from you.

Authenticate

If you imported this profile and your partner wants you to use this transport, this check box can be either:

- Selected if your trading partner requires that you authenticate the SSL connection with your certificate.

- Clear if your trading partner allows anonymous SSL connections.


POP Outbound Transport

The POP transport enables you to send documents to an SMTP server and your partner to retrieve them from a POP server. You configure this transport on the POP Transport Options window accessed from the Partner Profile window Outbound Protocols tab.

If you imported this profile, configuration information about this transport should be present if your partner wants you to send documents by this method.

Figure 8-12 POP Transport Options Window


Field Descriptions

The following describes the fields on the POP Transport Options window. For procedure see the following topics: Adding an Outbound Protocol, Editing an Outbound Protocol, and Removing an Outbound Protocol.
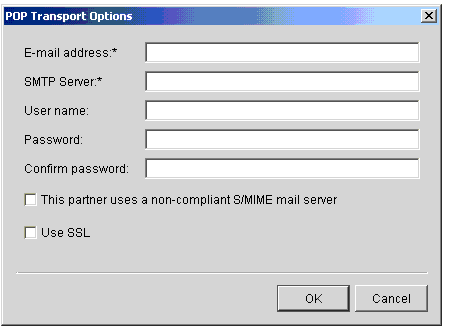
E-mail address

The e-mail address where you send documents to your partner. If you are adding this profile manually, type this value.

The e-mail address must be in the standard format of mailbox@server.domain (for example, john@worldwide.com).

The system uses the same e-mail address on the SMTP Transport Options window and the POP Transport Options window. The address you enter on one window also is used on the other, regardless whether you use the transport.

SMTP server

The fully qualified domain name (FQDN) or IP address of the SMTP server your organization uses for sending documents. Your WebLogic Integration - Business Connect system provides this value or you must type it. If a value is already present, it comes from the Outbound SMTP tab in Tools—>Preferences, if you completed that tab. If you imported the profile and this field is blank, or if you are manually creating a profile, you must enter your SMTP server. For more information see Preferences Outbound SMTP Tab.

User name

The user name for the server. If you are adding this profile manually, type this value.

Password

The password for this user name. If you imported the profile, the password appears as asterisks. If you are adding this profile manually, type this value.

Confirm password

The password for this user name. If you imported the profile, the password appears as asterisks. If you are adding this profile manually, type this value.

Use SSL

If this check box is selected, documents will be sent via Secure Sockets Layer protocol. If you imported this profile, do not change the value in this check box without consulting with your partner.


Partner Profile Firewall Tab


Use the Partner Profile window Firewall tab to set the parameters WebLogic Integration - Business Connect uses to exchange data through a partner's firewall. For more information see Firewall Details.

Currently, WebLogic Integration - Business Connect does not support outbound routing through your company's firewall.

The following topics are provided:

Supported Firewall Methods

Many organizations have installed firewalls to prevent unauthorized access to their computer systems. A firewall is a server that an organization places outside its network. It intercepts all inbound connections from the Internet, and by use of one of several schemes allows only authorized users to connect to a server on the organization's network. Three such schemes that WebLogic Integration - Business Connect supports are listed in the following table.

Table 8-3 Supported Firewall Methods

Transport

Firewall support method

FTP

Native FTP routing

HTTP

HTTP proxy routing

HTTPS

SSL tunneling


Because details about firewalls are kept confidential and because separate user IDs and passwords need to be set up for each partner, firewall information is not distributed in a company's profile. This is why you do not see this information in the Firewall tab when you import your partner's profile.

Getting Your Partner's Firewall Information

To get your partner's firewall information, contact your partner and determine the following:

  1. Ask whether your partner's organization has a firewall and whether it will require you to send documents through the firewall. Not all organizations with firewalls require that you use them.

  2. If your partner requires you to send documents through a firewall, ask your partner for the following information:

  3. If your partner's firewall requires authentication, ask for the user name or user ID and secret password your partner wants your WebLogic Integration - Business Connect to use when establishing a connection with the partner's firewall.

  4. If your partner uses S/KEY, ask the partner to recommend a minimum iteration count. This number depends on how often you need to connect to your partner's firewall to exchange documents. The iteration count functions as a reminder for you to obtain a new password from your partner. It is set each time your partner issues you a password. This setting is kept on your partner's system.

    Depending on how your partner sets this up, one use of a key might last for a predetermined period of time, so that several transactions might be passed during the time it is valid.

    Each use of this key decrements the iteration count by one. When the number reaches the limit you entered, WebLogic Integration - Business Connect issues a notification message reminding you to contact your partner for a new password. WebLogic Integration - Business Connect continues to send you notifications until your partner sends you a new password and resets your iteration count on the partner's system. During the time when the iteration count is below the minimum, your password will continue to function, and message traffic will flow uninterrupted. If the iteration count falls to zero or below, authentication might fail.

After you get the preceding information, you are ready to enter information in the Partner Profile window Firewall tab.

Figure 8-13 Partner Profile Firewall Tab


Field Descriptions on the Firewall Tab

The following describes the fields on the Partner Profile window Firewall tab. For procedure see Adding or Changing a Partner Profile or Importing a Profile from a Partner Who Uses WebLogic Integration.
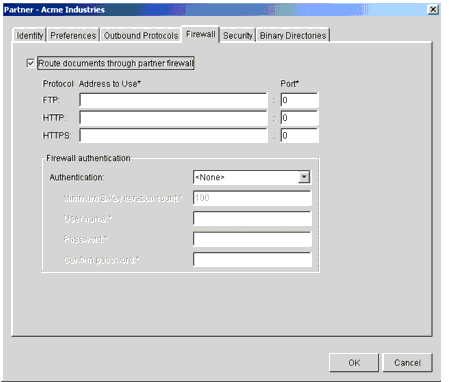
Route documents through partner firewall


If your partner requires that you route documents through a firewall, select this check box.

Protocol address to use

For the transport method you plan to use to send documents to this partner, type the name or IP address of the firewall host to which WebLogic Integration - Business Connect logs on when it sends documents to this partner. Your partner provides this information.

If your partner requires you to route documents through the partner's firewall but does not use authentication, you still must complete this field.

Port

In the port field for the transport method you plan to use to send documents to this partner, type the port number of your partner's firewall host. Your partner provides this information.

If your partner requires you to route documents through the partner's firewall but does not use authentication, you still must complete this field.

If you enter an address and port for the FTP transport protocol, WebLogic Integration - Business Connect uses them to establish the connection with the partner's firewall. The firewall then directs the connection to the partner's FTP server used by the partner's WebLogic Integration - Business Connect system. In this case, the values you enter in the control port field on the FTP Transport Options window are not used.

Firewall authentication

Skip this area if your partner does not require authentication. If your partner uses clear text or S/Key authentication, complete the following fields as applicable. Your partner must provide this information.

Authentication

If you select S/Key, complete the minimum S/Key iteration count, user name and password fields. If you select clear text, complete the user name and password fields. If your partner uses clear text authentication, your user name and password are sent to the partner's firewall in unencrypted form.

Minimum S/Key iteration count

If you select S/Key authentication, type the minimum iteration count you and your partner agreed upon. This field is active only if you select S/Key authentication.

When the number of iterations remaining on your current S/Key equals this number you enter, a notification is sent to you with each additional use of your key. In this way, it serves as a reminder that you need to ask your partner for a new key. For more information about how S/Key works see Firewall Details.

User name

If your partner uses clear text or S/Key authentication, type user name that WebLogic Integration - Business Connect uses when it logs on to your partner's firewall. Your partner must provide this information.

Password

If your partner uses clear text or S/Key authentication, type the password that WebLogic Integration - Business Connect uses when it logs on to your partner's firewall. If you authenticate with an S/Key-enabled firewall, your secret password is never sent in clear-text form. Your partner must provide this information.


Firewall Details

The following topics are provided about sending documents to partners who use firewalls:

HTTP and HTTPS for Firewalls and Proxy Servers

You can configure WebLogic Integration - Business Connect to communicate using the HTTP or HTTPS transport through firewall and proxy servers without compromising the security of your network.

To do this, you can use one of two alternatives:

Using Network Address Translation

See your firewall software documentation for instructions on implementing this solution.

Using Winsock

  1. In Administrator select Tools—>Preferences to open the Preferences window. Select the Ports tab. Type 8080 in the HTTP port field. Open your company profile and select the Inbound Protocols tab. Open the HTTPS Transport Options window and type 4443 in the Port field.

  2. Using your favorite text editor, create the wspcfg.ini file. The following is an example of the contents of this file:

    [jre]
    ServerBindTcpPorts=8080,4443
    Persistent=1
    KillOldSession=1

  3. Save the file in installation directory\bin and close the text editor.

  4. Re-initialize your server. The proxy server computer does not overwrite the wspcfg.ini file you created; rather it reads the file and binds the needed ports to WebLogic Integration - Business Connect when that application is started. Consequently, you can make configuration settings in this file that apply only to WebLogic Integration - Business Connect on a specific client computer.

Commands Sent to Firewalls

The following describes how WebLogic Integration - Business Connect sends documents through a trading partner's firewall using FTP and HTTP. Listed are the commands WebLogic Integration - Business Connect sends to the partner firewall for each transport.

Native FTP Authentication

User PROXYUSER@FTPUSER@DESTINATION

Password PROXYPASSWORD@FTPPASSWORD

HTTP Proxy

POST http://destinationhost:port/uri

Authenticate: FIREWALLUSER:FIREWALLPSWD

HTTPS Tunnelling

CONNECT http://destinationhost:port/

Authenticate: FIREWALLUSER:FIREWALLPSWD

Firewall Authentication Methods

The following describes how WebLogic Integration - Business Connect authenticates with firewalls that use various authentication methods.

Organizations deploy firewalls to prevent unauthorized users from gaining access to the corporate data that resides on their networks or in their computer centers. Although most organizations use either clear text or S/KEY authentication methods, you might encounter partners who use other strategies. WebLogic Integration - Business Connect supports the following:

Support for the S/KEY One-Time Password System

This section provides details about how WebLogic Integration - Business Connect uses the S/KEY One-time Password System (S/KEY) to navigate your partner's firewall. This information is for use by system administrators and other interested users. Because WebLogic Integration - Business Connect hides the complexity, a user need not understand it fully to successfully use the S/KEY.

S/KEY is used to prevent what is known as a replay attack on an organization's network. In a replay attack, an unauthorized person outside an organization's network eavesdrops on that network's connections to obtain the login IDs and passwords of legitimate users. At some later time, the unauthorized intruder replays the log-ins and passwords to gain access to the network. S/KEY foils these attacks by exchanging a series of challenge and responses with the user who is requesting access.

The S/KEY is documented by RFC 1760. You can see this RFC along with a list of others posted by the Internet Engineering Task Force (IETF) at the following web site:

http://www.ietf.org/home.html

See Partner Profile Firewall Tab for information on setting up WebLogic Integration - Business Connect to navigate an S/KEY-enabled firewall.

Figure 8-15 S/KEY Challenge-Response


A typical exchange between your WebLogic Integration - Business Connect and a partner with an S/KEY-enabled firewall occurs as follows (see Figure  8-15):
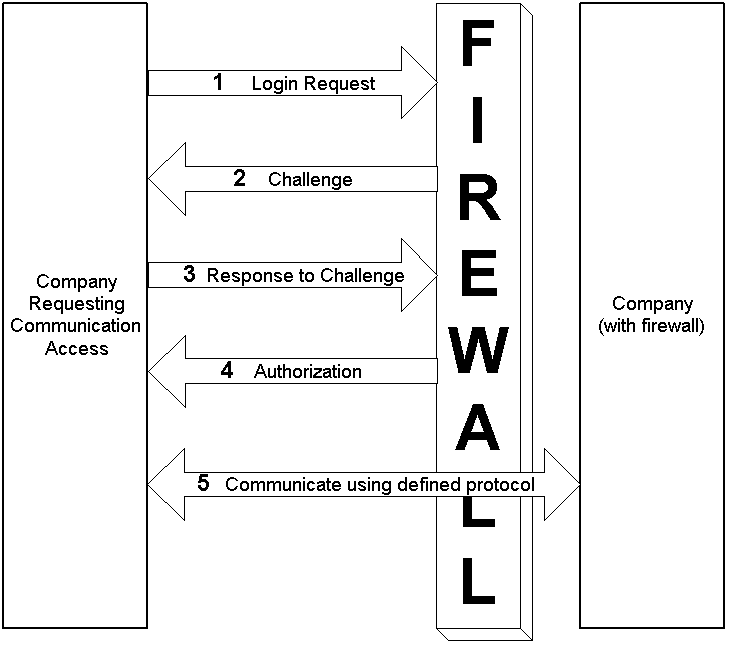
  1. Your WebLogic Integration - Business Connect server sends a login request to connect to your partner's firewall using a user name or user ID from the user name field in the firewall tab.

  2. In response, your partner's S/KEY-enabled firewall sends you a challenge. This challenge consists of the latest iteration count and a seed value.

  3. Upon receipt of this challenge, your WebLogic Integration - Business Connect computes a new password by hashing the seed value, the iteration count from the challenge response, and the password from the firewall tab. More specifically, WebLogic Integration - Business Connect iteratively hashes the result of the previous hash up to the number specified in the iteration count that came with the challenge response. The new computed password consists of six English words. WebLogic Integration - Business Connect then sends this new, computed, multi-word password and your user ID to your partner.

  4. Your partner verifies this new password and sends an approval or rejection back to your WebLogic Integration - Business Connect.

  5. If the response is valid, your WebLogic Integration - Business Connect server then passes documents through the firewall to your partner's WebLogic Integration - Business Connect.


Partner Profile Security Tab

Use the Partner Profile window Security tab to select or change the security settings for a partner profile. These are the parameters WebLogic Integration - Business Connect uses to sign, encrypt, and acknowledge receipt of documents you send to a partner.

The following topics are provided:

Bundled HTTPS Guideline


If you use bundled HTTPS to send documents to partners, we recommend that you select the sign documents check box and that you do not select the encrypt documents check box on the Partner Profile window Security tab.

Figure 8-16 Partner Profile Security Tab


Field Descriptions on the Security Tab

The following describes the fields on the Partner Profile window Security tab. For procedure see Adding or Changing a Partner Profile or Importing a Profile from a Partner Who Uses WebLogic Integration.
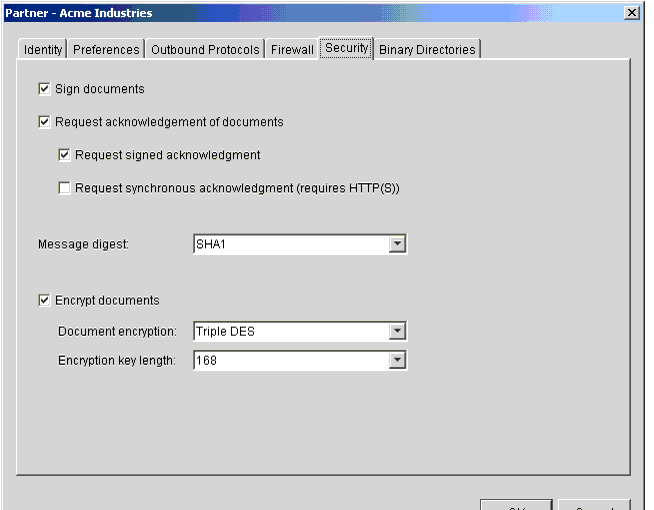
Sign documents

Select this check box to have WebLogic Integration - Business Connect sign the documents you transmit. This is the default.

Clear this check box to send documents without a digital signature.

Request acknowledgment of documents

Select this check box to have your partner send message disposition notification (MDN) acknowledgments to you upon receipt of your documents. The MDNs are signed or unsigned depending on your selection in the sign documents check box.

WebLogic Integration - Business Connect supports the use of MDNs for S/MIME documents as follows:

- Sends MDNs to those partners who request them for their S/MIME documents.

- If you receive an unsigned MDN from a trading partner who uses S/MIME, WebLogic Integration - Business Connect considers the document to have been acknowledged, but logs the MDN as Received, Generic in Tracker.

The selected check box is the default.

Clear the check box to indicate that you do not want your trading partners to send you acknowledgments for the documents you send them.

WebLogic Integration - Business Connect appends file names of received MDNs with _ack.

Request signed acknowledgment

Select this check box to have your partner sign the MDNs the partner sends to you. This is the default when you import a profile with a certificate from a partner who uses WebLogic Integration - Business Connect.

Clear this check box to have your partner send you unsigned MDNs.

Request synchronous acknowledgment (requires bundled HTTP(S))

If you use the bundled HTTP or HTTPS transport, select this check box if you want synchronous MDNs.

Message digest

The algorithm that WebLogic Integration - Business Connect uses to create a hash of the unencrypted document. This hash is a number which is encrypted with the sender's private key. It is decrypted by the recipient using the sender's public key. The recipient rehashes the decrypted document and compares the result with the hash that came with the document. If the two are identical, it ensures that the contents have not been altered.

You can choose from the algorithms MD5 and SHA1 (the default).

Encrypt documents

Select this check box to have WebLogic Integration - Business Connect encrypt the documents you transmit. This is the default when you import a profile with a certificate from a partner who uses WebLogic Integration - Business Connect.

Clear this check box to send unencrypted documents.

Document encryption

If you select encrypt documents, select one of the following from the drop-down list to indicate which algorithm WebLogic Integration - Business Connect is to use to encrypt the documents you send: RC2, ARC4, DES or Triple DES, the default.

Encryption key length

If you select encrypt documents, select the key length appropriate for the encryption algorithm you chose:


Partner Profile Binary Directories Tab

Use the Partner Profile window Binary Directories tab if you plan to exchange binary documents with a partner. This tab lets you set up partner-specific inbound and outbound directories for sending and receiving binary documents.

WebLogic Integration - Business Connect uses a unique binary-out directory for each partner so that it knows the correct addressee for the outbound binary documents. Conversely, the system uses a unique binary-in directory for each partner so that documents placed in it can be correctly processed by your business application.

Figure 8-17 Partner Profile Binary Directories Tab


Field Descriptions

The following describes the fields on the Partner Profile window Binary Directories tab. For procedure see Adding or Changing a Partner Profile or Importing a Profile from a Partner Who Uses WebLogic Integration.
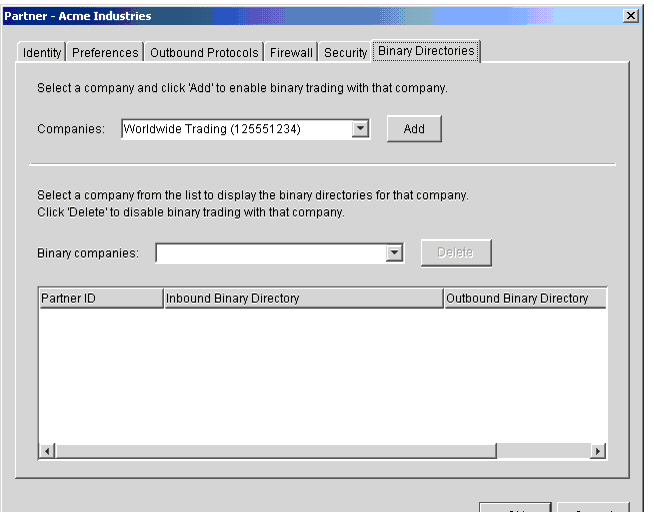
Companies

If you intend to exchange binary documents with this partner, select your company profile from the drop-down list and click Add.

If you set up a secondary ID for another trading partner on the Partner Profile window Identity tab for this partner, the system sets up binary directories on this tab for the secondary ID partner.

Note: Your partner must also make a similar selection in your partner profile on the partner's WebLogic Integration - Business Connect system.

Binary companies

Select a company from the drop-down list to display the binary directories for the company. Click Delete if you want to disable binary trading with the company.

At your discretion, you can type new paths and directory names in the inbound and outbound binary directory fields. Outbound directories must be unique across the whole application; inbound directories need not be unique.


Delete a Partner Profile

Use this procedure to delete a partner profile that is no longer needed. When you delete a partner profile:

Steps

  1. At the Partner Profiles information viewer, select the partner profile you want to delete and click Delete.

  2. Confirm the deletion in the dialog box that appears.


Back to Top Previous Next