

|
|
|
|
|
|
Setting Up and Sending E-mail for Campaigns
WebLogic Portal provides a default Mail Service, based on JavaMail, to process e-mail requests from scenario actions.
This topic includes the following sections:
Instead of the WebLogic Portal Mail Service, you can use a third-party mail service.
How Campaigns Use the Mail Service
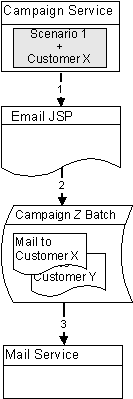
Business Analysts (BAs) can specify that a scenario within a campaign sends an e-mail to a customer. For example, when a customer buys a flashlight, a scenario can send a an e-mail that contains special offers for batteries.
When BAs create scenarios, they select a JSP file that contains the e-mail content. When a customer triggers the scenario action, the following process occurs:
Figure 4-1 The Mail Service for Campaigns
Configuring E-Mail Properties for Campaigns
Before a campaign can send e-mail, you must configure properties that the Campaign Service uses to send and receive mail. In a clustered environment, WebLogic Server propagates these properties to each node in the cluster.
To configure mail-related properties, do the following:
For information about property sets and properties, refer to "Creating and Managing Property Sets" in the Guide to Building Personalized Applications.
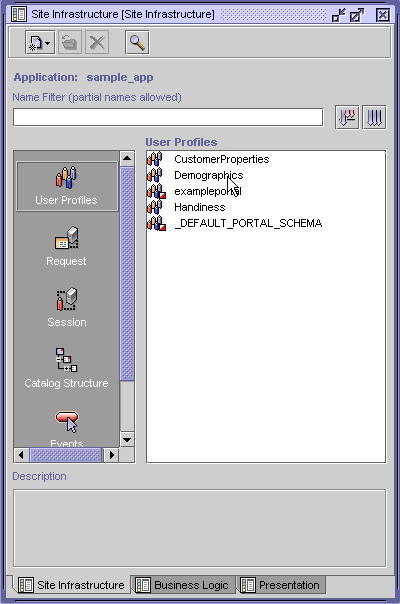
Figure 4-2 Find Names of User Properties
Creating E-mail JSPs
The Mail Service requires that you place the content and formatting of your e-mails in a JSP file. In this JSP, you can use any of the JSP tags and APIs that are available to other JSPs in WebLogic Portal.
This section describes the following:
E-mail Parameters
When a scenario action requests an e-mail JSP, it passes a userId parameter, which specifies the login name of the customer who triggered the scenario action. With the request.getParameter method, you can retrieve the user ID and pass it to JSP tags in the e-mail JSP.
In addition, the scenario passes the following parameters (you can also pass these parameters to JSP tags in the e-mail JSP):
Disabling Session Generation
The Java class that the Campaign Service uses to generate email from a JSP, InternalRequestDispatcher, also generates an HTTPSession object. Usually, generating this HTTPSession from an email JSP is extraneous because your application already generates an HTTPSession object when a customer accesses your site.
To disable the generation of an extraneous HTTPSession, add the following directive to the beginning of the JSPs that you use to generate email for campaigns:
<%@ page session="false" %>
Adding this directive is necessary only if your application generates HTTPSession objects when customers access your site (or log in) and only for email that is generated via the InternalRequestDispatcher.
Sample E-mail JSP
Listing 4-1 shows the e-mail JSP that is part of the wlcs sample Web application. The file is located at PORTAL_HOME/applications/wlcsApp/wlcs/campaigns/emails/Sample1.jsp
Listing 4-1 Sample E-mail JSP
<%@ page session="false" %>
<%@ page contentType="text/plain" %>
(This sample e-mail was automatically sent out as part of a sample campaign that you triggered while registering as a new user on the BEA Commerce Templates.)
-------------------------------
Hello <%= request.getParameter("userId") %>,Thank you for taking the time to become a registered member of our site. We hope you took advantage of your $10 discount on a purchase of $50 or more after you registered!
In addition, your registration entitles you to premium services including:
	**Special "Members Only" discounts
	**Advance notice of new product releases
	**A personalized customer experience customized to your
          specific interests
Thanks again for becoming a registered member.
Best Regards
Location of E-Mail JSPs
You must save e-mail JSPs in a specific directory within a Web application so that BAs can use the E-Business Control Center to browse and select the e-mail for a campaign.
By default, the directory is myApp/myWebApp/campaigns/emails.
For example, the wlcs application provides a sample e-mail in the following directory:
PORTAL_HOME/applications/wlcsApp/wlcs/campaigns/emails/
Sample1.jsp
To choose this e-mail as part of a scenario action, a BA opens the wlcsApp application in the E-Business Control Center. Then, while creating an E-mail action, the BA can browse through all e-mail JSPs that have been saved in PORTAL_HOME/applications/wlcsApp/wlcs/campaigns/emails and select Sample1.jsp for the scenario.
To change the default location in which you save JSP e-mail, do the following:
Sending Bulk Mail
You must periodically use a command to send the batches e-mail that the JSPs store in the WebLogic Portal data repository. You can also use cron or any other scheduler that your operating system supports to issue the send-mail command.
On Windows, the send-mail command is in a .bat file wrapper script; on UNIX it is in a .sh file. This section refers to the .bat file. UNIX users should substitute .sh for .bat.
This section includes the following subsections:
Sending Mail from a Remote Host or in a Clustered Environment
The send-mail wrapper script specifies the name and listen port of the WebLogic Portal host that processes the send-mail request. By default, the wrapper script specifies localhost:7501 for the hostname and listen port. However, localhost:7501 is valid only when you run the script while logged in to a WebLogic Portal host in a single-node environment (and only if you did not modify the default listen port).
Before you use the send-mail script from any other configuration, you must modify the script. This section describes the following tasks:
Modifying the Send-Mail Script to Work from a Remote Host
If you want to run the send-mail script from a remote host (that is, a computer that is not a WebLogic Portal host), do the following:
Modifying the Send-Mail Script to Work in a Clustered Environment
If you work in a clustered environment, you must modify the send-mail wrapper script to specify the name of a host in the cluster. The default localhost value is not valid for the Mail Service in a clustered environment.
To use the send-mail script in a clustered environment, do the following on each host from which you want to run the script:
To Send Bulk E-mail
To send bulk e-mail, do the following from a shell that is logged in to a WebLogic Portal host:
mailmanager.bat appName list (Windows)
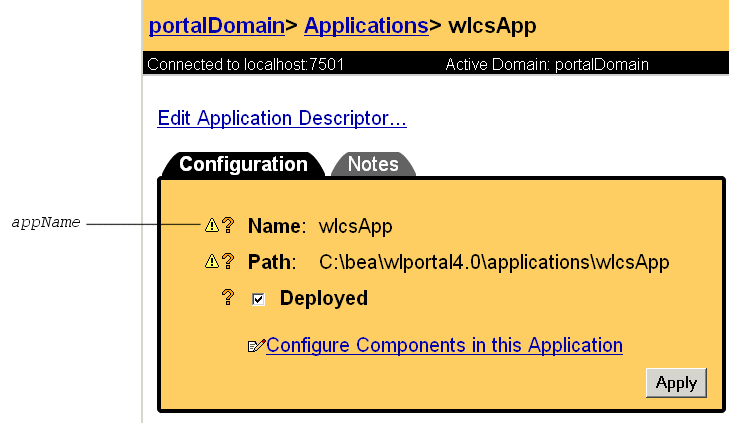
where appName is the name of the enterprise application that generated the e-mail batch. (See Figure 4-3.) The command prints to standard out. You can use shell commands to direct the output to files.
mailmanager.bat appName send-delete batch-name
Figure 4-3 Application Name
To Delete E-mail Batches
You can delete e-mail batches as you send them (as described in To Send Bulk E-mail). You can also do the following to delete e-mail batches:
mailmanager.bat appName list
where appName is the name of the enterprise application that generated the e-mail batch. (See Figure 4-3.) The command prints to standard out. You can use shell commands to direct the output to files.
mailmanager.bat appName delete batch-name
Scheduling Bulk E-mail Delivery
You can use a scheduling utility to send the e-mail batches in the data repository. Because you must specify the name of a batch when you use the mailmanager command to send mail, you must schedule sending mail for each campaign scenario separately. The name of a batch corresponds to the scenario's container ID. For information about the container ID, refer to E-mail Parameters.
For information in using a scheduling utility, refer to the documentation for your operating system.
Mailmanager Command Reference
The mailmanager command is a wrapper script that uses
java com.bea.p13n.mail.MailManager. The command syntax is as follows:
mailmanager.bat [ appName ] [ list | send | send-delete | delete ] [ batch-name ] (mailmanager.sh on UNIX)
If you specify only the appName arguments mailmanager prints to standard output the names all e-mail batches in the application and the number of e-mails in each batch.
Use the command arguments as follows:
The name of the enterprise application that generated the e-mail batch.
(See Figure 4-3.)
Prints to standard output the names of all e-mail batches in the data repository and the number of e-mails in each batch.
Prints to standard output the subject and recipients of all e-mail in the batch that you specify.
Sends all e-mails in the batch that you specify.
Sends all e-mails in the batch that you specify and then deletes the batch from the data repository.
Deletes e-mails in the batch that you specify.
The name of a batch that mailmanager list returns. This argument does not support wildcards.
Command Examples
To list all available batches, enter the following command:
mailmanager.bat list
To list the contents of a batch named /campaigns/campaign1.cam that the wlcsApp application generated, enter the following command:
mailmanager.bat wlcsApp list /campaigns/campaign1.cam
To send the campaign1.cam batch and delete it afterwards, enter the following command:
mailmanager.bat wlcsApp send-delete /campaigns/campaign1.cam
To delete the campaign1.cam batch, enter the following command:
mailmanager.bat wlcsApp delete /campaigns/campaign1.cam

|

|

|
|
|
|
Copyright © 2001 BEA Systems, Inc. All rights reserved.
|