|
|
|
|
|
|
Creating and Managing Property Sets
Property sets are the schemas for personalization attributes. Using the E-Business Control Center, you can create property sets and define the properties that make up these property sets.
This topic includes the following sections:
Overview of Property Sets
A property set is a convenient way to give a name to a group of properties for a specific purpose. For example, in the sample application you will find a User Profile property set named Customer Properties. This property set defines around thirty properties for an e-commerce customer, such as First Name, Last Name, Home Phone, Email, and Customer Type.
Property sets and property definitions are created in the E-Business Control Center, on the Site Infrastructure tab. A Property Editor allows you to give a new a property a name and a description, assign a data type, a selection mode, and a value range, and create a list of possible values for the property.
Although properties are designed in the EBCC, the value assigned to a property is created in the application. Properties are generally represented in an application as fields on a page. To use the Customer Properties property set to collect information about an e-customer, the application will typically present the thirty properties in a list or a table, with text boxes provided to fill in specific values for the customer.
Property Sets Serve as Namespaces for Properties
In the most general sense, a property can be considered a name/value pair. Property sets serve as namespaces for properties so that properties can be conveniently grouped and so that multiple properties with the same name can be defined.
For example, you might create a property set called Demographics to describe user profile properties. The Demographics property set contains properties called Age, Gender, Income, and so forth. Because property sets create unique namespaces for properties, another property set can also have a property called Gender, and the two values will be kept separate.
Figure 7-1 The Demographics Property Set uses the Gender attribute
Figure 7-2 The Handiness Property Set also uses the Gender attribute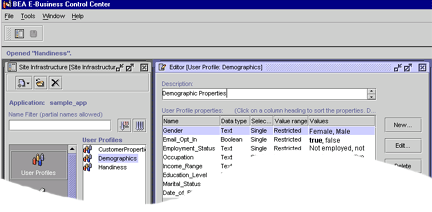
Where Property Sets Are Used For Portal and Personalization Server purposes, property sets are applied to six major areas. Of these, five are configured in the E-Business Control Center. Property Definition Attributes All properties includes the following information: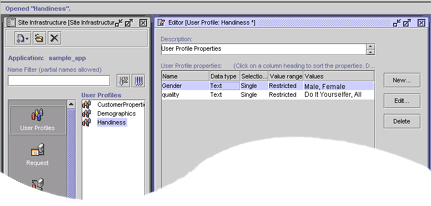
Optionally, property definitions can also include the following:
The following table lists the property definition attributes and values.
Possible Combinations of Properties
As the previous list suggests, a combination of property values are possible. The possible combinations of properties are listed here:
An instance of this property can have only one value assigned. For example, the property Favorite_Day_of_the_Week would have seven available values, but an instance of the property can have only one value (Saturday).
An instance of this property can have multiple values assigned. For example, the property Favorite_Days_of_the_Week would have seven available values, and an instance of the property can have any number of values (Friday, Saturday, Sunday).
Synchronizing Property Sets
Property sets are meant to be used as application code. Just as you would not normally deploy new code onto a production server without first testing and staging it, we recommend that you do not synchronize updates to the property sets onto a live server once the application itself is deployed into production.
Why would synchronizing to a live server be a problem? If you create a property set containing a property of a specific type, synchronize it and assign values to that property for users, then change the type and re-synchronize it, there will be inconsistent property value data in the database.
Let's look at an example. Suppose the "Date_of_Birth" property in the Demographics property set was originally a String. Users might have put in values in many different formats, such as "8/9/1974", "August 9th, 1974", "Aug 9 1974", and so forth. Then you decide these are too hard to parse and validate, so you make the "Date_of_Birth" property a Date/Time type. You redeploy the property set, but now there are values of the wrong type in the database.
It's up to you, the developer, to do the data conversion to make these properties into the correct type. Or, if your data is just test or sample data, you can delete the data altogether and start over.
Using the E-Business Control Center
The E-Business Control Center tools allow you to create and manage sets of typed properties. Using the Site Infrastructure tab, property sets can be defined to describe properties for User Profiles, Requests, Sessions, Catalog Structures, and Events.
Note: The Site Infrastructure tab also contains the Webflows/Pipelines tool icon, which is used to create and edit new pipelines and webflows. Since webflows and pipelines do not use property sets, these topics will not be covered here. See the topic "Using the Webflow and Pipeline Editors" in the Guide to Using the E-Business Control Center documentation.
Figure 7-3 The Site Infrastructure Tab on the E-Business Control Center
Creating a property set is a simple task via the E-Business Control Center. A name for the set must be provided as well as description, and the type of property set ("User/Group", "Session", or "Request") must be chosen. Once a User/Group property set is created and deployed, property values can be edited for a particular user or group via the User Management user and group tools. For "Session" and "Request" properties, the only editable values are the default values set in the property definitions -run-time values are determined by values in the HTTP session or HTTP request, respectively. Starting the Property Set Editors To begin using the Editors, follow these steps: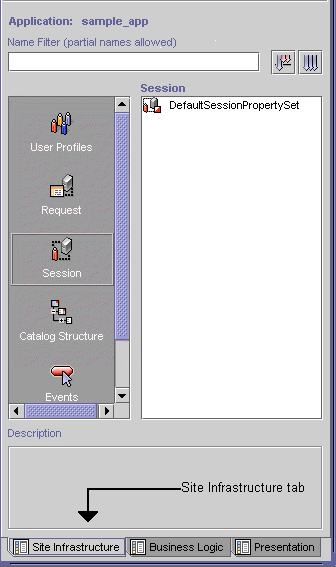
For detailed instructions on performing these tasks, see "Creating an Application Structure for E-Business Control Center Data" or "Opening Application Data" in the Guide to Using the E-Business Control Center documentation.
Using the Property Set Editors
The property set editors works the same way for all property sets. For these examples, we will be using the E-Business Control Center to create and modify Event properties. The examples used here can be used to register a custom event. You can follow the same procedures to create and modify property sets for Users and Groups, HTTP Requests, HTTP Sessions, and the Catalog Structure.
To register a custom event, complete the following steps
Note: For more information on connecting the E-Business Control Center to a server, see the topic "Connecting to the Server" in the Guide to Using the E-Business Control Center.
Figure 7-4 E-Business Control Center Window
Note: You cannot edit the standard events.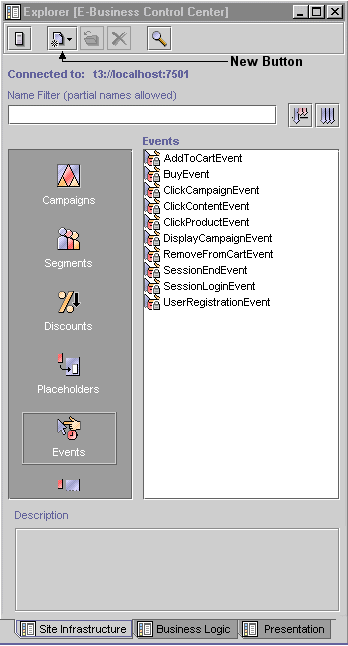
Figure 7-5 Event Editor Window
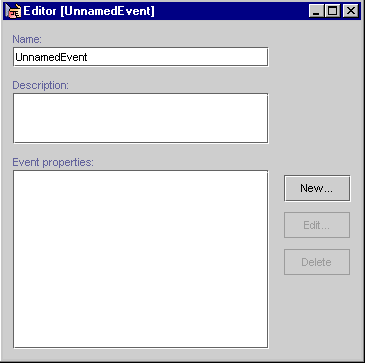
Figure 7-6 Edit Event Property Window
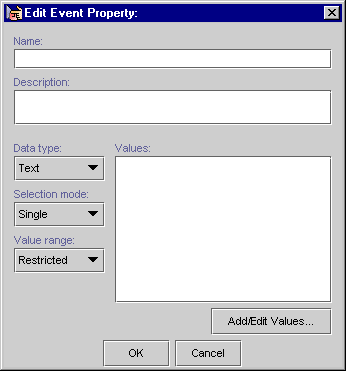
The type of window that appears depends on the values selected.
Property Values and Setting the Default Value
Depending on the data type, different steps are required for entering values and setting default values. The following property categories are available:
Properties with Boolean or a Single Value and Single Default
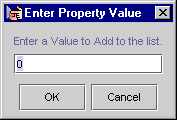
To enter the default value for Boolean property or a property with a single value and a single default (unrestricted), complete the following steps:
Figure 7-7 Enter Property Values Window-Boolean
Figure 7-8 Enter Property Values Window-Single Value, Single Default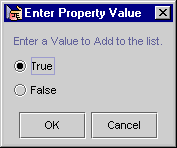
Properties with Multiple Values and Single, Multiple,
or All Defaults
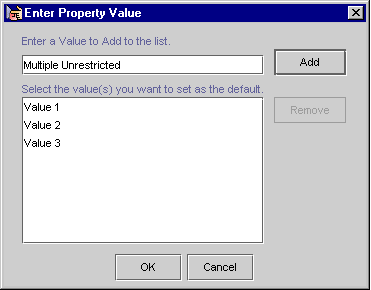
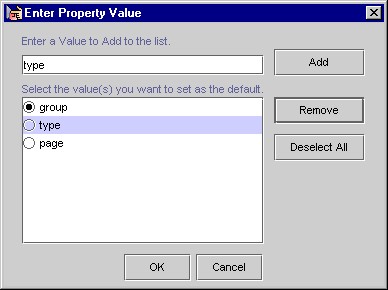
To enter multiple property values and set one or more defaults (unrestricted), complete the following steps:
Figure 7-9 Enter Property Values-Multiple Values, Single Default
Figure 7-10 Enter Property Values-Multiple Values, Multiple Restricted Defaults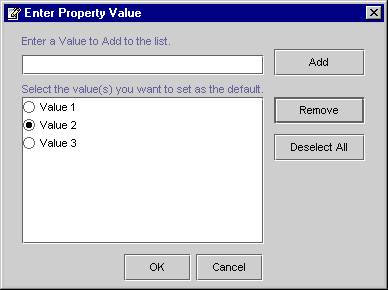
Figure 7-11 Enter Property Values-Multiple Values, Multiple Unrestricted Defaults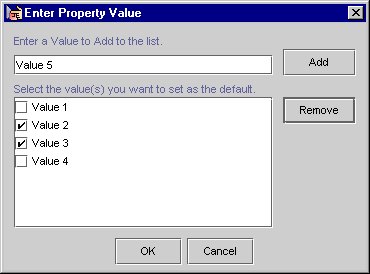
Note: To remove the default value for a property with multiple values and a single default, click the Deselect All button.
Note: For multiple values without restrictions (that is, the Value range is Unrestricted), you do not need to select any defaults.
Properties with Date and Time Values
Properties with date and time values can use all Selection mode and Value range settings. For more information about these settings, see Properties with Boolean or a Single Value and Single Default and Properties with Multiple Values and Single, Multiple, or All Defaults.
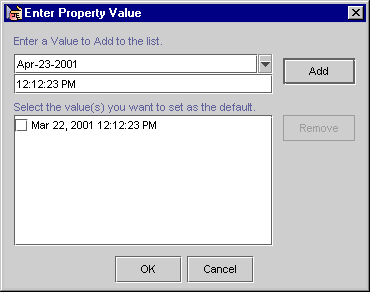
To enter date and time values and set one or more defaults, complete the following steps:
Figure 7-12 Enter Date/Time Values
Updating a Registered Custom Event
Whenever you make changes to a custom event's code, you should update that event's registration. Updating the registration lets the E-Business Control Center know about the changes in the custom event and aids campaign developers using the E-Business Control Center to modify any scenario actions that refer to the event.
To update a custom event, complete the following steps.
Note: For more information on connecting the E-Business Control Center to a server, see "Connecting to the Server" in the Guide to Using the E-Business Control Center documentation.
Note: You cannot edit standard events.
Figure 7-13 Explorer Window
Figure 7-14 Event Editor Window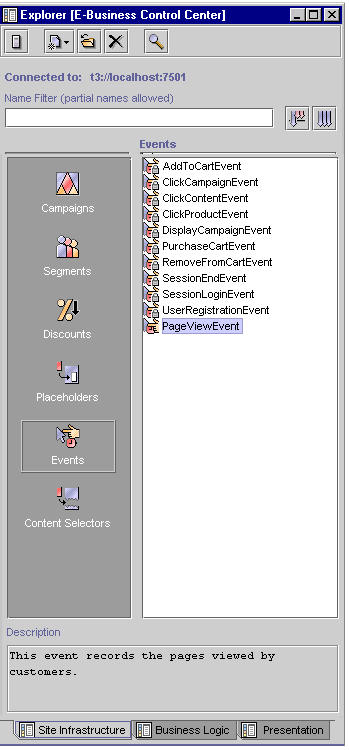
Note: For more information about setting custom event properties, see Property Values and Setting the Default Value. Figure 7-15 Edit Event Property Window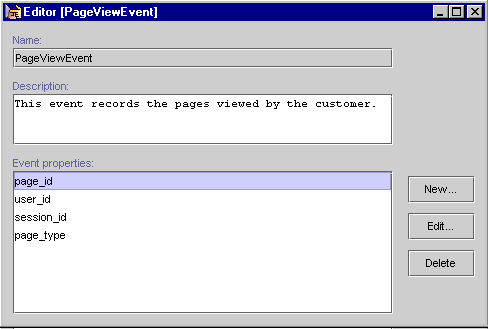
Note: If you change the property setting Data type, Selection mode, or Value range, the associated values will be erased. Figure 7-16 Enter Property Value Window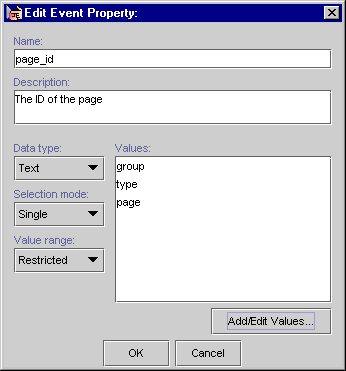

|

|

|
|
|
|
Copyright © 2001 BEA Systems, Inc. All rights reserved.
|