|
|
|
|
|
|
Creating and Managing Users
BEA WebLogic Personalization Server applications can store personal information about customers and display Web site content or offer other services based on customers' identities. For example, if you store information about the types of mutual funds in which your customer invests (conservative, moderate, aggressive), you can present content, advertisements, and additional fund recommendations that reflect each customer's preference.
The first sections of topic provide background information for the following WebLogic Personalization Server features:
The remaining sections provide instructions for creating and persisting data about your customers:
User and Group Profiles
A customer profile (or user profile) is a schema that determines which data you collect and store about a customer. Each piece of data in a customer profile is called a customer property. Customer properties can range from statically-defined properties, such as a user's social security number, to dynamically-created and persisted properties, such as Web-site tracking information for a particular user, or user preferences entered from a standard input screen.
Property Inheritance
User and group profiles can both inherit property values through the concept of a successor profile. If a property is requested from a profile, and no value is found for that property, the profile's successor will be queried for the profile. This process will be repeated recursively until either a value is found, or no more successors are found.
There are two types of successors: implicit and explicit.
An implicit successor is one that is set for a profile. For example, you can retrieve a user profile's ProfileWrapper object and call setSuccessor() on it, passing in a group name and a property set name. From that point on, that group will be used as a successor for the user profile when a property belonging to that property set is requested. A profile can have one implicit successor per property set, and one for the default, or null, property set. Properties that are set using a null property set name are are members of the default property set. To se an implicit successor for the default property set, you can call ProfileWrapper.setSuccessor() with null for the property set name argument.
Explicit successors are provided at the time of the property query, as an extra parameter to the getProperty() call. For example, calling getProperty("FooPropertySet", "Bar", "SomeGroup") on a user profile will look for the property called Bar in the FooPropertySet, then in the default property set, and if it is not found in either place it will retrieve the profile for the group called SomeGroup and repeat the search with that profile, and any of its implicit successors. Explicit successors will always be queried before implicit successors.
Users can only have groups as successors, and groups can only have other groups as successors. By default, when you add a group to a group, the parent becomes the child's implicit successor for the default property set. However, since users can belong to multiple groups, it is up to your application to decide which group to set as a user's successor.
The overall property search order, when getProperty( "Foo", "Bar", "SomeGroup" ) is called, is as follows:
Property Sets and Profiles
User profiles use property sets to organize the properties that they contain. A property set is a convenient way to give a name to a group of properties for a specific purpose; a property set type establishes a set of expectations for how a property set is used.
The sample applications define a property set named CustomerProperties which belongs to the User Profile property set type. CustomerProperties contains around thirty properties for an e-commerce customer, such as First Name, Last Name, Home Phone, Email, and Customer Type.
You create property sets and property definitions in the E-Business Control Center. You use JSP tags, APIs, or other WebLogic Personalization Server services to set the value of a property. WebLogic Personalization Server does not support creating a new property set type.
For more information about property sets, see Creating and Managing Property Sets, in this guide.
Security Realms and User Profiles
A security realm determines how a user is authenticated and retrieves access control lists for given names. WebLogic Server supports several types of security realms for different environments and security needs.
The default WebLogic Personalization Server realm, wlcsRealm, stores and retrieves user IDs and passwords from the user profiles that are stored in the WebLogic Personalization Server RDMBS repository. (See Figure 8-1.)
Figure 8-1 wlcsRealm and User Properties
Alternate Security Realms and User Profiles You can use other types of security realms to store and retrieve authentication data (user IDs, passwords, ACLs) in sources other than the RDBMS repository. For example, if you already have users and groups defined on a UNIX network, you can use the UNIX Security Realm to authenticate users and groups using UNIX login IDs and passwords. For a list of the types of security realms that WebLogic Server supports, refer to "Security Fundamentals" in the WebLogic Server Programming WebLogic Security guide. Also refer to the WebLogic Portal Security Guide. WebLogic Personalization Server provides two session beans, the UserManager and GroupManager, as a single point of entry for creating, editing, and removing user and group data. If you use an alternate security realm, methods in these beans act upon both the realm and the profile manager components to ensure that they stay synchronized. For example, Figure 8-2 illustrates using the UserManager to create or remove users. A Personalization service uses UserManager to create user IDs and passwords in both the UNIX Realm and the user profile in the RDBMS data repository. Figure 8-2 Synchronizing Security Realms and User Profiles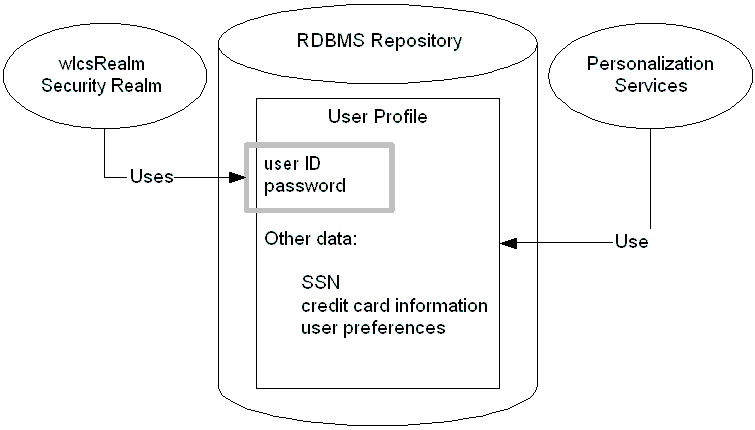
In general, if you are using APIs to manage user data, use the UserManager and GroupManager methods as opposed to manipulating the security realm directly. If you use a read-only realm such as LDAP Realm, UserManager and GroupManager cannot create users and groups in the realm. Instead, WebLogic Personalization Server creates user profiles for users and groups from the read-only realm on-the-fly. For example, if a user "joe" exists in your LDAP server and you are running the LDAP realm, the first time Joe's user profile is requested, the UserManager will see that the profile does not exist. It will then verify that Joe exists as a user in the LDAP realm, and will create a new profile record at that point and return it. If you use a third-party tool to manage user records in an alternate security realm (such as the administration tool that comes with an LDAP server), the UserManager has no way to know when users and groups are removed from the realm. This can result in profile records that belong to users and groups that no longer exist. The User Management Administration Tools provide a means to clean up these leftover records. See the section Deleting User Records That Do Not Exist in the Realm from the Personalization Database.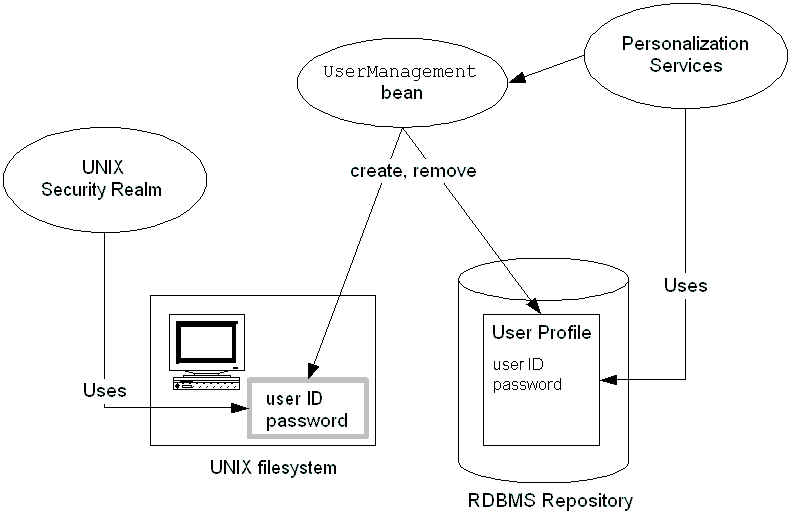
Unified User Profiles
WebLogic Personalization Server provides the ability to combine user properties from the WebLogic Personalization Server RDBMS repository with user properties from other data sources, such as an LDAP server into a single Unified User Profile (UUP). With the UUP, developers and system users need not worry about the different underlying data sources of user data. To them there is just one place to go for user information-the user profile. (See Figure 8-3.)
Figure 8-3 UUP That Combines Several Data Sources
For information on setting up a Unified User Profile that gathers user properties from an LDAP server, refer to Accessing Properties from an LDAP Server. For information on gathering user properties from other data sources, refer to Incorporating Data from Other External Sources.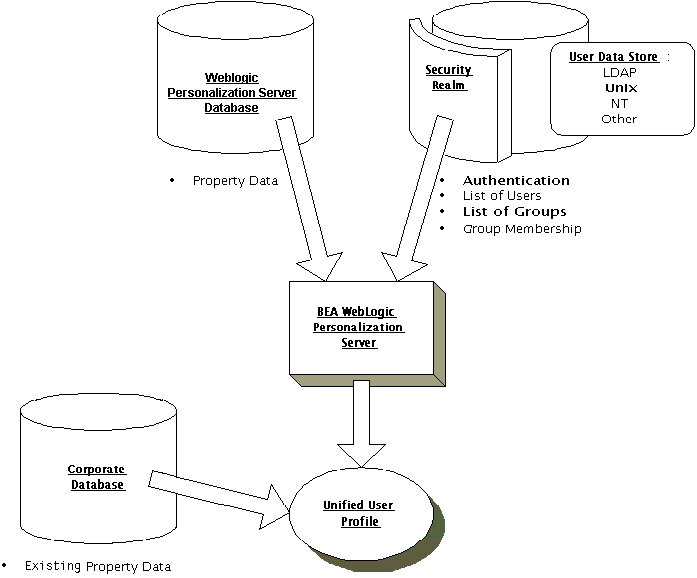
Anonymous User Profiles
Certain scenarios require an unidentified user to be able to use a system. While the unidentified user is using the system, you may need to have a profile for that user in order to set and get properties. For instance, a portal Web site might want to let new users tour the Web site and configure a few things before they actually have an official login name and password. The anonymous user profile allows for a user profile to be created for such a user.
An anonymous user profile can be treated just like a user profile for a known user, but the anonymous user profile only lives for the life of the user session. If the session is terminated without capturing an identity for the user, any profile information accumulated during the life of the anonymous user profile is lost. An anonymous user profile has no successor and will not retrieve default property values from a Property Set.
The anonymous user profile is available only through JSP tags. An anonymous profile is created when a <um:setProperty> or <um:getProperty> JSP tag is used before a <um:getProfile> tag has been called. If during a session a persistent user profile is created for the anonymous user, the <um:createUser> tag can be told to store the values from the anonymous profile into the new user profile. This is done with the saveAnonymous tag parameter set to true, as in:
<um:createUser saveAnonymous="true">.
Note: Campaigns cannot be used with anonymous users. Campaigns require a user ID that has two characteristics: the ID must be associated with a user profile, and that user profile must be saved (persisted). However, the anonymous profile for a user who is not logged in is a runtime profile (not saved), and not associated with a user ID.
Personalization features such as <pz:div> and <pz:contentSelector> JSP tags do work for anonymous users. This is because these features can use a runtime profile without a user ID.
For more information on these tags, see the section "User Management JSP tags" in Personalization Server JSP Tag Library Reference, in this guide.
Platform for Privacy Preferences Project (P3P)
The Platform for Privacy Preferences Project (P3P) is an emerging industry standard that is designed to provide an automated way to compare consumers' privacy preferences with the privacy practices of the Web sites they visit. It lets Web sites express their privacy practices in a format that can be retrieved automatically and interpreted easily.
The P3P is a work-in-progress by the World Wide Web Consortium (W3C), a global group drawn from industry, academia, and privacy groups as well as public policy organizations. For more information about the World Wide Web Consortium's ongoing P3P effort, visit the P3P site at http://www.w3.org/P3P.
Essentially, P3P compliance means that your Web site presents a privacy policy to the user. As put forth in the P3P specification, a privacy policy is a set of one or more privacy statements that describe what personal user data a Web site will retrieve, and how the data is to be used. The P3P specification currently defines three mechanisms by which a Web site's privacy policy information can be presented to the end user:
BEA Systems applauds the efforts of the World Wide Web Consortium and other organizations around the world working to empower users to control the use of their personal information on the Web sites they visit. However, it is important to note that WebLogic Personalization Server does not in any way enforce P3P compliance-that option is left up to the Web site developer.
Creating and Modifying Groups
This section describes using the WebLogic Portal Administration Tools to complete the following tasks:
For information on using JSP tags or APIs to create and modify groups, refer to Personalization Server JSP Tag Library Reference, and to the Javadoc API documentation
for the UserManager and GroupManager EJBs.Creating Groups
Note: The User Management tools do not allow the creation of a group called "everyone," because this is a reserved WebLogic Server group name.
To create groups:
For more information, see "WebLogic Portal Administration Tools" in the WebLogic Portal Architectural Overview.
Figure 8-4 User Management Administration Tools Home Page
Figure 8-5 The Create a Group Page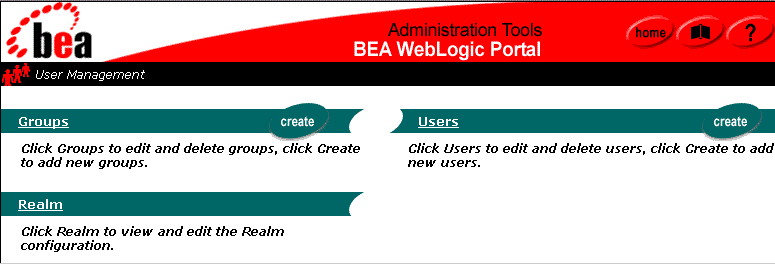
Figure 8-6 Expand the Group Hierarchy To Display the Add Icon (+)
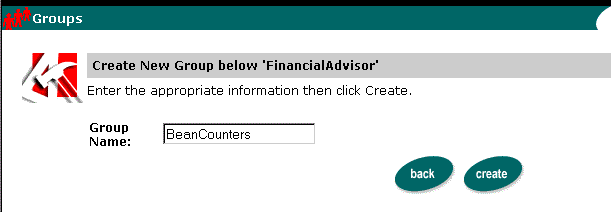
Figure 8-7 Enter the Name of the New Group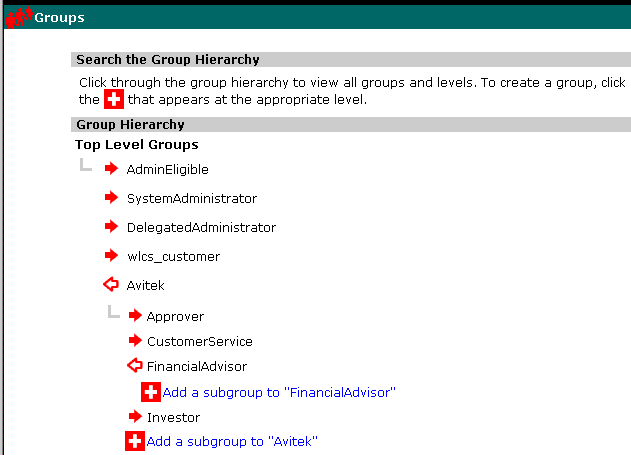
After you create a group, you can then personalize it by overriding the default property values. (The default property values are set up in the E-Business Control Center. For more information, see Creating and Managing Property Sets, in this guide.)
Adding Users to Groups
To add users to groups:
For more information, see "WebLogic Portal Administration Tools" in the WebLogic Portal Architectural Overview.
Figure 8-8 Search for a Group Page

Figure 8-9 Group Properties View
Figure 8-10 Add/Remove Users Page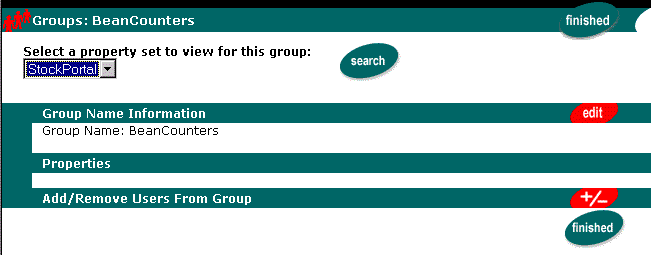
To locate a user, do one of the following:
Note: Only users already entered in the database are available in these lists. To add new users to the database, see Creating Users.
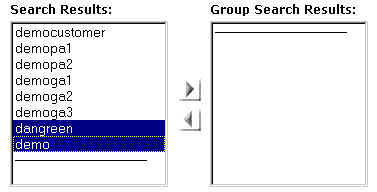
Figure 8-11 Use Left-Arrow to Move User Names into a Group
Note: The search applies to both list boxes.
Removing Users from Groups
To remove users from groups:
For more information, see "WebLogic Portal Administration Tools" in the WebLogic Portal Architectural Overview.
To locate the appropriate group, do one of the following:
To locate a user, do one of the following:
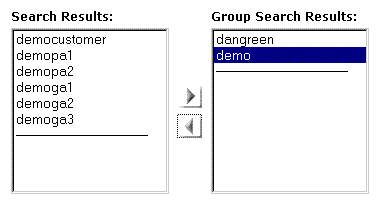
Figure 8-12 Use Right-Arrow to Move Usernames Out of a Group
Editing Group Property Values
To edit group property values:
For more information, see "WebLogic Portal Administration Tools" in the WebLogic Portal Architectural Overview.
To locate the appropriate group, do one of the following:
Note: Default property values are created using the E-Business Control Center. For specific instructions on property set management, see Creating and Managing Property Sets.
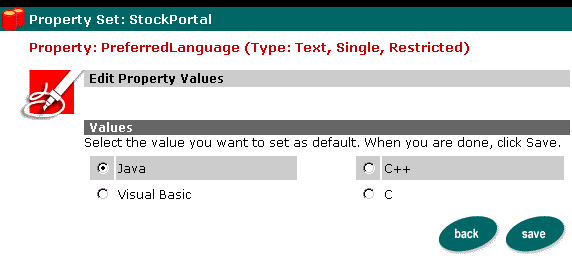
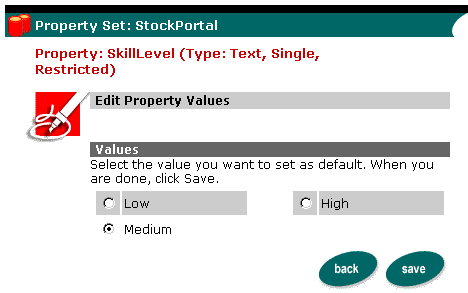
Figure 8-13 Edit Default Properties Page
Figure 8-14 Edit Property Values Page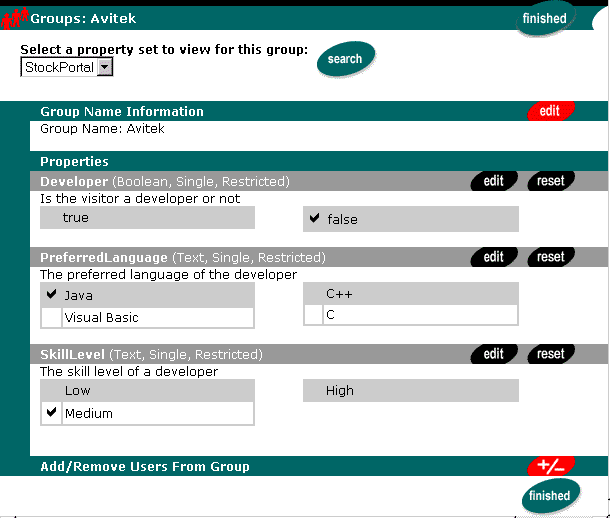
Note: Non-default property sets and properties that were not configured through the Site Infrastructure tab in the E-Business Control Center are not editable here.
Deleting Groups
To delete groups:
For more information, see "WebLogic Portal Administration Tools" in the WebLogic Portal Architectural Overview.
Figure 8-15 Search for a Group To Delete
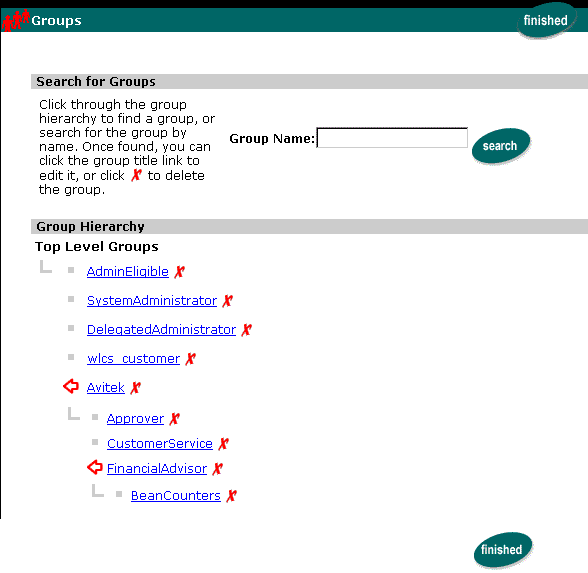
Figure 8-16 Confirmation Box: Group Successfully Deleted
Creating and Modifying Users
This section describes using the WebLogic Portal Administration Tools to complete the following tasks:
For information on using JSP tags or APIs to create and modify users, refer to Personalization Server JSP Tag Library Reference, and to the Javadoc API documentation
for the UserManager and GroupManager EJBs.For information on how customers can create and modify their own user profiles, refer to the Guide to Registering Customers and Managing Customer Services.
Creating Users
Note: The administration tools do not allow the creation of a user with username "system" or "guest", as these are reserved WebLogic Server terms.
To create users:
For more information, see "WebLogic Portal Administration Tools" in the WebLogic Portal Architectural Overview.
Figure 8-17 User Management Icon on the WebLogic Portal Administration Tools
Figure 8-18 User Management Home Page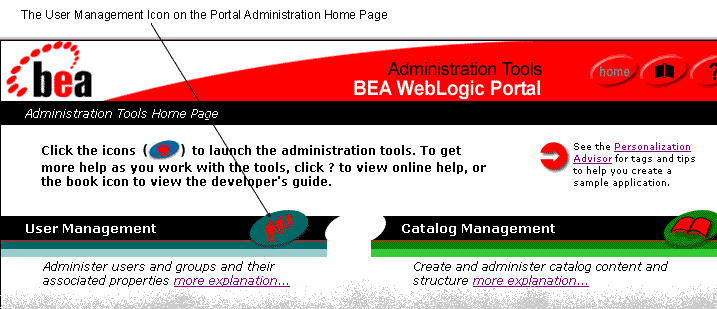
Figure 8-19 Create New Users Page
Note: Limit username to 25 characters. Note: Characters in password fields appear as asterisks.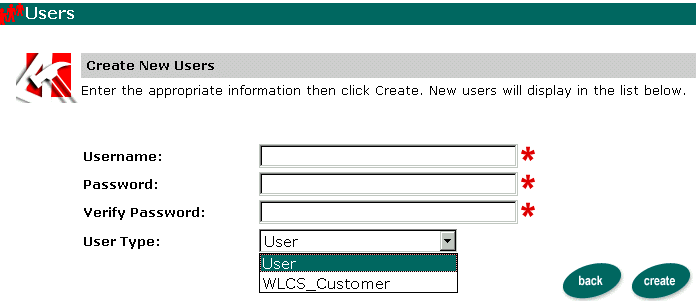
Alternatively, click Back to return to the User Management Home page without
creating the new user.
Note: The WLCS RDBMSrealm allows mixed case user creation. (For example: User, user.)
After you create a user, you can then personalize it by overriding the default property values. (The default property values are set up in the E-Business Control Center. For more information, see Creating and Managing Property Sets, in this guide.)
Editing User Property Values
Note: Explicit properties of UUP are only editable from the administration tools if a property set is created that mirrors those properties.
To edit user property values:
For more information, see "WebLogic Portal Administration Tools" in the WebLogic Portal Architectural Overview.
Figure 8-20 Search for a User
To locate a user, do one of the following:
Note: Default property values are created using the E-Business Control Center. For specific instructions on property set management, see Creating and Managing Property Sets.
Figure 8-21 User Properties View
Figure 8-22 Edit Property Values 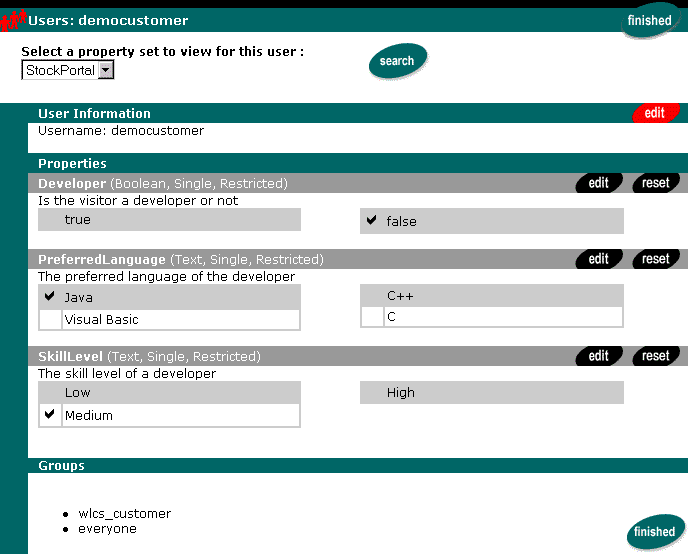
Note: If you click the Reset button on the Property bar (instead of Edit as we did in step 6), the property is set to null for that user. This will have one of three results:
Deleting Users
To delete users:
For more information, see "WebLogic Portal Administration Tools" in the WebLogic Portal Architectural Overview.
Figure 8-23 Search for a User to Delete
To locate a user, do one of the following: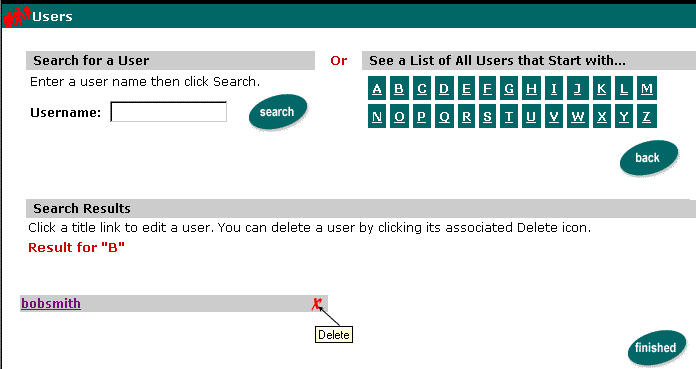
Deleting User Records That Do Not Exist in the Realm from the Personalization Database
When users are deleted from the realm, they might leave behind orphan profile records in your personalization database. This will only happen if the users are deleted directly from the realm, and not through the UserManager session bean. For example, a user might be deleted from an LDAP realm through the LDAP server's admin tool. To delete user profile records that no longer exist in the realm from the Personalization database:
For more information, see "WebLogic Portal Administration Tools" in the WebLogic Portal Architectural Overview.
Figure 8-24 The Realm Configuration Window
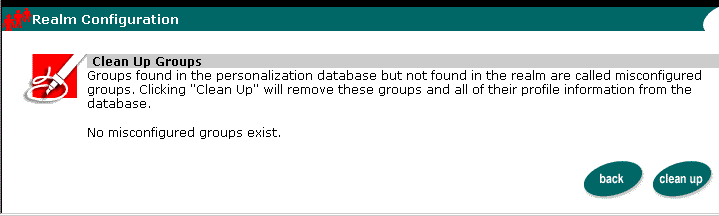
Figure 8-25 The Realm Window Offers An Opportunity to Clean Up Orphans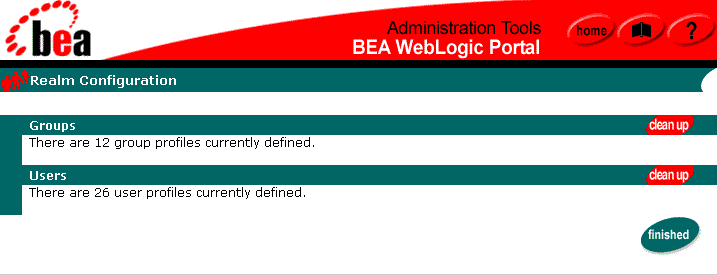
Accessing User and Group Data
Some WebLogic Personalization Server services, such as content selectors, access user and group data without requiring your intervention. If your business needs require additional use of your user and group data, you can do the following:
Use JSP Tags to Access User and Group Data
WebLogic Personalization Server provides JSP tag libraries that you can use to access user and group profile information, as well as create and delete users and groups, and manage user-group relationships.
For a complete list of user and group management JSP tags, refer to Personalization Server JSP Tag Library Reference.
Use APIs to Access User and Group Data
The UserManager and GroupManager session EJBs provide user management functionality in a WebLogic Personalization Server-specific context. Services provided by the EJBs include:
For a complete list of UserManager and GroupManager services, see the UserManager and GroupManager Javadoc API documentation
.As discussed in Alternate Security Realms and User Profiles, the UserManager and GroupManager are intended as a single entry point to both the security realm and the personalization database. All methods on these session beans delegate to either the realm, the profile components, or both when appropriate. This enables the developer to use a custom security realm implementation and have it integrate seamlessly with the WebLogic Personalization Server.
In addition to UserManager and GroupManager, you can instantiate and use the lightweight ProfileWrapper object to access a user or group profile. A ProfileWrapper can access the correct ProfileManager session bean(s) based on the identity it was initialized with. If it was initialized with both a user and group name, the group will be used as an explicit successor for all getProperty methods that do not take an explicit successor. For more information about ProfileWrapper, refer to the Javadoc API documentation
.
Setting Global Values for a Profile
Profile properties can also belong to the "default", or null, property set, by passing in a null value when setting the property. Doing this will mean that the property cannot be validated or recognized by the E-Business Control Center, but it provides a way to set global values for a profile. When a property is requested, the profile first looks for a value with that name in the given property set, and if it is not found, it looks in the default property set. For example, a user profile can have the property Age defined in the default property set, and as long as there is no property called Age in another property set, calling getProperty(x, "Age") will always return that value for any property set x.
Accessing Properties from an LDAP Server
The WebLogic Portal sample applications include a default property set named "ldap," which can retrieve properties from an LDAP server. Before you use this property set with the sample applications or with your own application, you must do the following:
Incorporating Data from Other External Sources
This section describes how to create a Unified User Profile that incorporates user data from external data sources in addition to or instead of LDAP servers, such as a legacy system or another database (See Figure 8-3).
This section includes the following subsections:
Note: If you want to incorporate user data only from an LDAP server, you do not need to complete the steps in this section. Instead, refer to Accessing Properties from an LDAP Server.
Unified User Profile Security
A Unifed User Profile is not a custom WebLogic security realm. User passwords are set in the WebLogic security realm, not in the user profile with other user properties. When UserManager.setPassword() is called, it delegates to the WebLogic security realm, not to a ProfileManager. However, the Unified User Profile and the WebLogic security realm are closely associated, because the UserManager is the synchronization point between the Unified User Profile and the WebLogic security realm. For example, the UserManager.createUser() method delegates to the security realm to create the user there, and then to a ProfileManager to create the user profile using the createUniqueId() method of one or more EntityPropertyManagers. All user management operations should be performed through the UserManager instead of directly through the security realm in order to keep the security realm and the user profile in sync.
See UserManager in the WebLogic Portal Javadoc at http://download.oracle.com/docs/cd/E13218_01/wlp/docs40/interm/javadoc.htm.
For information on writing a custom security realm, go to http://download.oracle.com/docs/cd/E13222_01/wls/docs61/security/prog.html#1041025.
How WebLogic Portal Retrieves User Data from External Sources
This section provides background information for completing the tasks that are described in Configuring WebLogic Portal To Retrieve User Data from External Sources.
To retrieve user data from a non-LDAP, external source, WebLogic Portal does the following (See Figure 8-26):
ProfileWrapper is a lightweight object that is used to access a user or group profile. For more information, refer to the Javadoc API documentation
.For example, you use the PostLoginProcessor Webflow component to retrieve user information on a specific JSP. When a customer accesses the JSP, PostLoginProcessor invokes the ProfileFactory.
See "Initializing the Customer Profile" in the Guide to Developing Campaign Infrastructure.
UserManager is the synchronization point between user profile support and the WebLogic Server security realm. The UserManager handles user creation and deletion by delegating to various ProfileManagers. The UserManager has a registry of ProfileTypes that map a ProfileType name to a particular deployment of a ProfileManager. For more information about the Java objects, refer to the Javadoc API documentation
.The getUserProfileManager method does the following:
You can specify a user's type when you create a user, (the createUser() method takes a user type as a parameter), and WebLogic Portal stores the type designation in its RDBMS repository. After you create a user, you cannot change the type.
ProfileManager is a stateless session bean used to access profile values. It coordinates property inheritance and the mapping of properties to different data sources.
UserManager and ProfileManager are both configurable through deployment descriptors: you should never have to modify/extend them by writing code.
The getProperty method does the following:
EntityPropertyManager is responsible for reading/writing properties to/from a datasource.
Note: You should use the WebLogic Portal Administration Tools to create a property set definition containing your UUP properties. This UUP property set can be used to provide default property values-default properties that are also required by the Portal personalization tools. For example, the tool for creating customer segments needs to know which properties (and which types of properties) are available for defining a customer segment.
Figure 8-26 How WebLogic Portal Retrieves Data From an External Source
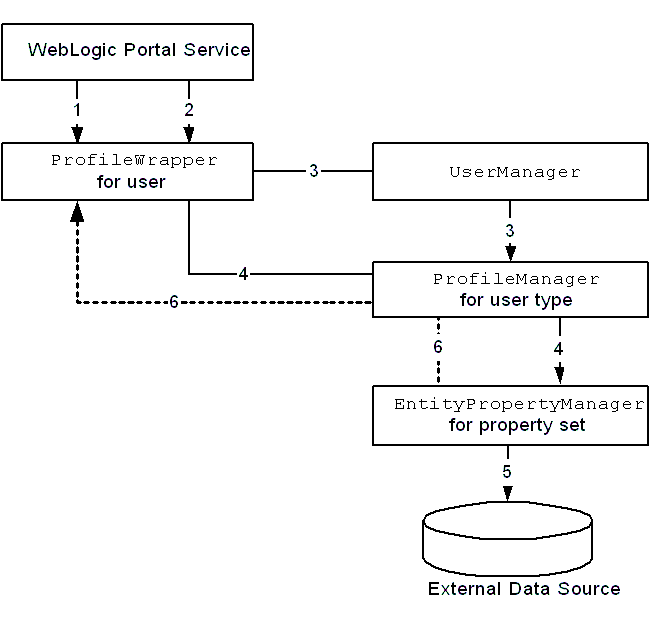
Note: The retrieval of default property values from the property set metadata in the portal schema is not shown in this figure.
A Unified User Profile is not a custom WebLogic security realm. For information on Unified User Profile security, see Unified User Profile Security.
Configuring WebLogic Portal To Retrieve User Data from External Sources
To retrieve user data from external sources, complete the following tasks:
Create an EntityPropertyManager EJB to Represent External Data
To incorporate data from an external source, you must first create a stateless session bean that implements the methods of the com.bea.p13n.property.EntityPropertyManager remote interface. EntityPropertyManager is the remote interface for a session bean that handles the persistence of property data and the creation and deletion of profile records if appropriate.
In addition, the stateless session bean should include a home interface and an implementation class. For example:
MyEntityPropertyManager
extends com.bea.p13n.property.EntityPropertyManager
MyEntityPropertyManagerHome
extends com.bea.p13n.property.EJBHome
Your implementation class can extend the EntityPropertyManagerImpl class. However the only requirement is that your implementation class is a valid implementation of the MyEntityPropertyManager remote interface. For example:
MyEntityPropertyManagerImpl extends
com.bea.p13n.property.internal.EntityPropertyManagerImpl
or
MyEntityPropertyManagerImpl extends
javax.ejb.SessionBean
We recommend the following guidelines for your new EJB:
getDynamicProperties
getEntityNames
getHomeName
getPropertyLocator
getUniqueId
getProperty() - Use caching. You should support the getProperties method to retrieve all properties for a user at once, caching them at the same time. Your getProperty method should use getProperties.
setProperty() - Use caching.
removeProperties(), removeProperty() - After these methods are called then a call to getProperty should return null for the property. Remove properties from the cache too.
Before you deploy your JAR file, follow the steps in the next section.
Deploy a ProfileManager That Can Use the New EntityPropertyManager
A "user type" is a mapping of a ProfileType name to a particular ProfileManager. This mapping is done in the UserManager EJB deployment descriptor.
To access the data in your new EntityPropertyManager EJB, you must do one of the following:
ProfileManager is a stateless session bean that manages access to the profile values that the EntityPropertyManager EJB retrieves. It relies on a set of mapping statements in its deployment descriptor to find data. For example, the ProfileManager receives a request for the value of the DateOfBirth property, which is located in the PersonalData property set. ProfileManager uses the mapping statements in its deployment descriptor to determine which EntityPropertyManager EJB contains the data.
Modifying the Existing ProfileManager Deployment Configuration
If you use the existing UserProfileManager deployment to manage your user profiles, perform the following steps to modify the deployment configuration.
Under most circumstances, this is the method you should use to deploy your UUP. An example of this method is the deployment of the custom EntityPropertyManager for LDAP property retrieval, the LdapPropertyManager. The classes for the LdapPropertyManager are packaged in ldapprofile.jar. (See Accessing Properties from an LDAP Server.) The deployment descriptor for the UserProfileManager EJB is configured to map the "ldap" property set to the LdapPropertyManager. The UserProfileManager is deployed in usermgmt.jar.
<!-- map all properties in property set ldap to ldap server -->
<env-entry>
<env-entry-name>PropertyMapping/ldap</env-entry-name>
<env-entry-type>java.lang.String</env-entry-type>
<env-entry-value>LdapPropertyManager</env-entry-value>
</env-entry>
and add an <env-entry> element after this to map a property set to your custom EntityPropertyManager like this:
<!-- map all properties in UUPExample property set to MyEntityPropertyManager -->
<env-entry>
<env-entry-name>PropertyMapping/UUPExample</env-entry-name>
<env-entry-type>java.lang.String</env-entry-type>
<env-entry-value>MyEntityPropertyManager</env-entry-value>
</env-entry>
<!-- an ldap property manager -->
<ejb-ref>
<ejb-ref-name>ejb/LdapPropertyManager</ejb-ref-name>
<ejb-ref-type>Session</ejb-ref-type>
<home>com.bea.p13n.property.EntityPropertyManagerHome</home>
<remote>com.bea.p13n.property.EntityPropertyManager</remote>
</ejb-ref>
and add a <ejb-ref> element after this to map a reference to an EJB that matches the name from the previous step with ejb/ prepended like this:
<!-- an example property manager -->
<ejb-ref>
<ejb-ref-name>ejb/MyEntityPropertyManager</ejb-ref-name>
<ejb-ref-type>Session</ejb-ref-type>
<home>examples.usermgmt.MyEntityPropertyManagerHome</home>
<remote>examples.usermgmt.MyEntityPropertyManager</remote>
</ejb-ref>
The home and remote class names match the classes from your EJB JAR file for your custom EntityPropertyManager.
<env-entry>
<env-entry-name>Creator/Creator1</env-entry-name>
<env-entry-type>java.lang.String</env-entry-type>
<env-entry-value>MyEntityPropertyManager</env-entry-value>
</env-entry>
<env-entry>
<env-entry-name>Remover/Remover1</env-entry-name>
<env-entry-type>java.lang.String</env-entry-type>
<env-entry-value>MyEntityPropertyManager</env-entry-value>
</env-entry>
This instructs the UserProfileManager to call your custom EntityPropertyManager when creating or deleting user profile records. The names "Creator1" and "Remover1" are arbitrary. All Creators and Removers will be iterated through when the UserProfileManager creates or removes a user profile. The value for the Creator and Remover matches the ejb-ref-name for your custom EntityPropertyManager without the ejb/ prefix.
<weblogic-enterprise-bean>
<ejb-name>UserProfileManager</ejb-name>
<reference-descriptor>
<ejb-reference-description>
<ejb-ref-name>ejb/EntityPropertyManager</ejb-ref-name>
      <jndi-name>${APPNAME}.BEA_personalization.
      EntityPropertyManager</jndi-name>
</ejb-reference-description>
and add an ejb-reference-description to map the ejb-ref for your custom EntityPropertyManager to the JNDI name. This JNDI name must match the name you assigned in weblogic-ejb-jar.xml in the JAR file for your customer EntityPropertyManager. It should look like this:
<weblogic-enterprise-bean>
<ejb-name>UserProfileManager</ejb-name>
<reference-descriptor>
<ejb-reference-description>
<ejb-ref-name>ejb/EntityPropertyManager</ejb-ref-name>
      <jndi-name>${APPNAME}.BEA_personalization.
      EntityPropertyManager</jndi-name>
</ejb-reference-description>
<ejb-reference-description>
      <ejb-ref-name>ejb/MyEntityPropertyManager
      </ejb-ref-name>
      <jndi-name>${APPNAME}.BEA_personalization.
      MyEntityPropertyManager</jndi-name>
</ejb-reference-description>
Note the ${APPNAME} string substitution variable. The WebLogic EJB container automatically substitutes the enterprise application name to scope the JNDI name to the application.
<module>
<ejb>UUPExample.jar</ejb>
</module>
<Cache
Name="UUPExampleCache"
TimeToLive="60000"
/>
For information on using com.bea.p13n.cache.Cache, see "Using Caches" in the Performance Tuning Guide.
Note: Be sure to synchronize the new data to your server after the property set is created.
Configuring and Deploying a New ProfileManager
If you are going to deploy a newly configured ProfileManager instead of using the default ProfileManager (UserProfileManager) to manage your user profiles, perform the following steps to modify the deployment configuration. In most cases, you will not have to use this method of deployment. Use this method only if you need to support multiple types of users that require different ProfileManager deployments-deployments that allow a property set to be mapped to different custom EntityPropertyManagers based on ProfileType.
An example of this method is the deployment of the custom CustomerProfileManager in customer.jar. The CustomerProfileManager is configured to use the custom EntityPropertyManager (CustomerPropertyManager) for properties in the "CustomerProperties" property set. The UserManager EJB in usermgmt.jar is configured to map the "WLCS_Customer" ProfileType to the custom deployment of the ProfileManager, CustomerProfileManager.
In addition, you could extend the UserProfileManager home and remote interfaces with your own interfaces if you want to repackage them to correspond to your packaging (for example., examples.usermgmt.MyProfileManagerHome, examples.usermgmt.MyProfileManager). However, it is sufficient to replace the bean implementation class:
<session>
<ejb-name>MyProfileManager</ejb-name>
  <home>com.bea.p13n.usermgmt.profile.ProfileManagerHome
  </home>
  <remote>com.bea.p13n.usermgmt.profile.ProfileManager
  </remote>
  <ejb-class>examples.usermgmt.MyProfileManagerImpl
  </ejb-class>
<session-type>Stateless</session-type>
<transaction-type>Container</transaction-type>
  <!-- map all properties in UUPExample property
  set to MyEntityPropertyManager -->
<env-entry>
<env-entry-name>PropertyMapping/UUPExample</env-entry-name>
<env-entry-type>java.lang.String</env-entry-type>
<env-entry-value>MyEntityPropertyManager</env-entry-value>
</env-entry>
<!-- register a Creator for MyEntityPropertyManager -->
<env-entry>
<env-entry-name>Creator/Creator1</env-entry-name>
<env-entry-type>java.lang.String</env-entry-type>
<env-entry-value>MyEntityPropertyManager</env-entry-value>
</env-entry>
<!-- register a Remover for MyEntityPropertyManager -->
<env-entry>
<env-entry-name>Remover/Remover1</env-entry-name>
<env-entry-type>java.lang.String</env-entry-type>
<env-entry-value>MyEntityPropertyManager</env-entry-value>
</env-entry>
<!-- the default property manager -->
<ejb-ref>
<ejb-ref-name>ejb/EntityPropertyManager</ejb-ref-name>
<ejb-ref-type>Session</ejb-ref-type>
    <home>com.bea.p13n.property.EntityPropertyManagerHome
    </home>
    <remote>com.bea.p13n.property.EntityPropertyManager
    </remote>
</ejb-ref>
<!-- my custom property manager -->
<ejb-ref>
<ejb-ref-name>ejb/MyEntityPropertyManager</ejb-ref-name>
<ejb-ref-type>Session</ejb-ref-type>
<home>examples.usermgmt.EntityPropertyManagerHome</home>
<remote>examples.usermgmt.EntityPropertyManager</remote>
</ejb-ref>
<!-- property set manager -->
<ejb-ref>
<ejb-ref-name>ejb/PropertySetManager</ejb-ref-name>
<ejb-ref-type>Session</ejb-ref-type>
<home>com.bea.p13n.property.PropertySetManagerHome</home>
<remote>com.bea.p13n.property.PropertySetManager</remote>
</ejb-ref>
<!-- group profile manager, which is the user's successor -->
<ejb-ref>
<ejb-ref-name>ejb/GroupProfileManager</ejb-ref-name>
<ejb-ref-type>Session</ejb-ref-type>
    <home>com.bea.p13n.usermgmt.profile.ProfileManagerHome
    </home>
    <remote>com.bea.p13n.usermgmt.profile.ProfileManager
    </remote>
<ejb-link>GroupProfileManager</ejb-link>
</ejb-ref>
<security-role-ref>
    <description>This ref declares the Administrative role
    for this bean</description>
<role-name>SystemAdminRole</role-name>
<role-link>SystemAdminRole</role-link>
</security-role-ref>
<security-role-ref>
    <description>This ref declares the Administrative role
    for this bean</description>
<role-name>DelegatedAdminRole</role-name>
<role-link>DelegatedAdminRole</role-link>
</security-role-ref>
</session>
You must create an <env-entry> element to map a property set to your custom EntityPropertyManager. You must also create a <ejb-ref> element to map a reference to an EJB that matches the name from the PropertyMapping with ejb/ prepended. The home and remote class names for your custom EntityPropertyManager match the classes from your EJB JAR file for your custom EntityPropertyManager.
Also, if your EntityPropertyManager implementation handles creating and removing profile records, you must also add Creator and Remover entries. This instructs your new ProfileManager to call your custom EntityPropertyManager when creating or deleting user profile records. The name suffixes for the Creator and Remover, "Creator1" and "Remover1", are arbitrary. All Creators and Removers will be iterated through when your ProfileManager creates or removes a user profile. The value for the Creator and Remover matches the <ejb-ref-name> for your custom EntityPropertyManager without the ejb/ prefix.
<ejb-ref>
<ejb-ref-name>ejb/ProfileType/UUPExampleUser</ejb-ref-name>
<ejb-ref-type>Session</ejb-ref-type>
<home>com.bea.p13n.usermgmt.profile.ProfileManagerHome</home>
<remote>com.bea.p13n.usermgmt.profile.ProfileManager</remote>
</ejb-ref>
The <ejb-ref-name> must start with ejb/ProfileType/ and must end with the name that you want to use as the profile type as an argument in the createUser() method of UserManager.
<weblogic-enterprise-bean>
<ejb-name>MyProfileManager</ejb-name>
<reference-descriptor>
<ejb-reference-description>
<ejb-ref-name>ejb/EntityPropertyManager</ejb-ref-name>
        <jndi-name>${APPNAME}.BEA_personalization.
        EntityPropertyManager</jndi-name>
</ejb-reference-description>
<ejb-reference-description>
<ejb-ref-name>ejb/PropertySetManager</ejb-ref-name>
        <jndi-name>${APPNAME}.BEA_personalization.
        PropertySetManager</jndi-name>
</ejb-reference-description>
<ejb-reference-description>
        <ejb-ref-name>ejb/MyEntityPropertyManager
        </ejb-ref-name>
        <jndi-name>${APPNAME}.BEA_personalization.
        MyEnitityPropertyManager</jndi-name>
</ejb-reference-description>
</reference-descriptor>
  <jndi-name>${APPNAME}.BEA_personalization.
  MyProfileManager</jndi-name>
</weblogic-enterprise-bean>
You must create an <ejb-reference-description> to map the <ejb-ref> for your custom EntityPropertyManager to the JNDI name. This JNDI name must match the name you assigned in weblogic-ejb-jar.xml in the JAR file for your custom EntityPropertyManager.
Note the ${APPNAME} string substitution variable. The WebLogic Server EJB container automatically substitutes the enterprise application name to scope the JNDI name to the application.
<transaction-isolation>
  <isolation-level>TRANSACTION_READ_COMMITTED
  </isolation-level>
<method>
<ejb-name>MyProfileManager</ejb-name>
<method-name>*</method-name>
</method>
</transaction-isolation>
<module>
<ejb>UUPExample.jar</ejb>
</module>
<Cache
Name="UUPExampleCache"
TimeToLive="60000"
/>
For information on using com.bea.p13n.cache.Cache, see "Using Caches" in the Performance Tuning Guide.
Note: Be sure to synchronize the new data to your server after the property set is created.

|

|

|
|
|
|
Copyright © 2001 BEA Systems, Inc. All rights reserved.
|