|
|
|
|
|
|
Introduction to the BEA E-Business Control Center
The BEA E-Business Control Center is a tool designed to simplify the tasks that are necessary to create and maintain a truly personalized Web site. Building upon the functionality of the WebLogic Portal server and the WebLogic Personalization Server products that may already support your e-business, the E-Business Control Center can make business analysts and marketing professionals in your organization more self-sufficient, thereby minimizing the need for collaboration with busy technical resources. And even when collaboration is required for more specialized or advanced tasks, this collaboration may take significantly less time and be more efficient overall.
To meet this objective, the E-Business Control Center guides users through a variety of tasks, ensuring that both business and technical staff members can focus on the aspects of e-business management that are relevant to their role in the organization. The E-Business Control Center's intuitive graphical user interface empowers people in these diverse roles, allowing them to provide exceptional value to their online customers and to effectively nurture customer relationships.
This topic is intended to introduce you to the capabilities of the E-Business Control Center and highlight some important points about its use. It provides information about the specific e-business roles and responsibilities this tool is intended to support. This topic includes the following sections:
The variable EBCC_HOME refers to your E-Business Control Center directory. By default on installation, this directory is called ebcc4.0.
Note: If you are viewing this guide in the online help system for the E-Business Control Center, only the help topics of the tools for which you are licensed are included. For the full version of this guide, go to the BEA e-docs Web site: http://download.oracle.com/docs/cd/E13218_01/wlp/docs40.
Links in the online help system that are not underlined launch a browser to jump to documents on BEA's e-docs Web site.
About the E-Business Control Center
As shown in Figure 1-1, the E-Business Control Center is an e-business tool built upon the BEA products your organization's technical professionals know and trust to support their e-commerce Web development efforts. Whether your company uses WebLogic Personalization Server or WebLogic Portal, the E-Business Control Center can make expanding and maintaining your online customer relationships easier and less time consuming.
Figure 1-1 WebLogic Portal Features
In the Personalization-only configuration, the E-Business Control Center exists in a simplified form, while still providing you with the utilities needed to display customized content and control Webflow. The WebLogic Portal product gives you access to even more features in the E-Business Control Center, such as portal and portlet configuration, discounts, and promotional campaigns. The information provided in the following section will help you to understand what features are available in each version of the E-Business Control Center, and how these features can help you achieve your e-business goals. The E-Business Control Center is a tool for just about everyone in the enterprise application development process, from the business analyst creating customer characteristics to the developer working with portals and Webflow. For more details about roles, see Roles and Responsibilities. Note: For more information about WebLogic Personalization Server and WebLogic Portal, see the Strategies for Developing E-Business Web Sites at http://download.oracle.com/docs/cd/E13218_01/wlp/docs40/strategs/index.htm. About the E-Business Control Center Interface Figure 1-2 shows the different parts of the E-Business Control Center. Figure 1-2 The E-Business Control Center
The tools available in the E-Business Control Center appear in the Explorer window. Tools are separated by the three tabs at the bottom of the window. The Editor window appears when you open a file. For more information on applications that are valid for deployment, see Synchronizing Application Data. Icons that Show Status File icons in the Explorer window can take on different appearances depending on the status of the files. Table 1-1 shows and describes the variations you might see on the standard icons. What the E-Business Control Center Provides No matter which version of the E-Business Control Center your organization uses, the E-Business Control Center's rich feature set is sure to provide you with the tools you need to effectively personalize your e-business. This section will help you understand which E-Business Control Center features are available in your version of the product, and describes some of the E-Business Control Center features that are available in all versions of the tool to help you get started. WebLogic Personalization Server 4.0 Customers WebLogic Personalization Server customers can: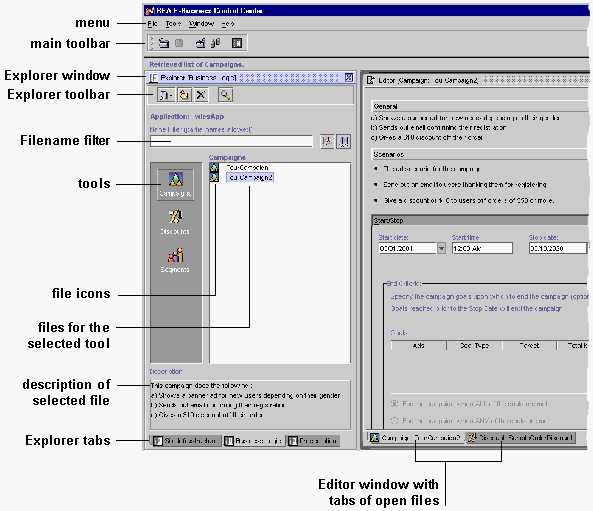
WebLogic Portal 4.0 Customers
In addition to the Personalization Server features, WebLogic Portal customers can:
Roles and Responsibilities
The E-Business Control Center was designed specifically to help business analysts, marketing professionals, and other non-technical professionals implement customized e-business strategies that will capture and maintain sizable online audiences. Because a business analyst's strength is in conceiving effective models for e-business, the tools you use should allow you to execute these strategies easily, without worrying about technical details or becoming overly dependent on technical resources.
The E-Business Control Center does not require you to have intricate knowledge about how a Web site is implemented. Rather, the E-Business Control Center allows you to remain in control of all your e-business efforts, including the creation and modification of promotional campaigns, through an intuitive graphical interface.
Although a business analyst's reliance on technical resources is greatly reduced when using the E-Business Control Center, some degree of collaboration with your organization's technical staff may still be necessary to fully personalize your customers' experience. The E-Business Control Center provides many out-of-the-box components that you can use to meet your business objectives. However, you may develop a new e-business strategy that leverages the power of BEA technology but does not surface in the E-Business Control Center tool. It is during these times that you may need to work with a technical resource in your organization to establish a supporting infrastructure. Once this is done, however, you can reuse the new components like you would any other in the E-Business Control Center.
Business Analysts will most likely collaborate with more technical resources who may:
Therefore, when you require additional support for the E-Business Control Center, you would typically contact a person (or a group of people) who fill the business engineer role described previously.
For more detailed information about how a business engineer accomplishes campaign-related programming tasks, see the Guide to Developing Campaign Infrastructure.
Establishing Organizational Policies
Much of the data in the E-Business Control Center is stored in XML files and modified on individual client systems. When synchronized to your server, that data determines the rules and behavior of your enterprise application.
Warning: When multiple developers work concurrently on a single set of source files and business documents, they can overwrite each others' work or create sets of changes that are incompatible and difficult to debug when they synchronize their data to the WebLogic Portal server.
We highly recommend using content management or version control software to control user access to files and provide a file revision history. Also, since such software usually stores data on a single server, your system administrator can back up that data. There are many issues involved with authoring and deploying your enterprise application to go live. To help save you time, effort, and money, and to help prevent you from making mistakes that negatively affect your Web presence, read about these issues in the Deployment Guide.
To facilitate concurrent development, we recommend the following model:
It is extremely important that your organization develop some policies about who owns objects like customer segments, placeholders, events, campaigns, and so on. Ownership of objects is critical when it comes to modifying information that may be in broad use. For example, if a customer segment is created by one user, it is very possible that other users may begin to use the segment (perhaps unbeknownst to the original author). If the author later changes the segment definition, many people are going to be affected. So, it is also highly recommended that your organizational policies identify which objects others can use, which are more proprietary or "use at your own risk," and so on.
Recommended Reading
After you have reviewed this introduction, you can take a number of paths through the documentation, depending upon your goals.
WebLogic Portal 4.0 Customers
If you are a WebLogic Portal customer, review the conceptual explanations in all chapters of this guide. If you are going to develop campaigns, pay particular attention to the "Roadmap for Creating Promotional Campaigns" before getting started. This topic should contain all the information you need to know before moving on to the step-by-step instructions that will guide you through campaign implementation.
Note: The importance of planning can never be overstated, so resist skipping the Roadmap discussion! Carefully thinking about and designing a detailed marketing strategy ensures that you have (at the very minimum) the information you will need to begin implementing your campaigns in the E-Business Control Center. In addition, up-front planning can help you identify areas where your strategy may be unclear, possibly preventing you from running into problems down the road that require both time and effort to resolve. Naturally, such problems can delay the release of a promotional campaign, thus affecting your ability to provide the valuable services your online customers expect.
WebLogic Personalization Server 4.0 Customers
If you have the Personalization-only version of the E-Business Control Center, you should review at least the conceptual explanations in the following chapters:
Additional Resources
In addition to this guide, the following resources will also help you understand and use the E-Business Control Center.
BEA E-Marketing Fieldbook
The goal of the BEA E-Marketing Fieldbook is to help you architect a strategy for e-business success. This document weaves together a breadth of fundamental e-business best practices with practical recommendations for how to implement your BEA customer management platform and other technologies to achieve maximum value from your customer relationships.
The Fieldbook contains content ranging from Marketing 101 concepts to leading-edge, technology driven marketing strategies. By covering a range of topics, the Fieldbook addresses the diverse needs of organizations with varied levels of marketing sophistication, while also conveying the importance of building e-business success through a solid foundation of marketing basics.
Fieldbook topics center around traditional functional marketing roles to enable individual contributors within your organization to quickly find the content that applies to their responsibilities. Although written for marketers and business managers, the Fieldbook still covers an array of technical issues, focusing on utilization of technology to drive business objectives.
The BEA E-Marketing Fieldbook is available on the BEA e-docs product documentation Web site: http://download.oracle.com/docs/cd/E13218_01/wlp/docs40/interm/pdf.htm.
Sample Applications and Product Tours
To help you understand the interactions taking place between the E-Business Control Center tool and your Web site or Portal, the documentation also contains two tours that walk you through the features highlighted in the sample applications:
For more information about these product tours, see the BEA e-docs product documentation Web site: http://download.oracle.com/docs/cd/E13218_01/wlp/docs40/index.html.
Online Help
At any time, you can access the E-Business Control Center's built-in online help system to select from a list of available topics or to search for a particular topic. The help system contains both step-by-step directions and specific recommendations about how to get the most out of the E-Business Control Center's capabilities for your e-business efforts.
The contents of this help system are also provided on the BEA e-docs product documentation Web site: http://download.oracle.com/docs/cd/E13218_01/wlp/docs40 (in both HTML and PDF formats), and is updated as new information is added or corrections are made.
Using the E-Business Control Center
This section provides an overview of the E-Business Control Center and shows you how to perform tasks that are common to all tools in the E-Business Control Center.
Note: While the E-Business Control Center may run successfully at lower monitor resolutions, we recommend a monitor resolution setting of 1024 by 768.
Starting the E-Business Control Center
If you feel comfortable with the materials previously described, you are ready to use the E-Business Control Center. To start the E-Business Control Center:
Windows: Selecting Start
For a full view of the E-Business Control Center, see Figure 1-2.
If you don't see the Explorer window along the left side of the E-Business Control Center, click the Open Explorer button in the main toolbar, as shown in Figure 1-3.
Figure 1-3 Opening the Explorer Window
Working with Application Data The E-Business Control Center lets you develop the data that controls the behavior of your enterprise applications. In the E-Business Control Center, data files for an enterprise application are stored in a specific directory structure. This structure, for example, contains directories for storing the Segments, Placeholders, Webflow, and so on, that an enterprise application will use when the data is synchronized to the server. There are many issues involved in creating and maintaining application data, especially if multiple developers will work on a single application, or the data files will be stored in a content management or version control system (which we recommend). For more information about the issues involved with maintaining application data, see Establishing Organizational Policies and the Deployment Guide. The following sections provide tasks for and information about working with application data in the E-Business Control Center. Creating an Application Structure for E-Business Control Center Data The data files in the E-Business Control Center must reside in a specific directory structure. This procedure shows you how to create that structure for an application in the E-Business Control Center. If you want to view an existing application before creating a new one, you can open the sample application that comes with the E-Business Control Center. See Opening Application Data. To create an application structure for E-Business Control Center data: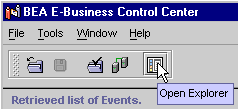
For example, to make the application a subfolder of the EBCC_HOME\applications folder, select the EBCC_HOME\applications folder.
You can create the application structure anywhere you like.
Note: Even though the application structure supports a specific enterprise application, you can name the E-Business Control Center application directory whatever you like. This directory name simply serves as a container for the structured subfolders that are automatically created in this procedure. The way the data in this application structure is ultimately sent to its enterprise application is determined by the connection settings to the server. See Connecting to the Server.
The application structure is built automatically, and you can begin using the E-Business Control Center to configure the enterprise application.
Note: When you create a new application structure, a default webflow-extensions.wfx file is placed in the application's default\webflow subfolder. This file contains the default Webflow extensions that will be used for any Web application you add to the application's structure (see Creating a Web Application Folder for an Enterprise Application).
If you customize the webflow-extensions.wfx file in the default\webflow subfolder, any Web application folder you add afterwards will contain the customized Webflow extensions.
Opening Application Data
To begin using the E-Business Control Center, you must open application data. When you open application data, all of that application's data is loaded into the E-Business Control Center, where you can modify, add to, remove, or synchronize that data.
Note: The E-Business Control Center is installed with the following sample applications, located in the EBCC_HOME\applications folder: p13nApp, petflowApp, portal, and wlcsApp. Each contains different types of data.
To open an application:
For example, to open the wlcsApp sample application, single-click the EBCC_HOME\applications\wlcsApp folder.
Data for the application is loaded into the E-Business Control Center.
When an application is loaded, you can select a tool icon in the Explorer window and see its files, as shown in Figure 1-4.
Figure 1-4 With an application open, click a tool icon to see its files
Each time you launch the E-Business Control Center, the last application you had open is loaded automatically. Directory Structure of an Application A valid application—one you can open in the E-Business Control Center—has a specific directory structure with specific directory names, as shown in Figure 1-5. Figure 1-5 Directory structure for a valid application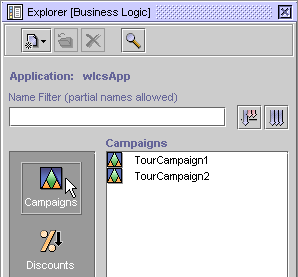
You can name the application (wlcsApp in this example), the webapps (tools, and wlcs in this example), and the subfolders of layouts and skins whatever you like (subject to standard naming restrictions). The directory structure and the rest of the directory names must match Figure 1-5 for you to be able to open the application in the E-Business Control Center. The default\webflow folder contains a file called webflow-extensions.wfx that you can use to customize your default extensions for Webflow. For more information, see Creating a Web Application Folder for an Enterprise Application. To ensure that you create the correct directory structure for an application, see Creating an Application Structure for E-Business Control Center Data. About the Sample Applications The sample applications that come with the E-Business Control Center, located in the EBCC_HOME\applications folder, contain files for each tool in the E-Business Control Center. You can open these files to get a better idea of how each tool works. See Opening Files for more information. Detailed information for working with each of the tools in the E-Business Control Center is contained throughout this guide. Creating a Web Application Folder for an Enterprise Application The Webflows/Pipelines tool in the E-Business Control Center is associated with specific Web applications within an enterprise application. Use this procedure to add a Web application directory to the structure of the enterprise application in the E-Business Control Center.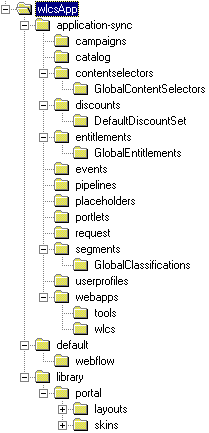
The webflow-extensions.wfx file in the application's default\webflow subfolder is also copied to the new Web application folder.
Creating a Web Application Folder for Portal
For information on creating a Web application folder for Portal, see "Introducing WebLogic Portal" in the Getting Started with Portals and Portlets.
Connecting to the Server
Although the majority of E-Business Control Center functionality does not require users to log in to a running WebLogic Portal server, some areas of the E-Business Control Center require you to log in to the server to view or use certain data. You must log in to the server to:
The connection settings determine which enterprise application on the server the E-Business Control Center will be synchronized to. The E-Business Control Center Connection Settings tool makes it easy to set the necessary connections to the WebLogic Portal server. You only need to know a few pieces of information to set up connections: the name of your enterprise application, the name of the server running WebLogic Portal server, the port number, and the username and password. You can get this information from your system administrator.
If your organization uses more than one server—for purposes of backup or failover, or to store different types of data on different servers—you can set up a connection for each server.
Connections you set up are available for all applications you open in the E-Business Control Center.
To set up connections to the server:
When you first access a feature in the E-Business Control Center that requires a server connection, the Connection Setup window appears (Figure 1-6). (If you choose Tools
Figure 1-6 The Connection Setup Window
To create a server connection to access the data: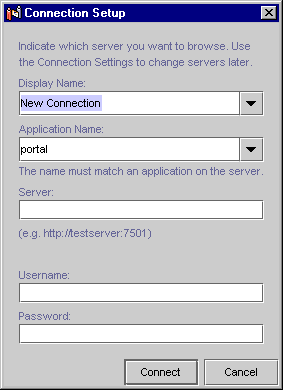
You can get the application name from your system administrator. Your system administrator can also provide your enterprise application name(s) in the Application Name drop-down list, and set a default application name to appear in that field automatically. See Adding Application Names to the Application Name Drop-Down List.
You can also select one of the sample application names from the drop-down list if you are working with and synchronizing to one of the sample applications.
You can get this information from your system administrator.
The default username is system, and the default password is the password that was set during WebLogic Server installation. The username and password are set up and maintained in the Administration Tools. Users assigned to the Administrators group can use their own username and password. You only need to enter your username and password once per session.
You are given access to the server-side data you are requesting, and the connection is added to the Connection Settings, described in Modifying Connections, where you can edit, delete, or select it for accessing data on the server.
When you create a connection to server-side data for the first time, the connection you establish is used for all data on the server listed at the beginning of this procedure. You will therefore be given automatic access to all other types of server-side data based on that connection.
If you want to use different connections for different types of data—for example, if you store campaign e-mail and ad content on a different server than other data, you can add connections with the Connection Settings tool and individually assign those connections to different types of server-side data. For more information, see Modifying Connections.
Modifying Connections
After you have established connections in the Connection Setup window when you access server-side data in the E-Business Control Center, you can modify those settings with the Connection Settings tool.
To modify existing connections:
Figure 1-7 Setting Connections to the Server
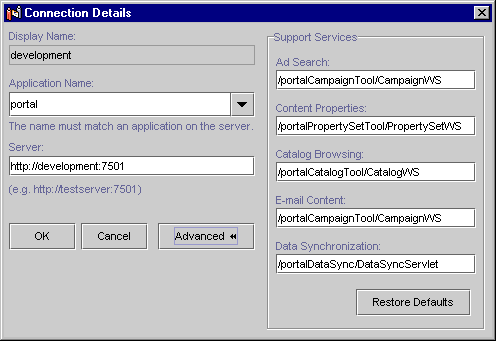
Figure 1-8 Connection Details Window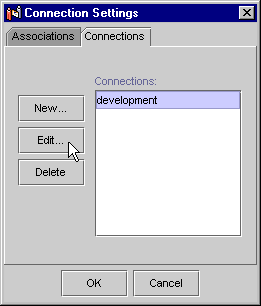
You can get the application name from your system administrator. Your system administrator can also provide your enterprise application name(s) in the Application Name drop-down list, and set a default application name to appear in that field automatically. See Adding Application Names to the Application Name Drop-Down List. You can also select one of the sample application names from the drop-down list if you are working with and synchronizing to one of the sample applications. You can get this information from your system administrator. Note: For convenience, the name you enter/select in the Application Name field is automatically put at the beginning of each URI in the Advanced section of the window. If you want to use different connections for different types of data, select the "Use independent connections for each task" option, and for each type of data listed in the window, select the appropriate connection. For example, if your organization stores ad content and e-mail content on a separate server or port from the main development server or main port, you could select that connection in the Content Preview and E-mail Content fields, and select the development connection for the remaining fields.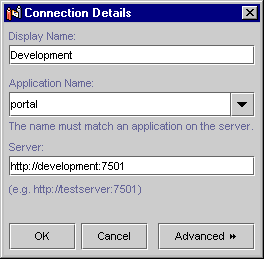
After you set up your connections, you are prompted for your username and password. You only need to enter your username and password once per session.
The default username is system, and the default password is the password that was set during WebLogic Server installation. The username and password are set up and maintained in the Administration Tools. Users assigned to the Administrators group can use their own username and password.
If for some reason you are ever presented with the Connection Setup window again, select an existing connection from the Display Name field, enter your username and password if necessary, and click Connect.
Advanced Connection Settings
The following sections provide instructions for system administrators to help make the connection-setting process easier and more error-free for E-Business Control Center users.
Changing the Default Connection Setting URIs
When users set up connection settings to access server-side data and to synchronize E-Business Control Center data to the server, they use the Connection Settings and Connection Details windows, shown in Figure 1-7 and Figure 1-8.
In the Connection Details window, there is an Advanced button that displays the URIs to the enterprise application selected in the Application Name field, as shown in Figure 1-9.
Figure 1-9 Connection URIs
The services are: adsearch, catalogbrowser, datasync, emailcontent, and propertyset.
For example, to override the adsearch service so that the E-Business Control Center points to ad data for a summer campaign, modify the <DefaultSupportServiceURIs/> element so it looks like this:
<DefaultSupportServiceURIs
 adsearch="CampaignTool/SummerCampaignWS" />
Note: The new URI you create is always automatically prepended by the name of the application selected in the Application Name field. For example, using the previous example change (adsearch="CampaignTool/SummerCampaignWS"), if a user has selected portal in the Application Name field of the Connection Details window, the following URI will be displayed in Ad Search field in the Advanced section of the Connection details window:
/portalCampaignTool/SummerCampaignWS
If you do not close the file, users will not be able to access the updated URIs.
To remove your URI overrides, remove any or all of the attributes you added to the <DefaultSupportServiceURIs/> element, and have your users modify their connection settings by clicking the Restore Defaults button in the Advanced section of the Connection Details window.
Adding Application Names to the Application Name Drop-Down List
When E-Business Control Center users set up connections to the WebLogic Portal server, as described in Connecting to the Server, there is an Application Name field in which they enter the name of the enterprise application they are working with.
The system administrator can add application names to the Application Name drop-down list so that users can select them rather than typing them. This functionality eliminates two potential problems: it eliminates typing mistakes that result in server connection failures (because the name, which is case-sensitive, must exactly match the name of the enterprise application); and it eliminates support calls that the system administrator must field when typing mistakes cause server connection failures.
Figure 1-10 shows the Application Name drop-down list to which the system administrator can add application names.
Figure 1-10 Application Name Drop-Down List
To add application names to the Application Name drop-down list: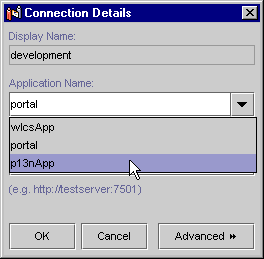
The following example shows how you would add an enterprise application called "gromit" to the drop-down list and make it the default name.
<EnterpriseApps>
<application name="gromit" default="true"/>
</EnterpriseApps>
If you do not close the file, users will not be able to see the new application in the drop-down list.
Working with Files
When you are working with tools in the E-Business Control Center (Portals, Campaigns, Placeholders, Webflows/Pipelines, and so on), all of your work is stored in XML files. When you have created all your E-Business Control Center files, you must synchronize those files to the WebLogic Portal server for those files to affect your enterprise application.
Files are stored in the application structure illustrated in Figure 1-5.
It is important to use a content management or version control system to store and maintain your E-Business Control Center data files, and it is important to have organizational policies for maintaining and synchronizing data. For more information, see Establishing Organizational Policies.
The following procedures show you how to create and maintain E-Business Control Center files.
Creating Files (Other than Webflow/Pipeline)
Use this procedure to create E-Business Control Center files of any type other than Webflow/Pipeline files. For instructions on creating Webflow/Pipeline files, see Creating Webflow/Pipeline Files.
If you are creating a Portal, select a Web application in the Select Web Application dialog box, and click OK.
The new files opens in an Editor window.
The remainder of this guide contains details for working with each type of file.
The length of the filename can be between 1 and 64 characters. The name must start with either a letter or an underscore character (_). The only characters allowed in the rest of the name are letters, numbers, underscores, periods, and hyphens.
If you receive an error trying to save a file, make sure the file name contains valid characters, and make sure your directory structure is correct, as described in Directory Structure of an Application.
Creating a File by Duplicating an Existing File
To save editing steps required to create a file, you can create a file by duplicating an existing file. To do this:
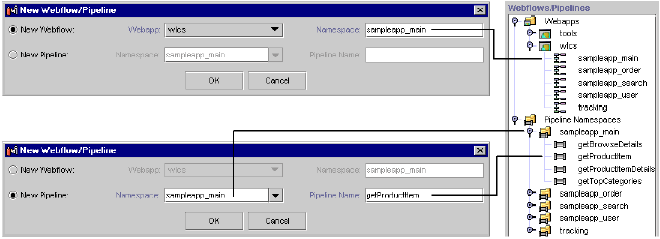
Creating Webflow/Pipeline Files
Use this procedure to create Webflow/Pipeline files in the E-Business Control Center. To create all other types of files in the E-Business Control Center, see Creating Files (Other than Webflow/Pipeline).
The length of the filename can be between 1 and 64 characters. The name must start with either a letter or an underscore character (_). The only characters allowed in the rest of the name are letters, numbers, underscores, periods, and hyphens.
Figure 1-11 Where New Webflow Namespace and Pipeline Files Appear in the Explorer Window
Note: You must add a new Web application to the E-Business Control Center for the Web application to appear in the Webflows/Pipelines Explorer window tree. See Creating a Web Application Folder for an Enterprise Application.
For more information on Webflows and Pipelines, see "Webflow Components and Concepts" and "Using the Webflow Editor."
Opening Files
To open a file, select the tool it belongs to in the Explorer window, and double-click the file in the list of files. The file opens in the Editor window.
Saving Files
After you have created or modified a file, with that file active in the Editor window, click the Save button in the main toolbar. If you are saving a newly created file, enter the name of the file in the Save As dialog box, and click OK.
If you close the file or the Editor window before saving changes you have made, you are prompted to save your changes.
Note: If you receive an error trying to save a file, make sure the file name contains valid characters, and make sure your directory structure is correct, as described in Directory Structure of an Application.
Deleting Files
To delete a file, select it in the Explorer window and click the Delete button in the Explorer toolbar.
Renaming Files
You can rename a file by opening it, choosing File
Filtering Files
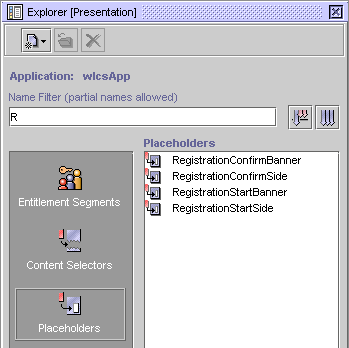
You can filter the list of files in the Explorer window to show files with specific name characteristics.
For example, if you want to list all files starting with the letter "R," enter R in the filter field and press the Filter button. If you want to view campaigns that contain "tour" in the name, enter tour in the Filter field.
Figure 1-12 Filtering files
Working with E-Business Control Center Windows
This section provides tips for manipulating the windows in the E-Business Control Center.
Tips for Closing Windows and Tabs
Here are a few tips for closing windows and tabs in the E-Business Control Center:
Organizing Tabs
You can move Explorer or Editor tabs among different windows by using the docking feature. Here is an illustration of one of the more practical uses of this feature: If you had four files (tabs) open in the Editor, and two files were related (a discount and the campaign that uses the discount, for example), you could dock the discount and campaign files into a separate window to better organize your workspace.
To dock a tab to another window:
If a file is the only open file in a window, it will not have a tab, and you cannot dock it into another window. A window must contain more than one file to display tabs.
Note: To restore the Explorer window to its default state of three tabs, click the Open Explorer button on the main toolbar.
Minimizing Windows
When you minimize an Editor window, it becomes an icon at the bottom of the E-Business Control Center window. To restore the Editor to full size, click the icon.
Synchronizing Application Data
Synchronizing application involves using the Tools
Warning: If you and other developers concurrently synchronize data to a single enterprise application, it is possible to overwrite each others' work or create sets of changes that are incompatible and difficult to debug. To prevent this possibility, synchronize to separate instances of your application. For more information on how to set up your development environment, see "Milestone 4: Set Up a Development Site" in the Strategies for Developing E-Business Web Sites documentation.
To synchronize, you must be connected to the server. See Connecting to the Server. Before you synchronize, you can also validate your E-Business Control Center data prior to synchronization to see if any files are incomplete (Tools
Note: If files are open in the E-Business Control Center Editor window with unsaved changes when you synchronize, those unsaved changes are not synchronized. Changes must be saved to be synchronized.
Error Logs
To find out more—albeit cryptic—details about any errors you may have received using the E-Business Control Center, you can open two different error logs:
You may also be asked to provide these files for any customer support calls you make.
If you do not see the tools.log file in the EBCC_HOME directory, that probably means there have been no errors to generate the file.
Warning: The tools.log file only stores errors for the current session. If you start the E-Business Control Center, and you have errors in the tools.log file from the previous session, the next error you receive in the current session will wipe out those previous errors. If you want to save error messages for a session, copy and rename the tools.log file so you can access it later.

|

|

|
|
|
|
Copyright © 2001 BEA Systems, Inc. All rights reserved.
|