

|

|
|
|
|
Retrieving Documents with Content Selectors
You can enrich a visitor's experience on your Web site by providing information that matches the visitor's interests or expectations. Using Content Selectors, you can specify conditions under which WebLogic Portal or WebLogic Personalization Server retrieves one or more documents from your content management system. For example, you can use a Content Selector to encapsulate the following conditions: between May 1 and May 10, if a customer in the SailingEnthusiast customer segment views this page, find and retrieve any documents that describe sailing along the Maine coast.
A document is a graphic, a segment of HTML, or a file that must be viewed with a browser plug-in. We recommend that you store most of your Web site's dynamic documents in a content management system because it offers an effective way to store and manage information.
A business analyst uses the BEA E-Business Control Center to define the conditions that activate a Content Selector and to define the query the Content Selector uses to find and retrieve documents. Then, a business engineer uses Content Selector JSP tags and a set of other JSP tags that retrieve and display the content targeted by the Content Selector.
This topic includes the following sections:
About Content Selectors
Content selectors consist of the following elements:
Business analysts create and modify the set of conditions in the E-Business Control Center.
Business analysts create and modify the query in the E-Business Control Center.
To display the documents that the query finds, a business engineer must use an additional set of tags. For information about using content-selector tags and other tags that display the query results, refer to "Working with Content Selectors" in Guide to Building Personalized Applications.
Describing Documents in Your Content Management System
The queries that you define for Content Selectors search through the descriptions (attributes) that you attach to the documents in your content management system. WebLogic Portal and WebLogic Personalization Server let you add any attributes to your documents, except the following system attributes, which are generated automatically: author, comments, creationDate, description, identifier, lockedBy, modifiedBy, modifiedDate, mimeType, name, size, and version.
You can, for example, create attributes that describe a document's subject, purpose, and category. When you define a query, the E-Business Control Center presents all of the attributes that your content management system contains.
We recommend that you analyze your overall personalization strategy and create attributes that you can use across customer segments. The more your attributes apply to multiple customer segments, the less often you need to create new attributes.
For information on creating attributes, refer to the documentation for your content management system. To learn more about using a content management system with WebLogic Personalization Server, refer to "Creating and Managing Content" in the Guide to Building Personalized Applications.
Defining Content Selectors
To define a Content Selector, you need the following information:
To define a Content Selector:
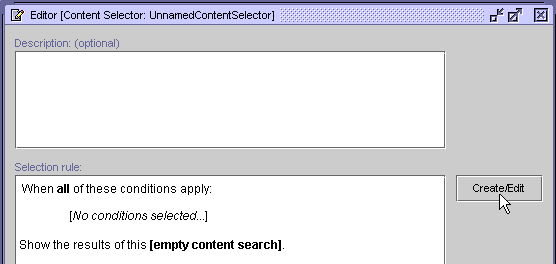
Figure 5-1 The Content Selector Editor
The description is displayed at the bottom of the Explorer window when you select the file. It also appears when you move the mouse pointer over the name of the file in the Explorer window. Figure 5-2 Create a Query to Display Content
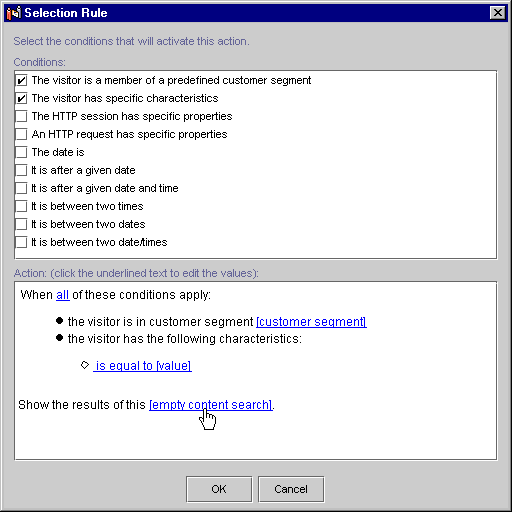
The conditions window is divided into two panes: Conditions and Action. After you select a condition, you define the characteristics of that condition in the Action pane. For example, if you select the condition, The Visitor Has Specific Characteristics, you will define those characteristics from the Action pane. When you select a condition, a corresponding line of text with hyperlinks appears in the Action pane. For a description of the conditions, see "Listing of the Available Conditions" in "Building Conditions and Queries in the BEA E-Business Control Center." For example, if you selected The Visitor Has Specific Characteristics condition as shown in Figure 5-2, click the Is Equal to [value] hyperlink under the bulleted phrase, "the visitor has the following characteristics." Depending on the condition and the hyperlink, a window or a dialog box opens. Table 5-1 provides a consolidated listing of the conditions and indicates where to look if you need detailed instructions for any of the corresponding windows/dialog boxes. Since the content you are trying to access is stored on the server, you are prompted for a user name and password. You only need to log in once per session. If you are also prompted to enter connection settings, see "Connecting to a "Server Outside of the Connection Settings Window" in the "Introduction to the BEA E-Business Control Center" chapter. Figure 5-3 Content Selector Editor Window: Selection Rule List
The Content Selector JSP tags that Business Engineers use refer to this name.
Previewing Documents
You can preview the document(s) you have configured your Content Selectors to display. To preview documents:
If you have not yet logged in to access this feature, you will be prompted to enter your user name and password.
A Web browser will open and display a page of links to the document(s) matching the query. Click the relevant links to view the documents you want to see.

|

|

|
|
|
|
Copyright © 2001 BEA Systems, Inc. All rights reserved.
|