|
|
|
|
|
|
Building Conditions and Queries in the BEA E-Business Control Center
This topic is a central point of reference for information about building conditions and queries in the BEA E-Business Control Center. The topics in this section are not meant to be read in sequence, but rather, are pieces of information or instructions that you will use in the context of other tasks. These tasks may be used when defining customer segments, running a query for content selectors, or adding scenarios to your promotional campaigns. (Queries search your content management system for documents based on a set of criteria that you specify.)
This topic includes the following sections:
Listing of the Available Conditions
The E-Business Control Center provides you with a number of conditions you can use to customize your e-business efforts. Depending on what you are trying to accomplish in the E-Business Control Center, you may encounter some or all of the conditions described in Table 2-1.
Note: The shopping cart conditions are available only if your license includes Commerce services.
Important Note About Dates and Times
When you set date and time conditions in the E-Business Control Center, the dates/times you set represent the time in your region. For example, if you are creating a campaign action that will be triggered at 8 p.m., that means 8 p.m. in your region. For a time zone that is two hours behind you, the action will be triggered at 6 p.m. in that time zone.
This also affects dates you set. The date you set becomes effective at midnight in your time zone. In a time zone that is six hours ahead of yours, that date becomes effective for that time zone at 6 p.m. your time the day before.
Time changes also affect time-triggered actions. For example, say you create a campaign that begins October 1 at noon and ends October 31 at noon. If a change to standard time (one hour earlier) occurs on October 29, the campaign will actually end on October 31 at 11 a.m. So if you want the campaign to end at noon on the new standard time, set the end time to 1 p.m.
Because of the different dates and times on which actions will be triggered around the country or world, it is important to tell customers that dates and times are effective for your time zone. This type of information allows customers to calculate when in their time zone they can take advantage of your promotions.
Using the Select Customer Segments Window
When you create a campaign scenario action or a content selector, select "The visitor is a member of a predefined customer segment" condition, and click the [customer segment] hyperlink in the Action pane, the Select Customer Segments window opens. Figure 2-1 shows the Select Customer Segments window.
Figure 2-1 Select Customer Segments Window
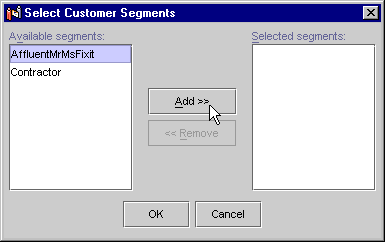
Note: If you make a mistake, click a customer segment name shown in the Selected Segments list to select it, then click Remove.
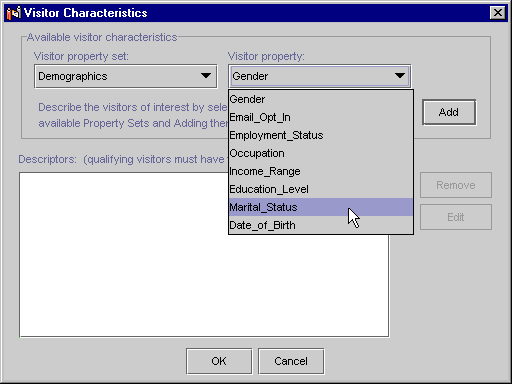
Using the Properties and Visitor Characteristics Windows
Many items in the E-Business Control Center can be described by their characteristics or properties. For example, visitors to the site, content to be shown to visitors, and events that represent visitor behavior can all be described in terms of their properties. Related properties are grouped together for convenience into property sets. Objects in the E-Business Control Center may have one or more property sets associated with them. For example, visitors may have one set of properties pertaining to general information, such as their address, and another set of properties pertaining to demographic information, such as their gender.
The windows where you describe E-Business Control Center objects by way of their properties are generically referred to as Properties windows. Using the Properties windows, and their associated Property Values windows, you can build Descriptors that describe an object of interest. The Descriptor is comprised of a property phrase and a value phrase.
For example, you may be interested in targeting an e-mail to customers whose income range is $75,000-$99,000. The Descriptor created in an E-Business Control Center Properties window would be:
Demographics: Income_Range is equal to "$75,000-$99,000"
Demographics is the property set in which you would find the Income_Range property, Is Equal is the comparison, and "$75,000=$99,000" is the value. Together, the property set and property form the following Property Phrase:
Demographics: Income_Range
Together, the comparison and the value form the following Value Phrase:
is equal to "$75,000-$99,000"
When you click the Is Equal To [value] hyperlink, a Properties window opens. Figure 2-2 is an example of a Properties window.
Figure 2-2 Properties Window
Note: The E-Business Control Center includes some values for the Property Set and Property lists. However, additional Property Sets and Properties may be defined by your organization's business engineer or other technical resource.
Figure 2-3 Property-Values Window
If the property value requires text entry, you can use the contains comparison to perform wild card matching. For example, if you want to send an automatic e-mail to customers who work at BEA when they log onto your site, you could select the Email property in CustomerProperties, select the contains comparison, and enter @bea.com. Warning: It may be possible to construct value phrases that are not reasonable in real world situations. Be sure to select a comparison and value that makes sense for the property set and property you previously selected. Figure 2-4 Value Phrases List Box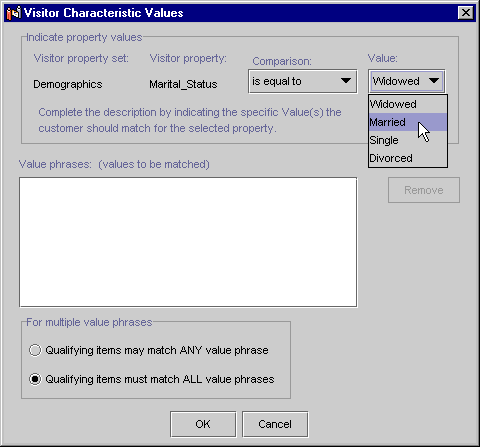
Note: If you need to remove a value phrases, click on the value phrases in the Value Phrases list box to select it, then click Remove. Figure 2-5 Descriptors List Box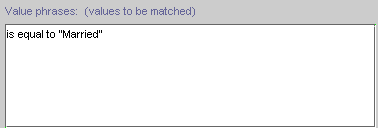

Using the Select Events Window
When you are creating a campaign scenario action, select the "An event has occurred condition," and click the [event name] hyperlink in the Action pane, the Select Events window opens. Figure 2-6 shows the Select Events window.
Figure 2-6 Select Events Window
Note: If you make a mistake, click an event name shown in the Selected Events list to select it, then click Remove.
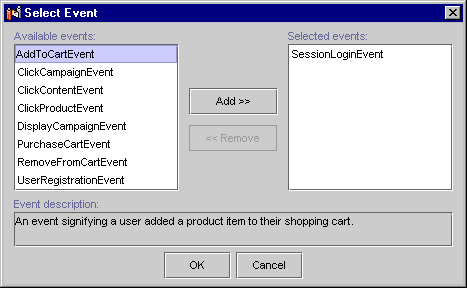
Using the Date/Time Entry Dialog Boxes
Before you set date and time conditions in the E-Business Control Center, see Important Note About Dates and Times.
When you click one of the generic date or time related hyperlinks, one of the date/time entry dialog boxes opens. Simply type in the date and/or time in the appropriate field, then click OK. When you do so, the date/time entry dialog box closes, and the generic hyperlinks change to reflect the dates and/or times you specified.
Tip: For dates, you can either type in the date, or click the drop-down calendar to select the date, as shown in Figure 2-7. Just click a date to select it.
Figure 2-7 Date Calendar
Using the Quantity Selector or Currency Selector Dialog Boxes
When you click the [n] hyperlink, a Quantity Selector dialog box opens. When you click the [monetary amount] hyperlink, a similar dialog box, called Currency Selector opens. Figure 2-8 shows the Quantity Selector dialog box.
Figure 2-8 Quantity Selector Dialog Box
Note: A default value may be shown in the field.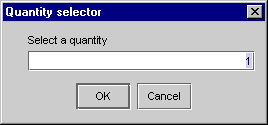
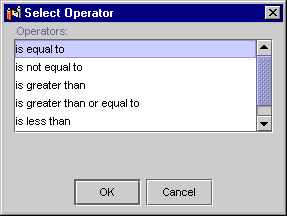
Using the Select Operator Dialog Box
When you click the Equal To hyperlink, a Select Operator dialog box opens. Figure 2-9 shows the Select Operator dialog box.
Figure 2-9 Select Operator Dialog Box
Using the Select Product Categories/Items Windows
When you click the [product category] or [sku] hyperlinks, the Select Product Categories/Items window opens, as shown in Figure 2-10. When you add a trigger or target to a discount, a Specify Trigger Items or Specify Target Items window appears. The procedure for entering SKU numbers or product categories in these windows is the same.
Figure 2-10 Select Product Categories Window
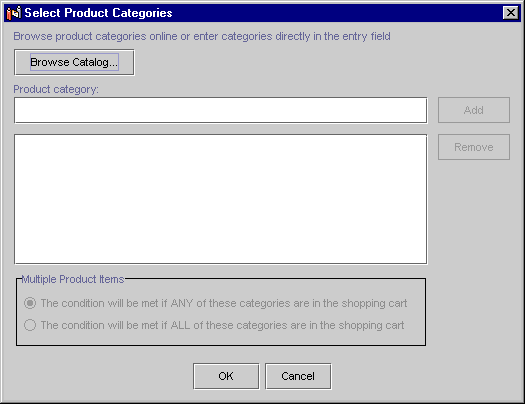
So, for example, if you specified SKU number T144 and SKU number D128 and you selected the Any option, customers with either of these SKU numbers in their shopping cart would meet the conditions. If you selected the All option, customers with both of these SKU numbers in their shopping cart would meet the conditions.
The following procedure explains how to use the Catalog Browser feature from step 1.
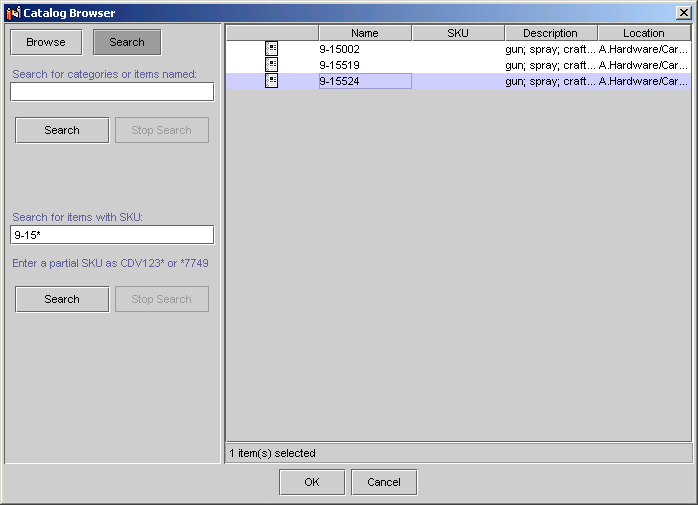
Using the Catalog Browser
The Catalog Browser allows you to easily find and select items for your campaign or discount definition. The following sections provide step-by-step instructions on how to use the Catalog Browser.
Browsing a Catalog
The browsing feature of the Catalog Browser allows you to select either categories or specific items from your catalog. You can select one or more items.
Note: You must first establish a connection to your catalog server. For more information, see Connecting to the Server.
Figure 2-11 Catalog Browser

Searching a Catalog
The search feature of the Catalog Browser allows you to find a specific item or category from your catalog. You can use a wildcard (*) to help you find items when you don't know the exact SKU.
Note: You must first establish a connection to your catalog server. For more information, see Connecting to the Server.
Note: When searching for a category, only the category field is available.
Figure 2-12 Catalog Browser Search
Using the Enter a Range Dialog Box
When you click the [x] hyperlink, the Enter a Range dialog box (shown in Figure 2-13) opens.
Figure 2-13 Enter a Range Dialog Box
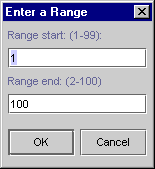
For more information on ranges, see "About Probability-Based Branching" in the Roadmap for Creating Promotional Campaigns chapter.
Constructing Queries
The documents that are stored in your content management system have certain properties associated with them that describe the documents. For example, all documents have system properties such as author, creation date, and modification date. You can also add custom properties to documents that more specifically describe the documents. For example, for your ad graphics, you can add properties for company name and product name. These properties are called metadata.
To create ad placeholders, scenario actions, and content selectors that find and display documents, you must construct queries. Queries search your content management system and retrieve documents that have the metadata you are looking for. The documents are then displayed in your Web pages. You can construct queries in the following ways:
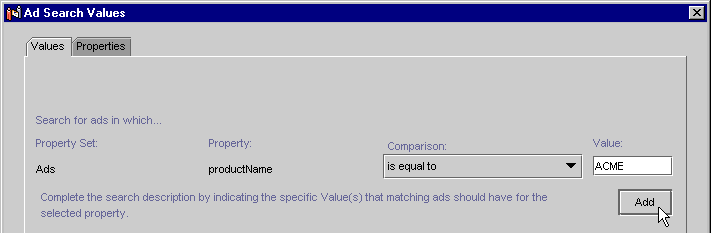
For example, you want to display ads for ACME mutual funds in an ad placeholder. Your content management system uses a property named productName to indicate the name of the mutual fund that a document advertises. You construct a query that finds all documents for which the productName property contains ACME.
For example, you want a content selector to display documents that describe investing in mutual funds. Your content management system uses a document property called investorRiskLevel to identify whether a document describes an investment that is aggressive, moderate, or conservative. Your customer profiles also include a property called investorRiskLevel to indicate whether a customer prefers aggressive, moderate, or conservative investments. You construct a query that finds all documents for which the investorRiskLevel property contains a value that is equal to the value of a customer's investorRiskLevel property.
For content selectors and scenario actions, you can also combine the two types of descriptors in a single query. For example, you can create a query for a content selector that finds documents that advertise ACME mutual funds and that match a customer's investment-risk profile.
To construct queries, do the following:
You can search for multiple document properties by repeating steps 1 through 3.
Select a Document Property
You select document properties in the Ad Search window or the Content Search window, depending on whether you are creating an ad placeholder, a scenario action for a campaign, or a content selector. The E-Business Control Center displays the Ad/Content Search window when you do any of the following:
In the Ad/Content Search window, do the following:
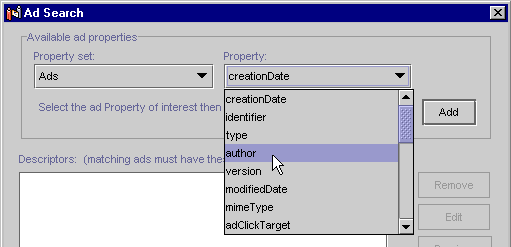
For example, you are constructing a query for a campaign ad. Your content management system uses a property named author to indicate the name of the person who authored the ad. To search for the ad based on the name of the author, select author from the Property list.
Figure 2-14 Select a Property for a Campaign Ad Scenario
These options are described in the following sections.
To edit the properties of an existing item, select it in the Descriptors list and click Edit.
Describe Documents by Comparing the Property to a Value or Range of Values
To find documents by comparing the document property with a value or range of values, do the following:
If the property value requires text entry, you can use the like comparison with wild card characters (* and ?). For example, if you have a set of ads with a four-digit number and "ad" as part of the name, you could select the like comparison and enter *10??ad*.
Note: If you set up a query based on filename and you are using the like comparison, begin the query with an asterisk (*), because path information always precedes the filename in the query results.
Figure 2-15 The Values Tab for Ad Search Queries
Describe Documents by Comparing the Property with the Properties of Other Objects
If you are constructing a query for a scenario action or a content selector, you can find documents by comparing the document property with the properties of other objects. To construct such a query, do the following:
If you are constructing a query for a campaign ad action, you can compare the document property with a property in one of the following property sets: User Profile, Session, Request, Event, or Catalog Structure.
If you are constructing a query for a content selector, you can compare the document property with a property in one of the following property sets: User Profile, Session, Request, or Catalog Structure.
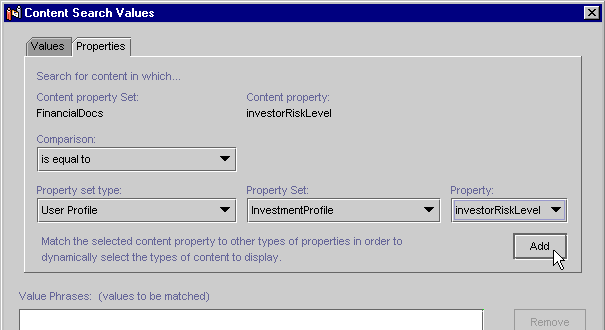
For example, you created a property set called FinancialDocs that contains a document property called investorRiskLevel to identify whether a document describes an investment that is aggressive, moderate, or conservative. (See Adding Property Sets to Drop-Down Lists.) Your customer profiles also include a property called investorRiskLevel to indicate whether a customer prefers aggressive, moderate, or conservative investments. To create a content selector query that matches documents with a customer's investment-risk preference, in the Content Search window, you select the investorRiskLevel document property. In the Content Search Values window, you click the Properties tab. From the Comparison list, select Is Equal To. Then from the Property Set Type list, select User. (See Figure 2-16.)
For example, if you place the investorRiskLevel user property in a property set named InvestmentProfile, then choose InvestmentProfile from the Property Set list.
Figure 2-16 Find Documents by Comparing the Properties of a User
Specify How to Handle Multiple Value Phrases and Descriptors
Adding Property Sets to Drop-Down Lists
When you select a property set for an Ad or Content search, you will see two default choices: Ads and LoadedData. These property sets relate to ad and content documents in WebLogic Portal that your query will find.
For most of the ad or content searches you perform (queries you set up) that place documents in placeholders on your JSPs, the Ads and LoadedData property sets should be sufficient. They contain most of the attributes that are appropriate for finding content that can be displayed by a JSP. In particular, these property sets include automatic system attributes you can use in your queries—attributes that all files have, such as name, size, creation date, and modification date. (See System Attributes for Property Sets.)
However, you can add more property sets to this list. There are good reasons for doing so:
If you have only a small number of custom ad attributes you want to use, you can add them to the existing Ads or LoadedData property sets instead of creating new property sets for them.
Adding a property set to the drop-down list involves creating a simple XML file. You can view the XML files for the Ads and LoadedData property sets in the PORTAL_HOME\dmsBase\doc-schemas folder. The files are called ad-schema.xml (for the Ads property set) and doc-schema.xml (for the LoadedData property set).
To add a new property set to the drop-down list:
<?xml version="1.0" standalone="no"?>
<!DOCTYPE doc-schemas SYSTEM "doc-schemas.dtd">
<doc-schemas>
<doc-schema name="FinancialDocs">
</doc-schema>
</doc-schemas>
The text you enter in the <doc-schema> element is the name of the property set that will appear in the drop-down list.
The following example shows two properties that will be available for selection in the property set: investorRiskLevel whose values will be selected from a drop-down list, and primaryHolding, a text entry field for the property value. investorRiskLevel has a default value set, which will appear automatically when you select that property for a query.
<?xml version="1.0" standalone="no"?>
<!DOCTYPE doc-schemas SYSTEM "doc-schemas.dtd">
<doc-schemas>
<doc-schema name="FinancialDocs">
<attribute name="investorRiskLevel" default="moderate">
<value>conservative</value>
<value>moderate</value>
<value>aggressive</value>
</attribute>
<attribute name="primaryHolding">
<description>Primary Stock Holding</description>
</attribute>
</doc-schema>
</doc-schemas>
or
You have to perform either of these restart tasks when you simply add a property to an existing property set.
For information on creating ads and loading them into the WebLogic Portal ad database, see "Setting up Ads for Campaigns" in the Guide to Developing Campaign Infrastructure.
System Attributes for Property Sets
The following system database attributes are available automatically for your property set and store data about your content. Do not add them to your *schema.xml file. Doing so will cause an error when you try to access the property set.
These attributes are: author, comments, creationDate, description, identifier, lockedBy, modifiedBy, modifiedDate, mimeType, name, size, and version.
Preview the Query Results
To run the query and see the documents that it finds, do the following:
The E-Business Control Center prompts you for a user ID.
For example, you want to see the documents that the query returns for customers with a conservative investment profile. The customer profile for Pat Gomes specifies a conservative investment profile, so you enter Pat's user name.
Note: You must enter a user ID, regardless of the type of condition that activates a placeholder, scenario action, or content selector.
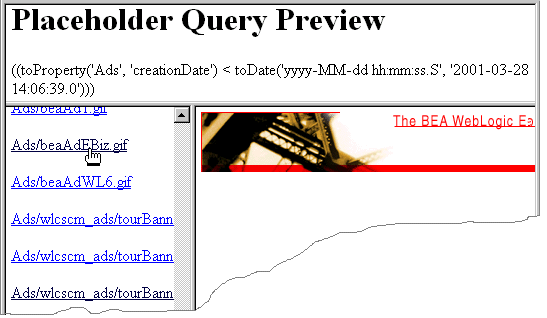
The E-Business Control Center runs the query and displays the results in your default browser. (See Figure 2-17.)
The top pane displays the query and the left pane displays the names of the ads that the query finds.
The right pane of your browser displays the document.
Note: WebLogic Portal or WebLogic Personalization Server creates a short-lived cache that stores the results of a query. If you add or modify documents in your content management system and then immediately redo the query preview, you might not see the results of your modifications. If this occurs, wait several minutes and then retry the query preview.
Figure 2-17 Query Preview in the Browser
For information on creating ad content, working with a content management system, and adding mime types, see "Setting up Ads for Campaigns" in the Guide to Developing Campaign Infrastructure.

|

|

|
|
|
|
Copyright © 2001 BEA Systems, Inc. All rights reserved.
|