

|

|
|
|
|
Using Customer Segments to Target High-Value Markets
This topic contains basic information about customer segments as they are used in the BEA E-Business Control Center. This information includes a conceptual description of a customer segment, an explanation about how you might want to use customer segments, and step-by-step instructions for creating a new customer segment or modifying existing customer segments within the E-Business Control Center.
This topic includes the following sections:
About Customer Segments
To understand what a customer segment is, you must first learn about customer profiles. Therefore, this section contains the following subsections:
About Customer Profiles
A customer profile is a collection of information that is gathered, saved, and updated as customers visit your Web site, or from other offline sources. Customer profiles are unique to each customer and can contain a variety of information, from product preferences to the demographic data customers provide on form pages. The information stored in customer profiles is increasingly seen as the true lifeblood of e-business. Effectively managing, analyzing, and using customer intelligence gives you a significant advantage over your competitors, because you can target your highest-value markets with your highest-value services, and do it cost-effectively.
Because the E-Business Control Center works with the BEA WebLogic Portal and WebLogic Personalization Server, the E-Business Control Center already supports some customer profile information out of the box. However, the system is extremely flexible about the customer data it can store, and thus can easily be extended. If you believe that extending the E-Business Control Center would be helpful to your organization, you will initially need to collaborate with a Business Engineer (BE) or other technical resource who can make modifications to the tool. If possible, you should initiate this process before starting to use the E-Business Control Center.
Note: For technical information about how a Web site gathers customer profile information, see "Creating and Managing Users and Groups" in the Building Personalized Applications documentation
at http://download.oracle.com/docs/cd/E13218_01/wlp/docs40/p13ndev/users.htm.
Creating Customer Segments from Information Stored in Customer Profiles
The customer profile information you collect can be used to create customer segments within the E-Business Control Center. A customer segment is a grouping of customers based on common characteristics from their profile, such as product preferences or age. Each piece of information stored in a customer's profile (or any combination of that information) can be used to create a customer segment.
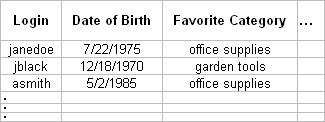
Using the sample customer profile information shown in Figure 4-1, there are a few customer segments you might create.
Figure 4-1 Example Customer Profile Information
Based on the Favorite Category profile information, you might create a customer segment named Office Supply Junkie, which would include the customers janedoe and asmith. Similarly, a customer segment named Over21 would include the customers janedoe and jblack, based on their Date of Birth profile information. For step-by-step instructions on creating new customer segments in the E-Business Control Center, see Creating a Customer Segment.
Uses of Customer Segments
This gives you an overview of how you can use customer segments once you create them. Since there are two ways to use customer segments, this section contains the following subsections:
Note: Depending upon the version of the E-Business Control Center you have, you may be able to use customer segments in one or both of the ways described in this section. For more information about the different versions of the E-Business Control Center that are packaged with the BEA WebLogic Portal and WebLogic Personalization Server, see "What the E-Business Control Center Provides" in the "Introduction to the BEA E-Business Control Center" or the Strategies for Developing E-Business Web Sites at http://download.oracle.com/docs/cd/E13218_01/wlp/docs40/strategs/index.htm.
Targeting Content to Online Customers
In all versions of the E-Business Control Center, customer segments can be used in conjunction with content selectors to personalize a customer's experience on your Web site.
A content selector is a mechanism used to retrieve documents from a content management system. A document is a graphic, a segment of HTML or plain text, or a file that must be viewed with a Web browser plug-in. Using content selectors, you can specify the conditions under which one or more documents are retrieved.
If you use a customer's membership in a segment as one of these conditions, you can specify that a particular piece of content be selected from the content management system and displayed to that customer. So, for example, customers who belong to an Office Supply Junkie segment may be shown an article titled: "Reducing Desk Clutter With Stackable Organizers."
Note: To use customer segments with content selectors, you should collaborate with your organization's business engineer or other technical resource. For more technical information about content selectors, see "Retrieving Documents with Content Selectors."
Displaying Personalized Content Within Promotional Campaigns
If you have a BEA WebLogic Portal license, you can also use customer segments within your promotional campaigns.
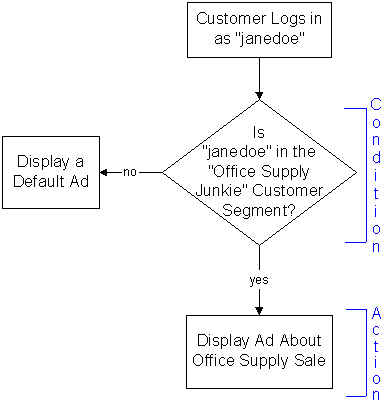
As part of a promotional campaign, a customer's membership in a particular segment may be used as a condition to trigger a specific action, such as sending an e-mail, offering a discount, or displaying an ad. For example, if janedoe is a member of the Office Supply Junkie customer segment, you might want to display an ad about an upcoming sale on office supplies to Jane when she logs in. Because such actions are only triggered under certain conditions, you can use customer segments to target only the appropriate audience(s) with your campaign content.
The flowchart shown in Figure 4-2 illustrates how customer segments can be used as conditions to trigger specific campaign-related actions.
Figure 4-2 Condition Based on Membership in a Customer Segment
Note: For instructions about how to use customer segments within promotional campaigns, see "Customer Segments in Scenario Actions" in the "Roadmap for Creating Promotional Campaigns" and "Adding Actions to Your Scenarios to the Campaign" in "Creating and Managing Promotional Campaigns." When and When Not to Use Segments You do not always have to use customer segments to target specific groups of people with campaign scenario actions or content selectors. When creating a scenario action or content selector, instead of triggering the action on a customer segment, you can trigger the action if the visitor has certain characteristics—the same set of characteristics you can use to create a customer segment. So since you can trigger a scenario action or content selector on visitor characteristics with or without a customer segment, you should put some thought into whether or not you create customer segments. In the following guidelines to determine whether or not you should create a customer segment for use in scenario actions, reuse is the key:
Creating a Customer Segment
Initially, you will probably want to spend some time creating new customer segments for use in the E-Business Control Center. This section provides step-by-step instructions you can follow to accomplish this task. If you have already created customer segments and need to edit them, see Modifying a Customer Segment.
To create a new customer segment:
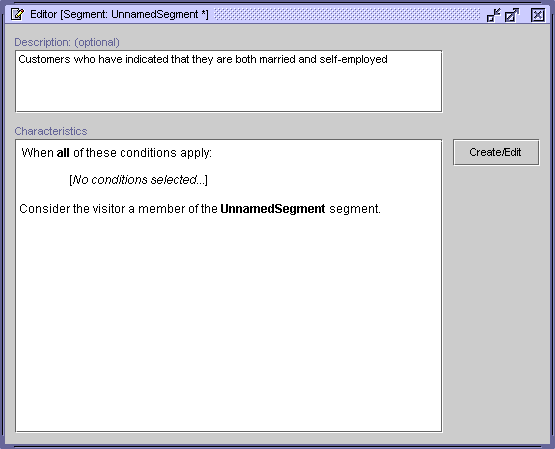
Figure 4-3 Customer Segment Editor Window
The description is displayed at the bottom of the Explorer window when you select the file. It also appears when you move the mouse pointer over the name of the file in the Explorer window. Figure 4-4 Customer Segment Details Window
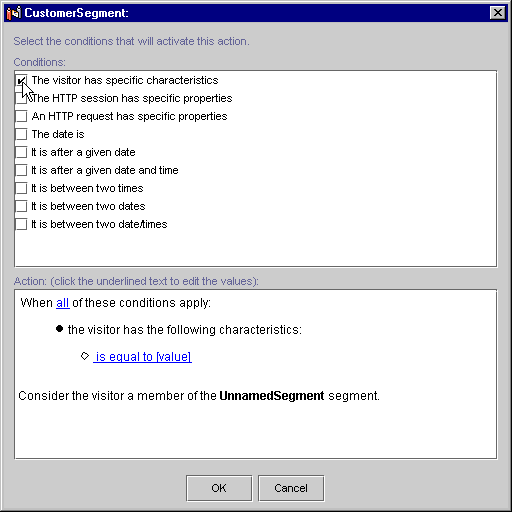
The conditions window is divided into two panes: Conditions and Actions. After you select a condition, you define the characteristics of that condition in the Action pane. For example, if you select the condition, The Visitor Has Specific Characteristics, you will select those characteristics from the Action pane. (Those visitor characteristics are defined in the User Profiles tool in the E-Business Control Center.) When you select a condition, a corresponding line of text with hyperlinks appears in the Action pane. For a description of the conditions, see "Listing of the Available Conditions" in "Building Conditions and Queries in the BEA E-Business Control Center." Tip: You can create conditions that are always true. For example, you can select the It Is After A Given Date condition and then specify the date as January 1, 1970. For example, if you selected The Visitor Has Specific Characteristics condition as shown in Figure 4-4, click the Is Equal to [value] hyperlink under the bulleted phrase, "the visitor has the following characteristics." Depending on the condition and the hyperlink, a window or a dialog box opens. Table 4-1 provides a consolidated listing of the conditions and indicates where to look if you need detailed instructions for any of the corresponding windows/dialog boxes. Figure 4-5 Customer Segment Editor Window: Characteristics List

Modifying a Customer Segment
To modify an existing segment, double-click its name in the Explorer window to open it in the Editor. You can modify the description, conditions used, and actions. For more information, see Creating a Customer Segment.
Warning: If the customer segment you modify is in use by content selectors, promotional campaigns, or other objects, modifications to the segment will affect every object that refers to that segment. Be certain that the modifications you make are in line with your organization's established policies and that you entered the modifications correctly in the E-Business Control Center.
Deleting a Customer Segment
Before you delete a segment (by selecting it in the Explorer window and clicking the Delete button in the Explorer toolbar), read the following warning.
Warning: As with any deletion you make, be absolutely certain that you select the correct customer segment and that you are sure you want to delete it. Deleted segments cannot be retrieved. If you delete a customer segment, anything that refers to it (content selectors, promotional campaigns, or other objects) will effectively be broken until the segment is dereferenced or a segment with the same name is created.

|

|

|
|
|
|
Copyright © 2001 BEA Systems, Inc. All rights reserved.
|