

|
|
|
|
|
|
Deploying Clusters
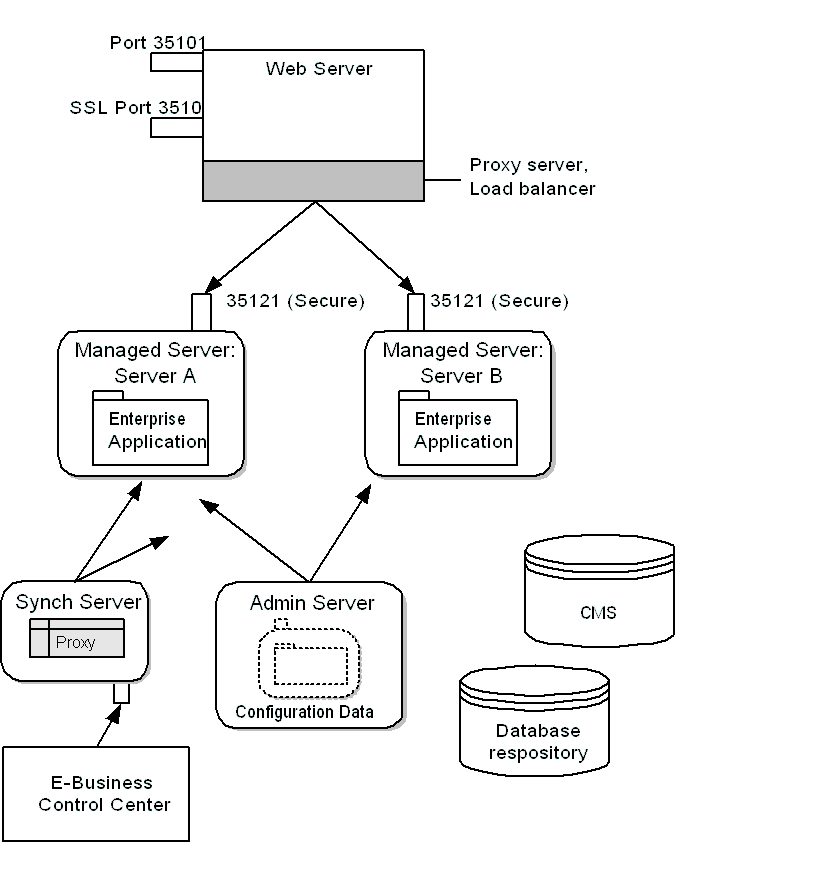
Clustering provides several advantages that are optimal for Production-type designs including, but not limited to, load-balancing, failover, performance, administration and security. A cluster comprises one Administration Server and one or more Managed Servers. The Administration Server provides most of the configuration for application deployment and network communication, while the Managed Servers handle most of the business logic and client requests.
This topic contains the following sections:
How Clusters Are Organized and Maintained
In any WebLogic Server cluster, the host for the Administration Server is the only computer that contains the physical files that describe the cluster, enterprise application, and other supporting services. If you want to modify the cluster or application's configuration, you do so from the Administration Server host. WebLogic Server distributes any configuration changes from the Administration Server to the logical processes and data structures on the Managed Servers.
While WebLogic Server supports a variety of cluster configurations, this topic guides you through deploying a cluster that is in the following recommended configuration (See Figure 6-1):
Note: If changes in your production environment are infrequent and highly controlled, or if you want to prevent modifications to the application data in your production environment, you do not need to set up a separate computer to host a synchronization server. For more information, refer to Preventing Synchronization by Undeploying DataSync Web Applications.
Figure 6-1 Components of a Cluster
Consider creating at least one mirror site for your cluster. When you need to perform maintenance or deploy additional application data onto a cluster, you can route all customers to a mirror site. Then, when you finish your updates, you can route customers to the original site while you update the mirror.
Before You Start
Before you start to set up a cluster, do the following:
Setting Up a Cluster
To set up a cluster, complete the following tasks on the computer that you want to host the Administration Server:
Activate the Domain and Start the WebLogic Server Administration Console
Logically, a cluster resides in a single WebLogic Server administrative domain: one domain defines and administers the cluster.
You can create a domain specifically for your cluster or copy an existing domain onto the computer that you want to host the Administration Server. To activate the domain, start an instance of WebLogic Portal on the computer that you want to be the cluster's Administration Server.
Note: Later in the process of setting up a cluster, you will install your enterprise application onto this server. Then WebLogic Server deploys this enterprise application onto the Managed Servers; it will also deploy any subsequent modifications that you make to the enterprise application on the Administration Server.
Then access the WebLogic Server Administration Console for the domain by entering the following URL in a Web browser:
http://admin-host-name:port-number/console
For example, http://localhost:7501/console
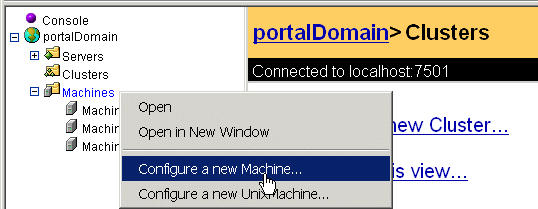
Create Machines
A machine is intended to be the logical representation of a single, physical, piece of hardware. WebLogic Server uses machines to establish a preferred order for replicating objects. (Its first preference is to replicate objects on separate machines for failover purposes.)
Create machines for each node by doing the following:
Figure 6-2 Creating a Machine
Create Server Configurations
A cluster contains configurations for one Administration Server and multiple Managed Servers. This section contains the following subsections:
Creating an Administration Server
By default, when you start a server instance, it is an Administration Server. You can use the currently active server as the Administration Server for your cluster, or, if you want to create a server configuration specifically for administering your domain, do the following:
Creating a Synchronization Server
To create a server for synchronizing application data across the cluster, do the following:
Creating Managed Servers
To create Managed Servers, do the following:
Set Up SSL
To set up SSL, do the following for each Managed Server:
For example, the reference server specifies the following values:
Server Key File Name: config/portalDomain/demokey.pem
Server Certificate File Name: config/portalDomain/democert.pem
Certificate Chain File Name: config/portalDomain/ca.pem
Configure a Cluster
Configure a cluster by doing the following:
Figure 6-3 Configure a Cluster
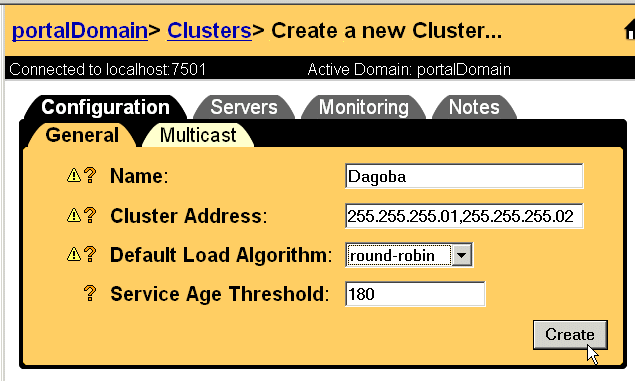
We recommend that you conduct a multicast test. For information on using the WebLogic Server MulticastTest utility, refer to "Using the WebLogic Java Utilities" in the WebLogic Server Administration Guide.
Configure Your Web Application to Support Clusters
Before you deploy your application, configure your Web applications to support clusters by completing the following steps:
<context-param>
<param-name>HTTP_PORT</param-name>
<param-value>35101</param-value>
</context-param>
<context-param>
<param-name>HTTPS_PORT</param-name>
<param-value>35102</param-value>
</context-param>
This excerpt uses the port numbers from Figure 6-1.
<session-param>
<param-name>PersistentStoreType</param-name>
<param-value>replicated</param-value>
</session-param>
Note: The name of the cookie on a proxy server must match the cookie name specified in the weblogic.xml of the deployed Web application. For Netscape Enterprise Server, no change is needed. For Apache, you declare the cookie name in the httpd.conf file. If WebLogic Server is being used as a Web proxy server, you make the change in the WebLogic Server proxy server's weblogic.xml file. For example, the unedited weblogic.xml might contain:
<session-param>
<param-name>CookieName</param-name>
<param-value>
JSESSIONID
</param-value>
</session-param>
The wlcsApp, for example, uses JSESSIONID_WLCS_COMMERCE in its weblogic.xml. On the proxy server's weblogic.xml, change the CookieName parameter's value to JSESSIONID_WLCS_COMMERCE.
For more information on modifying deployment descriptors, refer to the following sections:
Deploying Applications to a Cluster
To deploy applications and supporting services to a cluster, complete the following tasks:
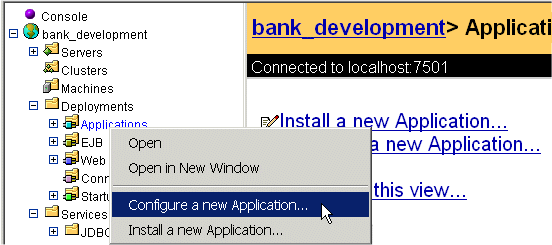
Configure a New Application
Figure 6-4 Configure a New Application
Deploy and Configure DataSync Web Applications for the Cluster
The DataSync Web application receives synchronization requests from the E-Business Control Center and channels them to Data Repositories, which are runtime representations of application data.
Clusters with Shared Access to Disk Containing DataSync Database Pool
If your cluster environment provides shared access to the disk containing the DataSync Database Pool, do the following to deploy the DataSync Web application that the cluster uses for configuration purposes:
http://hostname:port-number/datasync/index.html
Where datasync is the name of your DataSync Web application. For more information, refer to Adding DataSync in a Cluster.
Clusters without Shared Access to Disk Containing DataSync Database Pool
If your cluster environment does not provide shared access to the disk containing the DataSync Database Pool, we require that you configure two DataSync Web applications for each cluster. You will need:
You deploy this Web application to the Synchronization Server only. If you do not use a Synchronization Server, you can deploy this Web application on any server in the cluster.
You deploy this Web application to the cluster. When you start a Managed Server, it instantiates its own DataSync Web application based on the configuration of this Web application. Then it synchronizes its data repositories with the Master Data Repository that is deployed on the Synchronization Server (or Administration Server).
This section contains the following subsections:
For more information about Data Repositories, refer to Synchronized Data.
Deploying the Configuration DataSync Web Application
Do the following to deploy the DataSync Web application that the cluster uses for configuration purposes:
Deploying the Synchronization DataSync Web Application
Do the following to deploy the DataSync Web application that you use to synchronize data:
When you want to synchronize data for the cluster, you specify the URL of this DataSync Web application. It sends the synchronization information to its proxies, which, in turn, notify the repositories on each Managed Server.
Preventing Synchronization by Undeploying DataSync Web Applications
If changes in your production environment are infrequent and highly controlled, we recommend that after you start a Managed Server (which causes the server to synchronize its Data Repositories with the Master on the Synchronization Server or Administration Server) after you force a refresh-and-notify operation for your Managed Servers, do the following:
In a text editor, open the application.xml file for your application and remove the declaration for the DataSync Web application. For example, in the sample wlcsApp, open PORTAL_HOME/applications/wlcsApp/META-INF/application.xml and remove the following element:
<module>
<web>
<web-uri>datasync</web-uri>
<context-root>wlcsAppDataSync</context-root>
</web>
</module>
For information on forcing a refresh-and-notify operation, refer to Refreshing the Contents of Data Repositories.
Configuring Read-Write Persistence
When the DataSync Web application is deployed on the WebLogic Server Synchronization Server for a cluster (or on a single WebLogic Server instance in a single-server environment), the Master Data Repository uses a read-write JDBC Persistence Manager to read and write application data via the dataSync Data Source. The DataSync Web application that you deploy to a Managed Server reads data from the database when the server starts (or when you use the Data Repository Browser to explicitly refresh the contents). Then it stores the data in memory for use by the Managed Server. It assumes that the DataSync Web application on the Synchronization Server has already written to the database. You can modify this behavior by using the following java.lang.System properties:
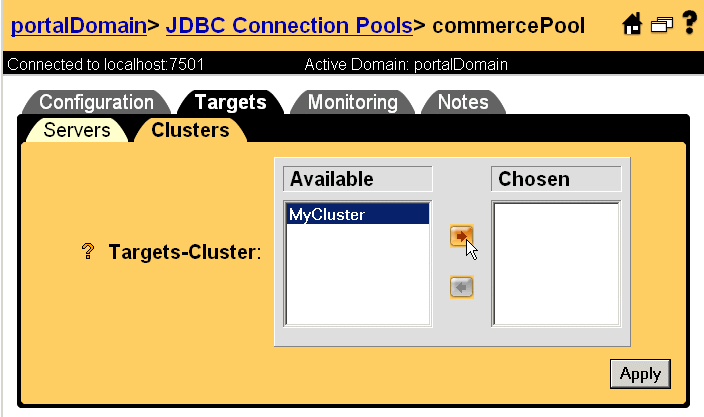
Deploy Your Web Application and Other Modules to the Cluster
To deploy the remaining modules of your enterprise application, do the following:
Figure 6-5 Deploy Application Modules to the Cluster
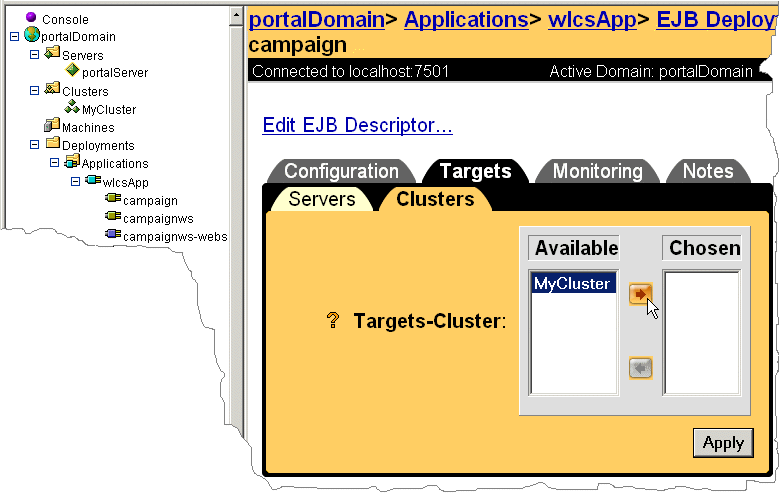
Figure 6-6 Deploy Connection Pools to the Cluster
Starting a Cluster
To start a cluster, complete the following tasks:
In addition, you must start the proxy server. For information on starting the proxy server, refer to the documentation for the server type that hosts the WebLogic Server plug-in.
Start the WebLogic Server Administration Console
Because the commands for setting environment variables and starting a server are long and prone to typographical errors, we recommend that you use scripts to start servers.
To create a startup script for an Administration Server, copy PORTAL_HOME/config/portalDomain/startPortal.bat (startPortal.sh on UNIX) onto the computer that hosts the Administration Server. On the target machine you can rename the file, if desired, to a more appropriate name like AdminSyncServer.bat (or .sh). You should shut down the server before creating a copy of StartPortal.bat and running the new script.
Make the following modifications:
Then run the startup script. You must start the Administration Server before the Managed Servers.
Start the Synchronization Server
Because the commands for setting environment variables and starting a server are long and prone to typographical errors, we recommend that you use scripts to start servers.
To create a startup script for a Synchronization Server, copy PORTAL_HOME/config/portalDomain/startPortal.bat (startPortal.sh on UNIX) onto the computer that hosts the Synchronization Server. On the target machine you can rename the file, if desired, to a more appropriate name like StartSyncServer.bat (or .sh). Then make the following modifications:
Then run the startup script. You must start the Synchronization Server before the Managed Servers.
Start the Managed Servers
To create a startup script for a Managed Server, copy PORTAL_HOME/config/portalDomain/startPortal.bat (startPortal.sh on UNIX) onto the computer that hosts the Managed Server. On the target machine you can rename the file, if desired, to a more appropriate name like StartManagedServer.bat (or .sh). Then make the following modifications on each computer:
Where host is the name or IP address of the machine where the Administration Server is running and port is the Administration Server's listen port. If you are using Secure Socket Layer (SSL) for communication with the Administration Server, the Administration Server must be specified as:
-Dweblogic.management.server=https://host:port
These username and password arguments are optional. If you do not add them to the startup file, then WebLogic server assumes that the username is system, and it prompts you to enter the password on each Managed Server during the server startup process.
For example, add the following variables to the startup script for each Managed Server:
SET DOMAIN_NAME=portalDomain
SET SERVER_NAME=ClusterNode1
SET ADMIN_SERVER=192.168.33.137:7501
SET ADMIN_SERVER_USERNAME=system
SET ADMIN_SERVER_PASSWORD=weblogic
And then use these variables in the startup command:
%JDK_HOME%/bin/java %JAVA_VM% -Xms128m -Xmx128m -classpath %CLASSPATH% -Dcloudscape.system.home=%WL_PORTAL_HOME%/db/data -Dweblogic.Domain=%DOMAIN_NAME% -Dweblogic.Name=%SERVER_NAME% -Dbea.home=%BEA_HOME% -Dweblogic.management.server=%ADMIN_SERVER% -Dweblogic.management.username=%ADMIN_SERVER_USERNAME% -Dweblogic.management.password=%ADMIN_SERVER_PASSWORD% -Djava.security.policy==%WEBLOGIC_HOME%/lib/weblogic.policy -Dcommerce.properties=%PORTAL_HOME%/weblogiccommerce.properties -Dpipeline.properties=%PORTAL_HOME%/pipeline.properties -Dwebflow.properties=%PORTAL_HOME%/webflow.properties weblogic.Server
Then run the startup script.
For more information about starting Managed Servers, refer to "Starting a WebLogic Managed Server" under "Starting and Stopping WebLogic Servers" in the WebLogic Server Administration Guide.
Refresh Data Repositories on Managed Servers
If you want to refresh the contents of the Data Repositories on the Managed Servers and cause subordinate repositories to refresh their contents, do the following on the Synchronization Server:
http://hostname:port-number/datasync/index.html
Where datasync is the name of your DataSync Web application. For more information, refer to Adding DataSync in a Cluster.
Figure 6-7 Refresh and Notify

Test Cluster and Application for Failover
To verify that the cluster supports the replication of session data, deploy one of the reference applications onto your cluster. Then access the reference application using the listen port of your proxy server and log in as a sample user. Kill the Managed Server that contains your current session and verify that the session data is available from another Managed Server.
To verify that your application's data is safe in a failover situation, we recommend the following testing methods as a supplement to testing with a multi-node cluster:

|

|

|
|
|
|
Copyright © 2001 BEA Systems, Inc. All rights reserved.
|