


|

|
|
|
|
Security in the WebLogic Portal Sample Applications
Out-of-the-box, WebLogic Portal includes several sample applications that demonstrate various capabilities of the product, and some that may provide you with a starting point for building your own e-commerce applications. These sample applications must occasionally implement J2EE security measures. For example, because the JavaServer Page (JSP) templates included in the Commerce (wlcs) Web application simulate a real-world storefront (including a check out process), some of the templates must be protected.
This topic describes how a visitor or customer's user experience might be affected by security in the sample applications, explains the back-end processes that support security in these applications, and describes the contents of each application's web.xml and weblogic.xml deployment descriptors. It also provides details about credit card security measures.
This topic includes the following sections:
Security in the Commerce (wlcs) Web Application
The Commerce (wlcs) Web application includes a set of JavaServer Page (JSP) templates that provide a model for your home page, search and browse pages, shopping cart pages, and many other pages that are commonly used on e-commerce sites. Web content developers can use the JSP templates and add customized HTML tags to match your organization's branding requirements, design preferences, navigation options, and the content of your product catalog. In summary, the JSP templates are a great starting point for building your own e-commerce Web application!
Because some e-commerce Web pages display or allow registered customers to modify personal information (such as billing information or demographic data), the included JSP templates that serve these purposes must be protected. This section describes which JSP templates are protected, how users can access the templates, and the techniques used to implement these security measures.
Accessing the Commerce (wlcs) Web Application
On Windows systems, you can view the Commerce Web application by first starting the WebLogic Portal server and then selecting Start
The default username/password combination for the wlcs templates is democustomer and password.
The files for the Commerce (wlcs) Web application are located in PORTAL_HOME\applications\wlcsApp\wlcs directory, where PORTAL_HOME is the directory in which you installed the product.
Protected JavaServer Page (JSP) Templates
Unless a Web page contains or requests sensitive customer information, there is no reason to prevent any user from viewing that page. For example, a potential customer who visits your e-commerce site for the first time should be able to browse through your product catalog with ease. Typical browsing interactions (excluding campaigns) should not require this user to register or log into your Web site.
With this concept in mind, the Commerce (wlcs) Web application allows anonymous users to move through the JSP templates freely, until they request a page that is protected (that is, contains or requests sensitive information). Protected pages are those located below the commerce\order and commerce\user directories.
Logging In with Form-Based Authentication
The main.jsp template is the default home page for the Commerce (wlcs) Web application, and can be accessed by anonymous users. Anonymous users can browse the store or perform other activities (search, view cart, and so on) using the hyperlinks presented on the main.jsp template. Essentially, anonymous users can access all of the product catalog JSP templates, which are described in detail in the Product Catalog JSP Templates topic of the Guide to Building a Product Catalog documentation. (In this documentation you will also find a detailed explanation of the main.jsp template.)
Although a Log In link is provided on the main.jsp template, users are not immediately required to log in. Only when an anonymous user attempts to access a protected Web page (or explicitly clicks the Log In link) are they directed to the login.jsp template for a username and password (see Figure 3-1). Users who choose to log in prior to accessing protected pages and are already authenticated are not prompted to log in again unless they log out or their session times out. (For more information about session timeouts, see Session Inactivity.)
Figure 3-1 Portion of the login.jsp Template
The Commerce (wlcs) Web application uses form-based authentication techniques to present the login.jsp template to the user. Form-based authentication allows developers to customize the authentication user interface presented by an HTTP browser. In other words, you can specify the HTML form or JSP file that prompts for the username and password. Or, you can modify the look and feel of the login.jsp template to adhere to your organization's marketing requirements. When the user submits their username and password to gain access to their account, If the supplied username/password combination is valid and the user arrived at the login.jsp template on their way to a protected page, the user is logged in and automatically directed to the protected JSP they were attempting to access. If the username/password combination was validated after explicitly requesting login.jsp from the main.jsp template, the application loads the secured version of the main.jsp template (secureMain.jsp). The user is now considered a registered user, so this page welcomes the user with a personalized greeting and presents the user with additional links in the left navigation bar (see Figure 3-2). Figure 3-2 Portion of main.jsp Template After User Login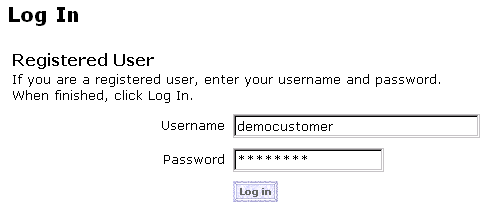
the submitted information is passed to the WebLogic Server for verification. The security mechanism in WebLogic Server verifies that the user is part of the wlcs_customer group and that the user has supplied the correct password
In either case, if the supplied username/password combination is deemed invalid, the badlogin.jsp template is displayed. The badlogin.jsp template is essentially the same as the login.jsp template, but includes an appropriate error message. Notes: The login.jsp and badlogin.jsp templates are described in detail in the "Customer Registration and Login Services" topic of the Guide to Registering Customers and Managing Customer Services documentation. While you are logging into the Commerce (wlcs) Web application, your browser may display information related to the demonstration certificate in a pop-up window. If you use the wlcs sample application as a basis for your own e-commerce Web site, be sure to purchase and install a real server license from a certificate authority. For more information about certificates, see Digital Certificates in the Programming WebLogic Server Security documentation. Session Inactivity If an authenticated user does not interact with the templates for a period of 15 minutes, the session will be deemed inactive. If the user then returns to the templates and attempts to access a protected page, the sessiontimeout.jsp template will be displayed. This page informs the user that because of the inactivity, they have automatically been logged out of the system and will need to log in again. This automatic logout prevents unauthorized individuals from accessing a logged-in user's account information if the user were to leave their machine for a certain period of time. Note: The session timeout interval is set in the application's web.xml deployment descriptor, and can be customized to something other than the default value of 15 minutes. For more information, see Contents of the Commerce (wlcs) Web Application's Deployment Descriptors. SSL and Declarative Transport The Webflow and Pipeline mechanisms that direct the presentation and business logic associated with the Commerce JSP templates make use of SSL and declarative transport mechanisms. Links that invoke protected JSP files, as well as certain Input Processors and Pipelines, need to be accessed via the HTTPS protocol. There are a number of these links already defined in the Commerce (wlcs) Web application's web.xml deployment descriptor. Secured JSP templates that rely on SSL also require a setting in the web.xml file that indicates the transport guarantee. This guarantee can be CONFIDENTIAL or INTEGRAL. A CONFIDENTIAL setting prevents other entities from observing the contents of the transmission, while an INTEGRAL setting prevents the data from being changed while transmitting between the client and server. For more information on these settings for the Commerce (wlcs) Web application, see Contents of the Commerce (wlcs) Web Application's Deployment Descriptors. Credit Card Security Service All credit card information your customers provide is considered sensitive and is encrypted for security purposes. This information is decrypted only when absolutely necessary during specific payment processing activities (such as authorization). On the order confirmation JSP template (confirmorder.jsp), for example, only the last 4 digits of a customer's credit card are displayed. This section provides detailed information about the credit card security service, including:
Encryption/Decryption Implementation
The Commerce services encryption mechanism relies on libraries from the WebLogic Server platform and is based upon RSA's public key infrastructure. A public key is used to encrypt a customer's credit card information, while a private key is used to decrypt it when required.
Note: For more information about RSA security standards, see http://www.rsasecurity.com/.
The public key is stored in the database for use by the EncryptCreditCardPC Pipeline Component, while the private key is itself encrypted using a password you supply, and stored in the database. When invoked from the Webflow, the EncryptCreditCardPC Pipeline Component reads the customer-provided credit card information from the Pipeline Session, encrypts it using the public key, and then places it back into the Pipeline Session. This encrypted data is subsequently persisted to the database. Decryption is accomplished using a back-end component and the private key. Again, decryption is initiated only in stages of the ordering process where this data is absolutely necessary.
Note: For more technical information about the Credit Card Security Service, please contact your BEA representative.
Customizable Security Settings
Although the Commerce services specify default settings for the Credit Card Security Service, you can customize them. The security settings reside in the weblogiccommerce.properties file (located in the PORTAL_HOME directory, where PORTAL_HOME is the directory in which you installed WebLogic Portal). These security settings are shown in Listing 3-1.
Listing 3-1 Security Settings in weblogiccommerce.properties
###################################################
# Properties required for the Security Services
###################################################
# Credit card encryption services are turned on by setting this
# property to true. Commenting out the property or setting it to
# false will disable credit card encryption.
is.encryption.enabled=true
# The name of the security table and column names for the public
# and private encryption keys can be specified using the properties # below.
security.table.name=WLCS_SECURITY
security.backup.table=WLCS_SECURITY_BACKUP
public.key.column.name=PUBLIC_KEY
private.key.column.name=PRIVATE_KEY
# The key bit size desired. Key bit length and length of data that # can be encrypted are related # as follows:
# KEY BIT LENGTH(bits)          DATA LENGTH (bytes)
#	512                      53
#	1024                     117
#	2048 (MAX LENGTH)        245
key.bit.size=1024
# This optional parameter specifies the private key password used # to decrypt the encrypted credit card encryption private key.
# WARNING: Setting this property will start up the server without # prompting for a password.
private.key.password=WLCS
First, the is.encryption.enabled property enables encryption mechanisms. Please note that a value of false (or no value at all) will disable encryption mechanisms. BEA has assigned this property a default value of true.
Next is a series of properties that allow you to specify the names of the security tables (primary and backup) and the columns in which the public and private keys will be stored. BEA has assigned default values to these properties, but you can modify them based on your database.
Following the properties related to the database, the key.bit.size property allows you to specify the encryption key length. By default, the Commerce services ship with a 1024-bit key size, although you may want to modify the encryption strength by changing the key size. Table 3-1 illustrates the possible key bit values.
Note: The higher the key size, the stronger the encryption and more secure the data. However, keep in mind that there is a trade-off in increasing the size of the key—your data may be more secure, but it may take longer to encrypt the data.
Lastly, the private.key.password property allows you to specify, in the weblogiccommerce.properties file, the password used to encrypt the private key. Please note that BEA does not recommend use of this property. Rather, the private key should be supplied by an administrator during server startup. For more information about supplying the private key, see Methods for Supplying the Private Key Encryption Password.
Note: If not used, the private.key.password property should be commented out with a # symbol. BEA has assigned this property a default value of WLCS, but this is for demonstration purposes only.
Methods for Supplying the Private Key Encryption Password
As previously mentioned, the private key used to encrypt customer credit cards is itself encrypted with a password before being stored in the database. There are three methods by which you can supply this password:
Specifying the Password in weblogiccommerce.properties (Default)
The first method for specifying the private key encryption password is to specify the password as a value for a property in the weblogiccommerce.properties file.
Note: BEA does not recommend this method because by providing the password in a simple text file, you leave yourself vulnerable to security attacks. Anyone who gains access to this file can read the password you use to encrypt the private key, and thus gain access to it.
To use this method, follow these steps:
Note: The KeyBootstrap class is located in the PORTAL_HOME\lib\commerce_system.jar file, and must be in the system classpath when starting WebLogic Portal. This class is already registered with the portalDomain and the wlcsDomain.
Specifying the Password at Server Startup Using the Console
The second method for specifying the private key encryption password is for an administrator to specify the password at server startup using the server console.
To use this method, follow these steps:
Note: The KeyBootstrap class is located in the PORTAL_HOME\lib\commerce_system.jar file, and must be in the system classpath when starting WebLogic Portal. This class is already registered with the portalDomain and the wlcsDomain.
Specifying the Password After Server Startup Using a Secure Web Form
The third method for specifying the private key encryption password allows an administrator to enter the password on a secure Web form, so the password is stored in memory on your system instead of in a text file.
To use this method, follow these steps:
Note: The KeyBootstrap class is located in the PORTAL_HOME\lib\commerce_system.jar file, and must be in the system classpath when starting WebLogic Portal. This class is already registered with the portalDomain and the wlcsDomain.
Figure 3-3 security_getPassword.html
On submission, this page will invoke the EncryptionServlet and KeyGeneratorServlet registered in the web.xml file (located in the PORTAL_HOME\applications\wlcsApp\tools\Web-inf directory, where PORTAL_HOME is the directory in which you installed the product).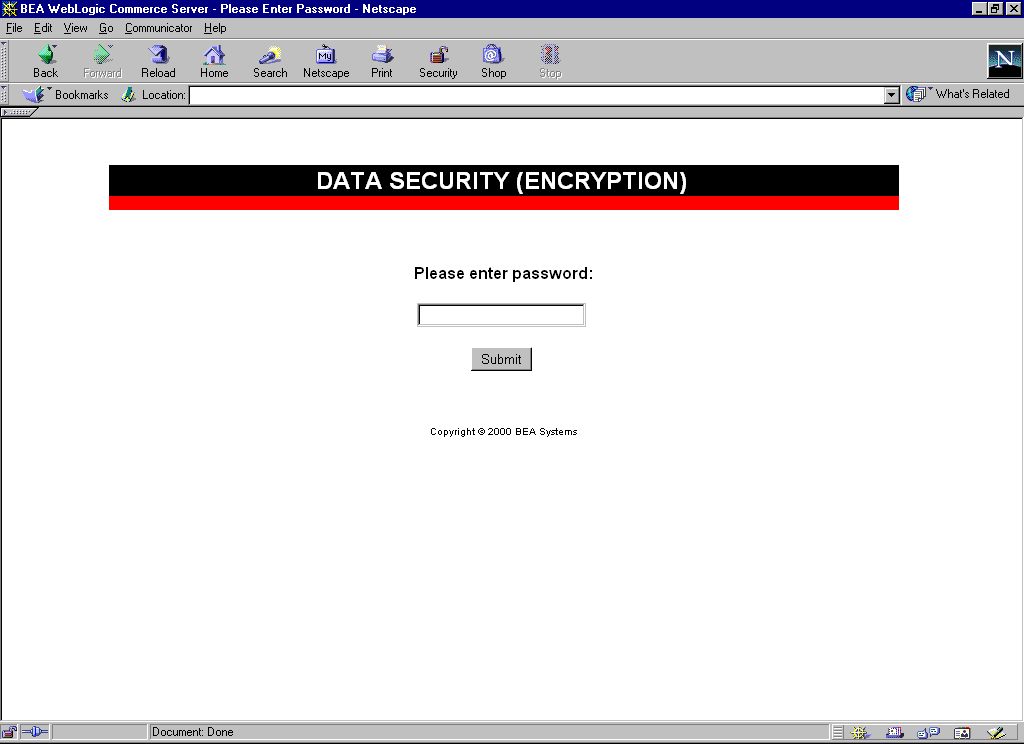
Important Notes About Supplying Your Password
You must supply the password for all nodes in a cluster. Should one node in the cluster fail, other machines that know the private key encryption password can be used for failover.
The first time you enter the password, you will be asked to confirm whether or not you want to generate new keys. If this is indeed the first time you are entering the password, you do want to generate new keys. However, be sure to select a password that is memorable. All credit cards accepted by your site will be encrypted using this password, and cannot be decrypted if you forget your password.
If you are asked to confirm whether or not you want to generate new keys and you are using the same password, then the keys cannot be found in the database. If no data was encrypted using the old keys, you can regenerate the keys. However, if data has already been encrypted using the old keys, this data will be lost because it cannot be read using the new keys. If you have data encrypted with the old keys, you should stop the server, check the database, and verify the properties in the weblogiccommerce.properties file to ensure that the system is set up properly.
During server startup, any orders placed before the password is entered will be persisted with a payment transaction in the RETRY state. After supplying the password, administrators should use the Payment Management WebLogic Portal Administration Tools to reauthorize the transaction. For more information about using the Payment Management Administration Tool, see Using the Order and Payment Management Pages in the Guide to Managing Purchases and Processing Orders documentation.
What if I Want to Change My Password?
Because all the credit cards that have been encrypted use the private key encryption password, it is not recommended that you change this password. However, there may be the rare occasion (for example, if the password has been compromised) when you will need to change the password. Changing the password means changing the public and private key pair. Therefore, you must follow this process when changing the password:
Note: Changing the password is especially difficult if you have a lot of encrypted data. Again, this process is not recommended and should not be done unless absolutely required.
Contents of the Commerce (wlcs) Web Application's Deployment Descriptors
This section provides detailed information about the security-related XML elements in the Commerce (wlcs) Web application's deployment descriptor files. It is intended as a reference. For background conceptual information about the security elements listed in this section, see The web.xml Deployment Descriptors and The weblogic.xml Deployment Descriptors.
web.xml
Along with other information, the web.xml deployment descriptor for the Commerce (wlcs) Web application contains several sets of XML elements for implementing the J2EE declarative security model. The contents of these elements are shown in the following code listings:
Listing 3-2 Listen Ports for Webflow-Generated URLs
<context-param>
   <param-name>HTTP_PORT</param-name>
  <param-value>7501</param-value>
</context-param>
<context-param>
  <param-name>HTTPS_PORT</param-name>
  <param-value>7502</param-value>
</context-param>
Listing 3-3 Declarations of Secure JSPs
<security-constraint>
   <web-resource-collection>
	<web-resource-name>Administration Tool Pages
	</web-resource-name>
	<description>The Administration Tool Pages</description>
	<url-pattern>/tools/*</url-pattern>
	<url-pattern>/repository/*</url-pattern>
	<url-pattern>/security/*</url-pattern>
	<http-method>GET</http-method>
	<http-method>POST</http-method>
   </web-resource-collection>
   <auth-constraint>
	<description>Administrators</description>
	<role-name>SystemAdminRole</role-name>
   </auth-constraint>
   <user-data-constraint>
	<transport-guarantee>NONE</transport-guarantee>
   </user-data-constraint>
</security-constraint>
Listing 3-4 Login Configuration
<login-config>
   <auth-method>BASIC</auth-method>
</login-config>
Listing 3-5 Declaration of Security Roles
<security-role>
   <description>Administrators</description>
   <role-name>SystemAdminRole</role-name>
</security-role>
weblogic.xml
Along with other information, the weblogic.xml deployment descriptor for the Commerce (wlcs) Web application contains several sets of XML elements for implementing the J2EE declarative security model. The contents of these elements are shown in the following code listings:
Listing 3-6 Security-Role Mappings
<security-role-assignment>
   <role-name>SystemAdminRole</role-name>
   <principal-name>SystemAdministrator</principal-name>
</security-role-assignment>
Listing 3-7 Check Authentication on JSP Forwarding
<container-descriptor>
   <check-auth-on-forward />
</container-descriptor>
Listing 3-8 Cookies
<session-descriptor>
   <session-param>
 	<param-name>CookieName</param-name>
	<param-value>JSESSIONID_WLCS_TOOLS</param-value>
   </session-param>
   .
   .
   .
</session-descriptor>
Security in the Stock Portal Web Application
The Stock Portal Web application includes a set of JavaServer Pages (JSPs) that illustrate an Internet portal. Internet portals are a key part of many e-commerce applications; they provide an entry point to the Internet as well as value-added services such as searching and application integration. Within portal pages are a number of portlets, or highly focused channels of information. A portal can contain many of these information channels. For example, an online retail portal could provide a variety of interactive merchandise portlets, each presenting a different specialty category such as mystery books, classical music CDs, and baseball memorabilia. Among other things, portal technology allows Web site visitors to select and arrange the portlets that appear within their portals, allowing for truly personalized information display.
Visitors that wish to customize the portal by selecting pages, the layouts or portlets that appear within those pages, or apply portlet skins to change the look of their portal must first log in so that their preferences can be saved. This section describes which JSP templates are used for the registration process, how users can access the templates, and the techniques used to implement these security measures.
Accessing the Stock Portal Web Application
On Windows systems, you can view the Stock Portal Web application by first starting the WebLogic Portal server and then selecting Start
The default username/password combination for the Stock Portal Web application is administrator and password.
The files for the Stock Portal Web application are located in PORTAL_HOME\
applications\portal\stockportal directory, where PORTAL_HOME is the directory in which you installed the product.
Anonymous Versus Authenticated Portal Visitors
There is no reason to prevent any anonymous visitor from browsing the Stock Portal Web application. The portal.jsp template is the default home page for the Stock Portal Web application; it allows all anonymous visitors of the portal to access and browse it. However, anonymous visitors are presented with a default portal that contains portlets, color schemes, organization, content, and so on that are not currently customized to the visitor's personal preferences. For the portal to display information based on visitor preferences, the Stock Portal Web application requires that visitors first be authenticated by logging into the portal. Only after a successful authentication can visitors request a personalized version of their portal.
The Stock Portal Web application contains a number of JSPs that handle visitor login and delegate authentication activities to the WebLogic Server. These JSPs are located below the PORTAL_HOME\applications\portal\stockportal\framework\
security directory.
Logging Into the Portal
The portal.jsp template does not automatically prompt a visitor for a username and password. Rather, the portal.jsp template requires visitors to initiate the login process by clicking the Login button. When a visitor clicks the Login link on the portal.jsp template, the following processing takes place:
Figure 3-4 Portion of the login.jsp Template

Once a visitor has successfully logged into the Stock Portal Web application, that visitor is considered a registered user and presented with additional links (Customize My Portal, Change Password, and Logout) on the portal.jsp template, as shown in Figure 3-5. Registered users may now customize the portal by selecting pages, the layouts or portlets that appear within those pages, or by applying portlet skins to change the look of their portal.
Figure 3-5 Avitek Stock Portal Home Page
Note: The pages, layouts, portlets, and skins available to a registered user are determined by administrators via visitor entitlements. For more information about visitor entitlements, see Visitor Entitlements. Webflow and Portal Security Out of the box, WebLogic Portal (and thus, the Stock Portal Web application) provides several security-related features, including those that allow a user to login, logout, autologin, change their password, and so on. Each of these security-related features is driven by an underlying Webflow. This Webflow contains a number of Input Processors, each of which are designed to perform discrete, specific tasks related to security. Because of this modular structure, you can easily customize security by adding other Input Processors to the Webflow, or by removing existing Input Processors from the Webflow. Note: If you are unfamiliar with the Webflow mechanism, see the Guide to Managing Presentation and Business Logic: Using Webflow and Pipeline documentation. Portal security is handled by two separate Webflow files: security.wf and user_account.wf, which are located in the PORTAL_HOME\applications\portal-project\application-sync\webapps\ Note: Changes made to any .wf file should be done using the Webflow Editor. For more information, see Using the Webflow and Pipeline Editors. Security-Related Use Cases The following use cases are provided to help you understand how WebLogic Portal handles security via the Webflow mechanism by default. It is recommended that you read each use case in sequence the first time through. This, along with an understanding of the individual Input Processors, should enable you to start modifying the Webflow that affects portal security. Notes: Details about any Input Processor in this section are described in more detail in the Javadoc. All JSPs described in this section can be located in the PORTAL_HOME\applications\portal\stockportal\framework\ The use cases described in this section are: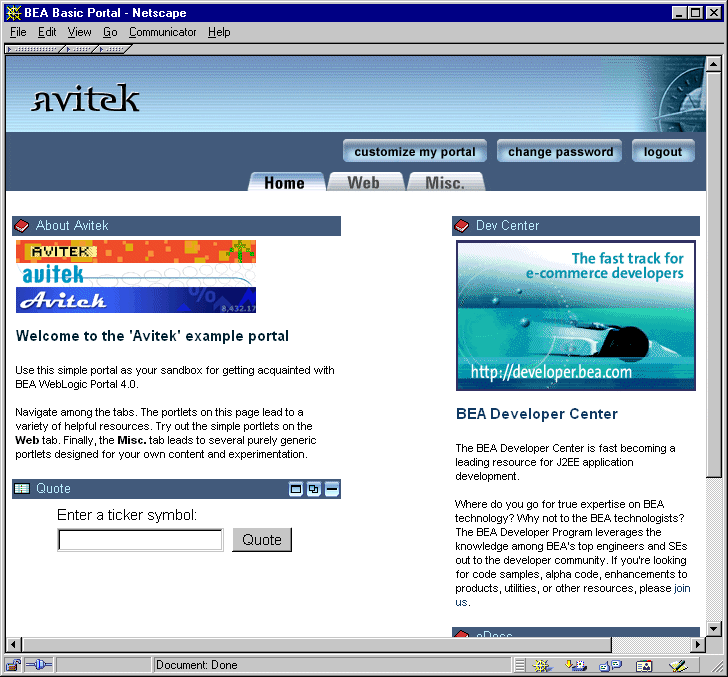
stockportal directory. The security.wf file contains the fundamental security logic and should not be modified. The user_account.wf file is where you will make any changes to the Webflow that affects portal security.
security directory.
Existing User Logs In (Single Group, Autologin Disabled)
In this simplest of use cases, the user has already registered with the portal Web site and is logging in as part of a return visit. The user belongs to only one portal group, and autologin has not been enabled for the portal Web application. Figure 3-6 illustrates the appropriate path through the Webflow for this use case.
Figure 3-6 Webflow For Existing User Login (Single Group, Autologin Disabled)
In this case, the user starts at portal.jsp, where they click the Login link. As shown in Figure 3-6, this action causes the Webflow to display login.jsp. The Webflow forwards information the user entered into the username and password fields on login.jsp to the loginFormProcessor Input Processor, where it is validated against criteria such as appropriate length, valid characters, and so on. (This criteria is specified in context parameters in the application's web.xml deployment descriptor. For more information, see Contents of the Stock Portal Web Application's Deployment Descriptors) If the information entered into the fields is invalid, the loginFormProcessor Input Processor indicates that the Webflow should return the user to login.jsp to make corrections. If the information is valid, the loginFormProcessor Input Processor indicates that the Webflow should forward to the loginProcessor Input Processor. The function of the loginProcessor Input Processor is to actually log the user into the system. This activity requires a call to the underlying WebLogic Server with a j_security_check. When WebLogic Server is finished, control is sent back to the portal Webflow. If the username/password combination itself is invalid and the user cannot be logged in, the loginProcessor Input Processor indicates that the Webflow should direct the user to badlogin.jsp to correct the information. If the loginProcessor Input Processor finds no problems with the user's information, the loginProcessor Input Processor indicates that the Webflow should forward to the groupProcessor Input Processor. In this use case, the groupProcessor Input Processor determines that the user has only one portal group, and simply indicates to the Webflow that control should be forwarded to the postLoginProcessor Input Processor. The postLoginProcessor Input Processor is the last mandatory Input Processor in the Webflow. Arriving at the postLoginProcessor Input Processor means that the user is guaranteed to be logged in and that a portal group is assigned to the user. The postLoginProcessor Input Processor performs the final set up work for the user by placing the correct profile in the HTTP session, then returns user.login to the Webflow, indicating that portal.jsp should be redisplayed. When portal.jsp is redisplayed to the user, the user is considered logged in and will see any predefined customizations. Existing User Logs In (Multiple Groups, Autologin Disabled) This use case is, for the most part, the same as that shown in Existing User Logs In (Single Group, Autologin Disabled), with one exception. Because the user belongs to multiple portal groups, the groupProcessor Input Processor must do more than just indicate to the Webflow that control should be forwarded to the postLoginProcessor Input Processor. This alternative flow (highlighted in blue) is shown in Figure 3-7. Figure 3-7 Webflow for Existing Login (Multiple Groups, Autologin Disabled)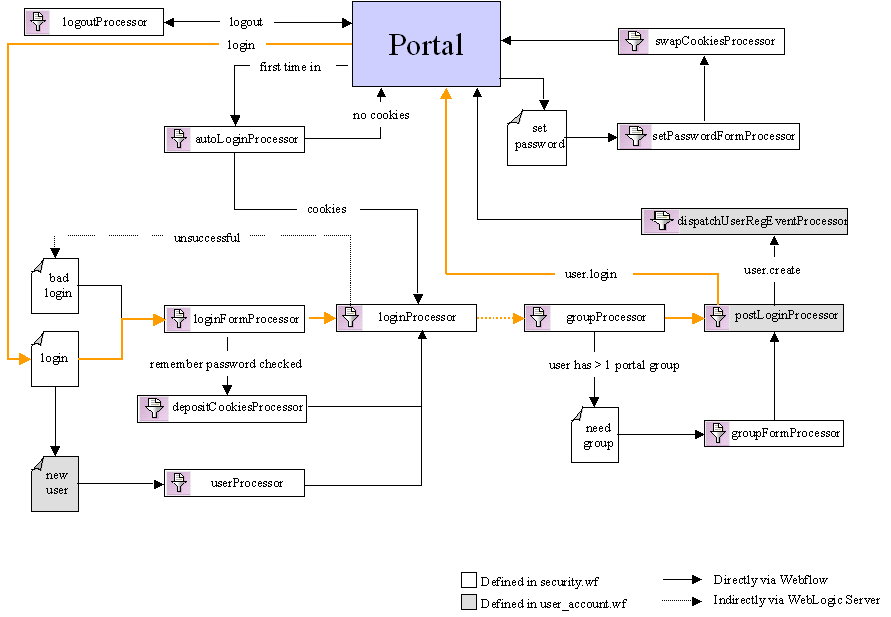
In this use case, the groupProcessor Input Processor determines that the user belongs to multiple portal groups, and indicates to the Webflow that need_group.jsp should be displayed. The need_group.jsp allows the user to select the group with which their login should be associated. When the user moves from need_group.jsp, Webflow forwards to the groupFormProcessor Input Processor to validate their selection. If no selection is made, the groupFormProcessor Input Processor indicates that the user should be sent back to need_group.jsp. If the user has made a selection, the groupFormProcessor Input Processor indicates that control should be passed to the postLoginProcessor Input Processor with the group selected, and flow continues as described in Existing User Logs In (Single Group, Autologin Disabled). Existing User Logs In (Multiple Groups, Autologin Enabled) This use case is a modification of the Existing User Logs In (Multiple Groups, Autologin Disabled) previously described. Because autologin is enabled in this use case, the first part of the Webflow is different. This alternative flow (highlighted in blue) is shown in Figure 3-8. Figure 3-8 Webflow for User Login (Multiple Groups, Autologin Enabled)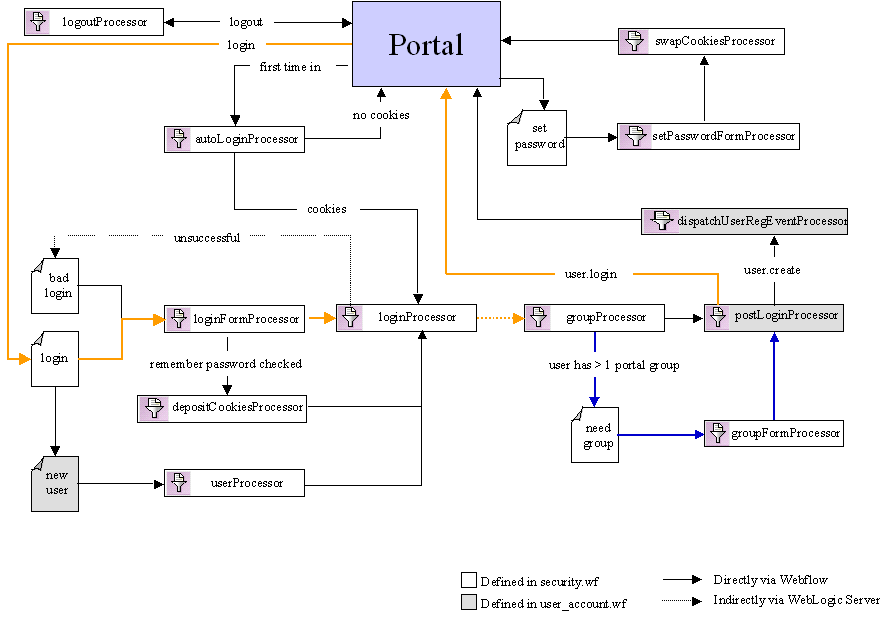
There are two prerequisites for the autologin feature: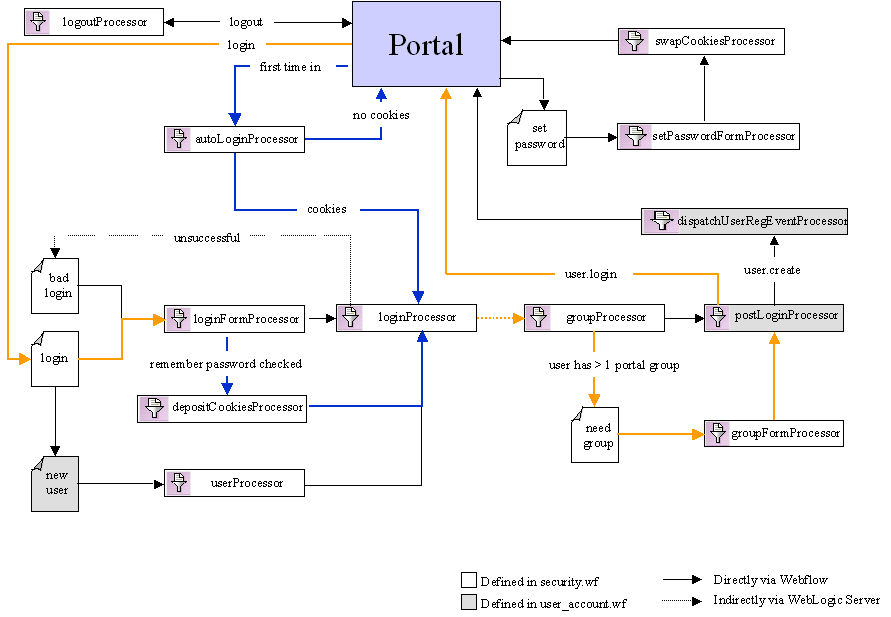
Thus, when a user first comes to the portal Web site, portal.jsp relies upon an internal preprocessor (not shown in the figure) to determine whether the user's session is new and whether autologin for the portal Web application has been enabled in the web.xml deployment descriptor. If the session is new and autologin is enabled, portal.jsp indicates to the Webflow that control should be fowarded to the autoLoginProcessor Input Processor, which attempts to locate autologin cookies on the user's machine.
If cookies are found, this means that the user has previously selected the autologin option on login.jsp. The autoLoginProcessor Input Processor then indicates to the Webflow that control should be fowarded to the loginProcessor Input Processor, and the flow continues as described in Existing User Logs In (Multiple Groups, Autologin Disabled). If no cookies are found, this means that the user has not selected the autologin option on login.jsp, and the Webflow returns the user to portal.jsp.
If the user is sent back to portal.jsp, user login takes place the same way as that described in Existing User Logs In (Multiple Groups, Autologin Disabled). (The internal preprocessor in portal.jsp is aware that the user cannot use autologin and therefore does not try this path again.) However, if the user clicks the Remember ID & Password check box on login.jsp during this process, the loginFormProcessor Input Processor detects this and returns a value to the Webflow indicating that control should be forwarded to the depositCookiesProcessor Input Processor. Then, the depositCookiesProcessor Input Processor deposits two cookies on the user's machine: their encrypted username, and their encrypted password.
Once the cookies are placed, the depositCookiesProcessor Input Processor indicates to the Webflow that control should be forwarded to the loginProcessor Input Processor, and the flow continues as usual.
Caution: If the user explicitly logs out of the system by clicking the Logout link (see Existing User Logs Out), autologin does not result in automatic re-login the next time the user visits the portal Web site. Rather, autologin causes the user to be automatically re-logged in if their session times out.
Existing User Changes Password
The portion of the Webflow for changing user passwords (as defined in the security.wf file) is shown in Figure 3-9.
Figure 3-9 Webflow for Changing User Passwords
When a user clicks the Change Password link on portal.jsp, the Webflow displays the set_password.jsp. When the user moves from set_password.jsp, the Webflow fowards to the setPasswordFormProcessor Input Processor to validate the information entered. If the information entered is not valid (in length, allowed characters, and so on), the setPasswordFormProcessor Input Processor indicates to the Webflow that the user should be sent back to set_password.jsp. (The criteria for validation is specified in context parameters in the application's web.xml deployment descriptor. For more information, see Contents of the Stock Portal Web Application's Deployment Descriptors.) If the user has entered valid information, the setPasswordFormProcessor Input Processor makes the changes to the password in the system, then indicates to the Webflow that control should be forwarded to the swapCookiesProcessor Input Processor. If autologin cookies have been set for the user's username and encrypted password on their machine, the swapCookiesProcessor Input Processor updates the cookies with the new username and encrypted password information, and indicates to the Webflow that portal.jsp should be displayed. If no autologin cookies exist, the swapCookiesProcessor Input Processor simply indicates to the Webflow that portal.jsp should be displayed. Existing User Logs Out The Webflow for logging out existing users (as defined in the security.wf file) is shown in Figure 3-10. Figure 3-10 Webflow for Logging Out Existing Users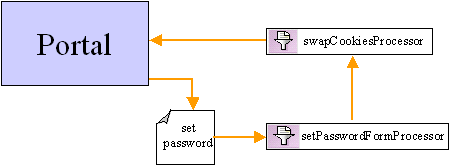
When a user explicitly clicks the Logout link on portal.jsp, the Webflow passes control to the logoutProcessor Input Processor. The logoutProcessor Input Processor invalidates the user's session, clears the autologin cookies (if they exist), and indicates to the Webflow that the default version of portal.jsp (that is, the non-personalized version) should be displayed to the user. New User Creates Account In this final use case, the user is brand new to the portal Web site, and has never logged in before. However, the user would like to be able to personalize portal.jsp, so they click the Login link. This causes login.jsp to be displayed as in previous use cases. However, once the user arrives at login.jsp, the flow of control is geared toward new user registration, as shown (highlighted in blue) in Figure 3-11. Figure 3-11 Webflow for Creating New User Accounts
From login.jsp, the user indicates they are a new user and would like to register by clicking Sign Up Now, instead of entering a pre-existing username and password combination. Webflow then passes control to new_user.jsp, which gathers information about the user (such as their username and password). When the user has completed the form fields on new_user.jsp, the Webflow invokes the userProcessor Input Processor. The userProcessor Input Processor performs two functions: it validates the username and password form fields against criteria such as length, valid characters, and so on, and it actually creates the new user in the system (security realm). (The criteria for validation is specified in context parameters in the application's web.xml deployment descriptor. For more information, see Contents of the Stock Portal Web Application's Deployment Descriptors.) When the userProcessor Input Processor has completed its tasks, it indicates to Webflow that control should be passed to the loginProcessor Input Processor. Once the loginProcessor Input Processor is invoked, the flow proceeds as described in previous use cases, up until the postLoginProcessor Input Processor completes execution. In the case of new user registration, the postLoginProcessor Input Processor returns a value of user.create to the Webflow, which results in a call to an additional Input Processor named dispatchUserRegEventProcessor (instead of returning user.login to the Webflow and redisplaying portal.jsp as described in previous use cases). The dispatchUserRegEventProcessor Input Processor dispatches an event to indicate that a new user has registered with the portal Web site, then indicates to the Webflow that portal.jsp should be redisplayed. Note: For more information about events and behavior tracking, see the Guide to Events and Behavior Tracking documentation. Modifying the Portal Security Webflow: An Example Figure 3-13 and Figure 3-13 illustrate one way the portal security Webflow may be modified (relevant portions only). In this example, the Webflow is extended to allow users to enter, view and update additional account information (that is, besides their username and password handled by userProcessor Input Processor described in previous use cases). Note: The JSPs and Input Processors described in this section are just examples, and are not included with the WebLogic Portal product. They are extensions to the portal security Webflow and as such, are to be coded by your organization's HTML/JSP and Java/EJB developers according to your requirements. Figure 3-12 Example of Extending the Security Portal Webflow: Part 1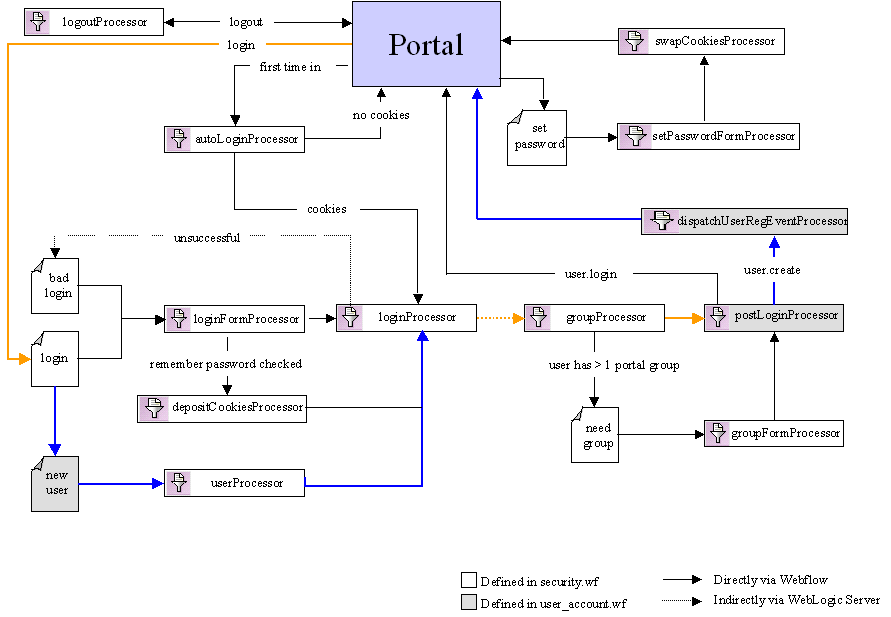
Figure 3-12 shows the addition of the createAccountFormProcessor Input Processor as part of the new user registration process. This Input Processor may allow users to enter information other than the username and password information (for which the userProcessor Input Processor is responsible). It may also perform validation on the additional form fields. Figure 3-13 Example of Extending the Security Portal Webflow: Part 2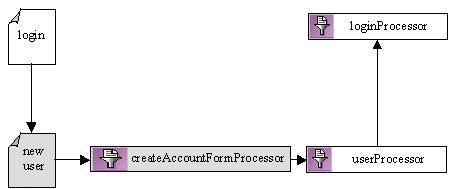
As shown in Figure 3-13, a related modification to the Webflow might allow the user to click an Account Info link from any JSP, which causes the Webflow to pass control to the getAccountProcessor Input Processor. The getAccountProcessor Input Processor obtains the user's profile information, bundles it into a class, and places it into the Pipeline Session as a Pipeline Session-scoped property. The getAccountProcessor Input Processor then indicates to the Webflow that control should be forwarded to an account information JSP, which displays the information to the user. Note: For more information about the Pipeline Session and property scoping, see Pipeline Session Internals in the Guide to Managing Presentation and Business Logic: Using Webflow and Pipeline documentation. If the user then clicks an Update Account link (after making changes to their information), the Webflow calls the updateAccountFormProcessor Input Processor to validate the form fields. If there are problems with the form validation, the Webflow will send the user back to the Account Info page to rectify the problem(s). If there are no problems with the form validation, the Webflow passes control to the updateUserProfileProcessor Input Processor, which actually updates the user's information in the database. Contents of the Stock Portal Web Application's Deployment Descriptors This section provides detailed information about the security-related XML elements in the Stock Portal Web application's deployment descriptor files. It is intended as a reference. For background conceptual information about the security elements listed in this section, see The web.xml Deployment Descriptors and The weblogic.xml Deployment Descriptors. web.xml Along with other information, the web.xml deployment descriptor for the Stock Portal Web application contains several sets of XML elements for implementing the J2EE declarative security model. The contents of these elements are shown in the following code listings:
Listing 3-9 Declarations of Secure Links
<context-param>
   <param-name>HTTPS_URL_PATTERNS</param-name>
   <param-value>/security/login.jsp, /security/new_user.jsp,
    /security/userProcessor.inputprocessor,
    /security/loginProcessor.inputprocessor</param-value>
</context-param>
Listing 3-10 Session Configuration
<session-config>
   <session-timeout>15</session-timeout>
</session-config>
Listing 3-11 Declaration of Secure JSPs
<security-constraint>
   <web-resource-collection>
	<web-resource-name>Pages which require login
	</web-resource-name>
	<description>Pages which require login</description>
	<url-pattern>/security/need_group.jsp</url-pattern>
	<http-method>GET</http-method>
	<http-method>POST</http-method>
   </web-resource-collection>
</security-constraint>
Listing 3-12 Login Configuration
<login-config>
   <auth-method>FORM</auth-method>
   <realm-name>default</realm-name>
   <form-login-config>
	<form-login-page>/framework/security/login.jsp
	</form-login-page>
	<form-error-page>/framework/security/badlogin.jsp
	</form-error-page>
   </form-login-config>
</login-config>
Listing 3-13 Autologin and Form Field Validation Settings
<!--
 If set to true Portal will perform auto login via cookies
-->
<context-param>
   <param-name>PORTAL_AUTO_LOGIN</param-name>
   <param-value>true</param-value>
</context-param>
<!--
 Override the default minimum password length
-->
<!--
<context-param>
   <param-name>PORTAL_MIN_PASSWORD_LEN</param-name>
   <param-value>4</param-value>
</context-param>
-->
<!--
 Override the default maximum password length
-->
<!--
<context-param>
   <param-name>PORTAL_MAX_PASSWORD_LEN</param-name>
   <param-value>10</param-value>
</context-param>
-->
<!--
 Override the default minimum username length
-->
<!--
<context-param>
   <param-name>PORTAL_MIN_USERNAME_LEN</param-name>
   <param-value>4</param-value>
</context-param>
-->
<!--
 Override the default maximum username length
<context-param>
   <param-name>PORTAL_MAX_USERNAME_LEN</param-name>
   <param-value>10</param-value>
</context-param>
-->
<!--
 Override the default timeout for autologin cookies (in seconds)
<context-param>
   <param-name>PORTAL_AUTOLOGIN_COOKIE_TIMEOUT</param-name>
   <param-value>172800</param-value>
</context-param>
-->
weblogic.xml
Along with other information, the weblogic.xml deployment descriptor for the Stock Portal Web application contains several sets of XML elements for implementing the J2EE declarative security model. The contents of these elements are shown in the following code listings:
Listing 3-14 Security-Role Mappings
<security-role-assignment>
   <role-name>SystemAdminRole</role-name>
   <principal-name>SystemAdministrator</principal-name>
   <principal-name>system</principal-name>
</security-role-assignment>
Listing 3-15 Check Authentication on JSP Forwarding
<container-descriptor>
   <check-auth-on-forward />
</container-descriptor>
Listing 3-16 Cookies
<session-descriptor>
   <session-param>
 	<param-name>CookieName</param-name>
	<param-value>JSESSIONID_STOCKPORTAL</param-value>
   </session-param>
   <session-param>
	<param-name>CookiePath</param-name>
	<param-value>/stockportal</param-value>
   </session-param>
   <session-param>
	<param-name>TimeoutSecs</param-name>
	<param-value>300</param-value>
   </session-param>
</session-descriptor>

|

|

|
|
|
|
Copyright © 2001 BEA Systems, Inc. All rights reserved.
|