
| Download Docs | Site Map | Glossary | |
|
|
|||
| bea.com | products | dev2dev | support | askBEA |
|
|
||||||||
| e-docs > WebLogic Platform > WebLogic Portal > Development Guide > Building Custom Templates |
|
Development Guide
|
Building Custom Templates
WebLogic Portal includes a number of wizards and templates to assist in creating domains, applications, portals and portlets quickly and efficiently. This section outlines instructions for creating your own custom templates. Domain and portal templates are consumed by the domain wizard or the portal wizard, and group portal templates are invoked using the WebLogic Portal Administration Tools.
This section includes information on the following subjects:
Introducing Templates
Three templates are built into the BEA WebLogic Platform: Domain templates, portal templates and group portal templates. Domain and portal templates are built as wizard components, whereas group portals are used by the WebLogic Portal Administration Tools.
Three Types of Templates
Before learning how to develop templates for WebLogic Platform, consider the role each template type plays in creating a portal:
The Domain Wizard Template
Out-of-the-box domain templates are stored in the form of JAR files in following directory:
<BEA_HOME>weblogic700\common\templates\domains
The Domain Configuration Wizard is launched from the Start -> Programs -> WebLogic700 menu, and does not require a server to be running. Gathering user input from a series of screens, the Wizard performs some directory and file copying, and then some string substitutions within the configuration files and startup scripts within the domain being created. Thus the user's choices are applied to the template and instantiated in the new domain directory.
Figure 5-1 shows the Domain Configuration Wizard explosing several domain templates.
Figure 5-1 Selecting a Custom Domain
The Domain Configuration Wizard recognizes templates based on the contents of the template.xml file. Information on editing that file appears later in this procedure. Figure 5-2 shows some of the contents of the stock WebLogic Portal domain JAR exploded to show the files within. Figure 5-2 WebLogic Portal Domain Template Files
The Domain Configuration Wizard uses the template.xml, config.xml and application.xml files to copy resources, perform string substitutions for configuration files and scripts within the new domain. The Portal Wizard Template One out-of-the-box portal template is included with the installation of WebLogic Portal: Figure 5-3 shows the contents of a custom Portal Template, which would be stored in the following directory: Figure 5-3 Avitek Portal Template file structure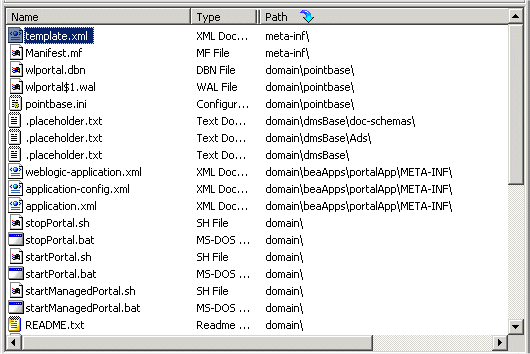
<BEA_HOME>\weblogic700\common\templates\webapps\portal
Like the Domain Configuration Wizard, the Portal Wizard consumes a file called template.xml, as well as a template-icon.gif. The template.xml file includes directives and variables for applying user input from the Portal Wizard to the J2EE and metadata resources contained in this folder. Through the lens of the Portal Wizard, portal templates appear by name and icon, as shown in Figure 5-4. Figure 5-4 Selecting Portal Templates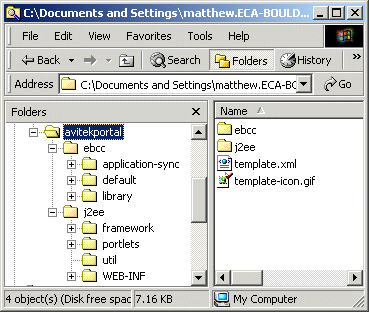
After the Portal Template is used to instantiate a portal, the WebLogic Portal Administration Tools are used to set attributes on pages, portlets, and other aspects of the portal. The Group Portal Template Unlike the Domain and Portal templates, the Group Portal template does not exist as a packaged entity. Rather, the WebLogic Portal Administration Tools provide a mechanism whereby every group portal is created using a template. Out-of-the-box, the only choice is the default group portal, to which no customization has been applied. Figure 5-5 shows the Create Group Portal link from the Portal Management Home page. Note: Because Group Portal Templates are essentially reused Group Portals, this document does not address their creation. For detailed instructions on creating Group Portals, consult the tutorial called Creating a Group Portal. Figure 5-5 Create Group Portal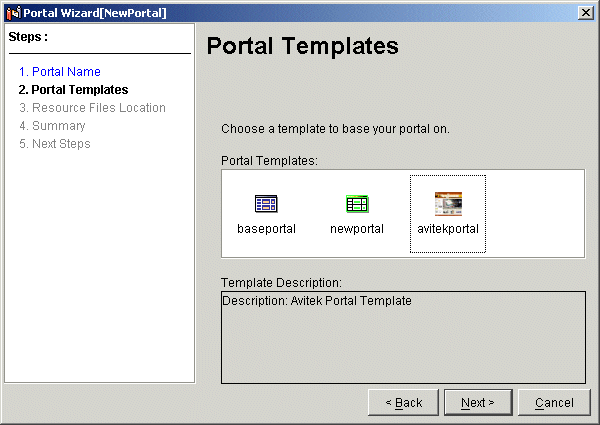
After the new group portal has been named and associated with a user group, a group portal template must be selected, as shown in Figure 5-6. Figure 5-6 Select Group Portal Template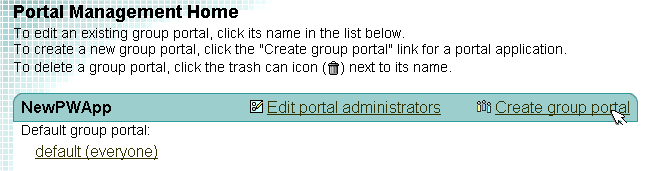
This way, any group portal can serve as a template for new group portals. Importantly, entitlements and delegated administration can be copied from the group portal template, as shown in Figure 5-7. Figure 5-7 Copying Entitlements and Delegated Administration from Group Portal Template

Using Templates Roughly three varieties of customization can be introduced into the Portal life cycle: look and feel customization can be imposed by creating stock layouts and skins, functionality can be customized by adding application elements, and subsets of these custom objects can be preserved and propagated using the group portal template. Each type of template confers a specific advantage:
Creating a Domain Template
The best way to create a custom portal domain template is to begin with a WebLogic Portal domain created using the template. Perform whatever customization is needed, everything from adding application functionality to setting entitlements on a portlet, and use the domain template as a mechanism for transmitting customization down the line to subsequent developers in your organization.
This section covers the basic steps in creating a template for the Domain Configuration Wizard:
Step 1: Instantiate a Portal Domain
Begin by using the Domain Configuration Wizard to instantiate a WebLogic Portal domain. For detailed instructions on this step, consult the tutorial "Creating a New Portal in a New Domain.
Step 2: Customize the Portal Domain
Customize the domain using the Portal Wizard, Portlet Wizard, and by adding application functionality, look and feel components, EJBs, or other J2EE components. This section provides some detailed instructions on adding functionality to a WebLogic Portal domain. This section contains the following instruction sets, each of which can be applied separately:
Supporting Two-Phase Deployment
If you choose to create your own portal Web application without using the template, make sure the weblogic-application.xml file shown in Listing 5-1 is saved in the following directory:
domain\beaApps\portalApp\META-INF\
This file is required in order for two-phase application deployment to function properly. It is included automatically when you create an application using the WebLogic Portal template. If you are creating an application without using the wizard, then you must manually create this file and add this entry.
Listing 5-1 weblogic-application.xml
<!DOCTYPE weblogic-application PUBLIC "-//BEA Systems, Inc.//DTD WebLogic Application 7.0.0//EN" "http://www.bea.com/servers/wls700/dtd/weblogic-application_1_0.dtd">
<weblogic-application>
<application-param>
<description>Required for deployment of portal
applications</description>
<param-name>weblogic.internal.listeners</param-name>
<param-value>com.bea.p13n.management.internal.lifecycle.J2EELifecycleListener</param-value>
</application-param>
</weblogic-application>
Adding All Portal Services to Your Domain
The template that ships with WebLogic Portal includes a subset of all the application functionality available to the portal framework, excluding content management, personalization, placeholder and ad services.
To add all this functionality to your domain, take the following steps:
The portal Web application in this domain will now support all services included in the WebLogic Platform. To use this domain as a template for the Domain Configuration Wizard, follow the remaining steps in this procedure, starting with Step 3: Apply General Configuration.
Listing 5-2 JARs to add all Portal Services
BEA_HOME/weblogic700/portal/lib/commerce/web/cat_taglib.jar
BEA_HOME/weblogic700/portal/lib/commerce/web/eb_taglib.jar
BEA_HOME/weblogic700/portal/lib/commerce/web/productTracking_taglib.jar
BEA_HOME/weblogic700/portal/lib/p13n/web/ad_taglib.jar
BEA_HOME/weblogic700/portal/lib/p13n/web/cm_taglib.jar
BEA_HOME/weblogic700/portal/lib/p13n/web/ph_taglib.jar
BEA_HOME/weblogic700/portal/lib/p13n/web/ps_taglib.jar
BEA_HOME/weblogic700/portal/lib/p13n/web/pz_taglib.jar
BEA_HOME/weblogic700/portal/lib/p13n/web/tracking_taglib.jar
Listing 5-3 Entries to web.xml to add all Portal Services
<!-- Add this just before the </web-app> entry at the tail end of the file. -->
<!-- Filter to fire click through events -->
<filter>
<filter-name>ClickThroughEventFilter</filter-name>
<filter-class>com.bea.p13n.tracking.clickthrough.ClickThroughEventFilter</filter-class>
</filter>
<filter-mapping>
<filter-name>ClickThroughEventFilter</filter-name>
<url-pattern>/application/*</url-pattern>
</filter-mapping>
<!-- The ShowDoc Servlet -->
<servlet>
<servlet-name>ShowDocServlet</servlet-name>
<servlet-class>com.bea.p13n.content.servlets.ShowDocServlet</servlet-class>
<!-- Make showdoc always use the local ejb-ref DocumentManager -->
<init-param>
<param-name>contentHome</param-name>
<param-value>java:comp/env/ejb/DocumentManager</param-value>
</init-param>
</servlet>
<!-- The AdClickThru Servlet -->
<servlet>
<servlet-name>adClickThru</servlet-name>
<servlet-class>com.bea.p13n.ad.servlets.AdClickThruServlet</servlet-class>
</servlet>
<!-- The ClickThrough Servlet -->
<servlet>
<servlet-name>clickThroughServlet</servlet-name>
<servlet-class>com.bea.p13n.tracking.clickthrough.ClickThroughServlet</servlet-class>
</servlet>
<servlet-mapping>
<servlet-name>ShowDocServlet</servlet-name>
<url-pattern>/ShowDoc/*</url-pattern>
</servlet-mapping>
<servlet-mapping>
<servlet-name>adClickThru</servlet-name>
<url-pattern>/adClickThru/*</url-pattern>
</servlet-mapping>
<servlet-mapping>
<servlet-name>adClickThru</servlet-name>
<url-pattern>/AdClickThru/*</url-pattern>
</servlet-mapping>
<servlet-mapping>
<servlet-name>clickThroughServlet</servlet-name>
<url-pattern>/clickThroughServlet/*</url-pattern>
</servlet-mapping>
<taglib>
<taglib-uri>cat.tld</taglib-uri>
<taglib-location>/WEB-INF/lib/cat_taglib.jar</taglib-location>
</taglib>
<taglib>
<taglib-uri>eb.tld</taglib-uri>
<taglib-location>/WEB-INF/lib/eb_taglib.jar</taglib-location>
</taglib>
<taglib>
<taglib-uri>productTracking.tld</taglib-uri>
<taglib-location>/WEB-INF/lib/productTracking_taglib.jar</taglib-location>
</taglib>
<taglib>
<taglib-uri>ad.tld</taglib-uri>
<taglib-location>/WEB-INF/lib/ad_taglib.jar</taglib-location>
</taglib>
<taglib>
<taglib-uri>cm.tld</taglib-uri>
<taglib-location>/WEB-INF/lib/cm_taglib.jar</taglib-location>
</taglib>
<taglib>
<taglib-uri>ph.tld</taglib-uri>
<taglib-location>/WEB-INF/lib/ph_taglib.jar</taglib-location>
</taglib>
<taglib>
<taglib-uri>ps.tld</taglib-uri>
<taglib-location>/WEB-INF/lib/ps_taglib.jar</taglib-location>
</taglib>
<taglib>
<taglib-uri>pz.tld</taglib-uri>
<taglib-location>/WEB-INF/lib/pz_taglib.jar</taglib-location>
</taglib>
<taglib>
<taglib-uri>tracking.tld</taglib-uri>
<taglib-location>/WEB-INF/lib/tracking_taglib.jar</taglib-location>
</taglib>
<!-- This is used by the various <cm:> tags -->
<ejb-ref>
<description>
The ContentManager EJB for this webapp
</description>
<ejb-ref-name>ejb/ContentManager</ejb-ref-name>
<ejb-ref-type>Session</ejb-ref-type>
<home>com.bea.p13n.content.document.DocumentManagerHome</home>
<remote>com.bea.p13n.content.document.DocumentManager</remote>
</ejb-ref>
<!-- This is used by the ShowDocServlet -->
<ejb-ref>
<description>
The DocumentManager for this webapp
</description>
<ejb-ref-name>ejb/DocumentManager</ejb-ref-name>
<ejb-ref-type>Session</ejb-ref-type>
<home>com.bea.p13n.content.document.DocumentManagerHome</home>
<remote>com.bea.p13n.content.document.DocumentManager</remote>
</ejb-ref>
<!-- This is used by the Placeholder tag -->
<ejb-ref>
<description>
The PlaceholderService Session EJB for the placeholder tag.
</description>
<ejb-ref-name>ejb/PlaceholderService</ejb-ref-name>
<ejb-ref-type>Session</ejb-ref-type>
<home>com.bea.p13n.placeholder.PlaceholderServiceHome</home>
<remote>com.bea.p13n.placeholder.PlaceholderService</remote>
</ejb-ref>
<!-- This is used by the AdClickThruServlet and the adTarget tag-->
<ejb-ref>
<description>
The AdService for this webapp
</description>
<ejb-ref-name>ejb/AdService</ejb-ref-name>
<ejb-ref-type>Session</ejb-ref-type>
<home>com.bea.p13n.ad.AdServiceHome</home>
<remote>com.bea.p13n.ad.AdService</remote>
</ejb-ref>
<!-- This is used by the AdClickThruServlet -->
<ejb-ref>
<description>
The AdBucketService for this webapp
</description>
<ejb-ref-name>ejb/AdBucketService</ejb-ref-name>
<ejb-ref-type>Session</ejb-ref-type>
<home>com.bea.p13n.ad.AdBucketServiceHome</home>
<remote>com.bea.p13n.ad.AdBucketService</remote>
</ejb-ref>
<!-- This is used by the various <pz:> tags -->
<ejb-ref>
<description>
The EjbAdvisor for this webapp
</description>
<ejb-ref-name>ejb/EjbAdvisor</ejb-ref-name>
<ejb-ref-type>Session</ejb-ref-type>
<home>com.bea.p13n.advisor.EjbAdvisorHome</home>
<remote>com.bea.p13n.advisor.EjbAdvisor</remote>
</ejb-ref>
Listing 5-4 Entries to weblogic.xml to add all Portal Services
<-- Add this after the <reference-descriptor> entry near the top of the file. -->
<ejb-reference-description>
<ejb-ref-name>ejb/ContentManager</ejb-ref-name>
<jndi-name>${APPNAME}.BEA_personalization.DocumentManager</jndi-name></ejb-reference-description>
<ejb-reference-description>
<ejb-ref-name>ejb/DocumentManager</ejb-ref-name>
<jndi-name>${APPNAME}.BEA_personalization.DocumentManager</jndi-name></ejb-reference-description>
<ejb-reference-description>
<ejb-ref-name>ejb/PlaceholderService</ejb-ref-name>
<jndi-name>${APPNAME}.BEA_personalization.PlaceholderService</jndi-name></ejb-reference-description>
<ejb-reference-description>
<ejb-ref-name>ejb/AdService</ejb-ref-name>
<jndi-name>${APPNAME}.BEA_personalization.AdService</jndi-name></ejb-reference-description>
<ejb-reference-description>
<ejb-ref-name>ejb/AdBucketService</ejb-ref-name>
<jndi-name>${APPNAME}.BEA_personalization.AdBucketService</jndi-name></ejb-reference-description>
<ejb-reference-description>
<ejb-ref-name>ejb/EjbAdvisor</ejb-ref-name>
<jndi-name>${APPNAME}.BEA_personalization.EjbAdvisor</jndi-name></ejb-reference-description>
Adding an EJB to your WebLogic Portal Domain
For instance, to add an Enterprise Java Bean to your domain, take the following steps:
<BEA_HOME>/yourdomain/BEAapps/portalApp/META-INF
<module>
<ejb>myEJB.jar</ejb>
</module>
<EJBComponent
Name="myEJB"
Targets="@TARGETS"
URI="myEJB.jar"
/>
Your EJB will be deployed with all the other application functionality at startup.
Step 3: Apply General Configuration
Aside from adding application functionality at the enterprise or Web application level, you may want to propagate more general customization by inserting portals, pages, portlets, and even skins and layouts into your customized WebLogic Portal domain template.
For detailed instructions on creating portals and portlets, consult the WebLogic Development Guide. For detailed instructions on creating group portals, consult the section of the WebLogic Portal Administration Guide called Creating a Portal and Group Portal.
For detailed instructions on creating custom layouts and skins, consult the section of the WebLogic Portal Development Guide called Creating a Look and Feel. This section explains how to add look and feel components to a domain such that it can be packaged within a custom WebLogic Portal domain.
Adding a Custom Layout to a Domain Template
This example shows a custom layout called "stack", a one-column vertical scheme. This layout consists of a JSP file, shown in Listing 5-5, and a thumbnail image, shown in Figure 5-8.
Figure 5-8 thumbnail.gif for stack layout
Listing 5-5 text of stack layout Having created a custom layout, make it available to the new domain template using the following steps:
<%@ taglib uri='ren.tld' prefix='layout' %>
<layout:placePortletsinPlaceholder placeholders="top,middle,bottom" />
<center>
<table BORDER COLS="1" WIDTH="250" >
<tr>
<td>
<layout:render section='top'/>
</td>
</tr>
<tr>
<td>
<layout:render section='middle'/>
</td>
</tr>
<tr>
<td>
<layout:render section='bottom'/>
</td>
</tr>
</table>
</center>
<BEA_HOME>\weblogic700\common\templates\domains\shared\bea\portal\projects\portalApp-project\library\portal\layouts\<yourlayoutName>\
<BEA_HOME>\weblogic700\common\templates\webapps\portal\newportal\j2ee\framework\layouts\<yourlayoutName>\
Warning: Filenames for layout thumbnails are not uniform. If they are not correct, the preview image may be missing in the E-Business Control Center or in the WebLogic Portal Administration Tools.
Adding a Custom Skin to a Domain Template
Having created a custom skin, use the following steps to make the custom skin available to the new domain template, take the following steps:
<BEA_HOME>\weblogic700\common\templates\domains\shared\bea\portal\projects\portalApp-project\library\portal\skins\<yourskinName>\
<BEA_HOME>\weblogic700\common\templates\webapps\portal\newportal\j2ee\framework\skins\<yourskinName>\
After these elements are added to the domain, what remains is to package the new domain in such a way that the Domain Configuration Wizard can use it to instantiate your custom domain.
Step 4: Package the New Domain as a Template
After confirming that all the customization in your domain has been added successfully, you can replicate this new functionality in the form of a domain template. This template can be used to give corporate developers a good baseline to work from, reducing unnecessary duplication of efforts at several points in the development, deployment and maintenance processes.
Entries have been made in several configuration files to support these additions. Assuming the J2EE resources are in place and archived correctly in the template JAR file, it is crucial that the metadata about these resources be entered correctly so the wizard can include them in the resulting domain. For this reason, pay special attention to the points at which the template.xml file makes reference to the other configuration files and J2EE resources.
Note: Any new domain template you create should include support for all portal services. For this reason, it is strongly recommended that you follow the steps outline in Step 2: Customize the Portal Domain before making your domain into a template.
To create a template from your customized domain, take the following steps:
Open the template.xml File
Obtain a copy of the template.xml file by making a copy of the following JAR file:
<BEA_HOME>\weblogic700\common\templates\domains\portal.jar
Unzip this archive and open the template.xml file in a text browser. Use this file as a reference when editing the config.xml file. After making any necessary edits, archive this file (in JAR form) so that it extracts to the \META-INF directory.
Edit the config.xml file
Open the config.xml file from your customized domain, and perform the substitutions shown in Listing 5-6. Replacing the populated attributes with the variables used by the template.xml allows the Domain Configuration Wizard to automatically populate user input into the fields of your config.xml file.
Listing 5-6 Domain node substitutions for config.xml file
<Server
Name="portalServer" replace with "@SERVER_NAME"
ListenPort="7501" replace with "@BEA_WEBLOGIC_SERVER_PORT@"
NativeIOEnabled="true"
JavaCompiler="@JAVA_HOME/bin/javac"
ServerVersion="7.0.1.0"
StagingMode="nostage"
TransactionLogFilePrefix="logs/"
>
<Log FileName="logs/weblogic.log"
Name="portalServer"/ replace with "@SERVER_NAME"
>
<SSL Enabled="true"
ListenPort="7502" replace with "@BEA_WEBLOGIC_SERVER_SSLPORT@"
Name="portalServer" replace with "@SERVER_NAME"
ServerCertificateChainFileName="ca.pem"
ServerCertificateFileName="democert.pem"
ServerKeyFileName="demokey.pem"/
>
<ServerStart Name="portalServer"/> replace with "@SERVER_NAME"
<WebServer
DefaultWebApp="DefaultWebApp"
LogFileName="access.log"
LoggingEnabled="true"
Name="portalServer" replace with "@SERVER_NAME"
/>
Note: In the template.xml, the @TARGETS value is used to allow the same domain to be deployed in a cluster, an admin server or a stand-alone server without modification to the config.xml file.
<change-pair name="TARGETS">
<before string="@TARGETS" />
<after string="$TARGET_NAMES$" />
</change-pair>
The Domain Wizard runs against your template, replacing variable entries as shown in Listing 5-7:
Listing 5-7 Variable replacements in the config.xml file
Original node in portal Template config.xml
<EJBComponent
Name="campaign"
Targets="@TARGETS"
URI="campaign.jar"
/>
Variables populated in new config.xml file
<EJBComponent
Name="campaign"
Targets="portalServer"
URI="campaign.jar"
/>
Edit the Application.xml file
As with the template.xml and config.xml files, extracting an example file from an existing template is a good way to start. Compare the archive file against your customized application.xml file. For each new Web application you want to automatically deploy at server start, an entry will need to be added in the Application node of application.xml. Listing 5-8 shows a Web module called NewPWApp inserted into the Application node.
Listing 5-8 Adding a module listing to application.xml
<application>
<module>
<web>
<web-uri>NewPWApp</web-uri>
<context-root>NewPWApp</context-root>
</web>
</module>
...
</application>
Check Shell Scripts for String Substitution
If your application requires special startup classes or environment settings, make sure these are added to the shell scripts within your template. Listing 5-9 shows the contents of startPortal.bat included with the out-of-the-box portal domain template.
If your domain requires any customized startup commands, make sure any added literal references will not make your scripts difficult to maintain.
Listing 5-9 startPortal.bat from portal.jar
@ECHO OFF
SETLOCAL
REM ###########################################################################
REM (c) 2002 BEA SYSTEMS INC. All rights reserved
REM
REM BEA WebLogic Portal Server startup script.
REM This script can also install/uninstall a Portal Window Service. Use the
REM -installService or -uninstallService command-line arguments.
REM ###########################################################################
REM ###########################################################################
REM The WLP installation directory
REM ###########################################################################
SET WLP_HOME=@BEA_PORTAL_HOME_BACK_SLASH@
REM ###########################################################################
REM Set the WebLogic server name
REM ###########################################################################
SET SERVER_NAME=@MANAGED_SERVER_REGISTERED_NAME_IN_ADMIN
IF "%SERVER_NAME%"=="" SET SERVER_NAME=@SERVER_NAME
REM ###########################################################################
REM Set the WebLogic Admin Server URL, if this is a managed node.
REM Otherwise, leave this blank
REM ###########################################################################
set ADMIN_URL=@ADMIN_SERVER_URL
REM ###########################################################################
REM Set the database type
REM Valid values are: POINTBASE, ORACLE_THIN, MSSQL, SYBASE_JCONNECT, DB2_TYPE2
REM Set set-environment.bat for more details
REM ###########################################################################
SET DATABASE=@DATABASE@
REM Try to get it from the db_settings.properties file
IF not exist .\db_settings.properties goto _setenv
SET DB_SETTINGS=.\db_settings.properties
FOR /F "eol=# tokens=1,2 delims==" %%i in (%DB_SETTINGS%) do (
if %%i == database SET DATABASE=%%j
)
:_setenv
REM ###########################################################################
REM Set the environment
REM See set-environment.bat for more details on the available parameters
REM ###########################################################################
CALL "%WLP_HOME%\bin\win32\set-environment.bat"
REM ###########################################################################
REM Set any additional CLASSPATH information
REM ###########################################################################
SET CLASSPATH=%CLASSPATH%;%P13N_DIR%\lib\commerce_system.jar;%P13N_DIR%\lib\campaign_system.jar
REM ###########################################################################
REM Start WebLogic with the above parameters.
REM See startWebLogic.cmd for more details on the available parameters.
REM ###########################################################################
set MEM_ARGS=-Xms128m -Xmx128m -XX:MaxPermSize=128m
set JAVA_OPTIONS=-Dcommerce.properties="%WLP_HOME%\weblogiccommerce.properties"
if "%1" == "-installService" goto _installService
if "%1" == "-uninstallService" goto _uninstallService
:_startWebLogic
call "%P13N_DIR%\bin\win32\startWebLogic.cmd"
goto _the_end
:_installService
call "%P13N_DIR%\bin\win32\installWebLogicService.cmd"
goto _the_end
:_uninstallService
call "%P13N_DIR%\bin\win32\uninstallWebLogicService.cmd"
goto _the_end
:_the_end
ENDLOCAL
Create the Archive
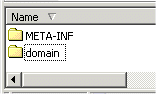
At this stage, all look and feel customization and functionality has been added to the portal domain, and the directory structure looks like that in Figure 5-9.
Figure 5-9 Expanded View of Custom Portal Domain
Take the following steps to create the archive: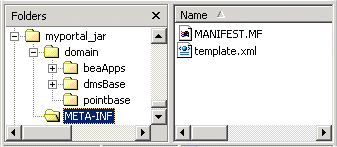
Figure 5-10 Domain Template Before Being Archived
jar -cfM ..\myportal.jar domain META-INF
<BEA_HOME>/weblogic700/common/templates/domains/
Creating a Portal Template
Like the process of creating a domain template, creating a portal template is largely a matter of creating and customizing a new instance of a portal, and then packaging it such that the Portal Wizard recognizes where to put the assets.
Instantiate a New Portal
For detailed instructions on creating a new portal using the Portal Wizard, consult the section Create the New Portal.
Customize the New Portal
A large body of information is available for those customizing the behavior and appearance of a portal. For an overview and links to specific instructions, consult the WebLogic Portal Development Guide.
Apply Basic Configuration
You can now apply configuration to the new portal, including adding group portals, pages, portlets, entitlements and delegated administration settings. For detailed instructions on configuring a portal, consult the Portal Administration Guide.
Package the New Portal as a Template
Unlike a template for the Domain Configuration Wizard, a portal template does not need to be delivered in the form of a compressed archive file. However, packaging the new portal is largely a matter of editing the template.xml file, one of which is shown in Listing 5-12. Take the following steps to package your customized portal as a template for the Portal Wizard:
Step 1: Make Staging Directory
Create a directory called /myportal to serve as the staging folder for the new portal template. Create two directories inside: /j2ee and /ebcc.
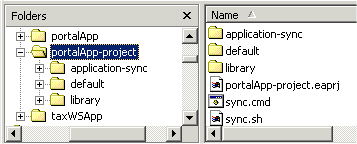
Step 2: Locate Source Directories
Locate the two directories associated with the source portal: the J2EE resources, as shown in Figure 5-11, and the metadata directories, as shown in Figure 5-12.
Figure 5-11 J2EE Resource Directories in NewPWApp
Figure 5-12 Metadata directories for NewPWApp
Step 3: Move Portal Resources
Move the resources into the template staging directory:
Note: Only copy metadata for resources you have added to the portal during customization. Do not copy the stock resource metadata files from the stockportal template.
Step 4: Edit template.xml
Edit the template.xml file according to the following rules:
Listing 5-10 Properties provided by the Portal Wizard
<property name="template.common.lib.root.dir" value="Path to directory containing required jar files" />
<property name="template.ebcc.root.dir" value="Path to directory containing application data directory" />
<property name="template.j2ee.webapp.root.dir" value="Path to web application root directory" />
<property name="template.webapp.name" value="Name of the web application"/>
<property name="template.portal.name" value="Portal web application name"/>
<property name="template.portal.description" value="Description of the portal application">
Listing 5-11 Properties unique to your portal template
<property name="template.name" value="baseportal" />
<property name="template.description" value="Description: Base Portal Template" />
<property name="template.hyperlink.text" value="After your new portal is deployed, follow these instructions..." />
<property name="template.hyperlink.url" value="http://download.oracle.com/docs/cd/E13218_01/wlp/docs70/dev/newdom.htm#1003370" />
Step 5: Create a Thumbnail
Create an icon to signify the look of your portal template in the Portal Wizard. Name this file template-icon.gif. (Without this optional file, the Portal Wizard will display a stock icon.)
Step 6: Create Archive File
(Optional) Compress the contents of the portal template: From the myportal directory, execute the following command:
jar -cfM ../myportal.jar *.*
Step 7: Make the Archive Available
Place the resulting archive file in the following directory:
<BEA_HOME>\weblogic700\common\templates\webapps\portal
Listing 5-12 Portal template.xml
<?xml version="1.0"?>
<project name="Base Portal Template" default="main" basedir=".">
<!--
The jar or directory must contain this template.xml file AND can
contain a template-icon.gif. If a template-icon.gif is not
present, a default will be provided.
-->
<!-- The caller should pass the following properties.
<property name="template.common.lib.root.dir" value="Path to directory containing required jar files" />
<property name="template.ebcc.root.dir" value="Path to directory containing application data directory" />
<property name="template.j2ee.webapp.root.dir" value="Path to web application root directory" />
<property name="template.webapp.name" value="Name of the web application"/>
<property name="template.portal.name" value="Portal web application name"/>
<property name="template.portal.description" value="Description of the portal application">
<property name="template.hotdeploy.path" value="Path to directory containing the portal for hot deploy"/>
<property name="template.hotdeploy.user" value="User name for logging into the server for hot deploy"/>
<property name="template.hotdeploy.password" value="Password name for logging into the server for hot deploy"/>
<property name="template.hotdeploy.adminurl" value="Server location for hot deploy"/>
-->
<!-- Template Properties -->
<property name="template.name" value="baseportal" />
<property name="template.version" value="1.0" />
<property name="template.type" value="portal-webapp" />
<property name="template.description" value="Description: Base Portal Template" />
<property name="template.hyperlink.text" value="After your new portal is deployed, follow these instructions..." />
<property name="template.hyperlink.url" value="http://download.oracle.com/docs/cd/E13218_01/wlp/docs70/dev/newdom.htm#1003370" />
<!-- This can either be a .war or a directory for hot deployment -->
<property name="template.hotdeploy.path" value="${template.j2ee.webapp.root.dir}/${template.webapp.name}/"/> <target name="main" >
<echo message="template.common.lib.root.dir ( ${template.common.lib.root.dir} )"/> <echo message="template.ebcc.root.dir ( ${template.ebcc.root.dir} )"/> <echo message="template.j2ee.eapp.root.dir ( ${template.j2ee.eapp.root.dir} )"/> <echo message="template.j2ee.webapp.root.dir ( ${template.j2ee.webapp.root.dir} )"/> <echo message="template.appsync.dir ( ${template.appsync.dir} )"/> <echo message="template.webapp.name ( ${template.webapp.name} )"/> <echo message="template.portal.name ( ${template.portal.name} )"/> <echo message="template.hotdeploy.path ( ${template.hotdeploy.path} )"/> <!-- everything but baseportal and tools webapps -->
<copy todir="${template.ebcc.root.dir}/"overwrite="no"
preservelastmodified="yes"
includeEmptyDirs="yes"
filtering="no" >
<fileset dir="ebcc/" >
<include name="**" />
<exclude name="application-sync/webapps/baseportal/" />
<exclude name="application-sync/webapps/tools/" />
</fileset>
</copy>
<!-- now copy baseportal webapp (exception baseportal.portal) and rename the directory to whatever webapp the user chooses -->
<copy todir="${template.ebcc.root.dir}/application-sync/webapps/${template.webapp.name}/"overwrite="no"
preservelastmodified="yes"
includeEmptyDirs="yes"
filtering="no" >
<fileset dir="ebcc/application-sync/webapps/baseportal/" >
<include name="**" />
<exclude name="baseportal.portal" />
</fileset>
</copy>
<filter token="template.portal.description" value="${template.portal.description}" /><!-- now copy the baseportal.portal file and rename it to whatever portal name the user chooses -->
<copy tofile="${template.ebcc.root.dir}/application-sync/webapps/${template.webapp.name}/${template.portal.name}.portal"file="ebcc/application-sync/webapps/baseportal/baseportal.portal"
overwrite="no"
preservelastmodified="yes"
includeEmptyDirs="yes"
filtering="no" >
</copy>
<!-- copy all J2EE resources -->
<copy todir="${template.j2ee.webapp.root.dir}/${template.webapp.name}/"overwrite="no"
preservelastmodified="yes"
includeEmptyDirs="yes"
filtering="no" >
<fileset dir="j2ee/" >
<include name="**" />
<exclude name="WEB-INF/weblogic.xml.stock"/>
<exclude name="WEB-INF/web.xml.stock"/>
</fileset>
</copy>
<filter token="template.portal.name" value="${template.portal.name}" /> <filter token="template.webapp.name" value="${template.webapp.name}" /> <copy tofile="${template.j2ee.webapp.root.dir}/${template.webapp.name}/WEB-INF/weblogic.xml"overwrite="yes"
preservelastmodified="yes"
includeEmptyDirs="yes"
filtering="no"
file="j2ee/WEB-INF/weblogic.xml.stock">
</copy>
<copy tofile="${template.j2ee.webapp.root.dir}/${template.webapp.name}/WEB-INF/web.xml"overwrite="yes"
preservelastmodified="yes"
includeEmptyDirs="yes"
filtering="no"
file="j2ee/WEB-INF/web.xml.stock">
</copy>
</target>
</project>

|

|

|


